Stay organized with collections
Save and categorize content based on your preferences.
Contact Center AI Platform (CCAI Platform) supports integration with Zendesk CRM. This
guide covers the steps needed to perform this integration. The following Zendesk
applications are supported:
Call: Latest version: v1.4.0
Chat: Latest version: v1.3.0
Before you start
The following are prerequisites for the Zendesk CRM integration:
Sign in to CCAI Platform portal as an administrator.
Zendesk account on the Professional or Enterprise plan.
Download Zendesk app files.
Read through instructions before installing.
Installation
Zendesk apps are private. They are not listed on the public Zendesk App
Marketplace. You can contact your Zendesk representative to obtain and install
them to your Zendesk account.
The Zendesk apps can be installed either by following these instructions or by
clicking on the link in the Zendesk apps. To upload and install a private app in
Zendesk support:
Sign in to Zendesk and click the Admin icon settings in the sidebar.
Select Apps > Manage.
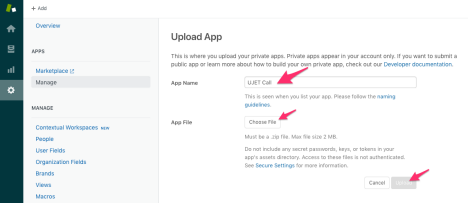
Click Upload App.
Enter a name for the app. It is recommended that you use Call for the
call app and Chat for the chat app.
Click Choose file and select the zip file for your private app.
For call app, the filename is zendesk-call-v1.4.zip.
For chat app, the filename is zendesk-chat-v1.3.zip.
Click Upload.
In the window that appears, click Agree and upload this App.
Enter your account subdomain.
Enable role or group restrictions, enter role or group if needed.
When prompted, click Install.
When the process is complete, your private app appears in the list of
installed apps on the Manage Apps page.
Repeat steps if both the call and chat apps need to be installed.
For the app configuration, specify the following field values:
Subdomain: Enter the subdomain of your Zendesk account, which you should
already know. (customer ie. customer.example.com)
-- Domain Name: Leave it as the default value example.com.
Managing apps
Once the chat and call applications have been installed they can be managed
through Zendesk.
Changing app settings
The application settings can be changed by following these instructions. You can
change the settings for an app, including the title.
Sign in to Zendesk and click the Admin icon settings in the sidebar.
Select Apps > Manage.
On the My Apps page, find the app you want to change.
Click the app icon to open that app's settings page.
Make the changes you want and click Save Settings at the bottom of the
page. Your changes are saved.
Updating apps
Periodically it might be necessary to update the installed apps. To update an app,
follow these instructions:
You can find instructions to update a private app or click the
following link from Zendesk, Private Apps.
Sign in to Zendesk and click the Admin icon settings in the sidebar.
Select Apps > Manage.
On the My Apps page, find the app you want to update.
On the app icon, click the settings icon
to open the app settings menu.
Click Update to open the screen where you can upload an updated zip
file.
Setting up an OAuth client
Zendesk apps use OAuth2 to authenticate API requests to Zendesk. You
should set up an OAuth Client for Zendesk Apps.
The following instructions guide you through the OAuth setup process including
registering your application with Zendesk.
Application registration
In Zendesk Support, click Managesettings.
Select API in the Channels category.
Click the OAuth Clients tab on the Channels / API page.
Click the add icon on the right side of
the client list.
Complete the following fields to create a client:
Client Name: Enter a name for your app. This is the name that users
will see when asked to grant access to your application, and when they check
the list of third-party apps that have access to their Zendesk.
Description: (Optional) This is a short description of your app that
users will see when asked to grant access to it.
Company: (Optional) This is the company name that users will see when
asked to grant access to your application. The information can help them
understand who they're granting access to.
Logo: (Optional) This is the logo that users will see when asked to
grant access to your application. The image can be a JPG, GIF, or PNG. For
best results, upload a square image. It will be resized for the
authorization page.
Unique Identifier: The field is auto-populated with a reformatted
version of the name you entered for your app. You can change it if you want.
Redirect URLs: Enter the URL or URLs that Zendesk should use to send the
user's decision to grant access to your application. The URLs must be
absolute and not relative, https (unless localhost or 127.0.0.1), and
newline-separated.
Click Save.
After the page refreshes, a new pre-populated Secret field appears on the
lower side. This is the client_secret value specified in the OAuth2
spec.
Copy the Secret value to your clipboard and save it somewhere
safe.
You should replace YOUR_SUBDOMAIN with the actual subdomain of your Zendesk
account.
Set the Unique Identifier and Secret fields which are are
auto-populated while adding a new OAuth client. You can edit the Unique
Identifier if you want, but not the Secret. The Secret is
displayed fully only once while adding a new client. Ensure this is kept
safe. These are the client_id and client_secret values in the OAuth2
specifications.
Configure OAuth application settings
Sign in to the CCAI Platform portal.
Go to Settings > Developer Settings.
Select Agent Platform Zendesk in CRM section.
Set Zendesk Subdomain to the subdomain of your Zendesk account.
Set OAuth Client ID to the Unique Identifier of your Zendesk OAuth
client.
Set OAuth Client Secret to the Secret of your Zendesk OAuth client.
Click Save.
Generate an API token
The Zendesk API leverages tokens for security. To generate an API token in
Zendesk, follow these steps:
In Zendesk, click the Adminsettings
icon in the sidebar.
Select Channels > API.
Click the Settings tab, and make sure Token Access is enabled.
Click the add icon to the right of
Active API Tokens.
Optionally, enter a description under API Token Description.
The token is generated and displayed for you:
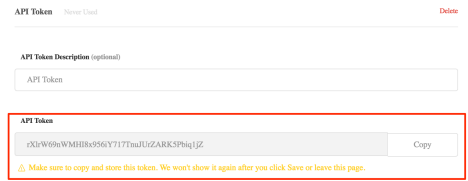
Copy the token, and paste it somewhere secure. Once you close this window,
the full token will never be displayed again.
Click Save to return to the API page.
A truncated version of the token is displayed:
Configure API token
To assign the API token to the Zendesk CRM settings, follow these steps:
Sign in to the CCAI Platform portal with an administrator account.
Go to Settings > Developer Settings.
Set API Token to the API token copied from your Zendesk client.
Create customer and ticket fields
Optionally, the customer and ticket fields can be created. Follow these steps:
Create a Zendesk account which has both administrator and agent role.
In Zendesk, go to Settings > Agent & Manager Team.
Select Add an admin.
Check This admin is also an agent.
Activate the account from invitation email.
Sign out of the current administrator account and sign in with the new
account.
Sign in to Zendesk with administration role not agent.
In Zendesk, sign in using the widget with credential which is an
administrator with agent role.
Click Authorize.
Open the CCAI Platform portal, go to Settings > Developer Settings.
Click the Create button from CRM > Customer fields for Contact and
Ticket section.
Check if the custom ticket fields were created from Zendesk Admin >
Manage > User Fields and Admin > Manage > Ticket Fields.
These should include the fields:
User fields:
Identifier
Ticket fields:
Verification (Checkbox)
Customer Text Feedback (Multi-line text)
Customer Satisfaction Rating (Numeric): 1 to 5
Shared Customer Rating (Text): Twitter or Facebook
[[["Easy to understand","easyToUnderstand","thumb-up"],["Solved my problem","solvedMyProblem","thumb-up"],["Other","otherUp","thumb-up"]],[["Hard to understand","hardToUnderstand","thumb-down"],["Incorrect information or sample code","incorrectInformationOrSampleCode","thumb-down"],["Missing the information/samples I need","missingTheInformationSamplesINeed","thumb-down"],["Other","otherDown","thumb-down"]],["Last updated 2025-08-28 UTC."],[[["\u003cp\u003eThis guide outlines the integration process between the Contact Center AI Platform (CCAI Platform) and Zendesk CRM, supporting both Call and Chat Zendesk applications, with the latest version being v1.3.0 for each.\u003c/p\u003e\n"],["\u003cp\u003eInstallation of the private Zendesk apps (Call and Chat) involves uploading zip files (zendesk-call-v1.3.zip and zendesk-chat-v1.3.zip respectively) through the Zendesk admin interface, after obtaining them from a Zendesk representative.\u003c/p\u003e\n"],["\u003cp\u003eManaging and updating the installed Zendesk apps can be done through the Zendesk admin panel, where settings can be modified and new versions can be uploaded, while periodically updating the app is a necessary task.\u003c/p\u003e\n"],["\u003cp\u003eSetting up OAuth2 for Zendesk apps is required, involving registering the application in Zendesk, configuring the OAuth client, and setting up a redirect URL, as well as storing a client secret in a safe location.\u003c/p\u003e\n"],["\u003cp\u003eThe Zendesk API requires an API token, which can be generated in Zendesk and then configured within the CCAI Platform portal, alongside optional creation of custom customer and ticket fields through a specific Zendesk account setup.\u003c/p\u003e\n"]]],[],null,["# Zendesk CRM installation guide\n\nContact Center AI Platform (CCAI Platform) supports integration with Zendesk CRM. This\nguide covers the steps needed to perform this integration. The following Zendesk\napplications are supported:\n\n- **Call**: Latest version: v1.3.0\n\n- **Chat**: Latest version: v1.3.0\n\nBefore you start\n----------------\n\nThe following are prerequisites for the Zendesk CRM integration:\n\n- Sign in to CCAI Platform portal as an administrator.\n\n- Zendesk account on the Professional or Enterprise plan.\n\n- Download Zendesk app files.\n\n- Read through instructions before installing.\n\nInstallation\n------------\n\nZendesk apps are private. They are not listed on the public Zendesk App\nMarketplace. You can contact your Zendesk representative to obtain and install\nthem to your Zendesk account.\n\nThe Zendesk apps can be installed either by following these instructions or by\nclicking on the link in the Zendesk apps. To upload and install a private app in\nZendesk support:\n\n1. Sign in to Zendesk and click the **Admin** icon settings in the sidebar.\n\n2. Select **Apps** \\\u003e **Manage**.\n\n3. Click **Upload App**.\n\n4. Enter a name for the app. It is recommended that you use **Call** for the\n call app and **Chat** for the chat app.\n\n5. Click **Choose file** and select the zip file for your private app.\n\n - For call app, the filename is **zendesk-call-v1.3.zip**.\n\n - For chat app, the filename is **zendesk-chat-v1.3.zip**.\n\n6. Click **Upload**.\n\n7. In the window that appears, click **Agree and upload this App**.\n\n8. Enter your account subdomain.\n\n9. Enable role or group restrictions, enter role or group if needed.\n\n10. When prompted, click **Install**.\n\nWhen the process is complete, your private app appears in the list of\ninstalled apps on the **Manage Apps** page.\n\nRepeat steps if both the call and chat apps need to be installed.\n\n1. For the app configuration, specify the following field values:\n\n - **Subdomain** : Enter the subdomain of your Zendesk account, which you should already know. (customer ie. **customer**.example.com)\n\n -- **Domain Name** : Leave it as the default value **example.com**.\n\nManaging apps\n-------------\n\nOnce the chat and call applications have been installed they can be managed\nthrough Zendesk.\n\n### Changing app settings\n\nThe application settings can be changed by following these instructions. You can\nchange the settings for an app, including the title.\n\n1. Sign in to Zendesk and click the **Admin** icon settings in the sidebar.\n\n2. Select **Apps** \\\u003e **Manage**.\n\n3. On the **My Apps** page, find the app you want to change.\n\n4. Click the app icon to open that app's settings page.\n\n5. Make the changes you want and click **Save Settings** at the bottom of the\n page. Your changes are saved.\n\n### Updating apps\n\nPeriodically it might be necessary to update the installed apps. To update an app,\nfollow these instructions:\n\nYou can find instructions to update a private app or click the\nfollowing link from Zendesk, Private Apps.\n\n1. Sign in to Zendesk and click the **Admin** icon settings in the sidebar.\n\n2. Select **Apps** \\\u003e **Manage**.\n\n3. On the **My Apps** page, find the app you want to update.\n\n4. On the app icon, click the settings icon\n to open the app settings menu.\n\n5. Click **Update** to open the screen where you can upload an updated zip\n file.\n\nSetting up an OAuth client\n--------------------------\n\nZendesk apps use OAuth2 to authenticate API requests to Zendesk. You\nshould set up an OAuth Client for Zendesk Apps.\n\nThe following instructions guide you through the OAuth setup process including\nregistering your application with Zendesk.\n\n### Application registration\n\n1. In Zendesk Support, click **Manage** settings.\n\n2. Select **API** in the Channels category.\n\n3. Click the **OAuth Clients** tab on the Channels / API page.\n\n4. Click the add icon on the right side of\n the client list.\n\n5. Complete the following fields to create a client:\n\n - **Client Name**: Enter a name for your app. This is the name that users\n will see when asked to grant access to your application, and when they check\n the list of third-party apps that have access to their Zendesk.\n\n - **Description**: (Optional) This is a short description of your app that\n users will see when asked to grant access to it.\n\n - **Company**: (Optional) This is the company name that users will see when\n asked to grant access to your application. The information can help them\n understand who they're granting access to.\n\n - **Logo**: (Optional) This is the logo that users will see when asked to\n grant access to your application. The image can be a JPG, GIF, or PNG. For\n best results, upload a square image. It will be resized for the\n authorization page.\n\n - **Unique Identifier**: The field is auto-populated with a reformatted\n version of the name you entered for your app. You can change it if you want.\n\n - **Redirect URLs**: Enter the URL or URLs that Zendesk should use to send the\n user's decision to grant access to your application. The URLs must be\n absolute and not relative, https (unless localhost or 127.0.0.1), and\n newline-separated.\n\n6. Click **Save**.\n\n After the page refreshes, a new pre-populated **Secret** field appears on the\n lower side. This is the `client_secret` value specified in the OAuth2\n spec.\n7. Copy the **Secret** value to your clipboard and save it somewhere\n safe.\n\n | **Note:** The characters may extend past the width of the field, so make sure to select everything before copying.\n8. Set the OAuth redirect URL.\n\n `https://YOUR_SUBDOMAIN.example.com/v1/zendesk/oauth_callback`\n\n You should replace YOUR_SUBDOMAIN with the actual subdomain of your Zendesk\n account.\n9. Set the **Unique Identifier** and **Secret** fields which are are\n auto-populated while adding a new OAuth client. You can edit the **Unique\n Identifier** if you want, but not the **Secret** . The **Secret** is\n displayed fully only once while adding a new client. Ensure this is kept\n safe. These are the **client_id** and **client_secret** values in the OAuth2\n specifications.\n\n### Configure OAuth application settings\n\n1. Sign in to the CCAI Platform portal.\n\n2. Go to **Settings** \\\u003e **Developer Settings**.\n\n3. Select Agent Platform **Zendesk** in **CRM** section.\n\n4. Set **Zendesk Subdomain** to the subdomain of your Zendesk account.\n\n5. Set **OAuth Client ID** to the **Unique Identifier** of your Zendesk OAuth\n client.\n\n6. Set **OAuth Client Secret** to the **Secret** of your Zendesk OAuth client.\n\n7. Click **Save**.\n\nGenerate an API token\n---------------------\n\nThe Zendesk API leverages tokens for security. To generate an API token in\nZendesk, follow these steps:\n\n1. In Zendesk, click the **Admin** settings\n icon in the sidebar.\n\n2. Select **Channels** \\\u003e **API**.\n\n3. Click the **Settings** tab, and make sure Token Access is **enabled**.\n\n4. Click the add icon to the right of\n **Active API Tokens**.\n\n5. Optionally, enter a description under **API Token Description**.\n\n6. The token is generated and displayed for you:\n\n7. Copy the token, and paste it somewhere secure. Once you close this window,\n the full token will never be displayed again.\n\n8. Click **Save** to return to the API page.\n\n9. A truncated version of the token is displayed:\n\nConfigure API token\n-------------------\n\nTo assign the API token to the Zendesk CRM settings, follow these steps:\n\n1. Sign in to the CCAI Platform portal with an administrator account.\n\n2. Go to **Settings** \\\u003e **Developer Settings**.\n\n3. Set **API Token** to the **API token** copied from your Zendesk client.\n\n### Create customer and ticket fields\n\nOptionally, the customer and ticket fields can be created. Follow these steps:\n\n1. Create a Zendesk account which has both administrator and agent role.\n\n2. In Zendesk, go to **Settings** \\\u003e **Agent \\& Manager Team**.\n\n3. Select **Add an admin**.\n\n4. Check **This admin is also an agent**.\n\n5. Activate the account from invitation email.\n\n6. Sign out of the current administrator account and sign in with the new\n account.\n\n7. Sign in to Zendesk with administration role not agent.\n\n8. In Zendesk, sign in using the widget with credential which is an\n administrator with agent role.\n\n9. Click **Authorize**.\n\n10. Open the CCAI Platform portal, go to **Settings** \\\u003e **Developer Settings**.\n\n11. Click the **Create** button from **CRM** \\\u003e **Customer fields for Contact and\n Ticket** section.\n\n12. Check if the custom ticket fields were created from Zendesk **Admin** \\\u003e\n **Manage** \\\u003e **User Fields and Admin** \\\u003e **Manage** \\\u003e **Ticket Fields**.\n\n These should include the fields:\n - **User fields**:\n\n - Identifier\n\n - **Ticket fields**:\n\n - Verification (Checkbox)\n\n - Customer Text Feedback (Multi-line text)\n\n - Customer Satisfaction Rating (Numeric): 1 to 5\n\n - Shared Customer Rating (Text): Twitter or Facebook"]]