This document provides instructions on the installation of the Zendesk application with Contact Center AI Platform (CCAI Platform).
Prerequisites
Have access as an administrator to the CCAI Platform portal.
Have a Zendesk account on the Professional or Enterprise plan.
Have downloaded the Zendesk app files:
Get started
Zendesk apps are private. They are not listed on the public Zendesk App Marketplace. You can contact your Zendesk representative to obtain and install them to your Zendesk account.
Installation
Follow the instructions below to refer to the Zendesk apps site Uploading and installing your private app in Zendesk.
Uploading and installing a private app in Zendesk Support
Click Settings to go to Admin Center.
Select Apps and Integrations > Zendesk Support App > Private App.
Click Upload Private App.
Enter a Name for the app. Example: (Call V1.4) (Chat V1.3)
Click Choose file and select the zip file for your private app (ujet-zendesk-call-v1.4.zip or ujet-zendesk-chat-v1.3.zip).
Click Upload.
In the window that appears, click Agree and upload this App.
Input your account subdomain.
When prompted, click Install.
When the process is complete, your private app appears in the list of installed apps on the Manage Apps page.
Repeat steps if both the Call and Chat app need to be installed.
The following configuration items need to be set:
App Name: It is recommended that you use Call and Chat.
App Configurations
Subdomain: Enter the subdomain of your account. For example: Instance, ie., instance.uc1.ccaiplatform.com.
Domain Name: Leave it as the default value: ue1.ccaipplatfrom.com.
Manage apps
Applications can be managed through the Zendesk portal.
Changing app settings
You can change the installed app settings, or update apps by using the following link from Zendesk: Managing your installed apps.
Change the settings for an app, including the title:
On the My Apps > Currently Installed page, find the app you want to change.
Click the options menu on the app where you want to change settings, then select Change settings.
Make the changes you want and click Update. Your changes are saved.
You can also update apps:
On the My Apps > Private App page, find the app you want to update.
Click the Options menu, then select Update.
Upload your updated zip file.
Setting up an OAuth client
Zendesk apps use OAuth 2.0 to authenticate API requests to Zendesk. You should set up an OAuth client for Zendesk Apps.
Follow these instructions or refer to the following link from Zendesk: Using OAuth authentication with your application.
Registering your Application
In the Zendesk Support Admin Center, click Apps and Integrations > Zendesk API.
Click the OAuth Clients tab on the Channels/API page, and then click Add OAuth Client by the client list.
Complete the following fields to create a client:
Client Name: Enter a name for your app. This is the name that users will see when asked to grant access to your application, and when they check the list of third-party apps that have access to their Zendesk.
Description: Optional. This is a short description of your app that users will see when asked to grant access to it.
Company: Optional. This is the company name that users will see when asked to grant access to your application. The information can help them understand who they're granting access to.
Logo: Optional. This is the logo that users will see when asked to grant access to your application. The image can be a JPG, GIF, or PNG. For best results, upload a square image. It will be resized for the authorization page.
Unique Identifier: The field is auto-populated with a reformatted version of the name you entered for your app. You can change it.
Redirect URLs: Enter the URL or URLs that Zendesk should use to send the user's decision to grant access to your application. The URLs must be absolute and not relative, https (unless localhost or 127.0.0.1), and newline-separated.
Client kind: This setting must be set to Confidential. If this is set to Public, you receive an Invalid Authorization Request error message when trying to authorize or authenticate in the CCAI Platform portal or agent adapter.
Click Save.
After the page refreshes, a new pre-populated Secret field appears. This is the "client_secret" value specified in the OAuth2 spec.
Copy the Secret value to your clipboard and save it somewhere safe.
Redirect URLs
Set the Redirect URLs of the OAuth client as follows,
https://INSTANCE.ccaiplatform.com/v1/zendesk/oauth_callback
You should replace INSTANCE with the actual subdomain of your
CCAI Platform.
Unique Identifier and Secret
The Unique Identifier and Secret fields are auto-populated while adding a new OAuth client. These are the client_id and client_secret values in the OAuth2 spec.
You can edit the Unique Identifier if you want, but not the Secret.
The Secret is displayed fully only once while adding a new client. Ensure this is kept safe.
Configure application settings
This section outlines the specific application settings.
Configuring OAuth
Sign in to the CCAI Platform portal as an administrator user.
Go to Settings > Developer Settings.
Select Agent Platform Zendesk in CRM section.
Set Zendesk Subdomain to the subdomain of your Zendesk account.
https://your_zendesk_subdomain.zendesk.comSet OAuth Client ID to the Unique Identifier of your Zendesk OAuth client.
Set OAuth Client Secret to the Secret of your Zendesk OAuth client.
Click Save.
Generate an API Token**
The following steps enable you to generate an API token in Zendesk:
In Zendesk Support Admin Center, click Apps and Integrations > Zendesk API.
Click the Settings tab, and make sure Token Access is enabled.
Click the Add API Token button to the right of Active API Tokens.
Optionally, enter a description under API Token Description. The token is generated, and displayed for you:
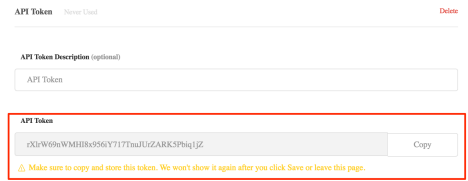
Copy the token, and paste it somewhere secure.
- Click Save to return to the API page. A truncated version of the token is displayed.
Configure API token
The follow sections provide guidance on configuring the Zendesk API token.
Assigning the API Token in the Admin settings
Sign in to the CCAI Platform portal with an administrator account, and go to Settings > Developer Settings.
Set API Token to the API token copied from your Zendesk client.
Create customer and ticket fields
The application creates custom fields and fills the value. We need to create an account which has both administrator and agent roles.
In the CCAI Platform portal, go to Settings > Agent & Manager Team.
Select Add an admin.
Check This admin is also an agent.
Activate the account from invitation email.
Sign out of the current administrator account and sign in with the new account.
Sign in to Zendesk with Admin role (not an Agent role).
In Zendesk, sign in using the widget with credential which is an administrator with agent role.
Click Authorize.
In the CCAI Platform portal, go to Settings > Developer Settings.
Navigate to the CRM > Customer fields for Contact and Ticket section.
Click Create.
Check if custom ticket fields were created from Zendesk by referring to:
Admin > Manage > User Fields
Admin > Manage > Ticket Fields
Fields
User Fields
- Identifier
Ticket Fields
Verification (Checkbox)
Customer Text Feedback (Multi-line text)
Customer Satisfaction Rating (Numeric): 1 to 5
Shared Customer Rating (Text): Twitter or Facebook
Domain-based Access Control
Refer to Domain-based Access Control for steps to limit platform access based on the domain and details related to CRM-specific domains.