As a CCAI Platform WFM scheduler, you create and assign shifts to agents for a specific period. Shifts can contain events such as breaks, meetings, and trainings, based on their duration.
To insert these events, follow these steps:
Create a set of event types and events for scheduling.
An event type is a property of an event and it's used to define the key characteristics of the event. Event types include the following properties:
Name: The name of the event type; for example, 15-minute break.
Description: An ancillary description of the event type that might be useful in understanding its purpose and relevant use cases.
Paid: Indicates whether this event is paid for by the company.
Can be part of an interval: Indicates whether this event can be inserted into an interval. If not, this is a standalone event like vacation or full-day time-off.
Can be scheduled over a break: Indicates whether an event can overlap with a break.
Create an event type:
Go to Event > Event Types.
Click Add.
In the window that displays, fill out the event type details.
Click Save.
Event type example
Consider the following example use case for event types.
A shift has two paid 15-minute breaks. In this case you would create an event type called 15-minute break and then set its Paid property to yes.
You would navigate to the Events page and create two events:
- Break 1 and Break 2, both being of type 15-minute break.
Events
A shift can contain a number of events, including breaks, meetings, training, and various ad hoc events. To add events while designing a shift, you must first define and configure these events on the Events tab.
Create a new event
To create an event, follow these steps:
On the events page, Click Add.
In the window that displays, specify the new event's values:
Name: This is the event's name as it will appear in shifts.
Description (Optional): A description of the purpose of this event.
Type: The type of this event. This was defined in the earlier staging the Event Types.
Click Save.
Add shift type
After you have created and event you need to add a shift type. You might configure different shift types for different personnel; For example, part-time, full-time, or flex.
To add a shift type, follow these steps:
To configure a shift type, do the following:
Go to Scheduling > Shift Types.
In the Shift Types table, click Add to add a new shift type.
Specify the shift type values:
Shift Type Name: Enter the preferred shift type name.
Description: Add a brief description of the shift type.
Active: Select this checkbox to Indicate if this shift type is active and can be used to create shift templates.
Click Add shift type.
You can now add a shift template.
You may now proceed to configure shift templates.
Add a shift template
In CCAI Platform WFM, a schedule can be calculated based on certain specific shift templates. A shift template defines the shift characteristics:
Its duration.
The earliest start time.
The latest stop time.
The included breaks.
For example, you can configure a template for an 8-hour shift with two breaks that starts at 7:00 AM or later and at 6:00 PM or earlier, without specifying the exact start and end time.
To create a shift template, follow these steps:
Go to Scheduling > Shift templates.
Click Add.
In the three-step wizard that displays, set the following values of the new template:
Template type: The type of the template from the shift types page.
Name: The name of the shift template.
Description: (Optional) A description of the template.
Earliest start time: The earliest time that the calculated shift can start. For example, if it's set to 7:30 AM, the shift won't start earlier than 7:30 AM.
Latest stop time: The latest time that the calculated shift can end. For example, if it's set to 9:00 PM, the shift won't end later than 9:00 PM.
Duration: The duration of the shift. For example, if it's set to 7 hours and 30 minutes, the shift lasts for 7 hours and 30 minutes.
Start increment: The minimum minute increment between possible start times. For example, if it's set to 15 minutes and the earliest start time is 7:30 AM, the possible start times are 7:30, 7:45, 8:00, and 8:15.
Minimum interevent gap: The minimum time gap between two consecutive events. This can be between the shift's start time and the first event, and also between the last event and the shift's end time. For example, if it's set to 20 minutes, the calculation service ensures that:
Between every two events there is at least a 20-minute gap.
Between the start of the shift and the first event there's at least a 20-minutes gap.
Between the last event and the end of the shift there's at least a 20-minute gap.
Optional: Add events to your new event template, For example, suppose you want to create an 8-hour shift with two breaks. In that case, you need to add two events on the last step of the wizard.
Each event has the following characteristics:
Name: Any event configured on the events tab.
Duration: The duration of the event added to the shift.
Not earlier than: The minimum time between an event's start time and the shift's start time or end time. For example, if the shift's start time is 7:00 AM and Not earlier than is set to 1 hour and 30 minutes, then an event must start no earlier than 8:30 AM. If the shift's end time is 4:00 PM and Not earlier than is set to 1 hour and 30 minutes, then an event must start no earlier than 2:30 PM.
Not later than: The maximum time between an event's start time and the shift's start time or end time. For example, if the shift's start time is 7:00 AM and Not later than is set to 2 hours and 30 minutes, then an event must start no later than 9:30 AM. If the shift's end time is 4:00 PM and Not later than is set to 2 hours and 30 minutes, then an event must start no later than 4:00 PM.
Click Save.
To add additional events, click + Add more.
After all of your events are created, click Save template.
Scheduling
The scheduling workflow is as follows:
Create a day planner.
Use the day planner to calculate a schedule.
Assign the shifts from the schedule to agents.
Shift assignment can be either manual or automatic. Manual assignment requires you to personally identify a suitable agent for each shift based on various criteria. Automatic assignment automatically pairs shifts with agents based on their skill sets, skill levels, and availability.
Manual scheduling
After you have saved a daily or a weekly schedule, you can assign the schedule's shifts to the target agents. Manual shift assignment occurs on the Shift Assignment page, under Scheduling.
This page includes the following two tabs: Daily Shifts and Weekly Schedules. Each tab contains a table that lists all existing daily or weekly schedules. To find the target schedule, use the following two filters in the toolbar:
Assigned / Unassigned: The schedules that are assigned or unassigned.
Day Planner: Lists schedules with the selected day planner.
For example, if you calculated a daily schedule based on a day planner called Christmas Week, you would go to the Schedule assignment page, open Daily schedules, and select Christmas Week in the day planner drop-down. You would then see the list of unassigned shifts from that schedule.
Each unassigned shift or schedule contains the following information:
Shift Template: Indicates which shift template corresponds to this shift.
Agents Required: Indicates the number of agents required to cover this shift. If the number is greater than 1, it means that several identical shifts have been generated.
Start Time: The shift's starting time.
End Time : The shift's end time.
Identify eligible agents
Next to each shift or schedule there's an Assign button that you can click to assign it to an agent.
The Agent Schedule page lists agents along with a summary of their eligibility, including whether they have sufficient skills, and whether they are available.
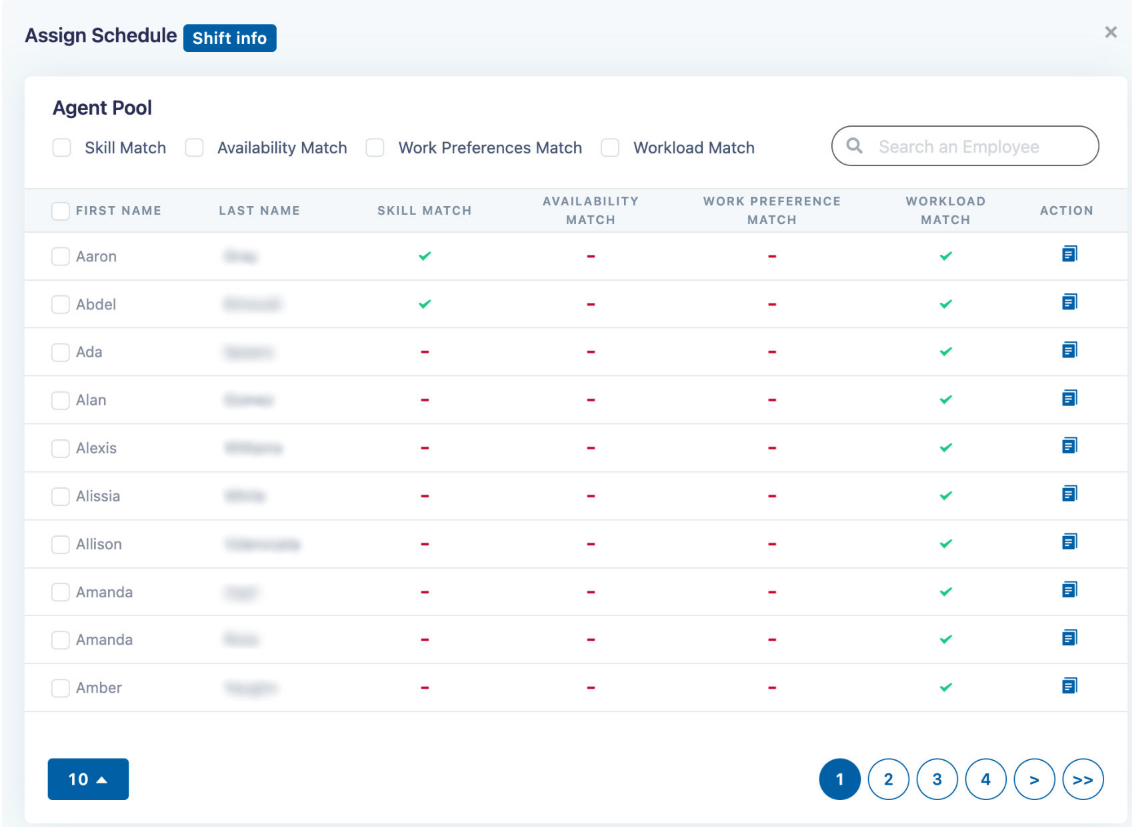
Agent conflicts
If you need more details about an agent's eligibility, click the Conflicts icon in the Action column. A conflicts window displays that lists the reasons that an agent is not eligible for the shift. These reasons include the following:
Insufficient skills: The agent is missing certain skills to cover the shift.
Suggestion: go to the agent's personal information and grant them the missing skills.
Availability mismatch: The shift's duration falls outside of the agent's availability hours.
Suggestion: go to the agent's personal information and change their availability to fit the shift.
Work preference mismatch: the shift's duration falls outside of the agent's preferred working hours.
Suggestion: go to the agent's personal information and modify their work preferences to fit the shift.
Workload mismatch: Assigning the shift to the agent violates their workload boundaries.
Workaround: go to the agent's personal information and change their workload boundaries to fit the shift.
Minimum hours per day: the agent is assigned to a shift that is shorter than their minimum daily workload.
Maximum hours per day: the agent is assigned to a shift that is longer than their minimum daily workload.
Maximum days per week: the agent is assigned to a shift that makes the number days worked per week more their maximum days per week workload.
You can toggle filters in the toolbar to display only agents who meet the specified criteria.
After you have identified the target agents for the shift or shifts, select the agents and click Assign. This displays the suggested number of agents required to cover the shift. At this point the shift is assigned to the selected agents. The agents will receive notifications about the newly assigned shifts, and they will be able to view them in the agent portal.
Agent Experience: Shift Pick-Up in the Agent Portal
CCAI Platform WFM lets agents pick up shifts in the agent portal without a manager's involvement.
Automatic scheduling
CCAI Platform WFM lets managers automatically allocate a set of shifts to the best matching candidates based on their skill set, availability hours, or workload constraints. Automatic scheduling eliminates the time and effort of scheduling manually.
Auto-assign a shift
To auto-assign a shift, select the day planner (i.e. calculation task) whose shifts you would like to automatically assign to the available and eligible agents. You may also filter the shifts by their shift template if you only want to use the auto-assignment engine for a particular template.
After you have located the specific day planner, follow these steps to auto-assign shifts:
Click Auto Assign. A pane displays where you can specify the auto-assignment process values.
Agent Filtering
Auto-assignment engine automatically finds appropriate candidates for a shift.
A perfect candidate:
Doesn't have any active shifts during the shift that you want to schedule.
Has sufficient skills to cover the shift.
Has availability covers the duration of the shift.
Has preferred working hours that cover the duration of the shift.
Has workload limits won't be violated as a result of taking the shift. These include:
Minimum hours per day.
Maximum hours per day.
Maximum number of days per week.
However, the selection of perfect candidates may be insufficient to cover the target schedule. In that case you may want to soften the selection criteria and allow agents with minor or major conflicts to be assigned shifts regardless of their suitability issues.
Automatic scheduling might not identify enough appropriate candidates to cover the shift that your are scheduling. In that case, consider loosening the selection criteria to increase the number of agents that are appropriate for the shift.
In addition, you have the option to do the following:
Force-assign shifts to agents with conflicting work preferences. In CCAI Platform WFM, preferences (as opposed to availability) are not strict, and managers can disregard a preference conflict during both manual and automatic shift assignment. If you select this checkbox after failing to find enough appropriate candidates, auto-assignment looks for agents who have a work preference conflict but no conflicts with skills, availability, time-offs, and workload limits.
Force-assign shifts to agents with conflicting availability. Unlike work preferences, availability is considered a strict limitation, meaning that agents are not willing to take shifts outside of their defined availability hours. Nonetheless, if a company is understaffed, you can disregard this limitation by selecting this checkbox.
Force-assign shifts to agents with insufficient skills. Selecting this checkbox enables auto-assignment to assign shifts to agents that don't have sufficient skills to cover the shift. This is not recommended, but it is available for emergency situations.
Force-assign shifts to agents with conflicting workload limits. Selecting the checkbox disregards agents whose workload limits would be violated as result of assigning the shifts to them. Specifically, the engine disregards he following validation rules:
The shift's duration is not long enough to ensure the agent's minimum daily workload.
The shift's duration exceeds the agent's maximum daily workload.
Assigning this shift will lead to a schedule where the number of working days during the week exceeds the defined limit—for example, up to five days per week.
Create ad hoc events
As a manager, you will frequently encounter situations where an unexpected meeting, training session, or some other event must be assigned to an agent or a group of agents during their shift.
For this purpose, WFM features a special page called Ad Hoc Events where you can examine the entire labor pool's schedules, find a target, and quickly assign a new ad hoc event.
Event blocks are represented in the schedule by an orange block with a mug icon.
Note: Ad hoc events can't be scheduled over an existing event. If you need to schedule an ad hoc event at the same time as an existing event, you must first edit or delete the existing event.
Create an ad hoc event
To create an ad hoc event, follow these steps:
In the CCAI Platform portal, click WFM > Admin. If you don't see the WFM menu, click Menu.
Click WFM Scheduling > Ad Hoc Events.
In the date field, select a date for your event.
In the Search agents field, select one or more agents for the ad hoc event. A new row appears for each agent that you select.
To set the event information for an agent, do the following:
In the agent's row, click +. The Create a new ad-hoc event dialog appears.
In the Name field, enter the event name.
In the Description field, enter the event description.
In the Start time and End time fields, set the event's start and end times.
To change the meeting type, click the coffee cup icon, and then click an icon for a different meeting type.
Click Proceed.
Optional: Drag the event to a different time slot.
Click the green checkmark to save the event.
Repeat these steps to set event information for another agent.
Agent portal: shift management
The agent portal lets agents to manage their shifts.
Offer a shift for another agent to cover
If you as an agent have an upcoming shift and want another agent cover it for you, you can click Cover shift next to it in the table. The system checks if you're eligible to offer the shift, using the following criteria:
Offloading this shift won't put you below the minimum number of shifts worked per week.
You won't exceed the company-defined limit on the number of covers per week.
Don't forget to include a note that agents who might cover your shift will see.
If you meet the criteria, the shift is marked as coverable in the system. All other agent with a sufficient skill set will see your shift. If they want to pick-up it up, they can to click Take shift. At this point the system checks if that agent meets the criteria for the shift. This includes the following:
Taking this shift won't put the agent above the maximum number of shifts worked per week.
The agent has a sufficient skill set for the shift.
The agent doesn't have an overlapping shift.
The agent doesn't have any other event at this time, for example, meeting or training.
Trading shifts
If you want to trade shifts with another agent, follow these steps:
On the agent portal, identify the shift that you want to trade.
Click Trade. The system first checka whether you're eligible to trade the shift using these criteria:
Trading this shift won't put you below your weekly working hours quota.
You won't exceed the company-defined limit on the number of shift trades per week.
If you meet the criteria, a calendar appears where you can select the date on which you'd like to trade shifts. Next, you will see a view where you can select an agent with whom you'd like to trade shifts. This list only includes agents who meet the criteria for accepting a trade shift. These include the following:
Taking this shift won't put the agent above the maximum number of shifts worked per week.
The agent has a sufficient skill set for the shift.
The agent doesn't have an overlapping shift.
The agent doesn't have any other event at this time. For example, a meeting or a training.
Don't forget to include a note that the trading agent will see.
Click Auto-choose. The system randomly picks an eligible agent.
Optional manager approval
Your company might have defined a policy where shift covers and trades must be approved by your manager. In this case, covers and trades are sent to the manager for final approval.
The manager can:
Accept the cover or trade.
Reject the cover or trade and provide a comment. In this case the shift is reassigned back to you.