The web SDK is designed to work on all modern desktop and mobile browsers, but we officially support the most recent version of the following browsers:
Desktop:
Chrome
Safari
Edge
Android:
Chrome
Edge
iOS:
Chrome
Safari
Edge
Proactive triggers
Proactive triggers make it possible to launch the web SDK and send a message to the consumers proactively. You can set up proactive chat triggers in Contact Center AI Platform by navigating to Settings > Chat > Web Proactive Chat Triggers.
For more information, see Proactive Web SDK Triggers.

Keeping track of users
If you would like to identify repeat users in your CRM or use pre-canned
responses using the users' information, you must add identifiers to users.
Using pre-canned responses requires a CRM.
Authentication (updating the identifier) can be done at the beginning of a session or mid-session. For more information about mid-session authentication, see Mid-Session Authentication by API.
Identifier
When initiating a call or chat, our system relies on an identifier for user authentication. You can specify your preferred value for the identifier field during configuration. If you already possess a GUID (globally unique identifier) for your users, you can employ it for user identification. However, if the identifier you have for a user is enumerable or contains personally identifiable information (PII), you must hash it for improved security.
The identifiers must be added in the following places:
Pass to backend in
getAuthToken()function getAuthToken() { // YOU SHOULD HAVE THIS KIND OF API ON YOUR SERVER return fetch('/auth/token', { headers: { 'Content-Type': 'application/json' }, method: "POST", body: JSON.stringify({ payload: { identifier: 'c727f2851b64b29761da170d0adee67a9a89c2d9960c8eee0ae53737413cfa4e', name: 'Test user', email: 'test@user.com', phone: '18008675309' } }) }).then(function(resp) { return resp.json(); }); }Add to payload when encoding JWT.
const express = require('express');
const jwt = require('jsonwebtoken');

const port = process.env.PORT || 3000;
const secret = process.env.COMPANY_SECRET || 'secret';

const app = express();

app.use(express.json());

app.post('/auth/token', function (req, res) {
  const payload = req.body.payload;
  payload['iss'] = 'YOUR_COMPANY_NAME';
  const iat = parseInt(Date.now() / 1000, 10);
  payload['iat'] = iat;
  payload['exp'] = iat + 600;

  const token = jwt.sign(payload, secret, { algorithm: 'HS256' });
  res.json({ token });
});

app.listen(port, function () {
  console.log(`Listening at http://localhost:${port}`);
});
Add extra options in
authentication()new UJET({` // ... authenticate: function() { return getAuthToken().then({ token } => { return { token: token, user: { identifier: YOUR_UNIQUE_USER_ID, name: 'Test user', //optional, email: 'test@user.com', //optional, phone: '000000000' //optional } }; }); }, })
External chatbot transfer
When you transfer a chat from the virtual agent to the agent, you can override
the greeting message and pass the transcripts to the agent by backfilling the
external_chat_transfer field to the custom data. The greeting_override
supports Markdown formatting.
ccaas.config({
  customData: {
    "external_chat_transfer": {
      "greeting_override": "YOUR GREETING MESSAGE."
    }
  }
"agent": {
      "name": "Agent Name",
      "avatar": "https://ujet.s3.amazonaws.com/default-virtual-agent-avatar-1.png"
    },
    "transcript": [
      {
        "sender": "agent",
        "timestamp": "2021-03-15 12:00:00Z",
        "content": [
          {
            "type": "text",
            "text": "Hello! How can I help you today?"
          },
          {
            "type": "buttons",
            "buttons": [
              {
                "label": "Create New Order",
                "selected": false
              },
              {
                "label": "Check Order Status",
                "selected": true
              },
              {
                "label": "Check Account Balance",
                "selected": false
              }
            ]
          }
        ]
      },
      {
        "sender": "end_user",
        "timestamp": "2021-03-15 12:00:15Z",
        "content": [
          {
            "type": "text",
            "text": "Check Order Status"
          }
        ]
      },
      {
        "sender": "agent",
        "timestamp": "2021-03-15 12:00:16Z",
        "content": [
          {
            "type": "text",
            "text": "I can help you with that, what's your order number?"
          }
        ]
      },
      {
        "sender": "end_user",
        "timestamp": "2021-03-15 12:00:20Z",
        "content": [
          {
            "type": "media",
            "media": {
              "type": "image",
              "url": "https://ujet.s3.amazonaws.com/default-virtual-agent-avatar-1.png"
            }
          }
        ]
      }
    ]
  }
}
Company name
Choose a custom name instead of the name from the company API.
ccaas.config({
  name: 'ACME',
})
Chat deflection
When agents are unavailable, you can specify options for automatically handling the situation with deflections.
Chat deflection options can be found in the portal under Settings > Chat > Web and Mobile Deflections.

Direct access points (DAP)
You can direct a user directly to a specific queue in the queue structure using direct access points.
To use a direct access point, you first need to create a direct access point in the portal.
In the CCAI Platform portal, click Settings > Queue. If you don't see the Settings menu, click Menu.
Turn on Use for the Web menu and go to EDIT / VIEW.
Select any queue from the queue structure.

Click Create direct access point.
Access Point type = General.
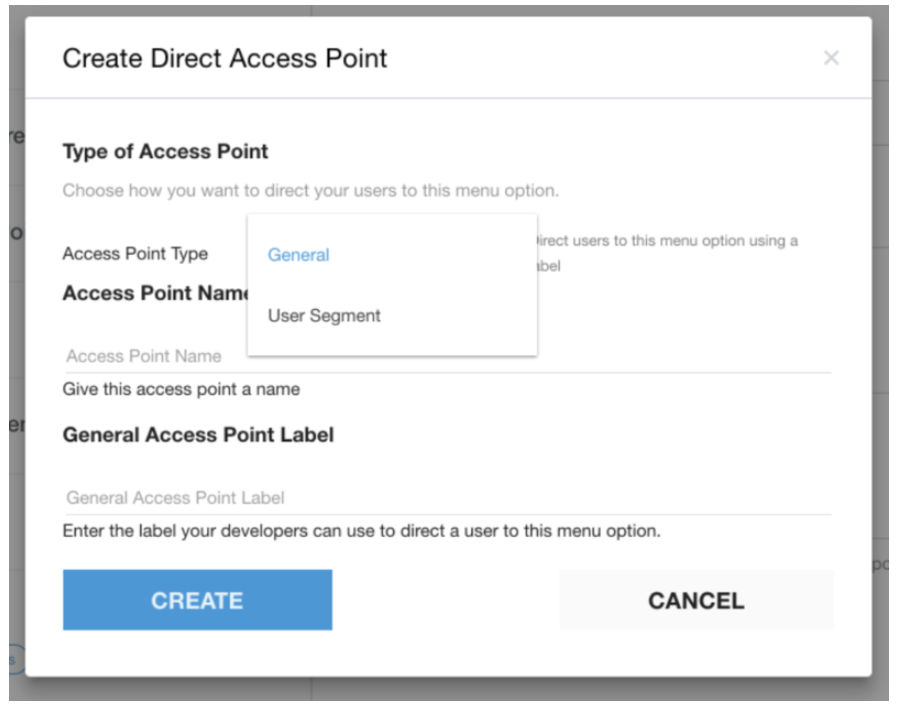
Add input data for the direct access point in the dialog. Note that the
General Access Point Labelfield corresponds with theMenuKeymentioned in the next step.Click CREATE.
Once configured using the portal, you can direct a user to a specific queue using
MenuKey:
ccaas.config({
  menuKey: 'vip'
})
Ticket ID
If you have an existing ticket for a consumer, you can retrieve the ticket ID from your CRM and pass it into the web SDK:
retrieveTicket().then(ticket => {
  ccaas.config({ ticketId: ticket.id })
})
Automatic channel selection
Using preferredChannel, you can automatically select a channel when a consumer
selecting the selects a particular queue:
ccaas.config({
  preferredChannel: 'chat'
})
Disabling attachments
By default, the web SDK allows consumers to upload photos and videos during a chat session. You can disable it using the follow script:
ccaas.config({
  disableAttachment: false
})
Passing custom data
When a chat is started, custom data can be sent with the chat object. Custom data can be anything from OS, Version, location, or any other data that may be relevant to the respective chat.
You can add unsigned custom data using customData configuration.
The custom data format is similar to a JSON object and consists of key,
label, and value.
ccaas.config({
  customData: {
    k1: {
      label: 'Version',
      value: '1.1.0'
    },
    k2: {
      label: 'Platform',
      value: navigator.platform
    }
  }
})
Key: a unique identifier for data. In the preceding example, k1 and k2 are
keys.
Label: the display name on the CRM page.
Value: the value of the label
You can add signed custom data using signedCustomData configuration:
ccaas.config({
  signedCustomData: "eyJhbGciOiJIUzI1NiIsInR5cCI6IkpXVCJ9.n...."
})
The signedCustomData is a JWT string with HS256 algorithm.
SIGN_JWT(
  algorithm='HS256',
  secret=YOUR_COMPANY_SECRET,
  payload={
    custom_data: {
      version: {
        label: 'Version',
        value: '1.0.0'
      },
      ...
    },
    iss: 'YOUR TENANT',
    iat: NOW,
    exp: NOW + 3600,
  }
)
Supporting multiple languages
The lang field can be used to control the default language at launch, and to
support multiple languages. If omitted, is English (en) by default. The default
language can be configured per page of your website. If other languages are live
in your tenant, the consumer will be provided with the option to switch to
another.
client.getMenus(key?: string, lang?: string)
The .getMenus method accepts an optional lang parameter, when not passing the
lang parameter to .getMenus, this method will use the default lang option.
Example:
const client = new Client({
  // ...
  lang: 'ja',
})
This option can be accessible using the following property:
console.log(client.lang)
The following languages are supported, and use the abbreviations indicated in the following table:
| Language | Abbreviation |
| English | en |
| English (Canada) | en-CA |
| English (UK) | en-UK |
| English (Australia) | en-AU |
| English (India) | en-IN |
| Spanish (Spain) | es |
| Spanish (Mexico) | es-MX |
| French (Canada) | fr-CA |
| German | de |
| Japanese | ja |
| Korean | ko |
| Italian | it |
| Chinese (Simplified) | zh |
| Chinese (Traditional) | zh-Hant |
| Swedish | sv |
| Portuguese | pt |
| Portuguese (Brazil) | pt-BR |
| Finnish | fi |
| Norwegian | nb |
| Danish | da |
| Dutch | nl |
| Turkish | tr |
| Vietnamese | vi |
| Thai | th |
| Arabic | ar |
| Czech | cs |
| Polish | pl |
| Hungarian | hu |
| Russian | ru |
| Hindi | hi |
| Romanian | ro |
| Croatian | hr |
| Ukrainian | uk |
| Tagalog | tl |
For more information about translations, see the Customizing Messages and Translations. section.
Programmatically starting the web UI
This step lets you open the Web UI programmatically with the
ccaas.start(options) method.
In some cases, you may want the consumer to click an additional button to open the Web SDK UI.
Example:
<button id="launcher">Click to open</button>

var ccass = new UJET({
  companyId: "YOUR_COMPANY_ID",
  host: "HOST_URL",
  authenticate: getAuthToken,
});

ccass.config({disableLauncher: true})

var launcher = document.getElementById('launcher');
launcher.addEventListener('click', function() {
  if (ccass.visible) {
    ccaas.hide();
    launcher.textContent = 'Click to open';
  } else {
    ccaas.show();
    launcher.textContent = 'Click to close';
  }
});

ccass.on('ready', function() {
  launcher.textContent = 'ready to talk';
});
You can also close the widget with the ccass.close() method, and you can remove
the widget with the ccass.destroy() method.
Programmatically closing the web UI
This step lets you call the callback function when the consumer wants to close the Web SDK.
ccass.on('visible', function(visible) {console.log(visible) })
Get information about active chat sessions
You can get information about active chat sessions, including the chat ID.
See the following example:
ccass.getOngoingChat()
If there is an active chat session, this returns the chat metadata. If there are
no active chat sessions, this returns null.
You can use this to prevent consumers from opening multiple chat sessions by conditionally hiding the SDK if there's an active chat in progress.
Track open or close status between multiple tabs or windows
You can sync the open or close status of the SDK between multiple tabs or windows of your website. Use the code snippet to track the state of the SDK in local storage:
ccass.on('visible', (isVisible) => {
 localStorage['ujetOpen'] = isVisible ? 'yes' : 'no'
})
if (localStorage['ujetOpen'] == 'yes') {
 ccass.show()
} else {
 ccass.hide()
}
Customize Screen Share consent dialogues and end button
template
You can customize the screen share dialog template with this option, the default
template is:
<dialog open class="cobrowse-dialog">
  <h1>$title</h1>
  <div class="cobrowse-dialog_content">$content</div>
  <div class="cobrowse-dialog_footer">
    <button class="cobrowse-dialog_allow js-cobrowse-allow">$allow</button>
    <button class="cobrowse-dialog_deny js-cobrowse-deny">$deny</button>
  </div>
</dialog>
This template is used for:
confirm session dialog
confirm remote control dialog
confirm full device dialog
The parameters in the template will be replaced by the content in messages option.
confirmSessionTemplate
This option is used to customize the confirm session dialog.
confirmRemoteControlTemplate
This option is used to customize the confirm remote control dialog.
confirmFullDeviceTemplate
This option is used to customize the confirm full device dialog.
sessionControlsTemplate
This option is used to customize the session controls button. The default template is:
<button class="cobrowse-end js-cobrowse-end">$end</button>
Messages
The preceding templates contain the following message variables:
$title$content$allow$deny
These variables will be replaced by:
{
  confirmSessionTitle: string;  // $title
  confirmSessionContent: string;  // $content
  confirmRemoteControlTitle: string;  // $title
  confirmRemoteControlContent: string;  // $content
  confirmFullDeviceTitle: string;  // $title
  confirmFullDeviceContent: string;  // $content
  allowText: string;  // $allow
  denyText: string;  // $deny
  endSessionText: string;  // $end
}
We have built-in Screen Share messages, for example, the messages for en locale:
{
  "confirmSessionTitle": "Screen Share Session Request",
  "confirmSessionContent": "Do you want to share your current screen with the agent?",
  "endSessionText": "End Screen Share Session",
  "confirmRemoteControlTitle": "Remote Access Request",
  "confirmRemoteControlContent": "The agent would like to have access to your currently shared screen to further assist you. Do you want to allow this?",
  "confirmFullDeviceTitle": "Screen Share Request",
  "confirmFullDeviceContent": "Do you want to share your full screen with the agent? The agent will not be able to control anything on the screen.",
  "allowText": "Allow",
  "denyText": "Deny"
}