Contact Center AI Platform (CCAI Platform) lets you configure hours of operation for the contact center and specific holiday hours per queue. With holiday hours, you have the flexibility to create and manage your own set of holidays with complete control over the holiday name, dates, and time. To make holiday management even easier, you can group your holidays together by creating folders.
Permissions
Of the default permissions, only the Admin permission permits the creation or editing of holidays.
Custom roles can also obtain this permission by being granted the Edit permission for the Support Center Details page.
Create folders and holidays
You can organize and manage holiday schedules using folders. For example, a folder named "Company Holidays" could include all holidays recognized by the company, such as Christmas, Thanksgiving, and New Year's Day. Another folder could be named "Regional Holidays" for holidays observed in specific regions where the company operates.
Add a folder
To add a folder with holidays, follow these steps:
In the CCAI Platform portal, click Settings > Support Center Details > Holidays. If you don't see the Settings menu, click Menu.
To create a new folder, click Add Folder.
Enter a name for the new folder, then click Add.
Edit a folder
In the CCAI Platform portal, click Settings > Support Center Details > Holidays. If you don't see the Settings menu, click Menu.
For the folder that you want to edit, click More, and then click Edit folder.
Make your edits, and then click Save.
Delete a folder
In the CCAI Platform portal, click Settings > Support Center Details > Holidays. If you don't see the Settings menu, click Menu.
For the folder that you want to edit, click More, and then click Delete folder.
Click Save.
Add a holiday
To add a holiday, follow these steps:
In the CCAI Platform portal, click Settings > Support Center Details > Holidays. If you don't see the Settings menu, click Menu.
Click Add Holiday.
Enter the name of the holiday—for example, New Year's Day. Maximum 25 characters.
There are two options for specifying the
Date:Select date range. Enter the Date (format MM/DD). This option is useful for events that occur on the same dates every year, such as Independence Day in the US, which is always on July 4th.
Select conditional dates: This option is useful for events that occur on different dates each year but follow a specific pattern, such as American Thanksgiving, which is always on the 4th Thursday of November.
If you select Select conditional dates, three mandatory fields appear:
Select the Day of Week that you want to specify. Click Add.
Select the Occurrence with options from Week 1 to Last. Click Add.
Select the Month that you want to specify. Click Add.
In the Time Range field, enter the Start Time and End Time if the holiday occurs during a specific time period.
If the holiday is an all-day event, select the All Day checkbox.
To add a custom message, follow these steps:
Click Add Language. Messages can be created for all enabled languages under Settings > Support Center Details > Languages & Messages. An error appears if messages are created for languages that aren't enabled.
Select the message language from the Language field.
Add your messages for voice and text channels:
For voice messages, you can use either text-to-speech or upload an audio file of a recorded message.
To create a text-to-speech message, select Text-to-speech, and then type your message into the text field.
To use an audio file, select Upload audio recording, then either drag the file into the field, browse for it.
For text messages, in the Text (Web, Mobile, SMS and WhatsApp) field, enter your message.
Click Add.
Repeat these steps for any other languages you want to configure for the holiday.
Edit a holiday
To edit a holiday, follow these steps:
In the CCAI Platform portal, click Settings > Support Center Details > Holidays. If you don't see the Settings menu, click Menu.
Find the holiday you want to edit in the table, and then click Actions.
Select Edit holiday.
Edit the holiday, and then click Save.
After hours call forwarding settings: Forward to another number
Go to Settings > Call. Click the Enable After Hour Deflection toggle.
Go to either the IVR Calls or Mobile & Web Calls After-Hours Deflection section.
Select Forward to Number and enter the phone number that calls should be forwarded to.
Click Set Caller Announcements to save your changes.
For more information about after hours deflection settings options, see After Hour Deflection for Calls and Chats.
Holiday components
Reporting: Calls deflected during holidays will not show in reports.
API: When a call deflects during a holiday, the following API responses are available: After hours voicemail, phone number deflection, and after hours message. Deflection data in the API can be found in the following location:
https://{subdomain}.{domain}/manager/api/v1/calls
Hours of operation settings
Settings are available to configure default operation hours and individual settings that may be configured based on Queue, channel, language, time of day, days of the week, or selected holidays.
After a call or chat is initiated outside of the set hours for the selected queue, what happens to that chat or call depends on your after hour deflection settings. If your queues are not set to 24-hours, make sure to enable after hours deflection.
An administrator can configure the following:
General Hours: A global default configuration controlling the days and hours during which your operation is open.
Custom Operation: (Optional) Settings to override the default settings based on queue, channel, language or entry point (mobile or web).
General hours of operation configuration
The general operation hours setting will be used as the default setting for your environment.
If the hours for a particular entry point or queue are different, create a new custom setting by following these steps:
In the CCAI Platform portal, click Settings > Support Center Details. If you don't see the Settings menu, click Menu.
Click the Edit (pencil) icon to edit the general hours.
Choose the correct Timezone. Time zone is used for Operation Hours and Deflection Settings.
Select your support center operation Days.
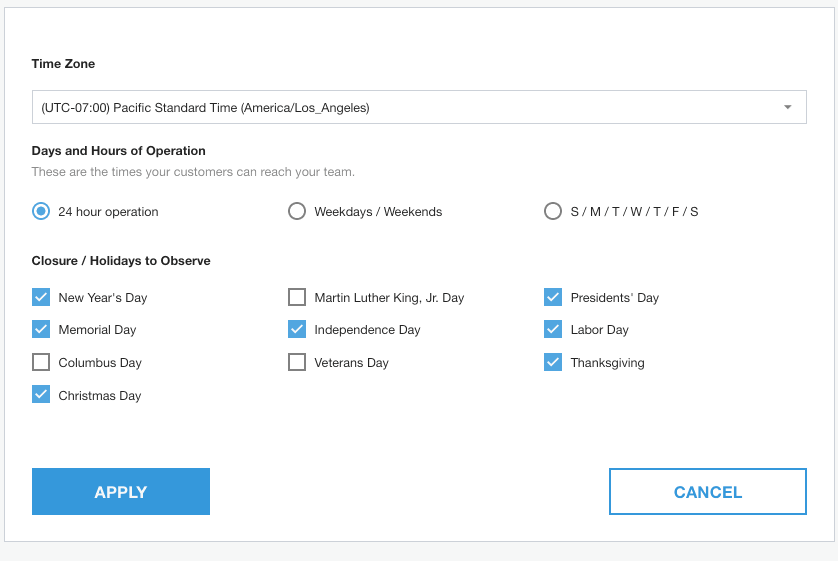
24 Hour Operation: For operations that are always open. Since the operation is always open, no daily hour settings will be shown.
Weekdays/Weekends: To be used for operations where the weekday hours stay the same all week and differ for weekend days. One time of day setting for Weekdays and one time of day setting for weekend days will be available for configuration.
S/M/T/W/T/F/S: To be used if you have different hours on various days of the week. 7 hours settings for each day will be available for configuration.
If you're not using 24-hour operation, input the hours for each day.
Mark off the Holidays your support center is closed. On selected holidays your after hour deflection settings will be used. For other holidays not listed, see Custom hours and queue settings for more information.
Click Apply.
Custom hours and queue settings
For all other specific hours based on Language selected, Entry point used to access CCAI Platform, or even specific queues, a new custom Operation Hour will need to be created.
Click Add Custom Operation Hours.
Name the operation hour setting (for internal use).
Click Next.
Choose the correct Timezone for support center operations. Time zone is used for Operation Hours and Deflection Settings.
Select the Days and Hours of Operation setting, then the hours of operation per day.
Mark the checkboxes next to the Holidays for this custom operating hour setup. On selected holidays, your After Hour deflection settings will be used.
Click Next.
Select the Entry Points that will inherit the custom hours per queue.
Select from the available channels - call or chat.
Select any languages that custom hours are associated with.
To select a specific queue or set of queues, Search for the name of the queue, then click Assign.
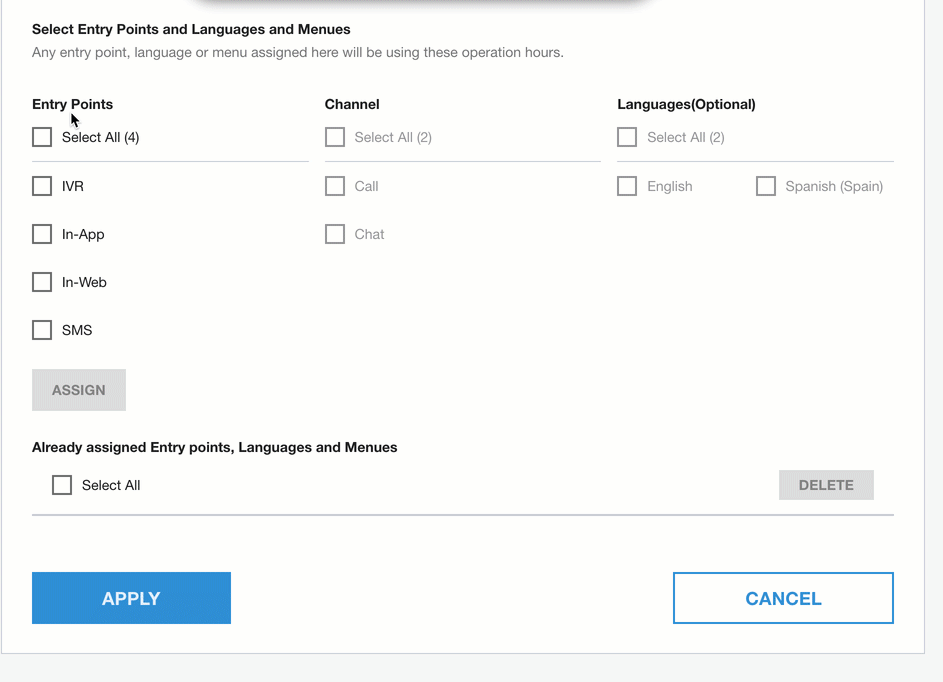
You can bulk select any assigned entry points and click Delete to delete them.
Or for individual edits, Delete can be used to remove a single entry point.
Click Finish to save.
IVR after hour settings at the queue level
This option lets you set what options are presented to the end-user when the queue is out of hours.
Configure after hour settings and messages at the queue level
In the CCAI Platform portal, go to Settings > Queue.
Click Edit / View in the IVR panel.
Select a queue to edit settings.
Go to the Custom After Hour Message Deflection section and click the toggle.
Use the radio button to select from the following options:
Message: Message will play, then end the call. Click the toggle to use default message set in Settings > Call or click the Custom Greeting to On to enter a Text-to-speech message or upload an audio recording.
Deflect to a Queue: search for the name of the queue, then select from the list of options presented.
Phone Number: Redirect callers after hours to a set phone number. Additional charges for call time apply.
Voicemail: Enables voicemail for this queue with an option for a custom voicemail greeting for this queue.
Mobile After Hours Messages and Custom options
For implementation contact Support.
Enable custom after hours settings
In the CCAI Platform portal, go to Settings > Support Center Details.
Click the Display After Hours Message in Mobile Channel toggle to the on position.
To set the default messages, see Customizing mobile and web SDK channel messages for further details and examples.
Configure after hours settings and messages at the queue level
In the CCAI Platform portal, go to Settings > Queue.
Click Edit / View in the Mobile panel.
Select a queue to edit settings.
Go to the Custom After Hour Message Deflection Options Mobile section and click the toggle to enable.
Use the radio button to select Deflect to a Queue or Deflection Options.
Deflect to a Queue: search for the name of the queue, then select from the list of options presented
Deflection Options: mark the checkboxes next to the channels you would like presented to the end-user when accessing the queue after hours
Click the toggle Display After Hour Deflection Message to enable.
Use the global after hour message set in Languages & Messages, or set a custom message by selecting Use custom after hour message and entering the message you would like displayed.
Click Set Custom After Hour Options.
Hours of operation queue hierarchy
If any leaf queue is open, or if any leaf queue has custom after hour deflection selected, options are provided at the parent level and the deflection follows the custom option or the global option depending on what is configured. If all sub queues and parent queues are closed, parent-queue after-hour deflection is followed. Here are some examples:
If the parent queue is closed, leaf queue 1 is open, and leaf queue 2 is closed, then parent-queue after-hour deflection is ignored and leaf queue options are provided. If the open leaf queue option is selected, the interaction routes to an agent. If the closed leaf queue is selected, the interaction follows either the global after-hour deflection or the queue deflection, depending on what is configured.
If the parent queue is closed and all leaf queues are closed with no queue level after hour deflection enabled, then the parent-queue after-hour deflection is followed.
If the parent queue is closed and all the leaf queues are closed and have their own after-hour deflection, then the parent-queue after-hour deflection is ignored and options are presented following the after-hour deflection of whichever queue option was selected.
If the parent queue is open and all leaf queues are closed without any queue-level after-hour deflection, the interaction follows parent-level after-hour deflection.
If the parent queue is open and some leaf queues are open, then all queue options are provided with the open options routing to an agent and the closed queues following the after-hour deflection, whether global or queue level is configured.