With Contact Center AI Platform (CCAI Platform), you can use external storage to store and retrieve CCAI Platform session data such as call recordings, chat transcripts, media files uploaded by end-users, email transcripts, and session metadata. These files are stored outside of your CRM, and you can link them to your CRM records. Files are encrypted during transit. Setting up external storage is helpful if you have a CRM that does not have a standard integration with CCAI Platform.
File types and naming conventions
The following table shows the file types that can be stored in external storage, as well as the naming convention for the various file types:
| File type | Naming convention |
|---|---|
| Call recordings | - call-{id}.mp3- call-{id}.wav |
| Chat transcripts | - chat-{id}.txt |
| Media files | - call-{id}-photo-{photo-id}.jpg- call-{id}-video-{video-id}.mp4- chat-{id}-photo-{photo-id}.jpg- chat-{id}-video-{video-id}.mp4 |
| Email transcripts | - email-{id}.pdf |
| Session metadata | - metadata-{id}.json- metadata-{id}.txt |
Storage types
You can use the following storage types for external storage:
Before you begin
To set up external storage for your CRM, you need the following:
A CCAI Platform account with administrator and agent roles
Access to your CRM
A Cloud Storage bucket or a secure file transfer protocol (SFTP) server, depending on the type of external storage you are setting up
Set up external storage using Cloud Storage
To set up external storage using Cloud Storage, follow these steps:
Sign in to the CCAI Platform portal using administrator credentials.
Click Menu, and then click Settings > Developer Settings.
Go to the External Storage pane, and then click the toggle to the on position.
For Server Setup, click Google Cloud and then click Service Account (Bucket Owner).
In the Bucket Name field, enter the path to your Cloud Storage bucket.
In the Key (JSON File) field, click Upload key. Select a key file for a service account that has write permissions to the Cloud Storage bucket.
If you want to save your session data to a specific folder in your Cloud Storage bucket, enter the path to the folder in the
https://storage.googleapis.com/storage/v1/b/o/field.Select the checkboxes next to the types of data that you want to store.
Optional: For Email, clear the checkboxes for the types of email data that you don't want to store in external storage. Checkboxes are selected by default.
Optional: For Email, edit the path for a type of email data. This changes the folder in your SFTP server where that type of email data is stored.
Click Link & Save.
Set up external storage using an SFTP server
To set up external storage using an SFTP server, follow these steps:
Sign in to the CCAI Platform portal using administrator credentials.
Click Menu, and then click Settings > Developer Settings.
Go to the External Storage pane, and then click the toggle to the on position.
For Server Setup, click SFTP Server.
In the Host field, enter the URL or IP address for your SFTP server.
In the Port field, enter the port number for your SFTP server.
In the Login User ID field, enter the user ID for signing into your SFTP server.
In the Password field, enter the password for signing into your SFTP server, if one is required.
If your SFTP server requires an SSH private key for authentication, select the SSH Private Key checkbox.
In the Private Key field, enter the private key.
In the Passphrase field, enter the passphrase.
If you want to save your session data to a specific folder in your SFTP server, enter the path to the folder in the
sftp://@:22/field.Select the checkboxes next to the types of data that you want to store.
Optional: For Email, clear the checkboxes for the types of email data that you don't want to store in external storage. Checkboxes are selected by default.
Optional: For Email, edit the path for a type of email data. This changes the folder in your SFTP server where that type of email data is stored.
Click Save Changes.
Accepted SSH key types
The following SSH key types that are accepted as private keys when setting up external storage using an SFTP server:
curve25519-sha256 (node v14.0.0+)curve25519-sha256@libssh.org (node v14.0.0+)ecdh-sha2-nistp256ecdh-sha2-nistp384ecdh-sha2-nistp521diffie-hellman-group-exchange-sha256diffie-hellman-group14-sha256diffie-hellman-group15-sha512diffie-hellman-group16-sha512diffie-hellman-group17-sha512diffie-hellman-group18-sha512diffie-hellman-group-exchange-sha1diffie-hellman-group14-sha1
Configure CRM comments
When you integrate with a CRM and save call recordings and chat transcripts to external storage, you can control how the recordings and transcripts are referenced in the CRM record. You can configure CCAI Platform to do one of the following:
Add a call recording or chat transcript link as a comment in the CRM record.
Add the call recording or chat transcript filename as a comment in the CRM record.
Don't add any reference to the call recording or chat transcript in the CRM record.
This is available with the following CRMs:
Custom CRMs
Freshdesk
Kustomer
Microsoft Dynamics
ServiceNow
Salesforce
Zendesk
Configure how a call recording is referenced in the CRM record
To configure how a call recording is referenced in the CRM record, do the following:
In the CCAI Platform portal, click Settings > Operation Management. If you don't see the Settings menu, click Menu.
Go to CRM Comments Creation Details.
For Post call recording link to CRM record, select one of the following:
Add the call recording link as a comment
Add only the filename for the call recording as a comment
Do not add any reference to the call recording
Click Save General.
Configure how a chat transcript is referenced in the CRM record
To configure how a chat transcript is referenced in the CRM record, do the following:
In the CCAI Platform portal, click Settings > Operation Management. If you don't see the Settings menu, click Menu.
Go to CRM Comments Creation Details.
For Post chat transcript link to CRM record, select one of the following:
Add the chat transcript link as a comment
Add only the filename for the chat transcript as a comment
Do not add any reference to the chat transcript
Click Save General.
Configure how a Screen Share recording is referenced in the CRM record
To configure how a Screen Share transcript is referenced in the CRM record, do the following:
In the CCAI Platform portal, click Settings > Operation Management. If you don't see the Settings menu, click Menu.
Go to CRM Comments Creation Details.
For Post Screen Share link to CRM record, select one of the following:
Add the chat transcript link as a comment
Add only the filename for the chat transcript as a comment
Do not add any reference to the chat transcript
Click Save General.
Agent experience
During a call or chat session, photos and videos uploaded by the end-user using Smart Actions are displayed in the agent adapter. When the session is over, agents see a link in the CRM pointing to the session recording or transcript stored on the external server.
Configure chat transcripts
You can configure CCAI Platform to add a chat transcript to a CRM record after a web SDK or mobile SDK chat session ends. After you do this, end-users using the web SDK can download chat transcripts during or after a chat session. Uploading chat transcripts also lets you enable the display of previous chat interactions for agents and end-users. Chat sessions aren't generated for SMS chat sessions, so end-users using SMS chat can't download chat transcripts.
A chat transcript shows a participant, a message, and a timestamp for each interaction in a chat session. For more information, see Chat transcript structure.
Configure how chat transcripts are added to CRM records
You can configure CCAI Platform to post chat transcripts to CRM records as comments or attachments. This is a requirement for the following capabilities:
End-users downloading chat transcripts.
Agents and end-users viewing previous chat interactions during a chat session.
To configure how chat transcripts are added to your CRM, follow these steps:
In the CCAI Platform portal, click Settings > Chat. If you don't see the Settings menu, click Menu.
Go to the Chat Transcript pane.
Select or clear the following checkboxes. You must select at least one of these checkboxes to enable downloading chat transcripts and viewing previous chat interactions.
Post the chat transcript as a comment in the record
Add the chat transcript as an attachment to the record
Click Save Chat Transcript.
Enable the display of previous chat interactions
You can enable the display of previous chat interactions for agents, end-users, or both.
To enable the display of previous chat interactions, follow these steps:
In the CCAI Platform portal, click Settings > Chat. If you don't see the Settings menu, click Menu.
Go to the Chat Transcript pane.
Be sure that at least one of the following checkboxes is selected. For more information, see Configure how chat transcripts are added to CRM records.
Post the chat transcript as a comment in the record
Add the chat transcript as an attachment to the record
For Display previous chat interactions, click the toggle to the on position.
To specify which users to display previous chat interactions to, select one of the following:
To agent and consumer
To agent only
To consumer only
Click Save Chat Transcript.
Location in CRM or server
Transcripts are uploaded to the CRM or server once the chat has been completed. Transcripts can be found where the chat ID and other chat information are stored:
Zendesk: added in plain text and attached as a file to a private comment in the ticket
Salesforce: added as a file attachment as a comment or to the CCAI Platform Session Object
Kustomer: added as both a file attachment and as a comment
MS Dynamics: added as an attachment under timeline for the ticket
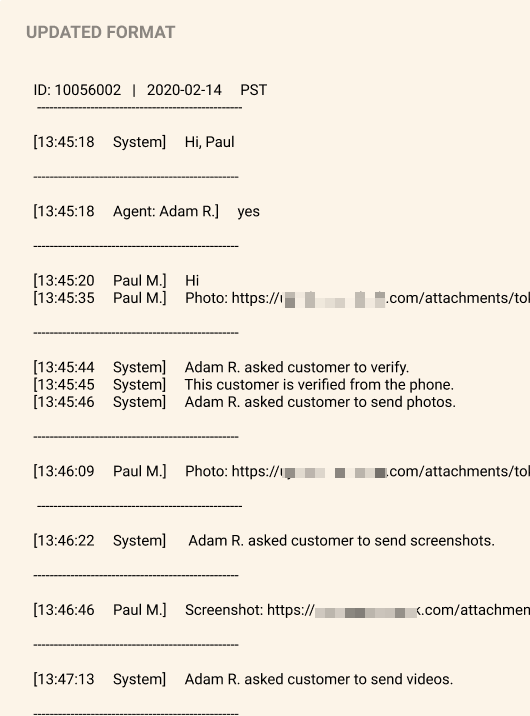
Chat transcript details
The following sections outline the handling of session transcripts with CRM.
Timestamp formatting
The timestamps in the chat transcripts default to the timezone as set in Settings > Support Center Details.
The timestamps are formatted in HH:MM:SS format.
Participant identification
The participants' first name and last name initial show, if available in the system.
The chat support agent name includes Agent before the agent's first name.
The full name of the agent won't be displayed anywhere in the system generated sections.
The full name of the end-user won't be displayed anywhere in the system generated sections.
Transcript styling
Header:
The transcript header contains the following:
The chat ID of the specific chat with a prefix "ID:".
The start date of the chat in the format of YYYY-MM-DD and timezone.
The dotted line made of 50 hyphens (-) is placed in the line right below the header.
Body:
The individual messages sent by the participants and the system.
Messages are chronologically ordered following the order of message exchange and include the following:
The exact timestamp of the message in HH:MM:SS format.
The name of the participant who sent the message.
The message sent by the participant.
No text case, styling, or format changes are made to the actual chat message sent by the participant.
All back-to-back messages from a single participant or system are stacked together to represent a message block.
Chat transcript structure
The following example shows the structure of a chat transcript: