Salesforce: Sales Cloud Object Mapping
This feature provides specialized integration functionality between Contact Center AI Platform (CCAI Platform) and Salesforce's Sales Cloud. It provides flexible account lookup and object mapping, supporting both typical and customized sales process flows in Sales Cloud.
CCAI Platform Portal can be used to configure account lookups in Sales Cloud and map specific fields of matching results in the agent adapter UI.
Key features include the ability to:
Lookup Objects: Lead and Contacts:-- define two separate lookup objects, as the primary and an optional secondary lookup object
Lookup Field: select the phone number lookup field for each lookup object
Display Field: select the field displayed to agents when multiple matching lookup object records need to be shown in the call adapter
Second Display Field: select an optional second field displayed to agents to help distinguish between multiple matching lookup object records
Opportunities: assign sessions to Opportunities (associated with a specific record)
Flexible Outbound Session Assignment: define whether agents should have the option to:
Assign a session to an open opportunity
Select from multiple open opportunities
Don't assign a session to any opportunity
Feature details
Sales calls are typically handled by teams of sales and business development agents. These agents specialize in handling sales queries raised by their potential customers relating to their product or service. While the majority of the customer support calls are inbound, sales calls are mostly outbound. Business development or sales agents initiate outbound calls to reach out to potential customers (Leads) with product or services offerings and to existing customers to renew contracts or follow-up on identified new Opportunities.
Customers using Sales Cloud to manage their sales and business development process may use multiple Sales Cloud objects to maintain their potential and current customer records. The agents will be required to locate the potential or existing customer record when initiating an outbound sales call.
Support for sales-focused outbound calling scenarios
Customers using the current implementation of the CCAI Platform call adapter can access existing records or create new records to objects in the Service Cloud. However, sales-focused outbound calling efforts typically involve additional scenarios that are appropriately handled in Sales Cloud and require additional flexibility from the agent call adapter and contact center platform.
Supported outbound sales call scenarios
Resolved object lookup limitations -- supported with the ability to define a second lookup object
Resolved limited object reference scenarios -- with the ability to display a second identification field to the agent, enabling them to identify the correct record
CCAI Platform provides flexible account lookup and object mapping to support typical and customized sales process flows as well as the above scenarios in Sales Cloud.
CCAI Platform configuration
Primary Sales Cloud configuration options can be found on the Settings > Developer Settings page in the CRM section with "Salesforce" selected in CCAI Platform portal.
Sign in to the CCAI Platform portal, go to Settings > Developer Settings.
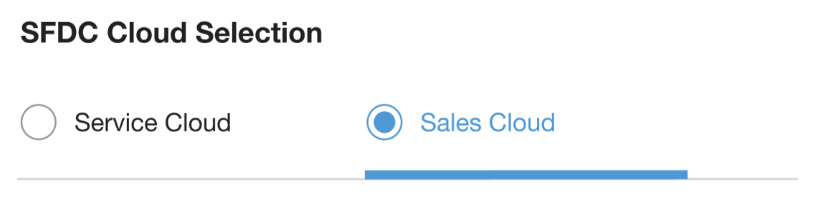
In the SFDC Cloud Selection section, use the option to select Sales Cloud. All Sales Cloud specific account lookup options will be displayed when Sales Cloud is selected.
The Sales Cloud tab contains:
Primary lookup object
Secondary lookup object
Opportunities
Default user
Mark the checkbox to use a Default User so that an administrator user will be the default author for all Sales Cloud tickets created through CCAI Platform. For more information, see CRM default administrator.
Primary Lookup Object
User interface - admin configurations:
Configuration fields
Enables administrators to set up the primary lookup object and field that will be used to look up the phone number of outbound sales calls.
Object: Leads, Contacts
Record type (optional)
Phone number lookup field: field containing the phone number identifying different records in your selected lookup object. CCAI Platform will look for a phone number match between the number from the incoming call and this field.
Custom field for SDKs: option to use a custom lookup field for sessions originating from one the CCAI Platform SDKs (mobile or web).
Agent adapter display fields
Matched account record display field: select the field (from the lookup object) that will be used when the matched account record(s) are displayed to the agent in the agent call adapter.
Second display field: option to display the second field in the agent call adapter.
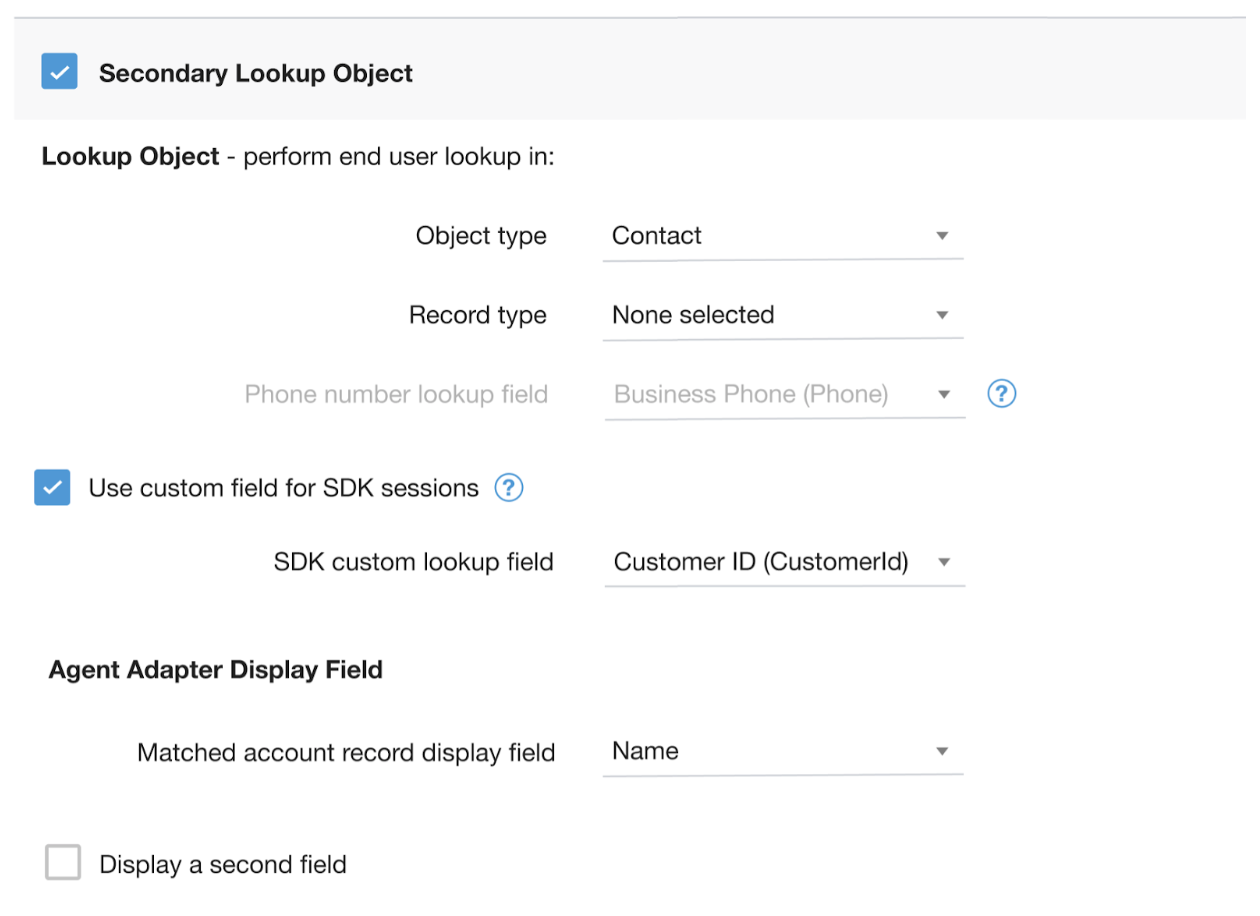
Secondary Account Lookup Object section
This subsection provides admins with the option to define a secondary lookup object and field. When enabled, these will be used to look up the phone number of outbound sales calls if the primary lookup did not return any results.
The typical use case is to select Leads as the primary lookup object and Contacts as the second, or vice versa.
The configuration fields for this second lookup object mirror those of the primary lookup object. Below is a sample UI for the second lookup object with the second display field not enabled:
Opportunities configuration
Provides configuration for how CCAI Platform will manage interactions with Sales Cloud Opportunities.

Opportunity close date - set the default time period for closing the opportunities which are created.
Attach CCAI Platform session object directly to an account object instead of an opportunity.
Flexible Outbound Dialing
The CCAI Platform Sales Cloud Integration automatically includes the Flexible Outbound Dialing configuration.
Flexible Outbound Dialing provides flexibility and granularity for managing outbound calls. Admins can configure if agents can create or not create a case, and whether or not agents can dial a number that will not be used for any account lookup or session association. These configurations impact the UI of the Agent Adapter.
Salesforce: Agent status inheritance
The CCAI Platform agent status inheritance feature gives admins an ability to map CRM agent statuses to CCAI Platform agent status to be updated in real-time. By inheriting the CRM's agent status, it allows admins to drive agent statuses from their CRM to CCAI Platform.
Custom mapping allows for flexibility to match each organization's distinct processes and status settings. One example would be for agents handling email in the CRM to be configured to define the agent's status as 'unavailable' in CCAI Platform.
This also allows an agent to determine their status from just one place. When they update the Salesforce Omni-Channel widget, their CCAI Platform status is updated in real-time, providing a single mechanism for manually updated and system updated statues to be set.
Installation and configuration requirements
Salesforce and CCAI Platform access required
CCAI Platform: Ask your internal CCAI Platform contact or administrator for a CCAI Platform user account with both adminstrator and agent roles assigned
The Admin role gives you access to developer settings
The Agent role gives you access to the agent adapter to utilize and test the agent status capability.
Salesforce account with administrative access
Assigned Omni-channel access
Your profile will need to be assigned to the CCAI Platform Call Center that has been set up in order to see the CCAI Platform agent adapter in Salesforce
Your organization's CCAI Platform environment URL and tenant or environment name will be used throughout the process and can be found in your CCAI Platform administrator portal link. You will have access when your CCAI Platform account is set up. The URL is
https://[my-instance-name].ccaiplatform.com.
Feature details
1 to 1 Salesforce agent account to CCAI Platform agent account mapping is required
This feature allows for 1-way sync from the CRM -> CCAI Platform
If the status is changed in CCAI Platform, the CRM status will not be changed
Status change behavior
CCAI Platform statuses protected from real-time CRM changes
- If an agent is In-call, In-chat, or Wrap-up, the status inherited from the CRM will be applied once the call, chat, or wrap-up has ended.
Once enabled and configured, there are 3 ways an agent status can be updated
Agent updates status in the Adapter: existing agent status behavior
Agent selects next status during a live session: existing agent feature, described in Allow agents to set their next status while on a call or chat.
CRM sends agent status update
When Agent is not Offline in CCAI Platform, CRM status changes will be made in CCAI Platform based on status mapping
When Agent is in Offline in CCAI Platform, CRM status changes will be ignored
When the CRM status changes while on an active session/call
CCAI Platform treats this status change the same as the agent Next Status feature and when the session is complete, after Wrap-up, the next status is governed by the new CRM status
- If the agent has defined their Next Status and a CRM status change request is also received, the agent's next status will be set to the latest received status
Salesforce Configuration
Configure omni-channel
If your org has already configured Omni-Channel, skip this section.
This supplemental information should be used in conjunction with Salesforce documentation. We will guide you to configure the minimal Omni-Channel settings to be able to use the CCAI Platform Agent Status Inheritance App.
To enable omni-channel settings, follow these steps:
Sign in to Salesforce as an Administrator.
From Setup enter omni in the Quick Find box, then select Omni-Channel Settings.
Select Enable Omni-Channel.
Click Save.
Add presence statuses
The Presence statuses should match those used in the CCAI Platform Portal. If Statuses are already set up in the Admin Portal, make sure the statuses are all entered here as well.
From Setup, enter Presence Statuses in the Quick Find box, then select Presence Statuses under Omni-Channel.
Click New.
In the next screen, you can add a status. For example type "Available For Generico" for Status Name and this will fill automatically "Available_For_Generico" for Developer Name.
Repeat Step 3 according to your needs. For example you can create "Available For Email", "Busy", "Meal" etc for the Presence Statuses.
Add omni-channel
The steps required to implement omni-channel depend on the Salesforce version.
Salesforce Classic
If you are using Lightning only, skip this step.
From Setup, enter App in the Quick Find box, then select Apps under Create.
Click the Edit button left of Sample Console (You may have a different name).
In the Edit screen, find the Choose Console Components section.
Select Omni-Channel in the Available Items dropdown.
Click Add then Omni-Channel will appear in the Selected Items dropdown.
Click Save at the bottom of the screen.
Salesforce Lightning
If you are using Classic only, skip this step.
If you are currently in Classic, click Switch to Lightning Experience.
Click the gear icon, then click Setup in the upper right area of the Lightning screen.
From Setup, enter App in the Quick Find box, then select App Manager under Apps.
Click the downward arrow icon in the upper-right of Service Console (You may have a different name).
Click Edit.
Click Utility Items in the Lightning App Builder screen.
Click Add Utility Item and select Omni-Channel.
Click Save.
Click Back in the upper right corner of the screen.
Grant users access to service presence statuses
In order for a Service Presence Status to be available to a User, access for each status needs to be granted to each applicable Profile/Permission Set. If a Profile/Permission set does not have access to a certain Service Presence Status, then that status will not be available/visible in the Omni-Channel widget for the assigned users.
Please reference Give Users Access to Presence Statuses with Profiles and Give Users Access to Presence Statuses with Permission Sets from Salesforce. The below steps are the simplified steps for giving access with Profiles.
From Setup, enter Users in the Quick Find box, then select Profiles under Manage Users.
Click a Profile name in the main section that you want grant access to Service Presence Status.
Find Enabled Service Presence Status Access and click Edit.
In the edit screen, select items in the Available Service Presence Statuses dropdown and click Add.
Click Save.
Repeat the steps 3 through 6 for each profile that you want to grant access to Service Presence Status.
Verify Omni-Channel
Salesforce Classic Console
If you are using Lightning only, skip this step.
If you are in Setup, click Back to Sample Console.
Click Omni-Channel.
Click the Offline link in the Omni-Channel widget.
Select one of Service Presence Status and see if you can change the status.
Salesforce Lightning
If you are using Classic only, skip this step.
In the bottom-left area of the Console screen, click the Omni-Channel button.
Click Offline link in the Omni-Channel widget.
Select one of Service Presence Status and see if you can change the status.
Omni-Channel should now be enabled in your Salesforce org, allowing you to use Omni-Channel in your console.
Remote site settings
Configure the remote site settings for the CCAI Platform Agent Status Inheritance App to be able to send data from Salesforce to CCAI Platform.
From Setup, enter remote in the Quick Find box, then select Remote Site Settings under Security Controls.
Click New Remote Site.
In the next screen input Remote Site Name and Remote Site URL. Ex. Use CCAI Platform for Remote Site Name. Input your CCAI Platform domain for Remote Site URL.
CCAI Platform configuration
Establish admin tokens
Configure one or more Salesforce Admin Tokens in the CCAI Platform administrator portal so that the administrator portal can fetch your Salesforce Omni-Channel Service Presence Statuses. For more information, see CRM default administrator.
In the CCAI Platform portal, go to Settings > Developer Settings
Salesforce Admin Token.
Click Link New User.
In the oAuth popup, sign in as your Salesforce administrator and allow the oAuth request
You will see your administrator user is linked in the Connected Admin Users section.
Enable Status Mapping
From the Admin Portal, go to Settings > Developer Settings > Salesforce Omnichannel Agent Status Inheritance.
Toggle the feature setting On.
Manage Status Mapping
Salesforce Statuses will be fetched from your Salesforce org automatically. If you don't see SFDC statuses please check the Establish Admin Token/s step and Configure Omni-Channel. Any Salesforce statuses that are not mapped will result in an error
Sign in to the CCAI Platform portal, go to Settings > Developer Settings
Salesforce Omnichannel Agent Status Inheritance.
Click Manage in Status Mapping.
In the popup, select a preferred CCAI Platform Status for each Salesforce Status.
Gather Company Key and Secret
Sign in to the CCAI Platform portal, go to Settings > Developer Settings
Company Key & Secret Code.
Gather the Company Key and Company Secret Code.
Identify your connected app name
From Salesforce, go to Setup, enter app in the Quick Find box, then select Connected Apps under Manage Apps.
Identify your CCAI Platform Connected App name.
Install the CCAI Platform Agent Status Inheritance App
Paste the installation link in the browser's url bar: https://login.salesforce.com/packaging/installPackage.apexp?p0=04t6g000003Rzxv
Select Install for all users.
After the installation is complete click Done.
For longer installations, you will get a notification email after the installation is complete.
Configure the app
From Setup, enter package in the Quick Find box, then select Installed Packages.
Click Configure left of the UJET_App_Status.
In the new window, click Add New Configuration.
In the configuration screen, select Organization as Setup Owner.
Fill the values for Company Key, Company Secret, Tenant name and Connected App name you have copied in the previous steps.
Check Enable Agent Status Inheritance.
Fill the value in CCAI Platform URL you have copied in the step 6 Copy settings value from CCAI Platform Admin Portal.
Click Save CCAI Platform Configuration.
Close the window.
Verify the Agent Status Inheritance App is Working
Change Omni-Channel status in your console.
Confirm CCAI Platform status changes according to the mapping setting in the Admin Portal.
Salesforce: CCAI Platform session object installation & configuration
The CCAI Platform session object provides a convenient, optimized, custom object, in which all session data will be stored. All session data, including associated files like voice recordings, chat transcripts, and media files uploaded by the end-user, are included within the related CCAI Platform Session object. This object is then related to the appropriate case or directly to a configured Account object.
Do the following actions and steps in order.
Install the CCAI Platform Salesforce package
Install version 1.17 or later of the CCAI Platform Salesforce package.
For more information, see the Salesforce installation guide.
Enable the CCAI Platform Session
To enable the CCAI Platform session, follow these steps:
In the CCAI Platform portal, click Settings > Operation Management. If you don't see the Settings menu, click Menu.
Go to the CRM Record Creation Details pane.
For Session Data, in the Map data to list, select UJET session.
Click Save General.
For more information, see Salesforce - CCAI Platform session mapping to case or account objects (person account, contact, lead).
Salesforce configuration
Steps to configure in Salesforce:
Step 1: Configure and enable Default Admin user
Define a CRM admin user to represent the default user for all CRM actions and events where a specific agent has not been identified or assigned. If this feature is not used, CCAI Platform will randomly assign the ticket or case to any users.
For more information, see CRM default administrator.
Step 2: Update Object Settings
From Salesforce Setup, navigate to Permission Sets.
Locate and select the CCAI Platform Agent Clone permission set (this may have a different name in your settings).
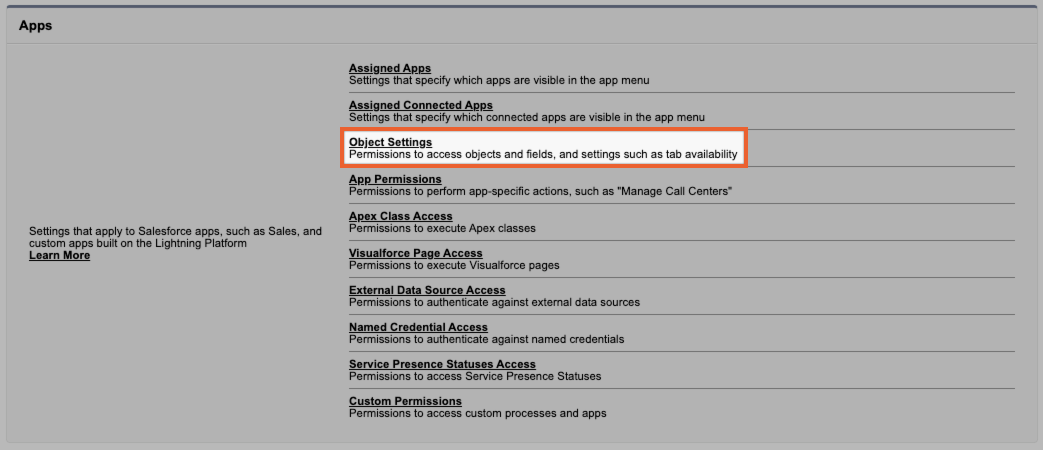
Select Object Settings.
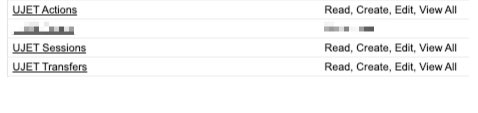
Locate the following Permissions:
- CCAI Platform Actions
- CCAI Platform Sessions
- CCAI Platform Transfers
Click on the CCAI Platform Actions object.
If you are using the Default Admin token from Step 1 above, agents do not need create, edit, or view all permissions. If you are not using the Default Admin user, assign all permission for proper access and object creation.
If using the Default Admin user, click the CCAI Platform Actions object and enable Read permission.
If not using the Default Admin user, click the CCAI Platform Actions object and enableRead,Create,Edit, andView Allaccess, then clickSave.
Repeat this step for CCAI Platform Sessions and CCAI Platform Transfers.
Step 3: Update Case or Account Object Page Layout
To see the CCAI Platform Session object, the Case or Account object Page Layout needs to be updated.
Follow the same steps for the Account object you are using if not using Case.
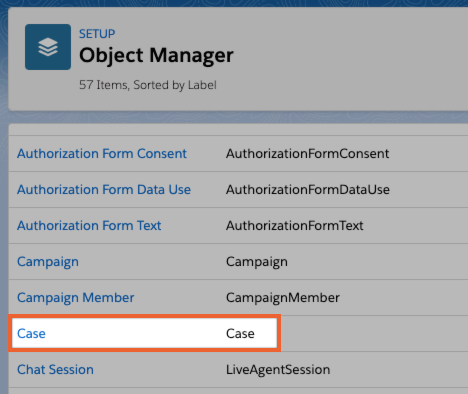
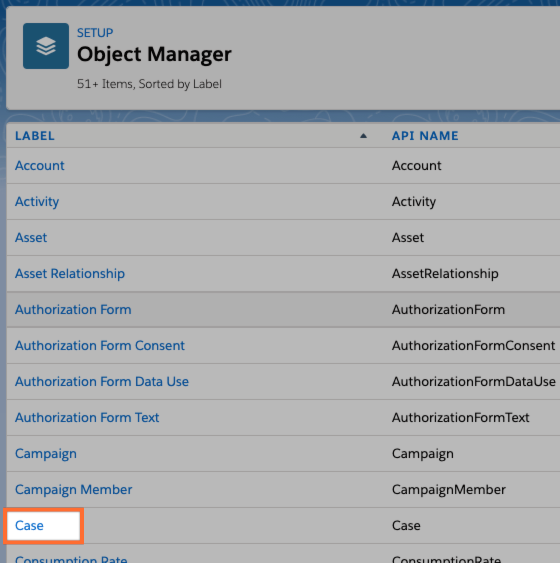
From Salesforce Setup, navigate to Object Manager > Case OR your configured Account object.
Click Case/Account object Page Layouts on the left.
Select the Page layout used by CCAI Platform users.
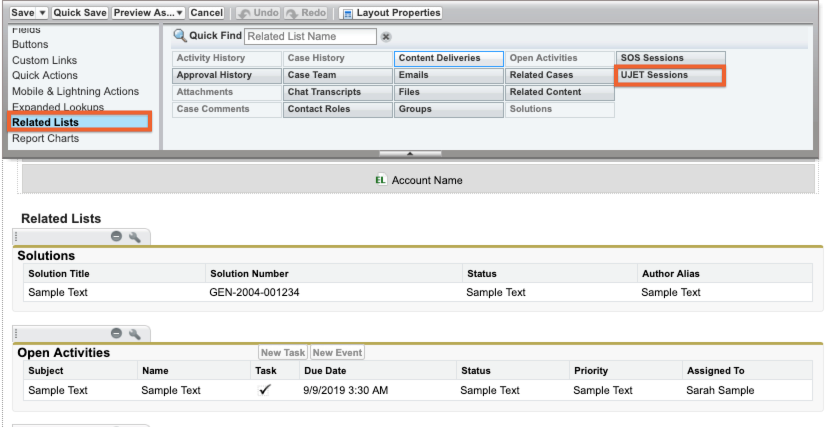
Locate CCAI Platform Sessions under Related Lists and drag the CCAI Platform Session object to where you want it to display in the Layout page.
Click Save at the top of the page.
Step 4: Optional additional step required for Lightning configuration
If using Lightning, follow these steps to create a new Lightning Record Page or update a current one.
From Salesforce Setup, go to Setup > Object Manager > Case > Lightning Record Page.
Click New.
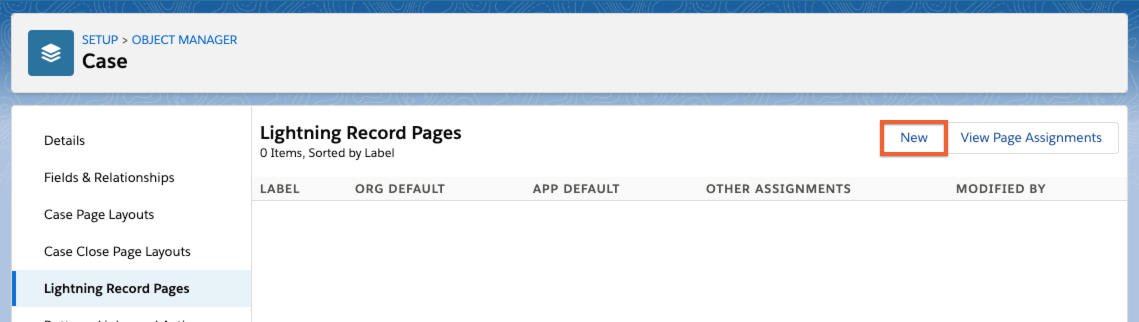
Click Record Page, then Next.
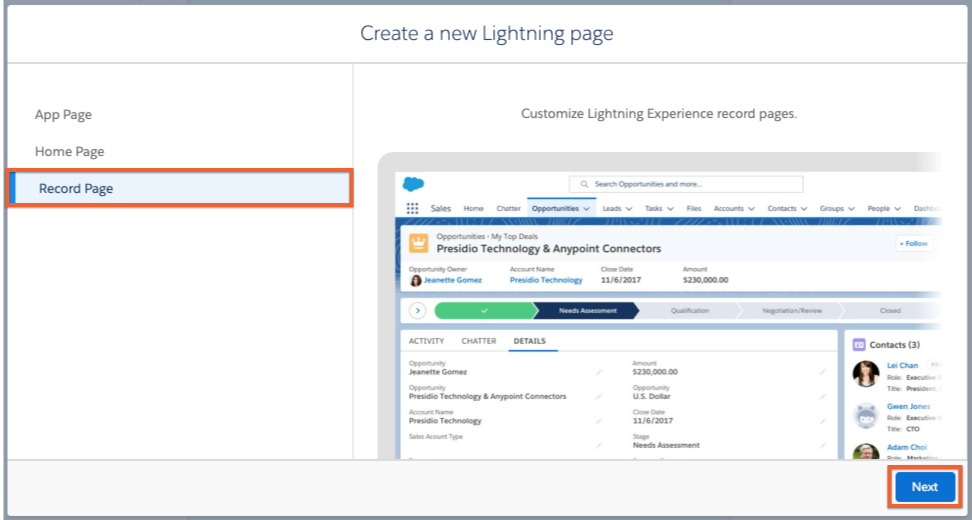
Create a label, and select Case as the object, then click Next.
Choose a page template and click Finish.
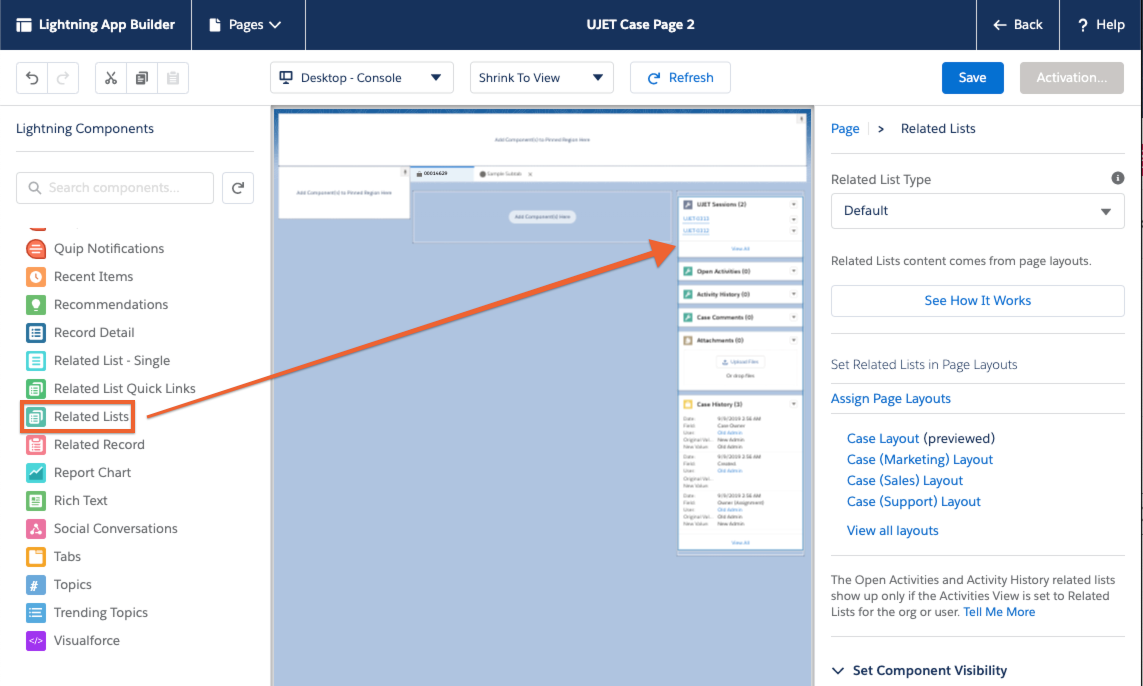
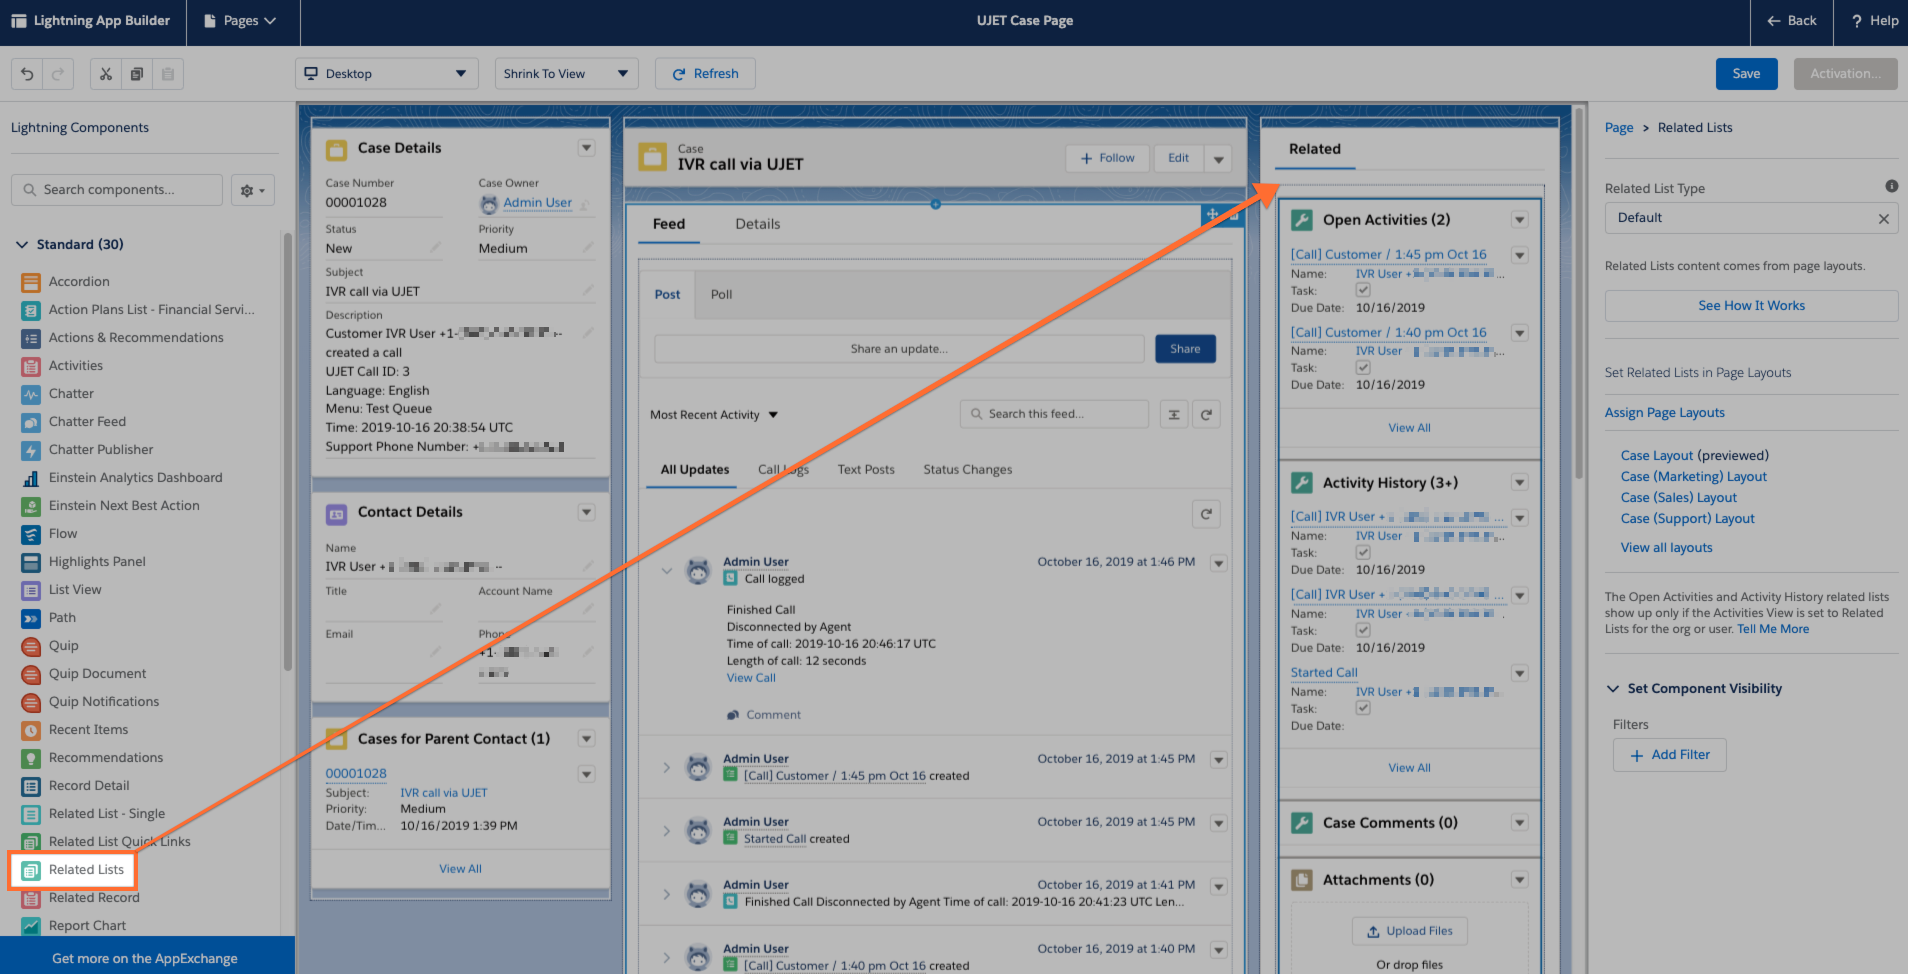
Include the component with the CCAI Platform Session object. In the following scenario, it was added to the "Related List" component.
Click Save.
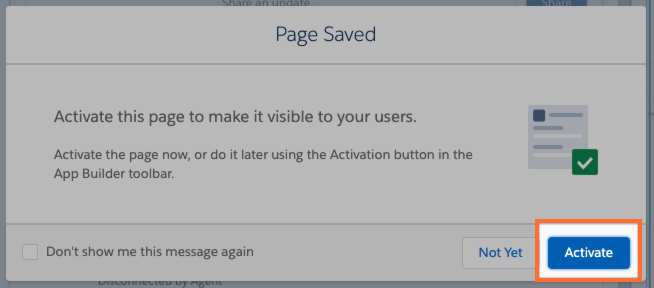
Click Activate.
Follow the Salesforce setup flow to assign the page to the application you are using in Lightning.
CCAI Platform Portal configuration
In the CCAI Platform Portal, go to Settings > Operation Management.
Scroll to Configure ticket creation details and select the desired behaviors.
If using Cases, go to Ticket title and configure the title of the Case as they are created.
Salesforce: Custom Survey
Customized surveys in Salesforce can be created and be made available from any IVR queue. This feature allows Admins to design surveys for multiple purposes like defining a CSAT question with a custom scale or general survey questions.
Management and configuration options
The Salesforce Custom Survey feature can be enabled for individual IVR queues.
Users must have Admin permissions to enable/disable the feature for the account
Survey questions can be mapped to Salesforce custom objects and fields. Responses, whether complete or incomplete, are automatically posted to Salesforce so that all survey data is gathered and managed in a single location for reporting purposes
Survey questions can be customized to the end user's selected language so callers will have an experience that fits your company's brand and communication expectations
Custom surveys support questions can use a number input like, "On a scale of one to seven, how was your service today?" Questions can also include enumerated values like, "Did we answer your question today? Press one for yes and two for no."
Caller experience
After the call has been completed and once the Agent leaves the call, the consumer will automatically be prompted to take the Custom Survey.
The Agent may want to mention that the Custom Survey will play as soon as they leave the call to help increase awareness and participation.
The Custom Survey questions are read out to the caller who is prompted to press various dial pad numbers to rate their experience and answer the Custom Survey question(s) as set below.
Admin Config
Salesforce configuration - CSAT Custom Object setup steps
Go to Setup > Objects and Fields > Object Manager > click the Create button > and select Custom Object.
Set up the Custom Object Information with the following required fields and click Save.
Label: CSAT
Plural Label: CSATs
Object Name: CSAT
Record Name: CSAT Name
Data Type: Auto Number
Display Format: CSAT-{000000}
Starting Number: 1
Optional Features:
Allow Reports
Track Field History
Search Status
- Allow Search

Salesforce Custom Survey Field creation
- Set up the Case lookup relationship.
Select Setup > Object Manager > CSAT > Fields & Relationships > click the New button

Select Lookup Relationship > then click the Next button.
Set the Related to dropdown list to Case and click the Next button
Field Label = Case
Field Name = Case
Child Relationship Name = This will auto-populate with the CSAT custom object plural name.
Use default selections for the rest of the setup steps by clicking Next three times, then the Save button
- Set up your Custom Survey question fields.
There are three Data Types that can be used.
CCAI Platform Question Types are matched to the Salesforce Data Types:
Numeric Scale = Number
Enumerated = Text
Free form = URL
Select Setup > Object Manager > CSAT > Fields & Relationships > click the New button
Select your Data Type and click the Next button
Depending on the CCAI Platform Question Type will determine which Salesforce Data Type you select:
Number:
Field Label will match the CCAI Platform 'Question Name' value
- For example: Rate Your Service
Length = 1 (it is not possible to select 2 digit numbers on a dial pad)
Decimal Places = 0 (it is no possible to select decimal place values on a dial pad)
Field Name = Internal in Salesforce only and should be auto-populated from the Field Label.
- For example: Rate_Your_Service
Click the Next button and use default values for all remaining options and click the Save button
Text:
Field Label will match the CCAI Platform 'Question Name' value
- For example: Was your issue resolved?
Length = How many characters are in the longest answer
- For example 'Press 1 for Yes and Press 2 for No' would mean that your longest answer 'Yes' has 3 characters
Field Name = Internal in Salesforce only and should be auto-populated from the Field Label.
- For example: Was_your_issue_resolved
Click the Next button and use default values for all remaining options and click the Save button
URL:
Field Label will match the CCAI Platform 'Question Name' value
- For example: Do you have any additional comments?
Field Name = Internal in Salesforce only and should be auto-populated from the Field Label.
- For example: Do_you_have_any_additional_comments
Click the Next button and use default values for all remaining options and click the Save button
Repeat Step #2 for each Custom Survey Question you are going to use.
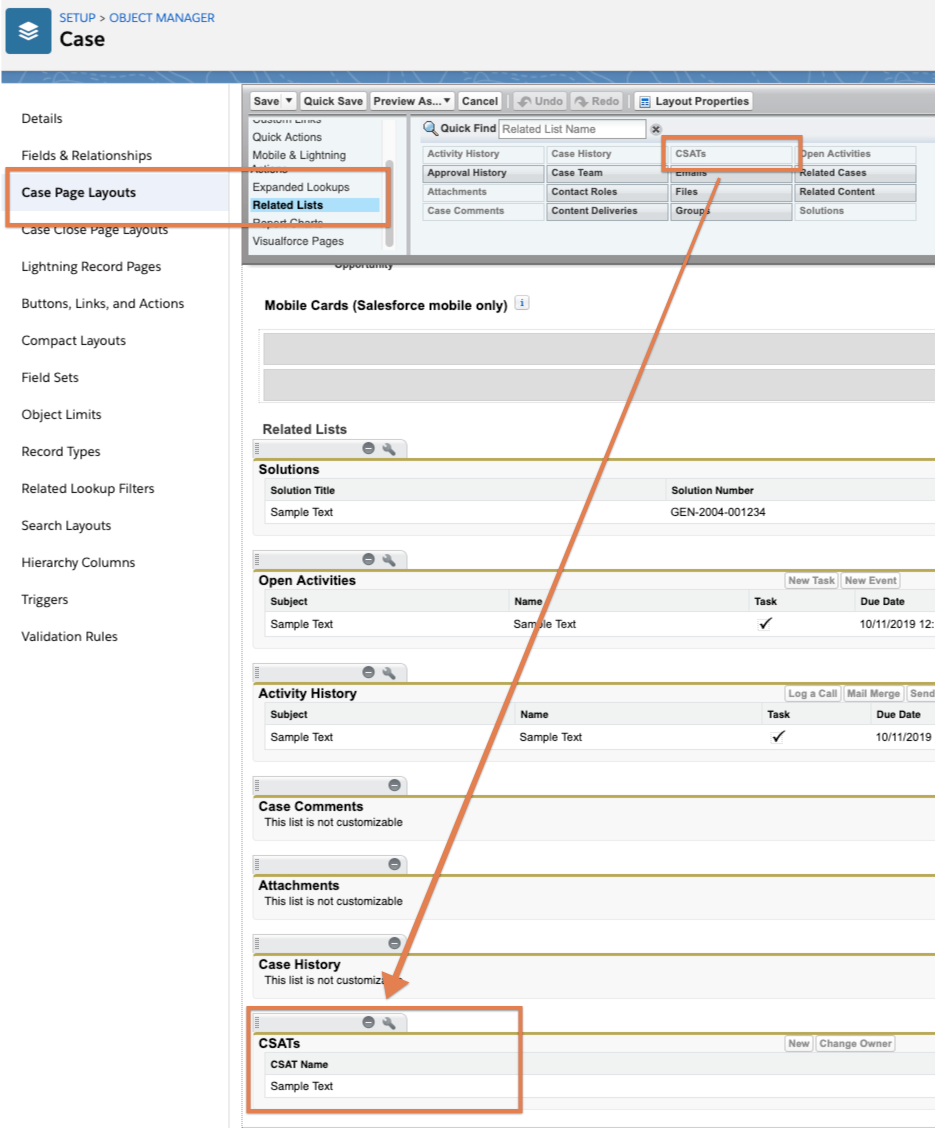
Add CSAT Object to the Case Page Layout
Go to Setup > Object Manager > Case.
Case Page Layouts > select Case Layout.
Scroll to Related Lists > Drag 'CSATs' down to the bottom of the page layout.
Add CSAT Object to Lightning
To see the CSAT objects in Lightning, update the Case Page Layout.
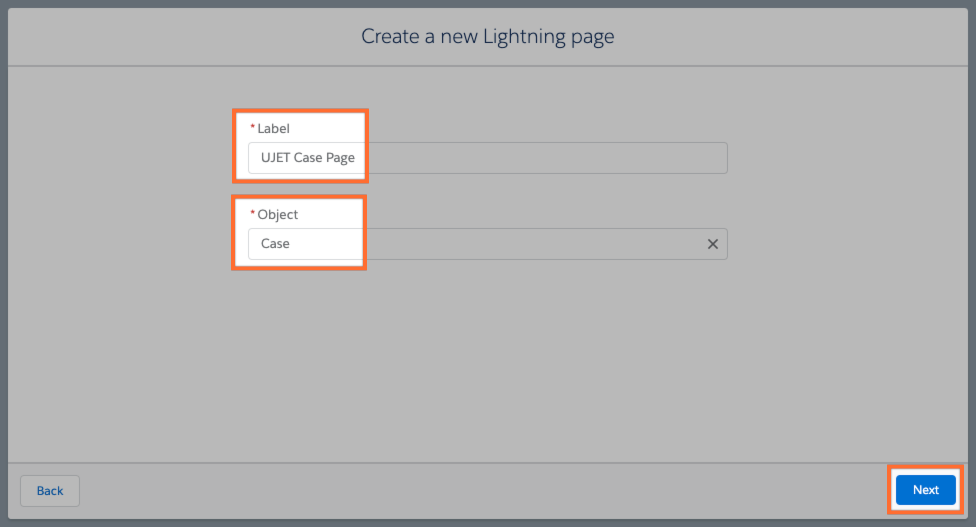
Select Setup > Object Manager > Case > Lightning Record Pages > click the New button.
Select Record Page and click the Next button.
Enter a Label (CCAI Platform Case Page) and select the Case Object, then click Next.
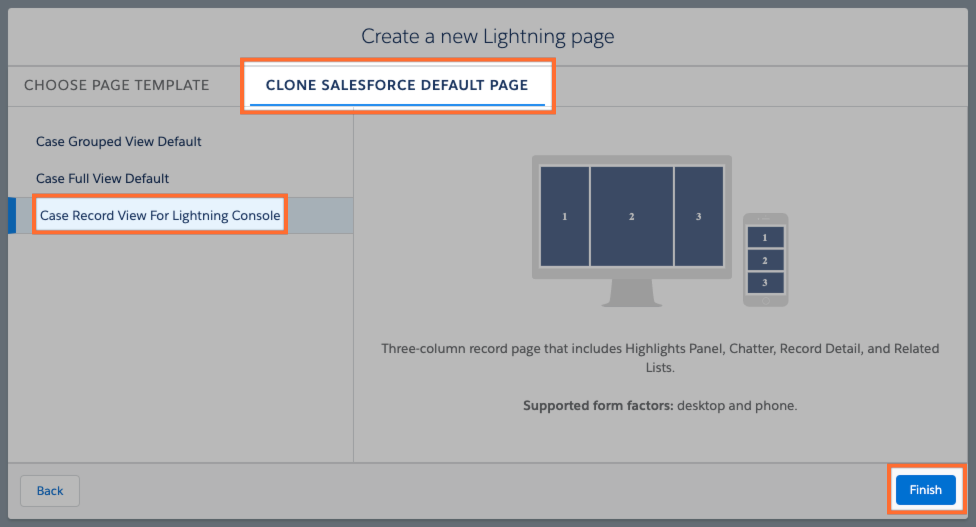
Select Clone Salesforce Default Page > Case Record View For Lightning Console.
Drag and drop the Related Lists component to the Related section.
Click the Save button, then click Activate.
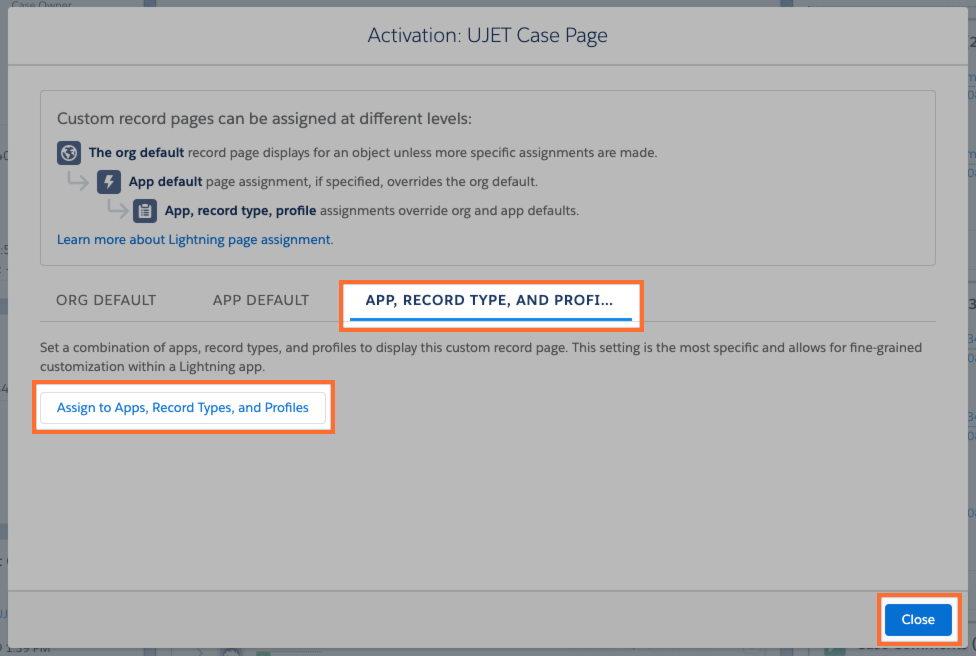
Assign page to App tenant by selecting the App, Record Type, and Profi... tab > then click the Assign to Apps, Record Types, and Profiles button.
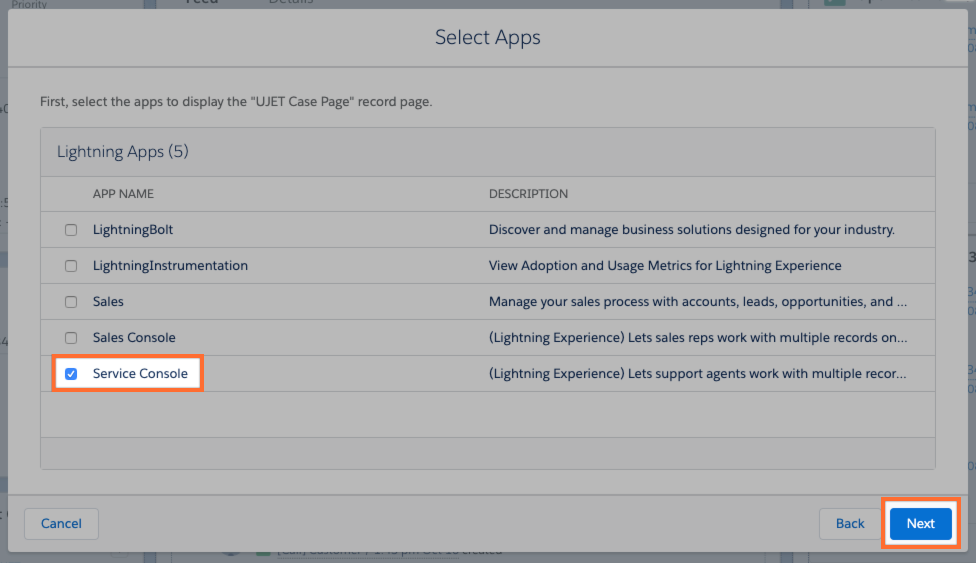
Select the Service Console app and click the Next button.
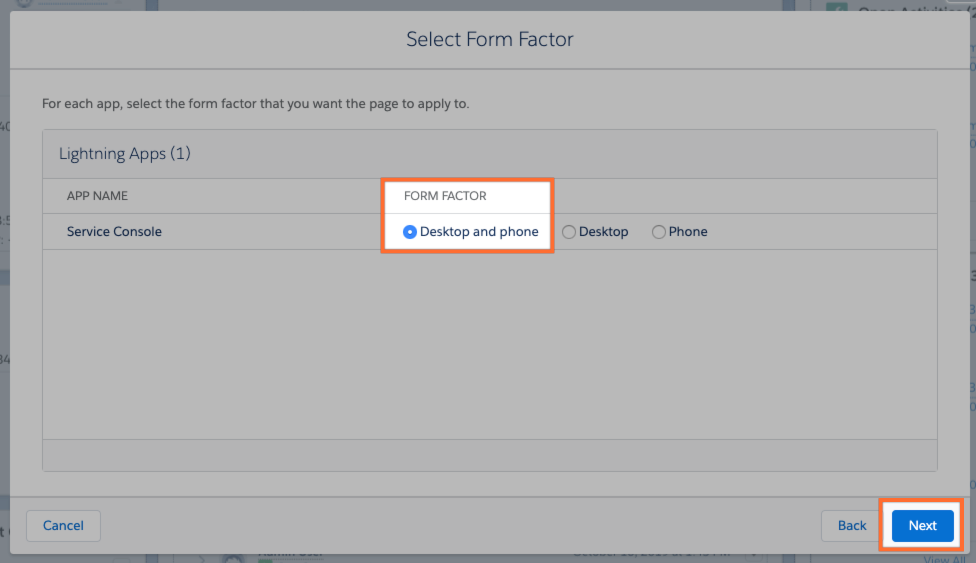
Ensure the default Form Factor is Desktop & Phone, then click Next.
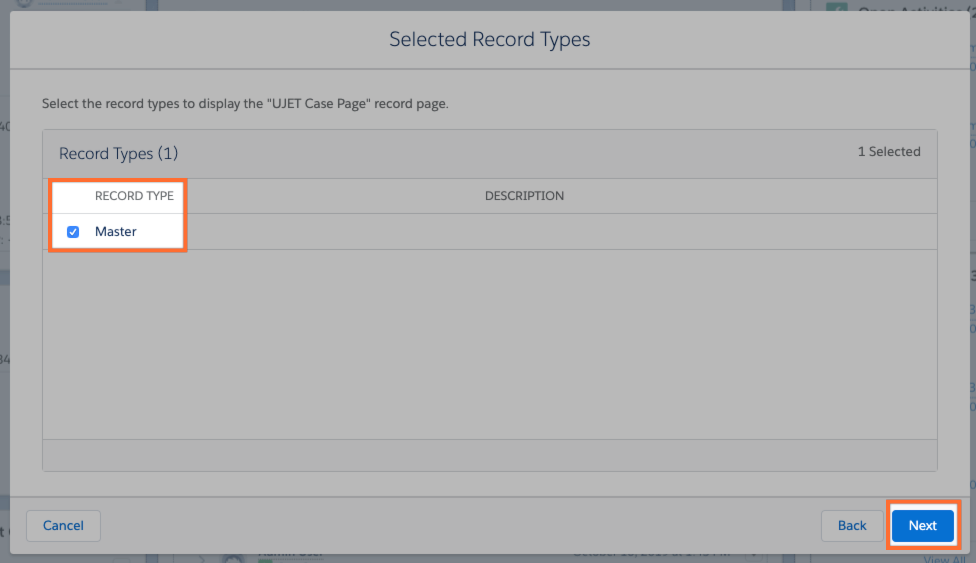
Select the Master Record Type and click Next.
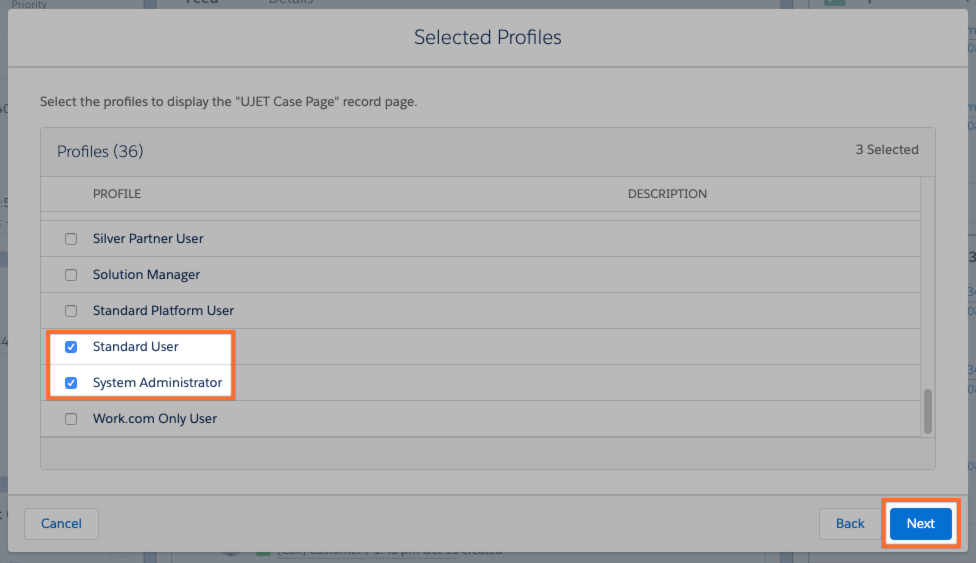
Select the profiles that you want to use the "CCAI Platform Case Page" (example: Custom: Support Profile, Standard User & System Administrator) and click Next.
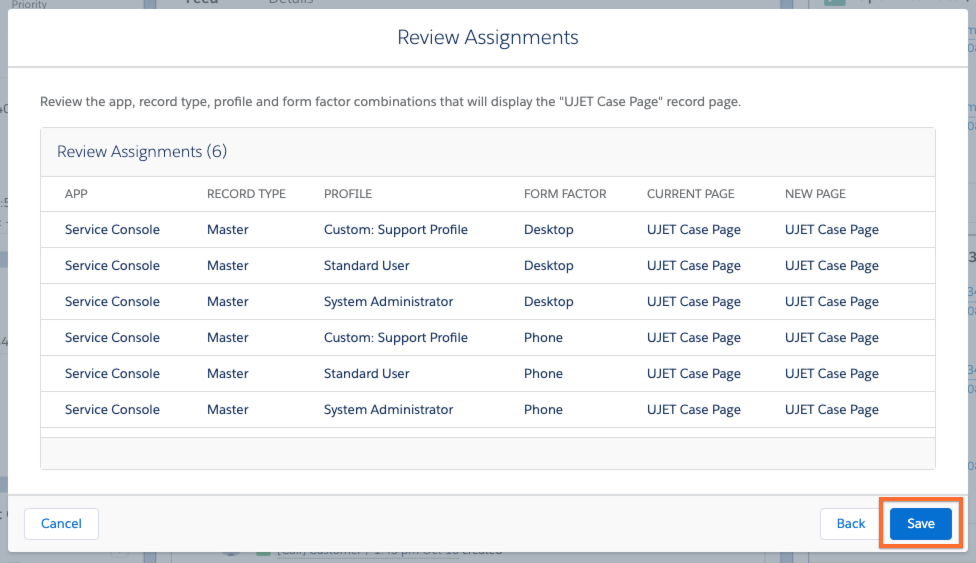
Review your Assignments and click the Save button.
CCAI Platform Portal configuration
Custom Field Mapping
Sign in to the CCAI Platform portal, go to go to Settings > Operation Management.
In the Custom Field Mapping section, click View all.
Click Advanced Field Mapping, thenAdd field mapping.
Configure custom field mappings to link Salesforce to CCAI Platform.
Custom Field Name is the Field Label in Salesforce
Custom Field API is the Field Name in Salesforce
Setting up Survey questions
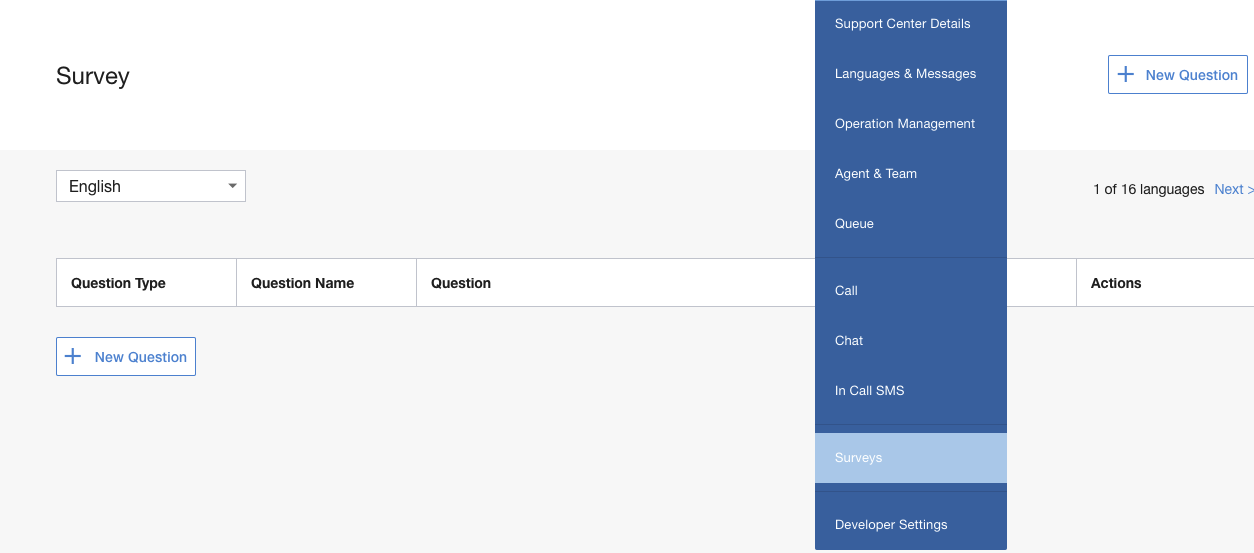
Go to Settings > Surveys.
Click + New Question to add a new question to the Survey.
Select the Salesforce Field Label for CCAI Platform to update when the survey is completed
Activity
Other option (Salesforce Field Name)
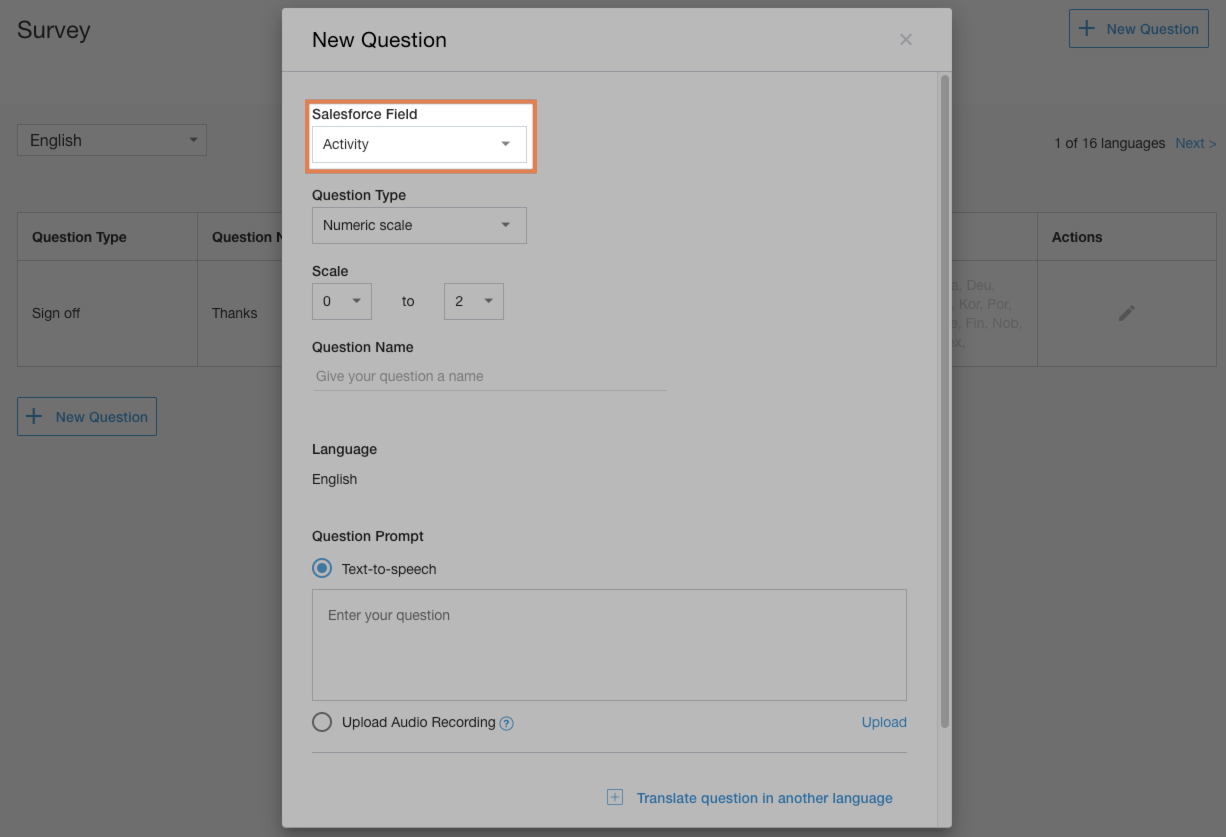
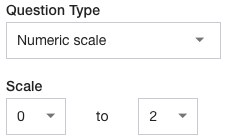
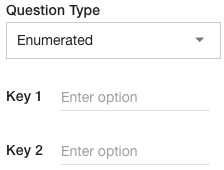
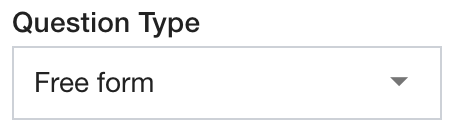
Select the Question Type:
Numeric Scale (Number) - Uses a raw number input. For example "On a scale of 1-5 how was your service today?"
Enumerated (Text) - Uses an enumerated value. For example: "Did we answer your question today? Press 1 for yes, or 2 for no"
Free Form (URL) - Allows the end-user to leave a voice recording. They press pound (#) when they are done.
Question Name: Enter the name to use for this question. This will appear in the Question Name column within CCAI Platform.
Language: Select for this question.
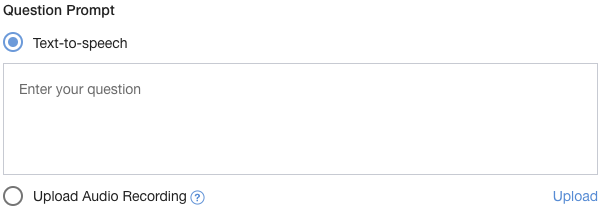
Question Prompt: Add the custom survey question.
TTS (Text-to-speech): Enter the question, and the text will then be read to the caller.
Upload Audio Recording: Upload an audio file for the system to play.
Repeat these steps for each of your questions.
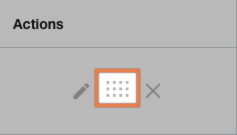
When a new question is created it will be added to the top of the list of questions. Click the icon to drag the question to the order you want it to be presented in.
Configure sign off message
After the survey has been completed, a sign-off message will play/display. This is a good opportunity to thank the caller for their input and time.
The default sign off message appears as "Thank you for your feedback - have a great day! " and can be customized by clicking the Edit icon:


Viewing custom survey results
Custom Survey results are all pushed to the custom Salesforce fields that were selected when setting up the Custom Survey question(s).
The Salesforce Case will be created with a section labeled "CSATs"

Clicking on the CSAT Name link will open the CSAT Survey so you can see the Survey results
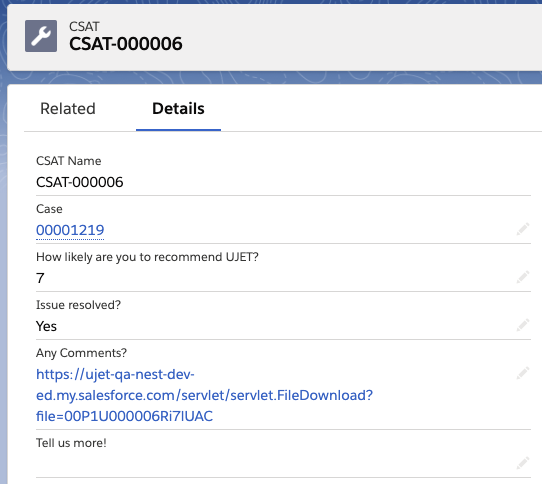
Note - If the End User does not leave a score for a particular question, then that question will remain blank (for example the 'Tell us more!' question has no answer).
CCAI Platform custom session object for Salesforce configuration
The CCAI Platform Custom Session Object provides a convenient, optimized, custom CCAI Platform Session object, in which all session data will be stored in a session object. When enabled, instead of storing session data in the Activities object via multiple entries, all session data, including associated files, for example, voice recordings, chat transcripts, and media files uploaded by the end user are included within the CCAI Platform session object. This object is then attached to the appropriate case (or optionally directly to an Account object.
Session object
The session object is an object for call or chat sessions and can be made available to Salesforce.
Admin configuration
In order for the CCAI Platform session object option to be available in the admin UI, CCAI Platform package 1.16 or higher, needs to be installed in Salesforce.
For more information, see Salesforce installation guide.
Go to Settings > Developer Settings > CRM > Salesforce > Session Data.
In the dropdown, set the option to Map data to CCAI Platform Session.
Salesforce updates
Updates are needed periodically to the installation and configuration of Salesforce.
CCAI Platform Salesforce package upgrade
An upgrade to CCAI Platform's Salesforce package 1.16, or later is required.
V 1.16 - supporting sessions, transfers, actions, files
URL: https://login.salesforce.com/packaging/installPackage.apexp?p0=04t4M000000syZQ&isdtp=p1
V 1.17 - added Email field in Account object (UJET__Email__c)
URL: https://login.salesforce.com/packaging/installPackage.apexp?p0=04t4M000000kkWd&isdtp=p1
Salesforce configuration updates
The following configuration changes are required in Salesforce.
Step 1: Update object settings
From Salesforce Setup, navigate to Object Manager > Permission Sets
Object Sessions.
Locate and select the CCAI Platform Agent permission set (this may have a different name in your settings).
Select Object Settings.
Update the object settings to include for:
-CCAI Platform Actions
-CCAI Platform Sessions
-CCAI Platform Transfers (Note: Make sure to update all three objects.)
Click on the Agent Actions object and enable Read, Create, Edit, and View All access, then click Save.
Repeat this step for CCAI Platform Sessions and CCAI Platform Transfers.
Step 2: Update case page layout
From Salesforce Setup, navigate to Case Page Layout section (this path varies for Classic and Lightning)
Select the Case layouts used by CCAI Platform users.
Locate CCAI Platform Sessions under Related Lists and drag the CCAI Platform Session object to where you want it to display in the Case Layout page.
Click Save at the top of the page.
Step 3: Optional additional step required for Lightning configuration
If using Lightning, follow these steps to create a new Lightning Record Page or update a current one.
From Salesforce Setup, go to Setup > Object Manager > Case > Lightning Record Page.
Click New.
Click Record Page, then Next.
Create a label, and select Case as the object, then click Next.
Choose a page template and click Finish.
Include the component with the CCAI Platform session object. In the following scenario it was added to the Related List component.
Click Save.
Click Activate.
Follow the Salesforce setup flow to assign the page to the application you are using in Lightning.
Salesforce + CCAI Platform rules and behaviors
Salesforce is a powerful CRM platform with endless customizations possible. CCAI Platform has a specific set of interactions that are either performed by default or can be customized from various settings in the Admin Portal.
Case creation
With standard configuration, using cases as the record type:
When a Mobile or Web SDK call/chat comes in, CCAI Platform:
Creates a case in Salesforce.
Assigns the case to the agent.
Includes any information available (i.e. Mobile user info + diagnostic data, Web user info, etc).
When an IVR call is answered by an agent, CCAI Platform:
Creates a case in Salesforce.
Assigns the case to the agent. In Salesforce, there is the concept of an object owner. By default, an object will assign to who creates a new object. For a case object, when an agent picks up a call, CCAI Platform will change the object owner to the agent who picked up the call.
Includes any information available (i.e. Name, menu selection, caller's phone number).
When an outbound call is placed using the agent adapter, CCAI Platform creates a new case in Salesforce.
When a user calls in but abandons the call, CCAI Platform creates a case in Salesforce.
When a caller calls and the call fails due to the agent canceling the call (ag_canceled), a case is created but not assigned to the agent who canceled the call.
When a caller leaves a voicemail, CCAI Platform creates a voicemail case in Salesforce even if there is an Open status case from the same customer.
- The voicemail case can be reused by a new IVR call or outbound call.
Case updates
All case updates will be viewable to the agent on the call/chat and if they were previously on the call and transferred the call/chat.
Appending calls or chats to cases
When there is an inbound call/chat from the same contact, same menu selection, and same channel as the most recent case for that contact is in New, Escalated or Working, CCAI Platform appends the call/chat to the open case as a new task on the case.
- This can be disabled in General Operation Management Settings.
When an outbound call is placed using click-to-call from the details section of the case (not from the sidebar), if the most recent case with that user is in Open, Working, or Escalated status, CCAI Platform will append the outbound call to the existing case for follow-up cases.
When an agent uses the Hang up and call back option from the widget, CCAI Platform appends the call to the open case.
When a call is less than 10 seconds, and the agent uses the Callback button, CCAI Platform appends the call to the open case.
Case owner and assignment
After the default administrator is enabled, the default administrator is used as the owner for the following:
Ticket/case and contact creation when a new chat is initiated before an agent is assigned to the chat
Voicemail tickets/cases before receiving a callback call
Call ticket/cases for abandoned calls (if enabled)
When a call/chat is transferred:
CCAI Platform assigns the case to the agent who the call is transferred to.
A new task is added to the case about the transfer.
Attachments and actions logged
When an inbound/outboundcall ends, CCAI Platform updates the case with the call recording file when call recording is enabled.
When a SmartAction is completed, CCAI Platform updates the case with action results and attachments.
When a SmartAction fails due to an error on the user's side (i.e. fingerprint access not enabled), CCAI Platform updates the case with the error message.
When the company uses custom field mapping (set up from the Admin portal), the data coming in from Mobile/Web SDK will be placed in the designated field in the CRM.
When the end-user rates an IVR or Mobile call/chat, CCAI Platform adds a rating score to the case.
When an agent reads/dismiss/calls back from voicemail, CCAI Platform updates the case.
Contact creation
When an IVR call comes in with a new phone number, CCAI Platform creates a contact in Salesforce.
When a new app user(new identifier) starts the CCAI Platform Mobile SDK, CCAI Platform creates a contact in Salesforce.
When IVR caller's number is blocked, CCAI Platform will create Unknown user contact in Salesforce.
When there are multiple contacts with the same phone number, CCAI Platform will display the contact selection screen in the Agent widget where the agent can choose which contact to use or choose to create a new contact.
Contact update
If the contact was just created from the current call:
For IVR calls, the Contact Owner field is updated to the assigned agent.
For contacts created from Mobile, Callback, and Voicemail calls, the Default Admin token is used if the setup is complete, or if default admin token is not available CCAI Platform will use a random agent token. For more information about the default admin user, see CRM default administrator.
Call and chat routing
User segment DAP: CCAI Platform will search for a contact using phone number (IVR) or email address (Mobile) or custom field (Mobile) from Salesforce to match settings in the queue and directly route call or chat to the queue.
APEX REST DAP: Admin can set up APEX REST endpoint as API Direct Access Point (DAP) endpoint. For more information, see API Direct Access Point - Salesforce REST API.
Outbound click to call
When viewing a Contact in Salesforce you can click on the Contact's Phone Number to start an Outbound Call.
When clicked from within the case details, depending on settings, the call will append if the case is not closed.

Salesforce: CCAI Platform session mapping to case or account objects (person account, contact, lead)
When a call or chat takes place, the associated data needs to be made available in your CRM and CCAI Platform offers flexibility in how the call/chat session data to is attached to Salesforce data objects.
The following configuration options are available:
Account Lookup: ability to perform account lookup against any Salesforce end-user based account object
Session Data Location: map session data to an Account object (Contact, Person Account, Account, Lead, or Task rather than a Case.
No Case: ability to connect the CCAI Platform Custom Session object directly to any Salesforce account object, bypassing the need to create a case
This builds on two related features:
Option to look-up end users in Person Account object (instead of Contact (default))
Option to leverage our CCAI Platform Session Object which stores all assets and data related to a single session in optimized CCAI Platform Session object
Configuration availability requirements
The configuration options for Account Lookup and Session Data are only available if the following conditions are met:
Account Lookup configuration
To configure custom account lookup settings, the following is required:
Logged in Agent - at least one agent needs to be logged into a CCAI Platform adapter in Salesforce. This is required to ensure there is an active token enabling CCAI Platform to access Salesforce data during the admin session.
Session Data configuration
To configure session data mapping options like selecting the CCAI Platform Session object, the following is required:
Logged in Agent - at least one agent needs to be logged into a CCAI Platform adapter in Salesforce. This is required to ensure there is an active token enabling CCAI Platform to access Salesforce data during the admin session.
CCAI Platform Salesforce package version 1.16 (or newer) is installed in your Salesforce instance. For Salesforce Lead object support, package version 1.18 is required, but version 1.20 or higher is recommended.
If the configuration access requirements for one or both of these settings are not met, the CCAI Platform Portal UI to configure Account Lookup and Session Data will be inactive as shown below:

CCAI Platform portal configuration
Account lookup and session data mapping
In the CCAI Platform portal, go to Settings > Developer Settings and select Salesforce.
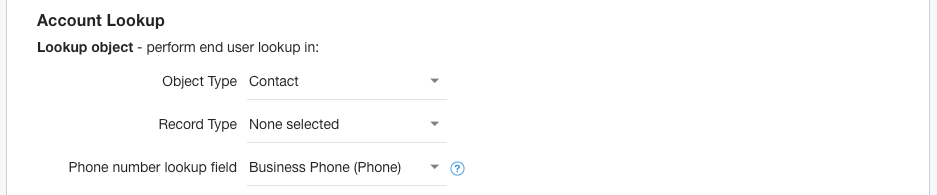
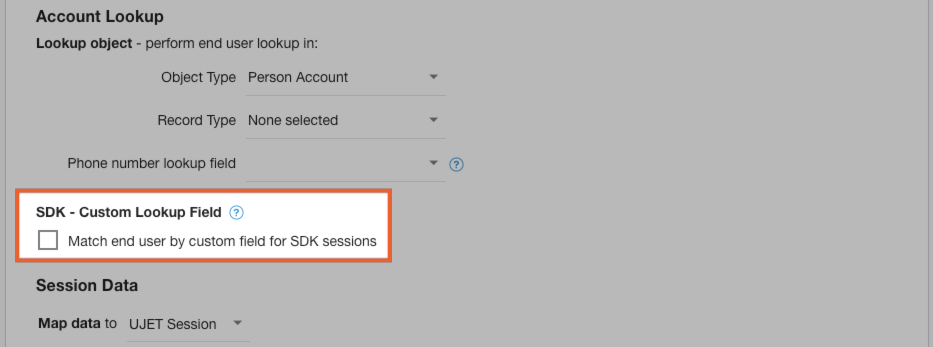
Select an Object Type:
Contact
Person Account
Account
Lead
Select a Record Type. These options vary based on the selected Object Type above.
Select the specific field CCAI Platform should match the end-user phone number against from the Phone number lookup field option. CCAI Platform will fetch all "phone type" fields from the selected account object above.
Mark the SDK Custom Lookup field to activate the option to pass a custom user identifier (UID) to CCAI Platform for end user lookup. Available for mobile and web SDKs.
Select a location for CCAI Platform to organize and attach core session data (call/chat ID, session duration, end-user file uploads, etc.) to Salesforce.

Activity Object - the session data is stored within the Salesforce Activity object. Records will be created with this option.
CCAI Platform Session - all session data is optimally organized and collected in CCAI Platform Session Object.
Offers an option to directly attach the CCAI Platform session object to a Salesforce Account, Contact, or Lead object based on your selection in step 2.
Based on your selection in step 2, if you select Contact or Lead, the CCAI Platform session object is directly attached to a Task object, then the Task is attached to the Contact or Lead object. If you select Person Accounts or Accounts, The CCAI Platform Session is attached to a Task Object, then the CCAI Platform Session is attached to the Account or Person Account.
Attach to Records - creates a CRM records and attaches to the session object.
No Records - if the CCAI Platform Session object is directly attached to a Salesforce Account object or Task object, no records will be created. This option is only available when mapping to the CCAI Platform Session object.
Required Salesforce permission sets configuration
Account object and field permission changes are required.
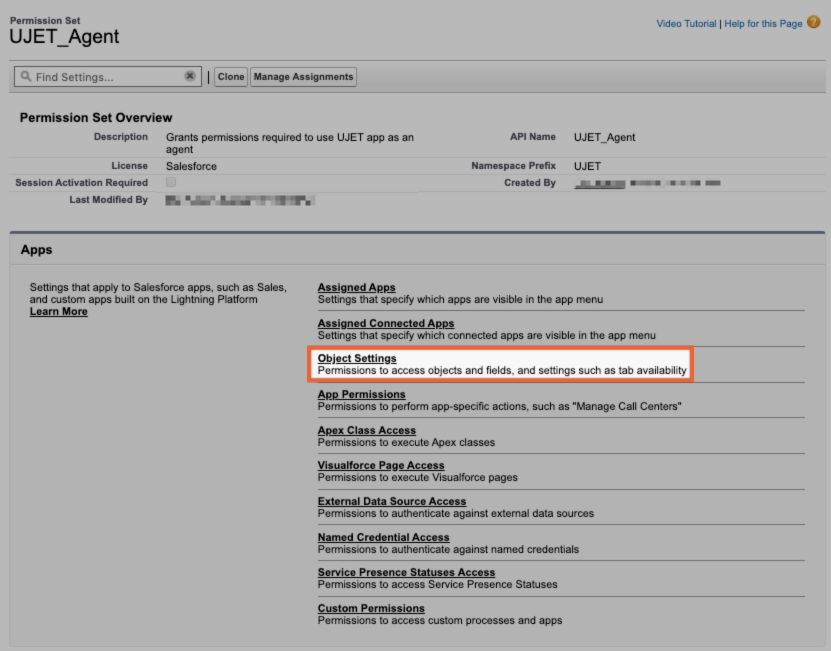
As a Salesforce Admin, go to the Setup page.
Using the search field, go to the Permission Set settings page.
You will see something similar to UJET_Agent permission set.
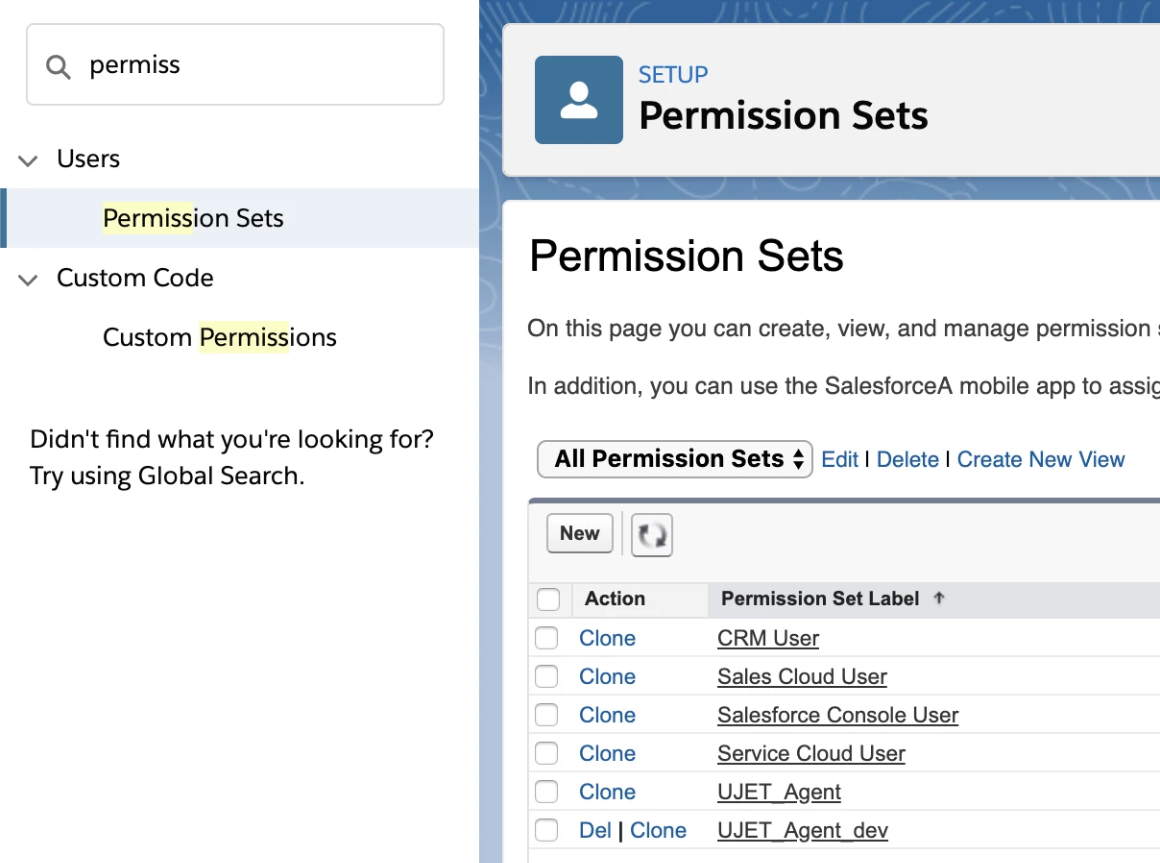
Select the UJET_Agent Permission set.
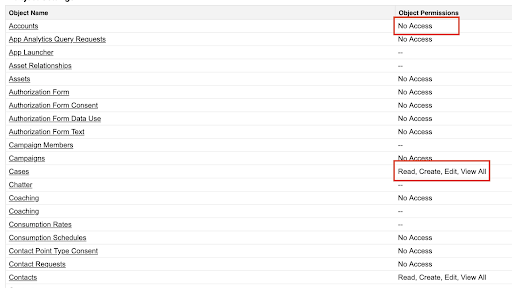
Account permissions should be set to enable: Read, Create, Edit, View All. If they don't, add the Read, Create, Edit, and View All permissions to the Account object.
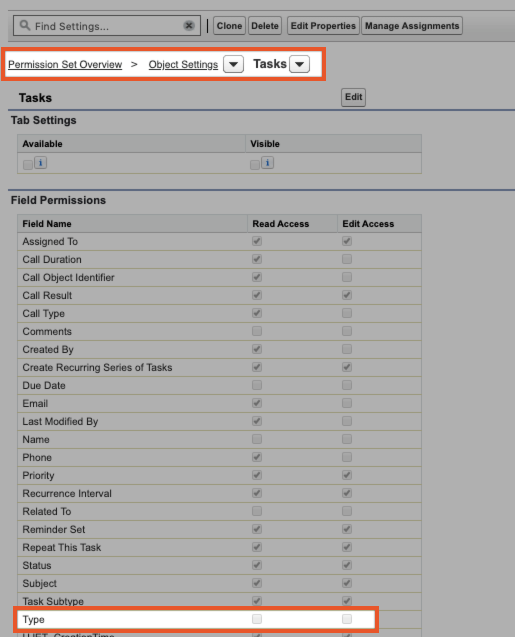
Scroll or use the drop-down sorting tools to view or change to the Field Permission section and enable Read and Edit access for Type.
Click Save to complete the changes and update the Permission set.
CCAI Platform custom session object for Salesforce
The CCAI Platform Custom Session Object provides a convenient, optimized, custom CCAI Platform Session object, in which all session data will be stored in a session object. When enabled, instead of storing session data in the Activities object using multiple entries, all session data, including associated files, for example voice recordings, chat transcripts, and media files uploaded by the end user, are included within the new CCAI Platform session object. This object is then attached to the appropriate case (or optionally directly to an Account object.
For Admin Config to map data to the session object see Salesforce: CCAI Platform Session Object Installation and Configuration.
Session object details
When the session object is enabled for data mapping:
All CCAI Platform session data will be stored in the new CCAI Platform session object, instead of the default Activity object.
The CCAI Platform session object will be attached directly to the case.
A case can have multiple CCAI Platform sessions attached to it, if the configuration and end user sessions logically align for that scenario to occur; for example the consumer calls back for the same issue while the underlying case is still open.
Session object data hierarchy
The session object is organized as follows:
Session(s) list - the list of session(s) attached to a case*.
**Session Detail- presents the core session object details**
Core session fields and lists any associated transfers and files.
File list - any files that have been uploaded / created as part of the session
Session detail - presents the core session object details; i.e.
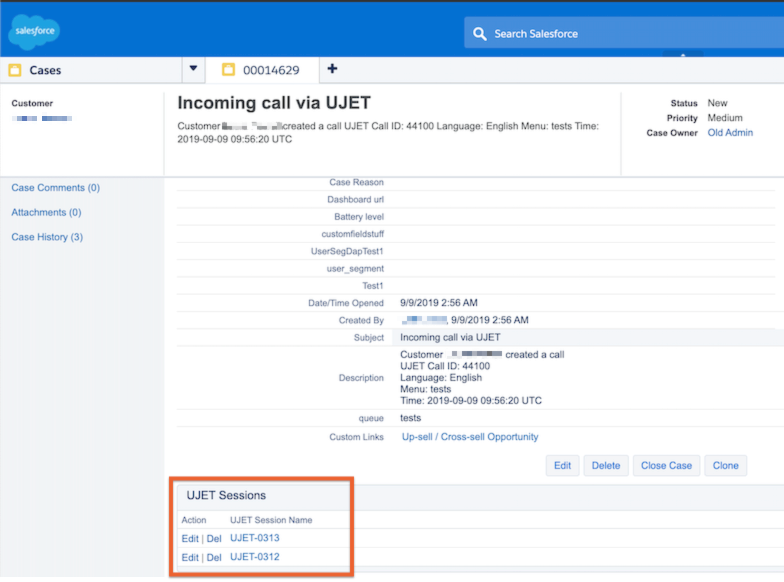
Sample UI of multiple CCAI Platform sessions attached to a case
Session overview
After opening a session, the following view will be provided, listing all associated CCAI Platform session actions, attached files, and transfers.
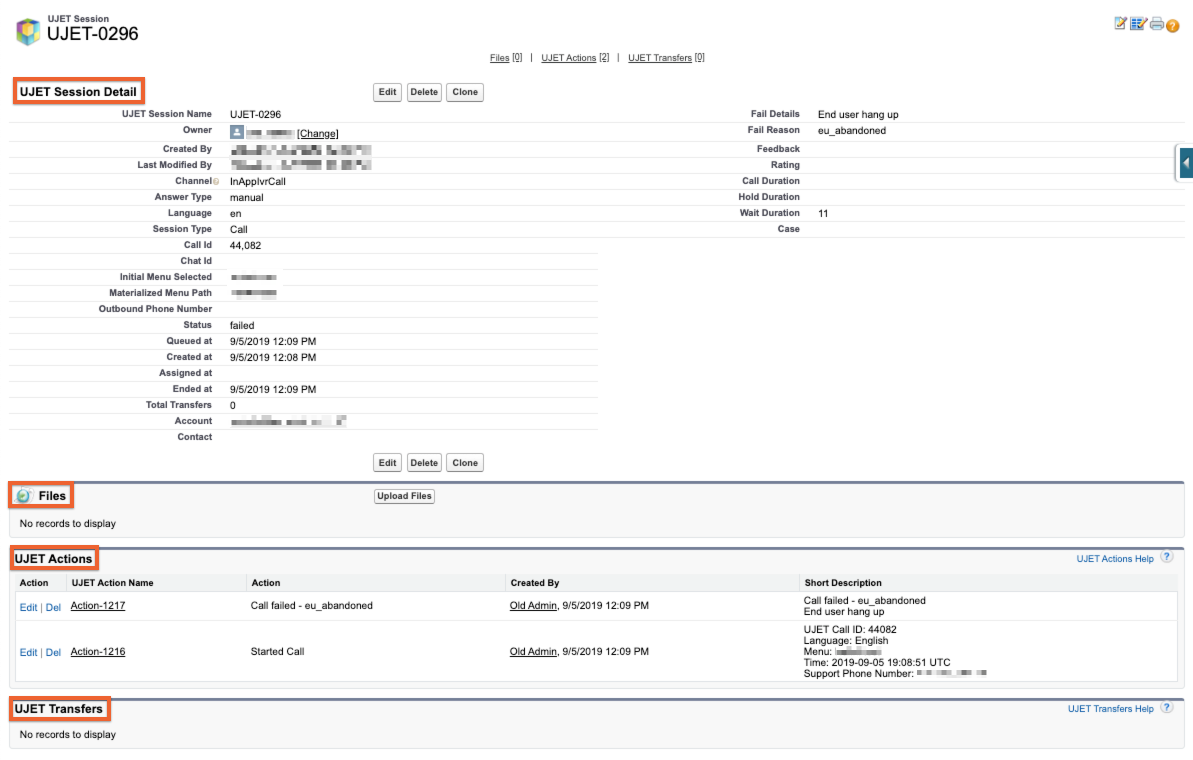
Session details
The available dataset for sessions includes the following fields:
Call/Chat ID: CCAI Platform call or chat ID
Created at: when the call, chat was created
Ended at: when the call, chat was ended
Channel: call or chat type (for example, Mobile, Web).
Session type: call or chat
Call duration: duration of session from start to end
Queued at: time session entered the queue
Assigned at: time session was assigned to agent
Wait: total wait duration in queue before being assigned to an agent for the session
Hold Duration: length of hold time does not include wait time (calls only)
Answer Type: indicates whether session was auto (0) or manually (1) answered
Fail reason: reason why a session "failed" and details.
Feedback: when enabled, shows customer feedback collected during session on record
Case: case the session object is attached to
Initial menu selected: initial queue menu selected
Materialized menu path: the selected path leading to connection with the agent
Language: the language used or selected for the session
Outbound phone number -- applicable outbound phone number
Status: status of the session
Total transfers: number of total transfers during the session
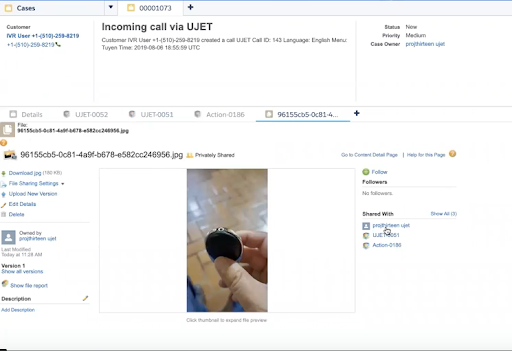
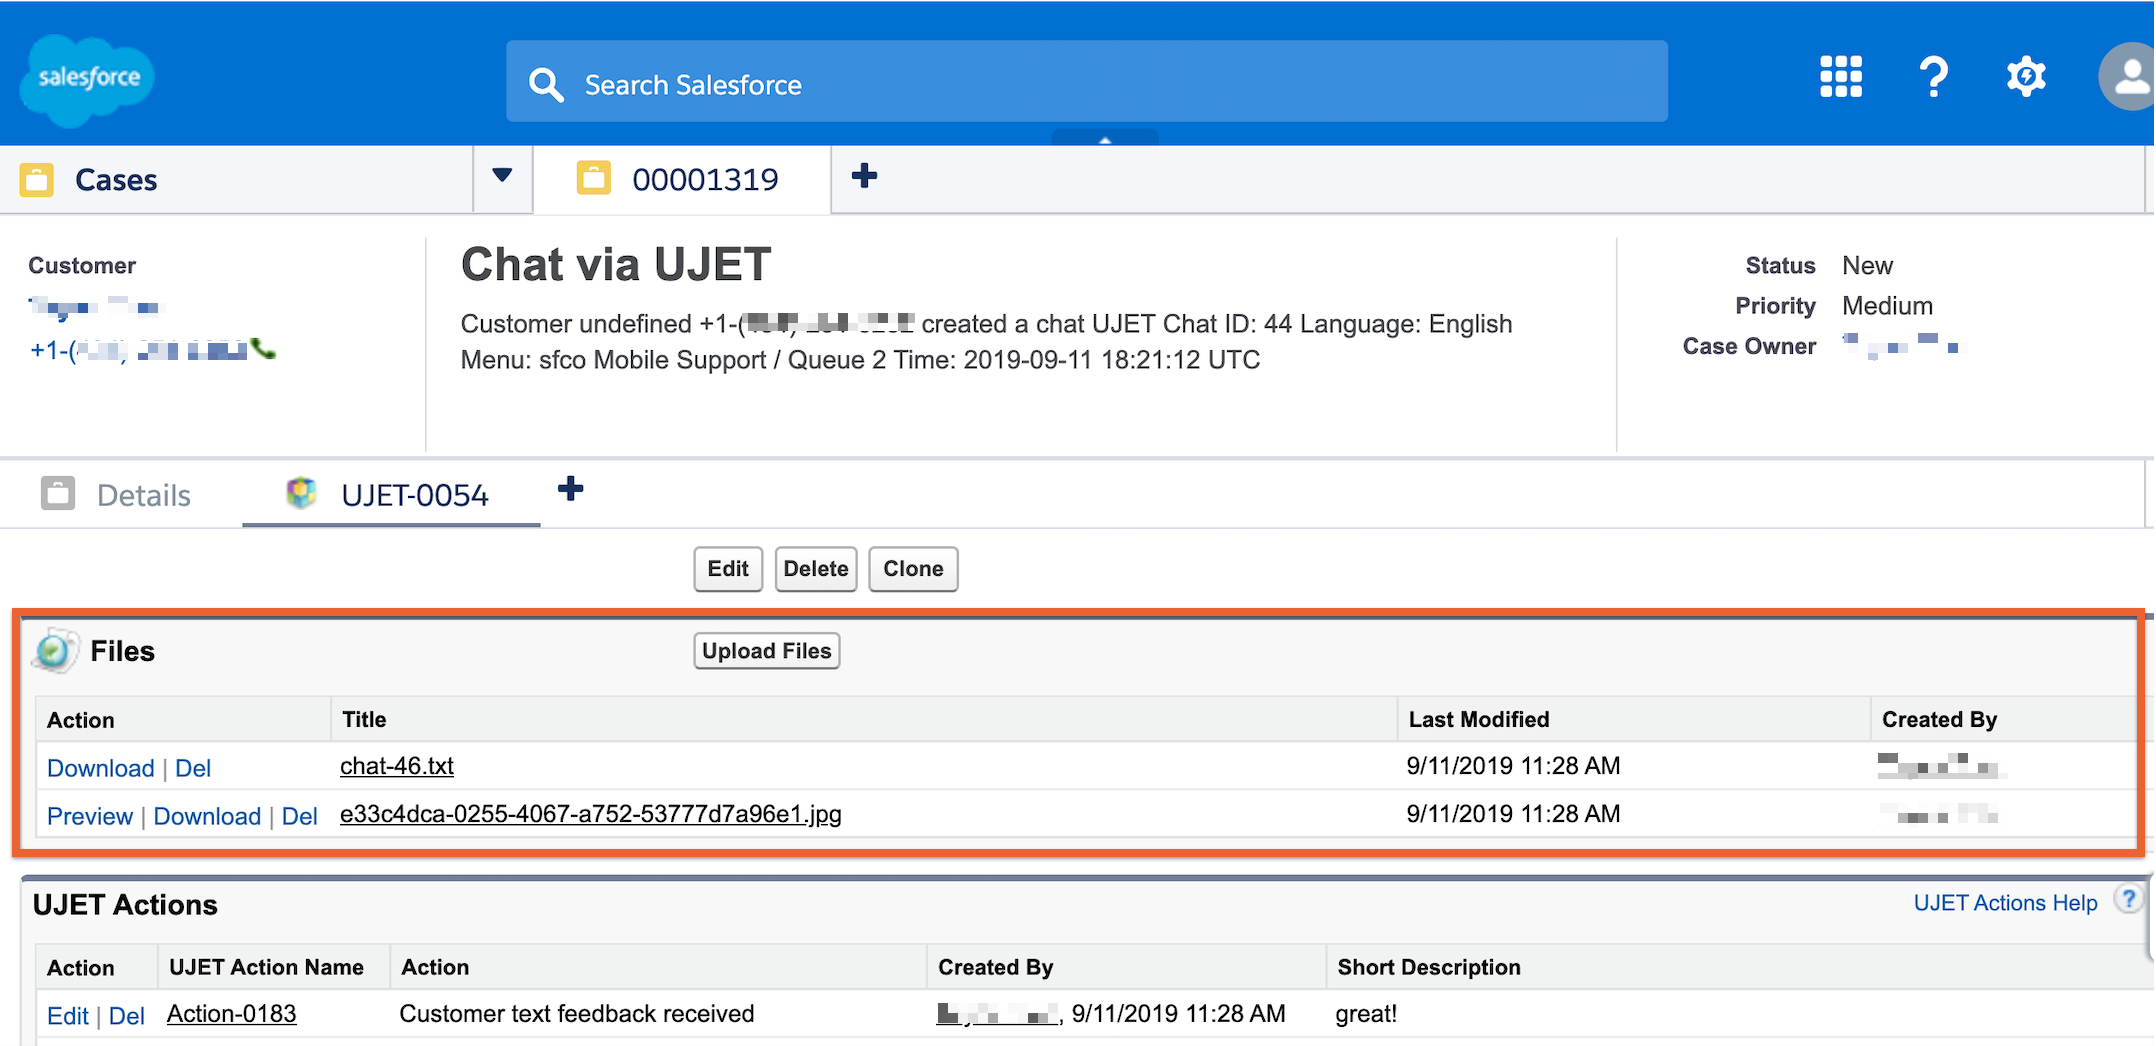
Files
All media files associated with the session object are attached as files to the session object. This includes:
Call recordings
Chat history
Mobile SDK based diagnostic package
Media files sent by end users
UI examples
File List UI - sample for session file list for call recording

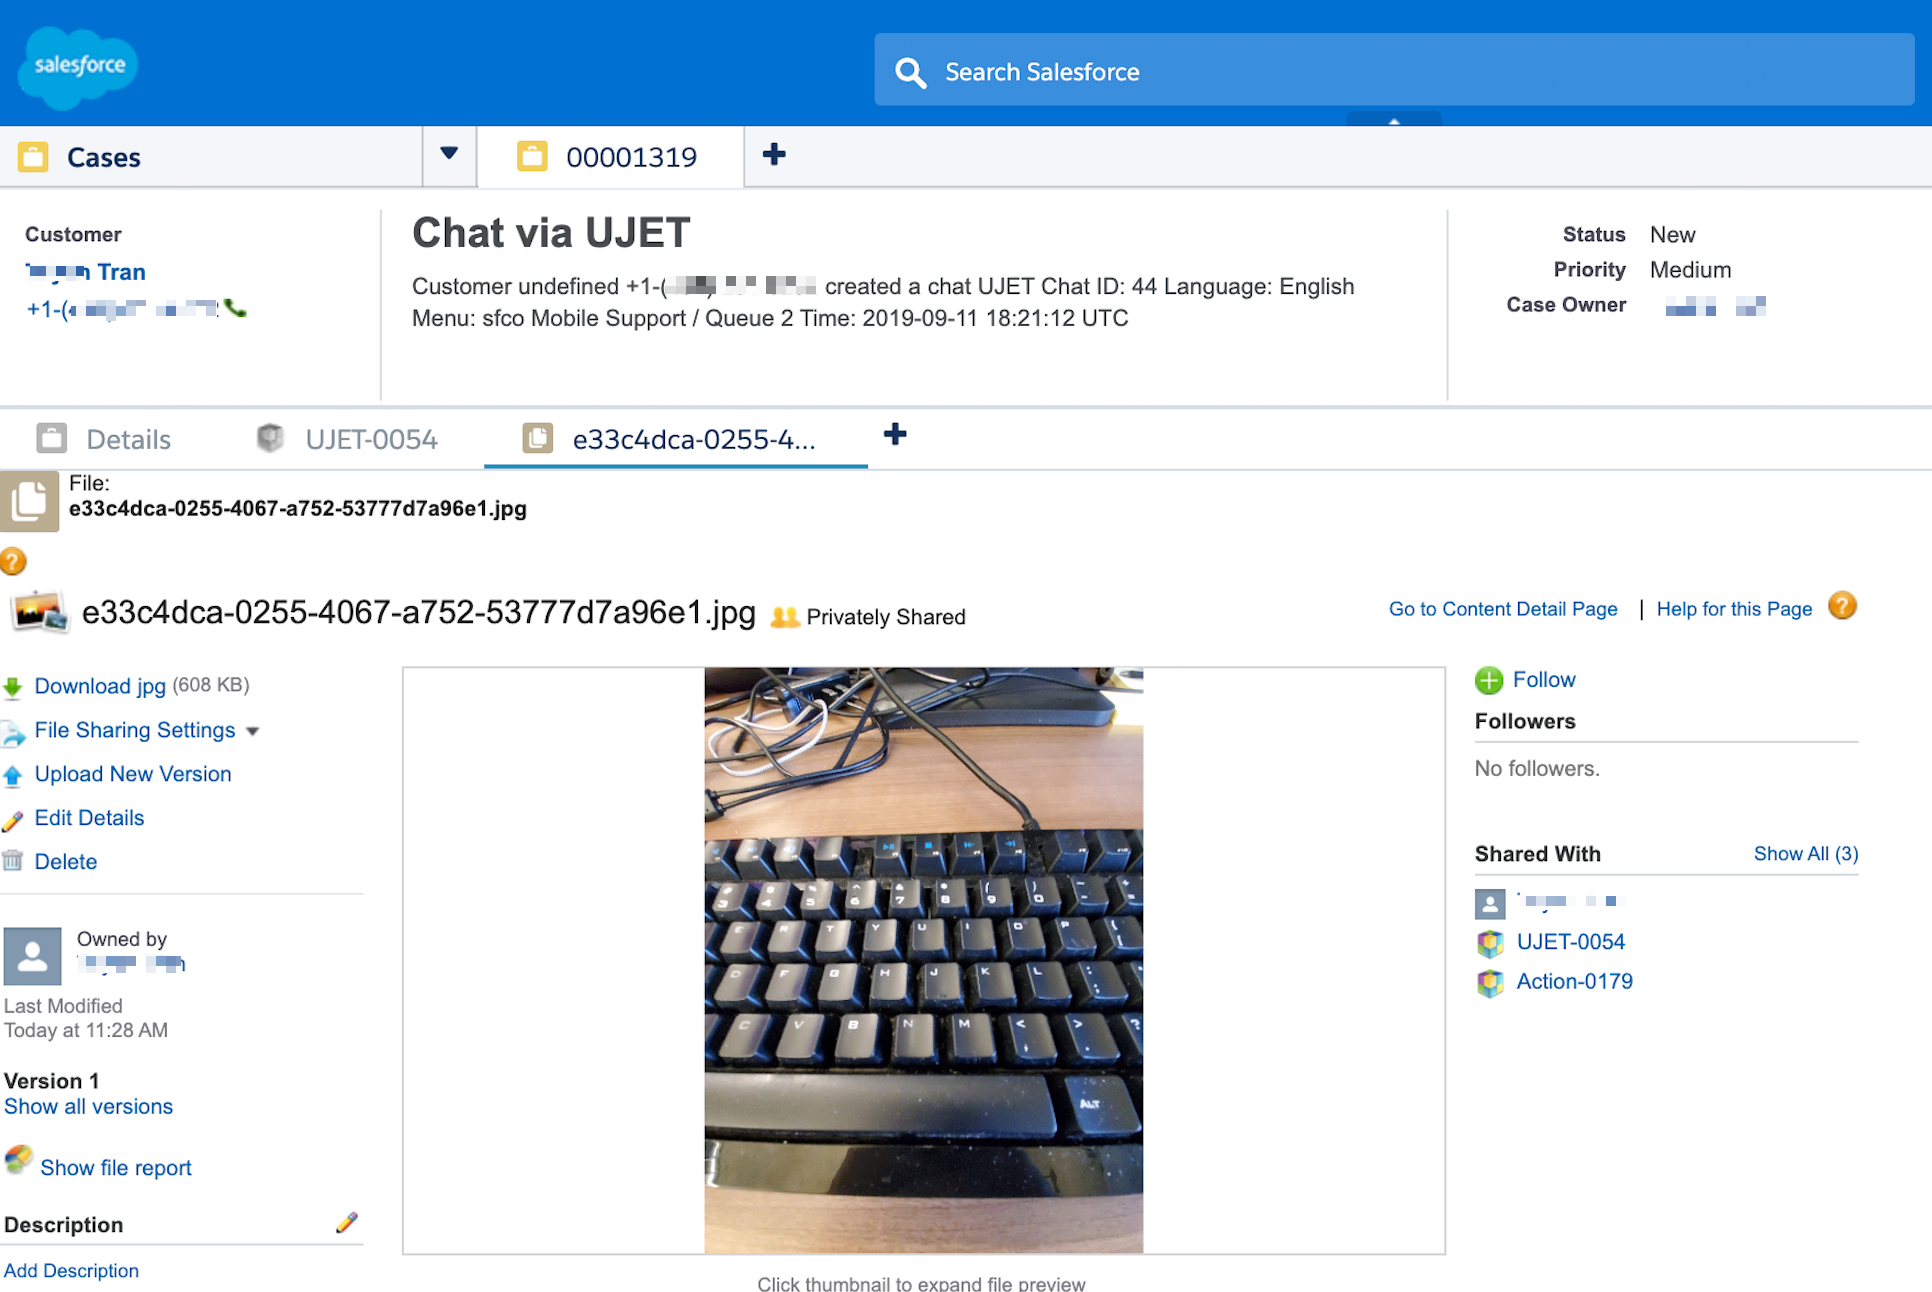
File Detail UI - for example, image upload by the consumer.
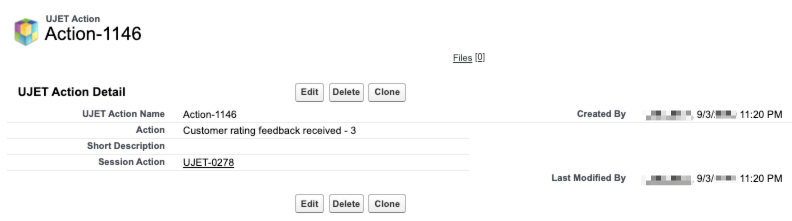
Session actions
Reflects session activities:
Started call
Custom data from customer has arrived
Finished call
Customer rating feedback received
Example: Session action detail UI - end user feedback
Transfers
Any transfers associated with the session are listed in this section. If you are not already using API data, the Transfer details section introduces a new set of information about the call. Transfer details represent a complete account of each transfer and are defined using the fields:
Transfer name: the name of the transfer.
Transfer ID: the unique ID of the transfer.
Agent transferred from: agent initiating the session transfer
Agent transferred to: agent receiving the session transfer
Created at: time transfer was created
Fail reason: reason for failure of session transfer
Menu transferred from: the originating queue menu from which transfer was initiated
Menu transferred to: queue menu the session was transferred to
Session: CCAI Platform session ID
Status: status of transfer
Transfer from materialized path: the materialized path transfer was originated from
Transfer to materialized path: the materialized path the session was transferred to
CCAI Platform agent experience in Salesforce Lightning
Provide expected CCAI Platform behaviour in Salesforce Lightning to Admins and Agents, specifically when connecting to the Activity object rather than the CCAI Platform Session object.
Requirements
Salesforce Service Cloud licenses
Salesforce Service Console Lightning apps
Updated Salesforce instance
Salesforce Lightning enabled
CCAI Platform 1.15 or above
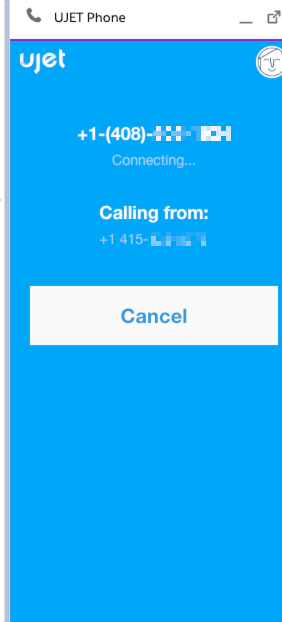
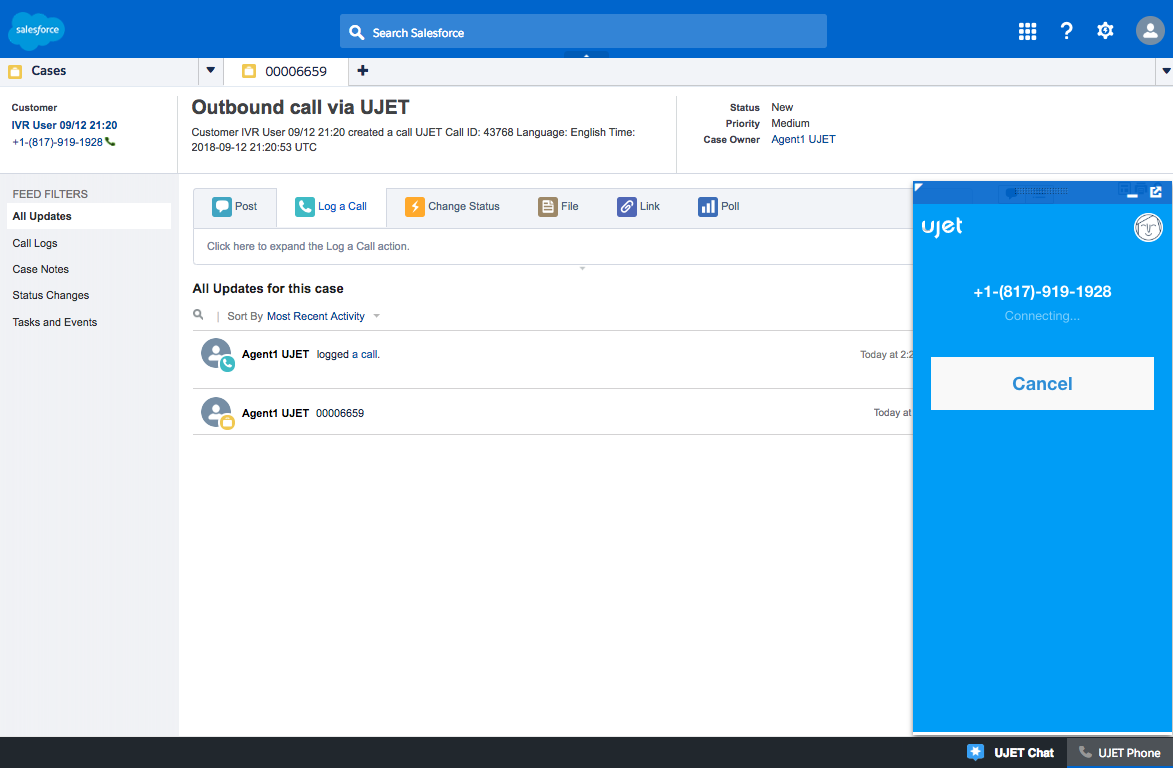
The agent adapter
The agent adapter will show on the bottom left of the Service Console Lightning (or Sales Console Lightning) apps, in the utility bar. If you don't see the CCAI Platform phone adapter, contact your company's Salesforce or IT team.
When making or receiving calls or chats, the CCAI Platform integration will automatically pop the Salesforce case.
Other notes
The widget can be minimized while in use.
The case will vary dependent on your Salesforce settings.
Case will auto-assign to the agent answering the ticket.
A corresponding Task is automatically created and related to the Case
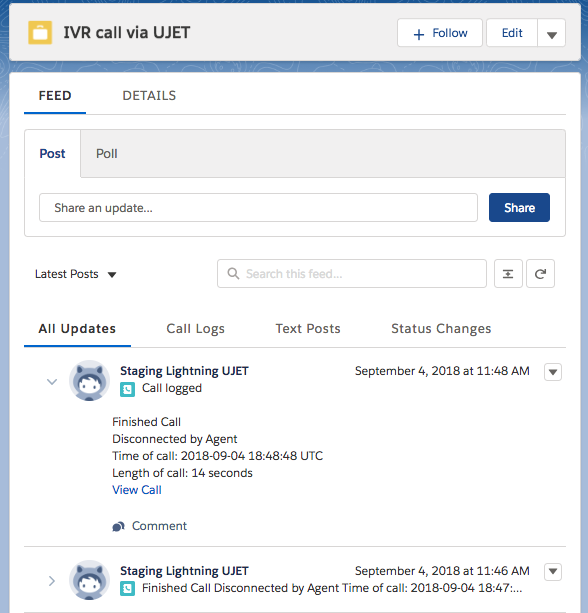
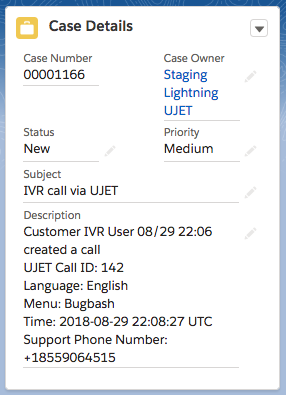
Standard data
Immediately upon case creation, CCAI Platform will provide standard data into the Description field of the Case. This includes the Call ID, Language, and Inbound Menu selection.
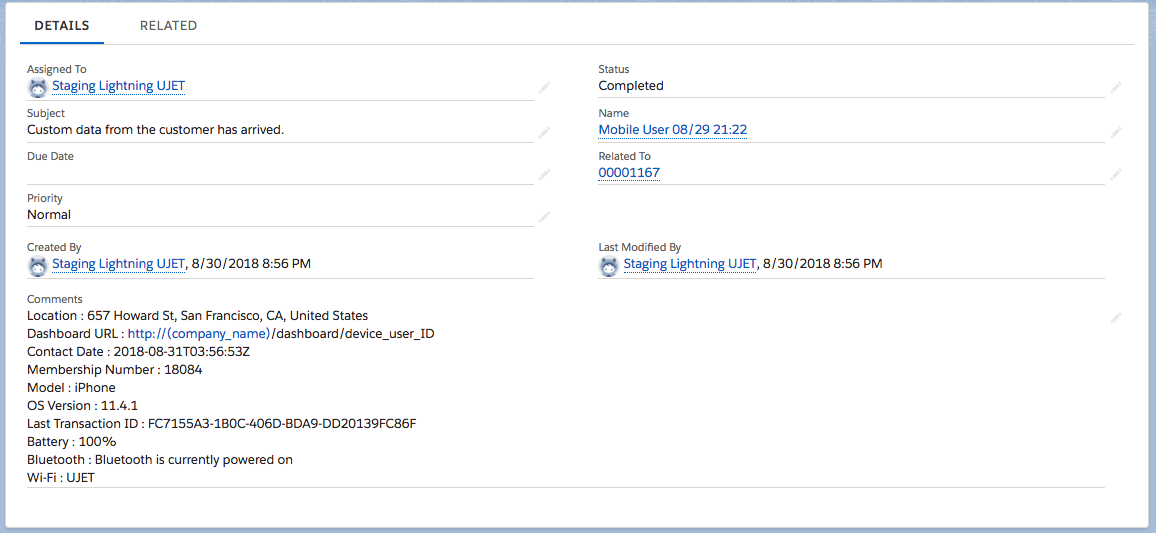
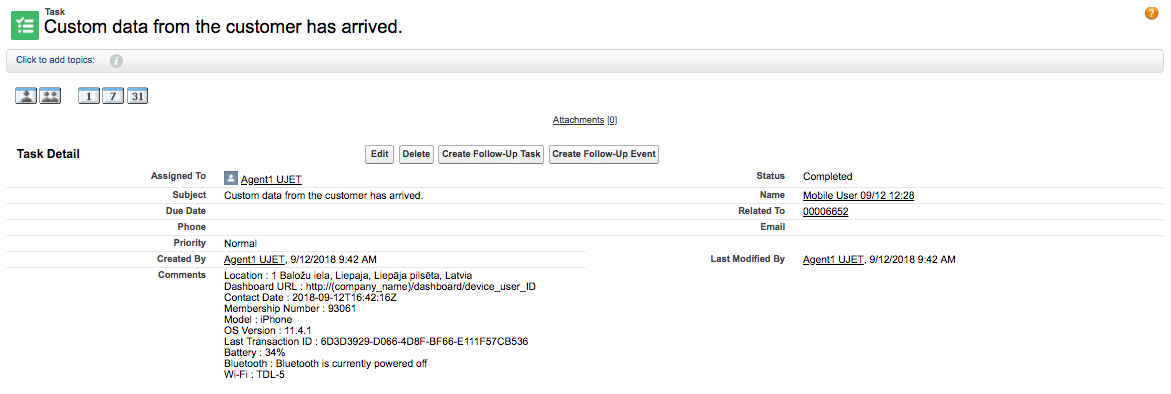
Custom data
If using Custom Data from the CCAI Platform SDKs, the information will create a task related to the case Dependent upon your Salesforce settings, this will show in the publisher feed.
CCAI Platform agent experience in Salesforce Classic
The following sections outline expected behaviors between Salesforce Classic and CCAI Platform.
Requirements
Salesforce Service Cloud licenses
Salesforce Service Console apps
Updated Salesforce instance
CCAI Platform 1.13 or later
Agent adapter
The agent adapter will show on the bottom right of the Service Console (or Sales Console) apps.

When making or receiving calls or chats, the CCAI Platform integration will automatically pop the Salesforce case.
Other notes
The adapter can be minimized while in use.
The case will vary dependent on your Salesforce settings.
Case will auto-assign to the agent answering the ticket.
A corresponding Task is automatically created and related to the Case
Standard data
Immediately upon case creation, CCAI Platform will provide standard data into the Description field of the Case. This includes the Call ID, Language, and Inbound Menu selection.
Custom data
If using Custom Data from the CCAI Platform SDKs, the information will create a task related to the case Dependent upon your Salesforce settings, this will show in the publisher feed.
Salesforce: CCAI Platform session object technical details
The CCAI Platform Custom Session Object provides a convenient, optimized, custom CCAI Platform Session object, in which all call or chat session data will be stored. When enabled, instead of storing session data in the Activities object using multiple entries, all session data, including associated files like voice recordings, chat transcripts, and media files uploaded by the end user, are included within the CCAI Platform session object. This object is then related to the appropriate case or directly to a configured Account object.
For more information, see to Salesforce: CCAI Platform session mapping to case or account objects (person account, contact, lead).
CCAI Platform session object
When the session object is enabled:
All CCAI Platform session data will be stored in the new CCAI Platform session object, instead of the current default 'Activity' object.
The CCAI Platform session object will be related directly to the Case or Account object as a single relationship for each session.
Settings for 'Abandoned call case creation' configured in Settings > Operation Management will be respected. A session object won't be created if the "create tickets for abandoned calls/chats" setting is disabled.
It is possible for a case or account object to have multiple CCAI Platform sessions related to it if the CCAI Platform configuration and end-user sessions logically align for that scenario to occur. Example: end-user calls back for the same issue while the underlying case is still open.
Sample UI of multiple CCAI Platform sessions related to a case
CCAI Platform session object data hierarchy
The session object is organized as follows:
Session(s) related list: the list of session(s) related to a case or account object
Session Detail: presents the core session object details
Core session fields: lists any associated transfers and files
File list: any files that have been uploaded or created as part of the session
- File detail: all details about a file, including access to file itself
Actions: a list of actions that occurred during the session
- Action detail: additional info about a specific action
Transfers: complete list of transfers that occurred during the session
- Transfer detail: displays all fields and data associated with a single transfer events
CCAI Platform session overview
After opening a session, the following view will be provided, listing all associated CCAI Platform session actions, attached files, and transfers.
CCAI Platform session data set fields
The available dataset for sessions includes the following fields. See Data Dictionary for more detailed definitions.
Call/Chat ID: The unique ID of the interaction.
Created at: When the call or chat was created.
Ended at: When the call, chat was ended.
Channel: The type of Channel (For example, Mobile, Web, IVR).
Session type: The type of session or interaction.
Call duration: Duration of session from start to end.
Queued at: Time session entered the queue.
Assigned at: Time session was assigned to agent.
Wait: Total wait duration in queue before being assigned to an agent for the session.
Hold Duration: Length of hold time- does not include wait time (calls only).
Answer Type: Indicates whether session was auto (0) or manually (1) answered.
Fail reason: Reason why a session failed.
Feedback: When enabled, shows customer feedback collected during session on record.
Case: Case the session object is attached to.
Initial menu selected: Initial queue menu selected.
Materialized menu path: The selected path leading to connection with the agent.
Language: The language used or selected for the session.
Outbound phone number: Applicable outbound phone number.
Status: Status of the session.
Total transfers: Number of total transfers during the session.
Files
All media files associated with the session object are attached as files to the session object. This includes:
Call recordings.
Chat history.
Mobile SDK based diagnostic package.
Media files sent by end users.
UI examples
File list UI: Example of session file list for call recording.
File Detail UI: Example of image upload by end user.
CCAI Platform Session actions
Reflects session activities:
Started call.
Custom data from the customer has arrived.
Finished call. .
Customer rating feedback received
Example session action detail UI: End-user feedback.
Transfers
Any transfers associated with the session are listed in this section. It introduces a new set of information about the call that is not yet available in Admin Portal reports (this data has been available by API).
Transfer details represent a complete account of each transfer and are defined using the following fields:
Transfer name: CCAI Platform specific name of the transfer.
Transfer ID: ID of the transfer.
Agent transferred from: agent initiating the session transfer.
Agent transferred to: agent receiving the session transfer.
Created at: time transfer was created.
Fail reason: reason for failure of session transfer.
Menu transferred from: the originating queue menu from which transfer was initiated.
Menu transferred to: queue menu the session was transferred to.
Session: CCAI Platform session ID.
Status: status of transfer.
Transfer from materialized path: the materialized path transfer was originated from.
Transfer to materialized path: the materialized path the session was transferred to.
Account lookup against multiple numbers
Admins can configure CCAI Platform portal to look up an account across multiple phone number fields in Salesforce. This makes it easier to connect different support sessions to a single account for consumers who have multiple phone numbers, such as mobile, home, or work numbers. This works for both inbound and outbound calls.
Create a new phone number field in Salesforce
All existing phone number fields in Salesforce are available to use as a phone number lookup field. If there are still some phone number fields you want to add, you can create a new field. To add a new phone number field
Go to Object Manager.
Select the Account to edit.
Click Fields & Relationships.
Click New to add a new field.
Enter the information for the new phone number field. For example, if you are adding a mobile number, you could enter Mobile as the
Field Label, the mobile number as theField Name, and Phone as theData Type.After the new field is created, it will be displayed as a lookup field option in CCAI Platform portal. You can then add it as a lookup phone number for an account.
Add phone numbers as lookup numbers in CCAI Platform portal
All phone number types across every CRM object (Contact, Account, Lead, and so on) are available selections in the CCAI Platform portal. You can update the following:
Phone number lookup fields: Previously-named phone number lookup fields. This option provides the ability to select multiple phone numbers, such as mobile, account phone, account fax. You can then associate these numbers with the same account.
Phone number primary fields:This field changes depending on what you select for phone number lookup fields. It provides the ability to select the phone number field to be used when you create a new CRM account.
To add multiple phone numbers as additional lookup numbers:
Go to Developer Settings > Account Lookup.
Select the Object and Record Type to apply the lookup fields to.
In the Phone number lookup fields drop-down list, select the phone numbers to use as additional lookup numbers.
Click Save in the drop-down box.
Select the primary phone number to use when UJET creates a new CRM account. This drop-down list changes based on the phone numbers you selected for the previous field.
Click Save in the Developer Settings section. The lookup numbers you selected will now connect to the same account.
Salesforce flexible lookup permission changes
For Flexible Account lookup, the Agent permission set needs to be adjusted in order to open up flexibility regarding how CCAI Platform manages Salesforce data and process flow.
Example use cases
Disabling case creation and attaching the CCAI Platform Session object to an Account, Person Account or custom account object.
Disabling case creation and attaching the CCAI Platform Session object to Salescloud account objects like Leads and Opportunities.
Additional setup steps
Go to the Permission Sets settings page. You will see a cloned UJET_Agent permission set.
Click Object Settings.
You will see the Case and Contact object has Read, Create, Edit, and View All permissions, but Accounts does not. The next step is to add permissions for Account also.
Add Read; Create, Edit; and View All access to the account object permissions and save it.
Add Tasks type field permission.
Check the boxes to allow Read Access and Edit Access for the Type field.
Salesforce: Flexible outbound dialing
Flexible outbound call handling provides flexibility and granularity for managing outbound calls.
Requires CRM package v1.24, and for Sales Cloud requires v1.26.
Admins can configure if agents are able to create or not create a case, and whether or not agents can dial a number that won't be used for any account lookup or session association.
Many new updates to the Agent call adapter
Review and select from multiple matching account records
Select from open cases associated with the selected account
Create a new case
Configurable option to not create a ticket and/or create a new ticket
Handling multiple matching account records
Flexible ticket to session association
Feature details
The object/term Account is referenced below as well as in the Agent Adapter UI, however, the object being referenced as "Account" may be different based on your configuration in Developer Settings .
Settings dependencies like settings for appending calls or chats to existing cases impact this feature.
Configuration saved in Settings > Developer Settings for Account Lookup can be overridden by agent selection in the agent adapter if an object other than the primary object is synced
Account ID and case ID field details
Labels
The object/term Account is referenced in this article as well as in the Agent Adapter UI, however, the object being referenced as "Account" may be different based on your configuration in Developer Settings.
The Object Type, as set in the Admin portal > Settings > Developer Settings, under Account Lookup will populate the field called "Account ID."
The field called "Case ID" can be disabled.
This UI will be updated to update the Agent Adapter fields dynamically based on settings in a future release.
Account and case behavior
Account ID
Account ID can be selected by:
Clicking on the phone number from Account or Contact record
Clicking the sync icon to sync when on the page of an Account or Contact record
Entering an outbound phone number that is associated to an Account
Clicking on a phone number in a Case that is associated with an Account ID and Case
Case ID
Case ID can be selected by:
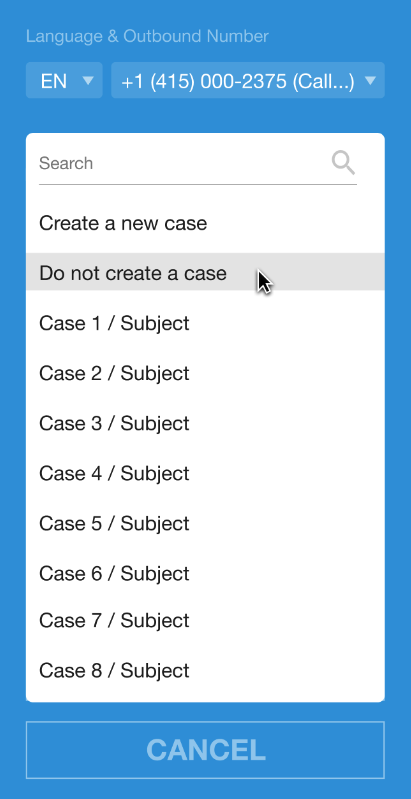
Once the Account ID is selected by one of the options above, CCAI Platform checks for one or more open cases for the selected Account ID and selects the most recent, or allows the agent to select based on your settings.
When the Account ID is selected and the Prompt agents to select open case from list (when applicable) option is enabled, select from the list of open cases.
When the Account ID is selected and the option Allow agent to select "Create a new case" option for outbound calls is enabled, a new case ID entered in the field and CCAI Platform pops a case and call attaches session data to the case using activity or CCAI Platform Session object.
Sync button behavior
Sync button works on the following types of Salesforce objects:
Case page
CCAI Platform finds the current lookup object - Contact, Account, Person Account, or Lead
The phone number field is populated based on the default phone setting
Contact or Account or PersonAccount or Lead page
If the current object is the same object type as lookup object, the object is populated and the object's phone number field.
If the current object is not the same object as a lookup object (set in Developer Settings), the default phone field's phone number is populated.
The page has a CCAI Platform Session or Task or Activity
CCAI Platform looks to see if object has the current lookup object association.
- Ex. with the CCAI Platform Session object, this could be is UJET__Contact__c, UJET__Account__c, UJET__Lead__c.
If there is no lookup object association, information cannot be synced
CCAI Platform configuration
Set lookup object
Based on your data model and process, you can choose what the primary lookup object should be when interacting with Salesforce.
Custom configuration: Enable or disable Cases
When using the CCAI Platform Session object to map session data to Salesforce, you have the option to disable cases. When this setting is disabled, the Case ID field in the Agent Adapter will no longer be available.
In the CCAI Platform portal, go to Settings > Operation Management.
In the Session Data section, when CCAI Platform Session is selected, enable or disable the option for Attach CCAI Platform Sessions directly to the account lookup object. No cases will be created.
Custom configuration: Operation management
In the CCAI Platform portal, go to Settings > Operation Management.
In the Multiple Account/Cases section enable or disable:
Prompt agents to select open case from list (when applicable):
Disabled: most recent open case associated with the contact/account will be auto-selected.
Enabled: agent will be prompted to select from all open cases associated with the contact/account.
When the above option is enabled, Allow agent to select "Create a new case" option for outbound calls can be enabled. When disabled the agent must use an existing open case.
Allow agent to select "Do not create a case" option for outbound calls
When settings indicate that session data is mapped to the CCAI Platform Session object, call data including the call recording will be stored in the CCAI Platform Session and associated to the selected lookup object.
Agent adapter: The Case ID field will no longer appear in the UI.
When settings indicate that session data is mapped to the Activity Object, no call data will be stored, including the call recording. Do not enable this option if your compliance regulations/standards require all call recordings to be accessed because CCAI Platform will not be able to retrieve call recordings of calls where a case is not created.
Allow "Use entered number to make call" option
Enabled: Agents can select the Account ID, then enter a number not saved to the Account/Contact to place a call. The numbers will not be stored against the Account/Contact
Disabled: Outbound calls can only be placed to numbers that are stored on the Account/Contact object.
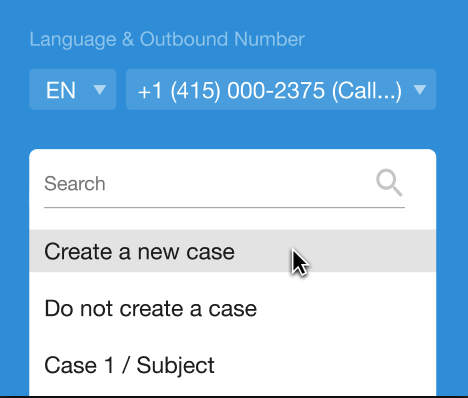
Agent experience
Agent UI
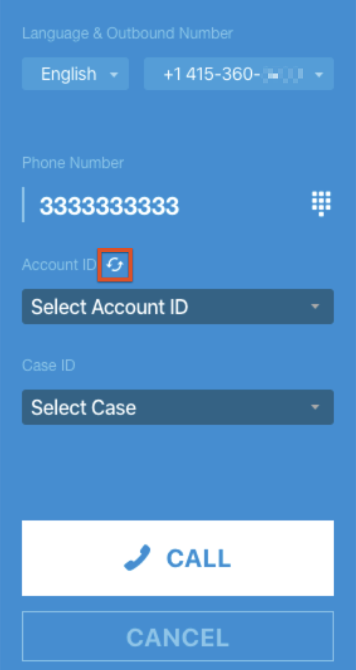
Below is an example Call Adapter with all options enabled.
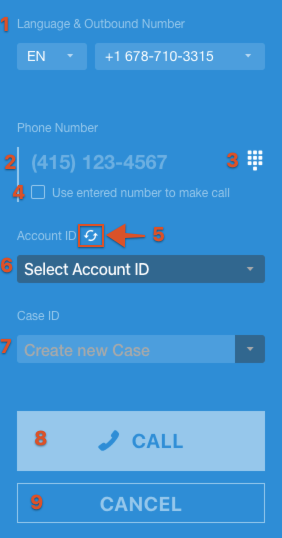
Language and outbound number selection dictate which number will show when the caller answers the call. See Multiple Outbound Numbers for details.
Shows current selected, synced, or entered phone number to which the call will be placed.
Dialpad icon opens the phone number input screen where you can enter or paste a phone number
Check the checkbox to use a number that is not associated with the selected account/contact. See "Use entered number to make call" option. May not be present based on settings.
When the sync button is clicked, information from the currently open tab is used to populate the Account ID and/or Case ID fields.
Account ID field displays the primary lookup, based on Admin settings in Settings > DeveloperSettings > Account Lookup > Lookup object. Further described above in Labels.
Case ID field displays the selected record type, based on Admin settings in Settings > DeveloperSettings > Account Lookup | Lookup object. Further described above in Labels May not be present based on settings.
Once Account and Case ID are selected, Call places the outbound call.
Cancel brings you back to the main Agent Adapter UI.
Agent UI variables
The Agent Adapter will display different options and different views based on your Developer Settings, and Operation Management settings.
Admin Portal settings that can impact the Agent experience
Do not append call or chat session to any existing open ticket
Prompt agents to select open case from list (when applicable)
Allow agent to select "Create a new case" option for outbound calls
Allow agent to select "Do not create a case" option for outbound calls
Allow "Use entered number to make call" option
Attach CCAI Platform Sessions directly to the account lookup object. No cases will be created
CRM data impacting the Agent experience
Number of contacts with the same phone number
No Contact with phone number
Only one Contact with phone number
Multiple Contacts with phone number
Number of open cases
No Case
Only one Case
Multiple Cases
Placing an outbound call
Dialed outbound call
Placing a call by syncing with the current page in Salesforce
From Salesforce, navigate to a Case, Contact, Account, or Lead.
Click Sync in the Agent Adapter.
If necessary, select the Account ID and Case ID objects from the dropdowns.
Be aware of the 3 things impact the adapter screen you will see after syncing
Your environment settings: select from open cases option enabled/disabled, create a new case option enabled/disabled, do not create a case option enabled/disabled
Number of contacts with the same phone number
No Contact with phone number
Only one Contact with phone number
Multiple Contacts with phone number
Number of open cases
No Case
Only one Case
Multiple Cases
Click Call.
Use entered number to make call option
A specific account might have multiple locations or contacts, and not all phone numbers are saved to the account or contact. In this situation, your agents may need to dial out to numbers that aren't saved within the account/contact. This option lets an agent dial out to a number not saved to the contact while still associating the case with the contact. The number dialed will be saved in the comments of the CCAI Platform Session Object. To enable this capability, see Custom configuration: Operation management.
From Salesforce, locate the account or contact and click the sync button in the Agent Adapter.
Optional: Click the Call a separate number toggle to the on position to call a different number than the phone number you used to find the CRM account or record.
Click the dialpad icon to edit the number.
Paste or enter the phone number in the phone number field.
Click Call.
API Direct Access Point - Salesforce REST API
The API Direct Access Point(DAP) allows for routing logic to be implemented directly from an API source. Salesforce provides APEX REST class to fetch their data which CCAI Platform can use to direct callers using that API for Direct Access Points (DAP). Unlike other DAP options, AND logic can be used with multiple key/value pairs.
Salesforce admin configuration
Prepare APEX REST class on Salesforce
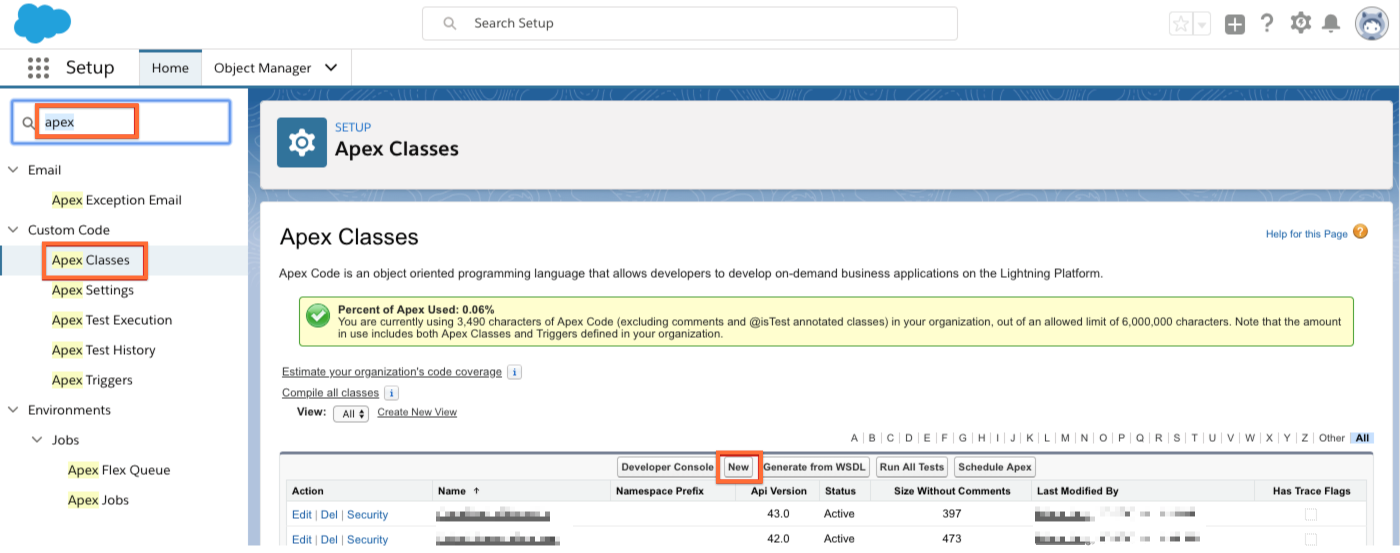
Quick search "apex".
Select Custom Code > Apex Classes > New.
Create an APEX REST class
Although your code will be different, please see the below example:
@RestResource(urlmapping = '/searchVIP')
global class UjetVIPSearch {
    @httpPOST
    global static void searchVIP(){
        RestRequest req = RestContext.request;
        RestResponse res = RestContext.response;
        responsewrapper response= new responsewrapper();
        try{
            requestWrapper jsonBody;
            jsonBody  = (requestWrapper) JSON.deserialize(req.requestBody.toString(), requestWrapper.class);

            String aninumber = jsonBody.phone;
            // CCAI Platform will send phone parameter in format %222%333%4444
            if(string.isNotBlank(aninumber)){
                integer cnt = [SELECT count() from Contact where Contact.Phone like :aninumber AND VIP__c = true];
                response.is_vip = (cnt > 0);
                res.responseBody = blob.valueof(JSON.serialize(response));
            }
            else{
                res.statuscode = 404;
                res.responseBody = blob.valueof('No Contact found');
            }
        }
        catch(exception e){
            res.statuscode = 500;
            res.responseBody = blob.valueof(e.getmessage());
        }
    }
    public class responsewrapper{
        public boolean is_vip;
    }
    public class requestWrapper{
        public string phone;
    }
}
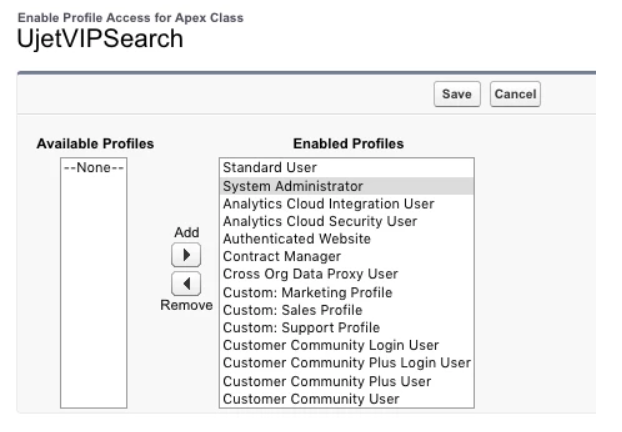
Modify security
Since the Apex REST class will be accessed by the agent's OAuth token, you will need to add all applicable agent profiles into the "Enabled Profiles" column.
Once the APEX Rest class is created, click Security to edit.

Select all agent profiles.
Click the arrow to add to the Enabled Profiles column.
Click the Save button.
Configuration
Choose from available routing logic options
Enable and configure in the CCAI Platform Portal
Create DAPs in the Queue Settings
Test Routing
Call the IVR using a phone number which should trigger the API DAP.
Confirm the call is routed to the correct queue.