Menjalankan kode PySpark di notebook BigQuery Studio
Dokumen ini menunjukkan cara menjalankan kode PySpark di notebook Python BigQuery.
Sebelum memulai
Jika Anda belum melakukannya, buat Google Cloud project dan bucket Cloud Storage.
Menyiapkan project
- Sign in to your Google Cloud account. If you're new to Google Cloud, create an account to evaluate how our products perform in real-world scenarios. New customers also get $300 in free credits to run, test, and deploy workloads.
-
In the Google Cloud console, on the project selector page, select or create a Google Cloud project.
-
Enable the Dataproc, BigQuery, and Cloud Storage APIs.
-
In the Google Cloud console, on the project selector page, select or create a Google Cloud project.
-
Enable the Dataproc, BigQuery, and Cloud Storage APIs.
Buat bucket Cloud Storage di project Anda jika Anda belum memilikinya.
Menyiapkan notebook Anda
- Kredensial notebook: Secara default, sesi notebook Anda menggunakan
kredensial pengguna Anda. Atau, aplikasi
dapat menggunakan kredensial akun layanan sesi.
- Kredensial pengguna: Akun pengguna Anda harus memiliki peran Identity and Access Management
berikut:
- Editor Dataproc (peran
roles/dataproc.editor) - Pengguna BigQuery Studio (peran
roles/bigquery.studioUser) - Peran Pengguna Akun Layanan (roles/iam.serviceAccountUser)
di akun layanan sesi.
Peran ini berisi izin
iam.serviceAccounts.actAsyang diperlukan untuk meniru akun layanan.
- Editor Dataproc (peran
- Kredensial akun layanan: Jika Anda ingin menentukan kredensial akun layanan, bukan kredensial pengguna untuk sesi notebook, akun layanan sesi harus memiliki peran berikut:
- Kredensial pengguna: Akun pengguna Anda harus memiliki peran Identity and Access Management
berikut:
- Runtime notebook: Notebook Anda menggunakan runtime Vertex AI default kecuali jika Anda memilih runtime yang berbeda. Jika Anda ingin menentukan runtime sendiri, buat runtime dari halaman Runtimes di konsol Google Cloud .
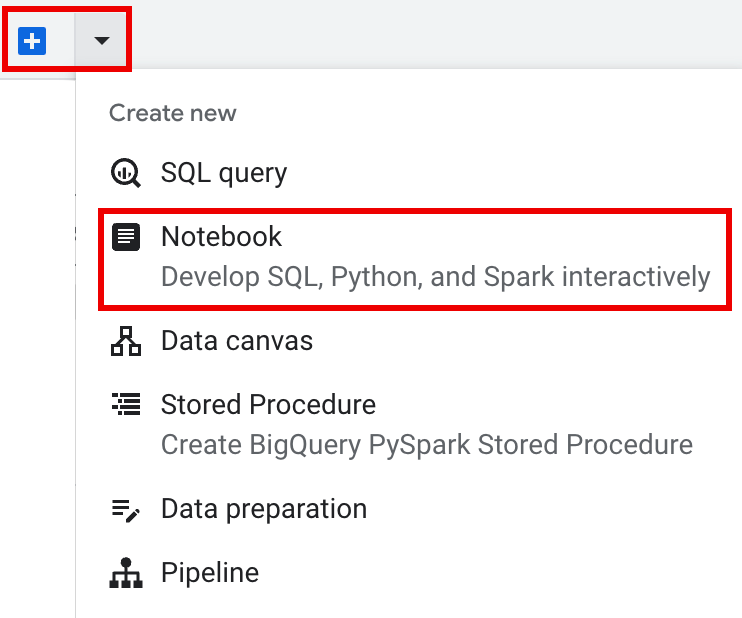
Di Google Cloud konsol, buka halaman BigQuery.
Di panel tab panel detail, klik panah di samping tanda +, lalu klik Notebook.
- Konfigurasi dan buat satu sesi di notebook.
- Konfigurasi sesi Spark di
template sesi interaktif Dataproc Serverless untuk Spark,
lalu gunakan template untuk mengonfigurasi dan membuat sesi di notebook.
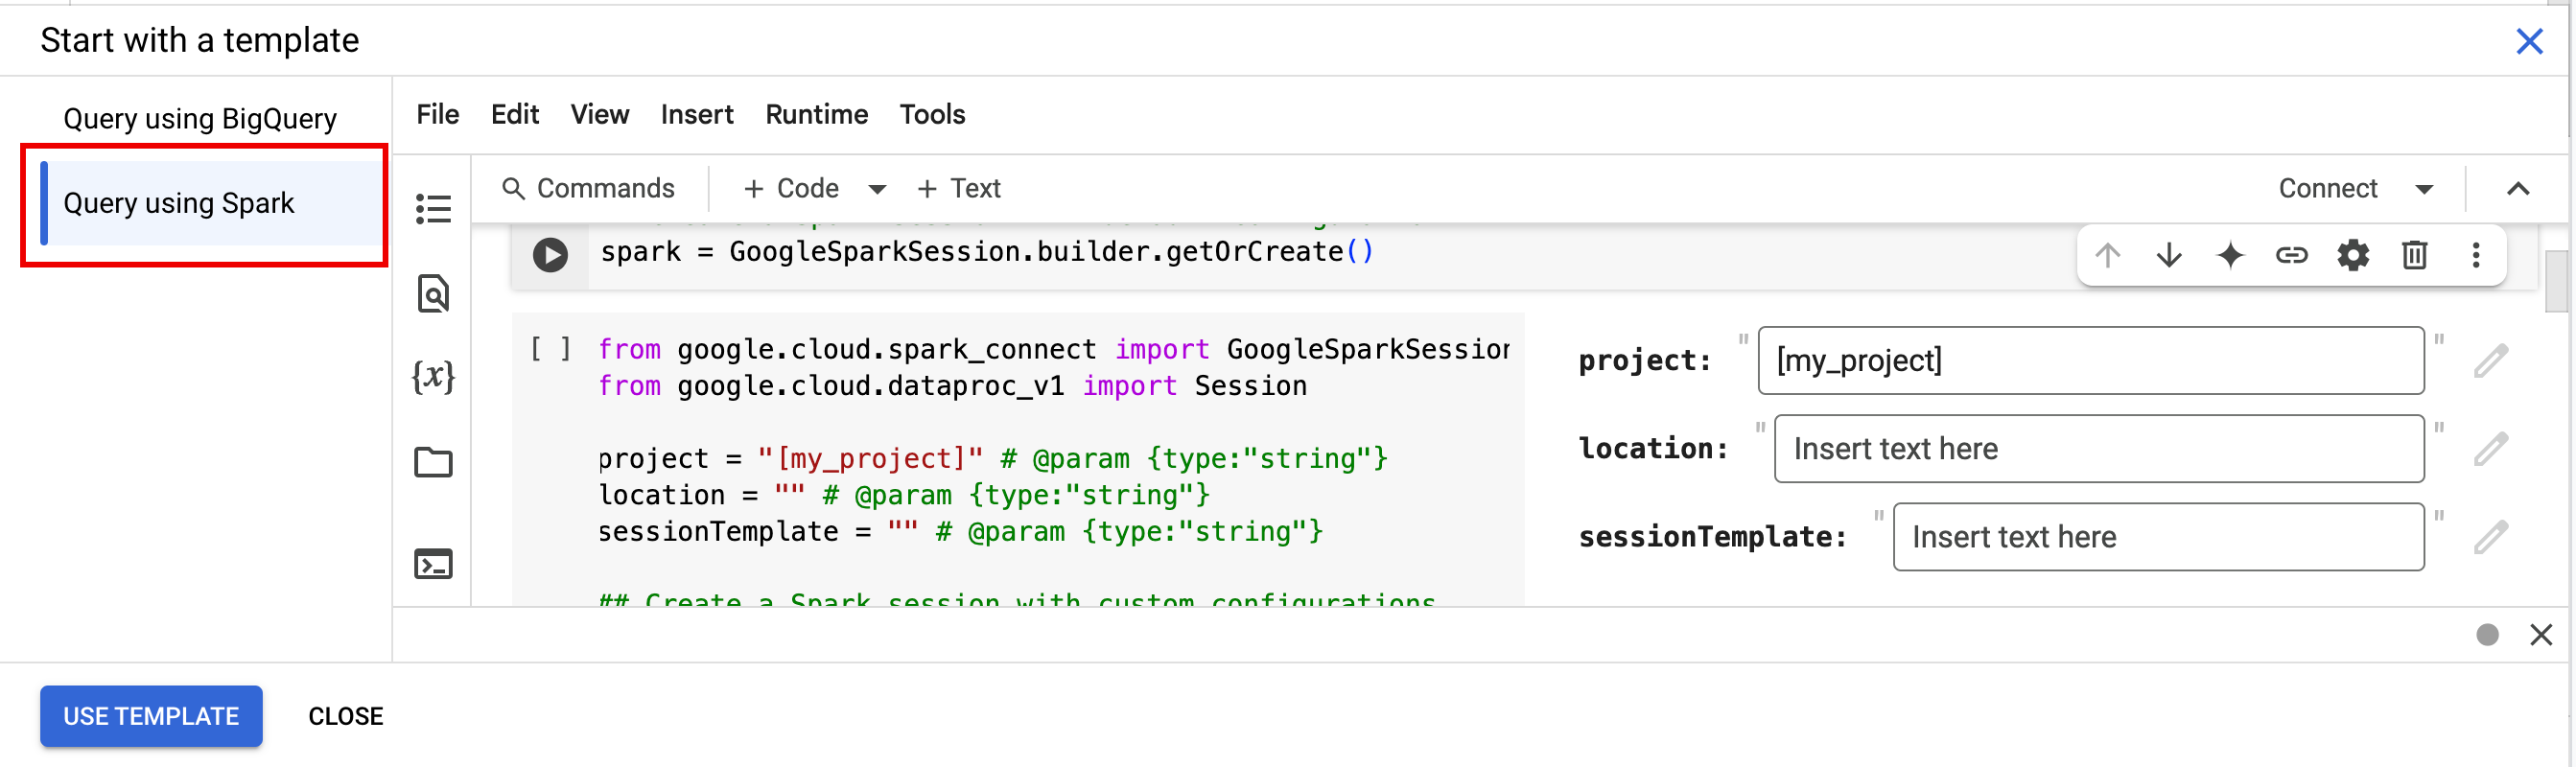
BigQuery menyediakan fitur
Query using Sparkyang membantu Anda mulai membuat kode sesi yang dibuat dari template seperti yang dijelaskan di tab Sesi Spark yang dibuat dari template. Di panel tab panel editor, klik panah drop-down di samping tanda +, lalu klik Notebook.
Salin dan jalankan kode berikut dalam sel notebook untuk mengonfigurasi dan membuat sesi Spark dasar.
- APP_NAME: Nama opsional untuk sesi Anda.
- Setelan Sesi opsional: Anda dapat menambahkan setelan
SessionDataproc API untuk menyesuaikan sesi. Berikut beberapa contohnya:RuntimeConfig:
session.runtime_config.properties={spark.property.key1:VALUE_1,...,spark.property.keyN:VALUE_N}session.runtime_config.container_image = path/to/container/image
EnvironmentConfig:
- session.environment_config.execution_config.subnetwork_uri = "SUBNET_NAME"
session.environment_config.execution_config.ttl = {"seconds": VALUE}session.environment_config.execution_config.service_account = SERVICE_ACCOUNT
- Di panel tab panel editor, klik
panah drop-down di samping tanda +, lalu klik
Notebook.
- Di bagian Start with a template, klik Query using Spark, lalu klik
Use template untuk menyisipkan kode di notebook Anda.
- Tentukan variabel seperti yang dijelaskan dalam Catatan.
- Anda dapat menghapus sel kode contoh tambahan yang disisipkan di notebook.
- PROJECT: Project ID Anda, yang tercantum di bagian Project info pada dasbor konsolGoogle Cloud .
- LOCATION: Region Compute Engine tempat sesi notebook Anda akan berjalan. Jika tidak diberikan, lokasi defaultnya adalah region VM yang membuat notebook.
SESSION_TEMPLATE: Nama template sesi interaktif Dataproc Serverless yang ada. Setelan konfigurasi sesi diperoleh dari template. Template juga harus menentukan setelan berikut:
- Versi runtime
2.3+ Jenis notebook:
Spark ConnectContoh:

- Versi runtime
APP_NAME: Nama opsional untuk sesi Anda.
- Jalankan jumlah kata terhadap set data Shakespeare publik.
- Buat tabel Iceberg dengan metadata yang disimpan di metastore BigLake.
- APP_NAME: Nama opsional untuk sesi Anda.
- PROJECT: Project ID Anda, yang tercantum di bagian Project info pada dasbor konsolGoogle Cloud .
- REGION dan SUBNET_NAME: Tentukan region Compute Engine dan nama subnet di region sesi. Dataproc Serverless mengaktifkan Akses Google Pribadi (PGA) di subnet yang ditentukan.
- LOCATION:
BigQuery_metastore_config.locationdanspark.sql.catalog.{catalog}.gcp_locationdefault adalahUS, tetapi Anda dapat memilih lokasi BigQuery yang didukung. - BUCKET dan WAREHOUSE_DIRECTORY: Bucket dan folder Cloud Storage yang digunakan untuk direktori gudang data Iceberg.
- CATALOG_NAME dan NAMESPACE: Nama katalog Iceberg dan namespace digabungkan untuk mengidentifikasi tabel Iceberg (
catalog.namespace.table_name). - APP_NAME: Nama opsional untuk sesi Anda.
Di Google Cloud konsol, buka halaman BigQuery.
Di panel project resources, klik project Anda, lalu klik namespace Anda untuk mencantumkan tabel
sample_iceberg_table. Klik tabel Details untuk melihat informasi Open Catalog Table Configuration.Format input dan output adalah format kelas
InputFormatdanOutputFormatHadoop standar yang digunakan Iceberg.
Sisipkan sel kode baru dengan mengklik + Code di toolbar. Sel kode baru menampilkan
Start coding or generate with AI. Klik Buat.Di editor Buat, masukkan perintah natural language, lalu klik
enter. Pastikan untuk menyertakan kata kuncisparkataupysparkdalam perintah Anda.Contoh perintah:
create a spark dataframe from order_items and filter to orders created in 2024
Contoh output:
spark.read.format("bigquery").option("table", "sqlgen-testing.pysparkeval_ecommerce.order_items").load().filter("year(created_at) = 2024").createOrReplaceTempView("order_items") df = spark.sql("SELECT * FROM order_items")Untuk mengizinkan Gemini Code Assist mengambil tabel dan skema yang relevan, aktifkan sinkronisasi Data Catalog untuk instance Dataproc Metastore.
Pastikan akun pengguna Anda memiliki akses ke Data Catalog tabel kueri. Untuk melakukannya, tetapkan peran
DataCatalog.Viewer.- Jalankan
spark.stop()di sel notebook. - Hentikan runtime di notebook:
- Klik pemilih runtime, lalu klik Kelola sesi.

- Pada dialog Sesi aktif, klik ikon hentikan, lalu
klik Hentikan.

- Klik pemilih runtime, lalu klik Kelola sesi.
Jadwalkan kode notebook dari konsol Google Cloud (harga notebook berlaku).
Jalankan kode notebook sebagai workload batch Dataproc Serverless (harga Dataproc Serverless berlaku).
- Jadwalkan notebook.
- Jika eksekusi kode notebook adalah bagian dari alur kerja, jadwalkan notebook sebagai bagian dari pipeline.
Download kode notebook ke dalam file di terminal lokal atau di Cloud Shell.
Buka notebook di panel Explorer di halaman BigQuery Studio di konsol Google Cloud .
Download kode notebook dengan memilih Download dari menu File, lalu pilih
Download .py.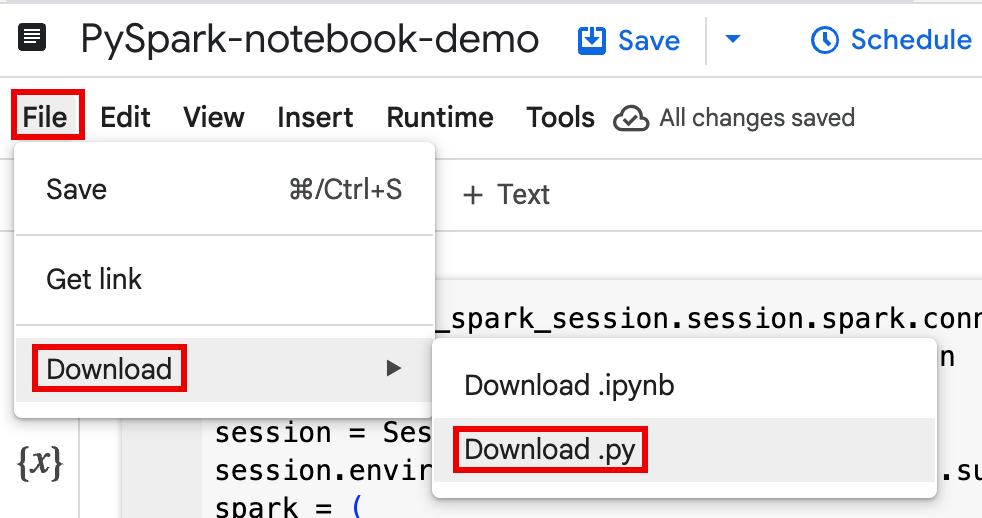
Buat
requirements.txt.- Instal
pipreqsdi direktori tempat Anda menyimpan file.py.pip install pipreqs
Jalankan
pipreqsuntuk membuatrequirements.txt.pipreqs filename.py
Gunakan Google Cloud CLI untuk menyalin file
requirements.txtlokal ke bucket di Cloud Storage.gcloud storage cp requirements.txt gs://BUCKET/
- Instal
Perbarui kode sesi Spark dengan mengedit file
.pyyang didownload.Hapus atau jadikan perintah skrip shell sebagai komentar.
Hapus kode yang mengonfigurasi sesi Spark, lalu tentukan parameter konfigurasi sebagai parameter pengiriman beban kerja batch. (lihat Mengirimkan workload batch Spark).
Contoh:
Hapus baris konfigurasi subnet sesi berikut dari kode:
session.environment_config.execution_config.subnetwork_uri = "{subnet_name}"Saat Anda menjalankan beban kerja batch, gunakan flag
--subnetuntuk menentukan subnet.gcloud dataproc batches submit pyspark \ --subnet=SUBNET_NAME
Gunakan cuplikan kode pembuatan sesi sederhana.
Contoh kode notebook yang didownload sebelum penyederhanaan.
from google.cloud.dataproc_spark_connect import DataprocSparkSession from google.cloud.dataproc_v1 import Session
session = Session() spark = DataprocSparkSession \ .builder \ .appName("CustomSparkSession") .dataprocSessionConfig(session) \ .getOrCreate()
Kode workload batch setelah penyederhanaan.
from pyspark.sql import SparkSession
spark = SparkSession \ .builder \ .getOrCreate()
-
Lihat Mengirimkan workload batch Spark untuk mendapatkan petunjuk.
Pastikan untuk menyertakan tanda --deps-bucket untuk mengarah ke bucket Cloud Storage yang berisi file
requirements.txtAnda.Contoh:
gcloud dataproc batches submit pyspark FILENAME.py \ --region=REGION \ --deps-bucket=BUCKET \ --version=2.3
Catatan:
- FILENAME: Nama file kode notebook yang Anda download dan edit.
- REGION: Region Compute Engine tempat cluster Anda berada.
- BUCKET Nama bucket Cloud Storage yang berisi file
requirements.txtAnda. --version: spark runtime version 2.3 dipilih untuk menjalankan workload batch.
Lakukan commit pada kode Anda.
- Setelah menguji kode workload batch, Anda dapat melakukan commit file
.ipynbatau.pyke repositori menggunakan kliengit, seperti GitHub, GitLab, atau Bitbucket, sebagai bagian dari pipeline CI/CD.
- Setelah menguji kode workload batch, Anda dapat melakukan commit file
Jadwalkan beban kerja batch Anda dengan Cloud Composer.
- Lihat Menjalankan workload Dataproc Serverless dengan Cloud Composer untuk mengetahui petunjuknya.
- Demo video YouTube: Mengoptimalkan kehebatan Apache Spark yang terintegrasi dengan BigQuery.
- Menggunakan metastore BigLake dengan Dataproc
- Menggunakan metastore BigLake dengan Dataproc Serverless
Harga
Untuk mengetahui informasi harga, lihat Harga runtime Notebook BigQuery.
Membuka notebook Python BigQuery Studio
Membuat sesi Spark di notebook BigQuery Studio
Anda dapat menggunakan notebook Python BigQuery Studio untuk membuat sesi interaktif Spark Connect. Setiap notebook BigQuery Studio hanya dapat memiliki satu sesi Dataproc Serverless aktif yang terkait dengannya.
Anda dapat membuat sesi Spark di notebook Python BigQuery Studio dengan cara berikut:
Sesi tunggal
Untuk membuat sesi Spark di notebook baru, lakukan hal berikut:
from google.cloud.dataproc_spark_connect import DataprocSparkSession
from google.cloud.dataproc_v1 import Session

import pyspark.sql.connect.functions as f

session = Session()

# Create the Spark session.
spark = (
   DataprocSparkSession.builder
     .appName("APP_NAME")
     .dataprocSessionConfig(session)
     .getOrCreate()
)
Ganti kode berikut:
Sesi Spark berbasis template
Anda dapat memasukkan dan menjalankan kode di sel notebook untuk membuat sesi Spark berdasarkan template sesi Dataproc Serverless yang ada. Setiap setelan konfigurasi
sessionyang Anda berikan dalam kode notebook akan menggantikan setelan yang sama yang ditetapkan dalam template sesi.Untuk memulai dengan cepat, gunakan
Query using Sparktemplate untuk mengisi notebook Anda dengan kode template sesi Spark:from google.cloud.dataproc_spark_connect import DataprocSparkSession from google.cloud.dataproc_v1 import Session import pyspark.sql.connect.functions as f session = Session() # Configure the session with an existing session template. session_template = "SESSION_TEMPLATE" session.session_template = f"projects/{project}/locations/{location}/sessionTemplates/{session_template}" # Create the Spark session. spark = ( DataprocSparkSession.builder .appName("APP_NAME") .dataprocSessionConfig(session) .getOrCreate() )Menulis dan menjalankan kode PySpark di notebook BigQuery Studio
Setelah membuat sesi Spark di notebook, gunakan sesi tersebut untuk menjalankan kode notebook Spark di notebook.
Dukungan Spark Connect PySpark API: Sesi notebook Spark Connect Anda mendukung sebagian besar PySpark API, termasuk DataFrame, Functions, dan Column, tetapi tidak mendukung SparkContext dan RDD serta PySpark API lainnya. Untuk mengetahui informasi selengkapnya, lihat Yang didukung di Spark 3.5.
API khusus Dataproc: Dataproc menyederhanakan penambahan paket
PyPIsecara dinamis ke sesi Spark Anda dengan memperluas metodeaddArtifacts. Anda dapat menentukan daftar dalam formatversion-scheme, (mirip denganpip install). Hal ini menginstruksikan server Spark Connect untuk menginstal paket dan dependensinya di semua node cluster, sehingga tersedia untuk pekerja UDF Anda.Contoh yang menginstal library
textdistanceversi tertentu dan libraryrandom2yang kompatibel terbaru di cluster untuk mengizinkan UDF menggunakantextdistancedanrandom2berjalan di node pekerja.spark.addArtifacts("textdistance==4.6.1", "random2", pypi=True)Bantuan kode notebook: Notebook BigQuery Studio memberikan bantuan kode saat Anda mengarahkan kursor ke nama class atau metode, dan memberikan bantuan penyelesaian kode saat Anda memasukkan kode.
Dalam contoh berikut, masukkan
DataprocSparkSession. dan menahan pointer di atas nama class ini akan menampilkan penyelesaian kode dan bantuan dokumentasi.
Contoh PySpark notebook BigQuery Studio
Bagian ini memberikan contoh notebook Python BigQuery Studio dengan kode PySpark untuk melakukan tugas berikut:
Jumlah kata
Contoh Pyspark berikut membuat sesi Spark, lalu menghitung kemunculan kata dalam set data
bigquery-public-data.samples.shakespearepublik.# Basic wordcount example from google.cloud.dataproc_spark_connect import DataprocSparkSession from google.cloud.dataproc_v1 import Session import pyspark.sql.connect.functions as f session = Session() # Create the Spark session. spark = ( DataprocSparkSession.builder .appName("APP_NAME") .dataprocSessionConfig(session) .getOrCreate() ) # Run a wordcount on the public Shakespeare dataset. df = spark.read.format("bigquery").option("table", "bigquery-public-data.samples.shakespeare").load() words_df = df.select(f.explode(f.split(f.col("word"), " ")).alias("word")) word_counts_df = words_df.filter(f.col("word") != "").groupBy("word").agg(f.count("*").alias("count")).orderBy("word") word_counts_df.show()Ganti kode berikut:
Output:
Output sel mencantumkan contoh output jumlah kata. Untuk melihat detail sesi di konsol Google Cloud , klik link Interactive Session Detail View. Untuk memantau sesi Spark, klik View Spark UI di halaman detail sesi.

Interactive Session Detail View: LINK
+------------+-----+
|        word|count|
+------------+-----+
|           '|   42|
|       ''All|    1|
|     ''Among|    1|
|       ''And|    1|
|       ''But|    1|
|    ''Gamut'|    1|
|       ''How|    1|
|        ''Lo|    1|
|      ''Look|    1|
|        ''My|    1|
|       ''Now|    1|
|         ''O|    1|
|      ''Od's|    1|
|       ''The|    1|
|       ''Tis|    4|
|      ''When|    1|
|       ''tis|    1|
|      ''twas|    1|
|          'A|   10|
|'ARTEMIDORUS|    1|
+------------+-----+
only showing top 20 rows
Tabel Iceberg
Jalankan kode PySpark untuk membuat tabel Iceberg dengan metadata metastore BigLake
Contoh kode berikut membuat
sample_iceberg_tabledengan metadata tabel yang disimpan di metastore BigLake, lalu membuat kueri tabel.from google.cloud.dataproc_spark_connect import DataprocSparkSession from google.cloud.dataproc_v1 import Session import pyspark.sql.connect.functions as f # Create the Dataproc Serverless session. session = Session() # Set the session configuration for BigLake Metastore with the Iceberg environment. project_id = "PROJECT" region = "REGION" subnet_name = "SUBNET_NAME" location = "LOCATION" session.environment_config.execution_config.subnetwork_uri = f"{subnet_name}" warehouse_dir = "gs://BUCKET/WAREHOUSE_DIRECTORY" catalog = "CATALOG_NAME" namespace = "NAMESPACE" session.runtime_config.properties[f"spark.sql.catalog.{catalog}"] = "org.apache.iceberg.spark.SparkCatalog" session.runtime_config.properties[f"spark.sql.catalog.{catalog}.catalog-impl"] = "org.apache.iceberg.gcp.bigquery.BigQueryMetastoreCatalog" session.runtime_config.properties[f"spark.sql.catalog.{catalog}.gcp_project"] = f"{project_id}" session.runtime_config.properties[f"spark.sql.catalog.{catalog}.gcp_location"] = f"{location}" session.runtime_config.properties[f"spark.sql.catalog.{catalog}.warehouse"] = f"{warehouse_dir}" # Create the Spark Connect session. spark = ( DataprocSparkSession.builder .appName("APP_NAME") .dataprocSessionConfig(session) .getOrCreate() ) # Create the namespace in BigQuery. spark.sql(f"USE `{catalog}`;") spark.sql(f"CREATE NAMESPACE IF NOT EXISTS `{namespace}`;") spark.sql(f"USE `{namespace}`;") # Create the Iceberg table. spark.sql("DROP TABLE IF EXISTS `sample_iceberg_table`"); spark.sql("CREATE TABLE sample_iceberg_table (id int, data string) USING ICEBERG;") spark.sql("DESCRIBE sample_iceberg_table;") # Insert table data and query the table. spark.sql("INSERT INTO sample_iceberg_table VALUES (1, \"first row\");") # Alter table, then query and display table data and schema. spark.sql("ALTER TABLE sample_iceberg_table ADD COLUMNS (newDoubleCol double);") spark.sql("DESCRIBE sample_iceberg_table;") df = spark.sql("SELECT * FROM sample_iceberg_table") df.show() df.printSchema()Catatan:
Output sel mencantumkan
sample_iceberg_tabledengan kolom yang ditambahkan, dan menampilkan link ke halaman Detail Sesi Interaktif di konsol Google Cloud . Anda dapat mengklik View Spark UI di halaman detail sesi untuk memantau sesi Spark.
Interactive Session Detail View: LINK
+---+---------+------------+
| id|     data|newDoubleCol|
+---+---------+------------+
|  1|first row|        NULL|
+---+---------+------------+

root
 |-- id: integer (nullable = true)
 |-- data: string (nullable = true)
 |-- newDoubleCol: double (nullable = true)
Melihat detail tabel di BigQuery
Lakukan langkah-langkah berikut untuk memeriksa detail tabel Iceberg di BigQuery:
Contoh lainnya
Buat
DataFrameSpark (sdf) dari Pandas DataFrame (df).sdf = spark.createDataFrame(df) sdf.show()Jalankan agregasi di Spark
DataFrames.from pyspark.sql import functions as F sdf.groupby("segment").agg( F.mean("total_spend_per_user").alias("avg_order_value"), F.approx_count_distinct("user_id").alias("unique_customers") ).show()Membaca dari BigQuery menggunakan konektor Spark-BigQuery.
spark.conf.set("viewsEnabled","true")
spark.conf.set("materializationDataset","my-bigquery-dataset")

sdf = spark.read.format('bigquery') \
 .load(query)
Menulis kode Spark dengan Gemini Code Assist
Anda dapat meminta Gemini Code Assist untuk membuat kode PySpark di notebook Anda. Gemini Code Assist mengambil dan menggunakan tabel BigQuery dan Dataproc Metastore yang relevan serta skemanya untuk menghasilkan respons kode.
Untuk membuat kode Gemini Code Assist di notebook Anda, lakukan hal berikut:
Tips untuk pembuatan kode Gemini Code Assist
Mengakhiri sesi Spark
Anda dapat melakukan salah satu tindakan berikut untuk menghentikan sesi Spark Connect di notebook BigQuery Studio:
Mengatur kode notebook BigQuery Studio
Anda dapat mengatur kode notebook BigQuery Studio dengan cara berikut:
Menjadwalkan kode notebook dari konsol Google Cloud
Anda dapat menjadwalkan kode notebook dengan cara berikut:
Menjalankan kode notebook sebagai workload batch Dataproc Serverless
Selesaikan langkah-langkah berikut untuk menjalankan kode notebook BigQuery Studio sebagai workload batch Dataproc Serverless.
Memecahkan masalah error notebook
Jika terjadi kegagalan dalam sel yang berisi kode Spark, Anda dapat memecahkan masalah error dengan mengklik link Interactive Session Detail View di output sel (lihat contoh tabel Wordcount dan Iceberg).
Masalah umum dan solusinya
Error: Runtime notebook yang dibuat dengan Python versi
3.10dapat menyebabkan errorPYTHON_VERSION_MISMATCHsaat mencoba terhubung ke sesi Spark.Solusi: Buat ulang runtime dengan versi Python
3.11.Langkah berikutnya