Use the BigQuery JupyterLab plugin
To request feedback or support for this feature, send an email to bigquery-ide-plugin@google.com.
This document shows you how to install and use the BigQuery JupyterLab plugin to do the following:
- Explore your BigQuery data.
- Use the BigQuery DataFrames API.
- Deploy a BigQuery DataFrames notebook to Cloud Composer.
The BigQuery JupyterLab plugin includes all the functionality of the Dataproc JupyterLab plugin, such as creating a Dataproc Serverless runtime template, launching and managing notebooks, developing with Apache Spark, deploying your code, and managing your resources.
Install the BigQuery JupyterLab plugin
To install and use the BigQuery JupyterLab plugin, follow these steps:
In your local terminal, check to make sure you have Python 3.8 or later installed on your system:
python3 --versionIn your local terminal, initialize the gcloud CLI:
gcloud initInstall Pipenv, a Python virtual environment tool:
pip3 install pipenvCreate a new virtual environment:
pipenv shellInstall JupyterLab in the new virtual environment:
pipenv install jupyterlabInstall the BigQuery JupyterLab plugin:
pipenv install bigquery-jupyter-pluginIf your installed version of JupyterLab is earlier than 4.0.0, then enable the plugin extension:
jupyter server extension enable bigquery_jupyter_pluginLaunch JupyterLab:
jupyter labJupyterLab opens in your browser.
Update your project and region settings
By default, your session runs in the project and region that you set when you
ran gcloud init. To change the project and region settings for your
session, do the following:
- In the JupyterLab menu, click Settings > Google BigQuery Settings.
You must restart the plugin for the changes to take effect.
Explore data
To work with your BigQuery data in JupyterLab, do the following:
- In the JupyterLab sidebar, open the Dataset Explorer pane: click the
 datasets icon.
 To expand a project, in the Dataset Explorer pane, click the expander arrow next to the project name.
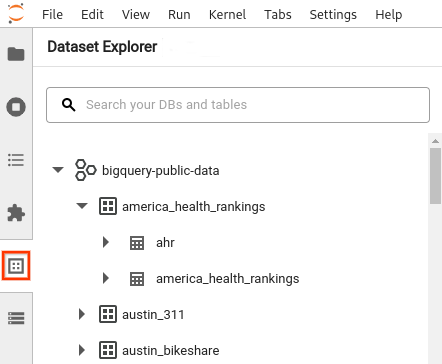
The Dataset Explorer pane shows all of the datasets in a project that are located in the BigQuery region that you configured for the session. You can interact with a project and dataset in various ways:
- To view information about a dataset, click the name of the dataset.
- To display all of the tables in a dataset, click the expander arrow next to the dataset.
- To view information about a table, click the name of the table.
- To change the project or BigQuery region, update your settings.
Execute notebooks
To query your BigQuery data from JupyterLab, do the following:
- To open the launcher page, click File > New Launcher.
- In the BigQuery Notebooks section, click the BigQuery DataFrames card. A new notebook opens that shows you how to get started with BigQuery DataFrames.
BigQuery DataFrames notebooks support Python development in a local Python kernel. BigQuery DataFrames operations are executed remotely on BigQuery, but the rest of code is executed locally on your machine. When an operation is executed in BigQuery, a query job ID and link to the job appear below the code cell.
- To view the job in the Google Cloud console, click Open Job.
Deploy a BigQuery DataFrames notebook
You can deploy a BigQuery DataFrames notebook to Cloud Composer by using a Dataproc Serverless runtime template. You must use runtime version 2.1 or later.
- In your JupyterLab notebook, click calendar_monthJob Scheduler.
- For Job name, enter a unique name for your job.
- For Environment, enter the name of the Cloud Composer environment to which you want to deploy the job.
- If your notebook is parameterized, add parameters.
- Enter the name of the Serverless runtime template.
- To handle notebook execution failures, enter an integer for Retry count and a value (in minutes) for Retry delay.
Select which execution notifications to send, and then enter the recipients.
Notifications are sent using the Airflow SMTP configuration.
Select a schedule for the notebook.
Click Create.
When you successfully schedule your notebook, it appears on the list of scheduled jobs in your selected Cloud Composer environment.
What's next
- Try the BigQuery DataFrames quickstart.
- Learn more about the BigQuery DataFrames Python API.
- Use the JupyterLab for serverless batch and notebook sessions with Dataproc.