Snowflake to BigQuery migration: Overview
This document shows you how to migrate your data from Snowflake to BigQuery.
For a general framework for migrating from other data warehouses to BigQuery, see Overview: Migrate data warehouses to BigQuery.
Snowflake to BigQuery migration overview
For a Snowflake migration, we recommend setting up a migration architecture that minimally affects existing operations. The following example shows an architecture where you can reuse your existing tools and processes while offloading other workloads to BigQuery.
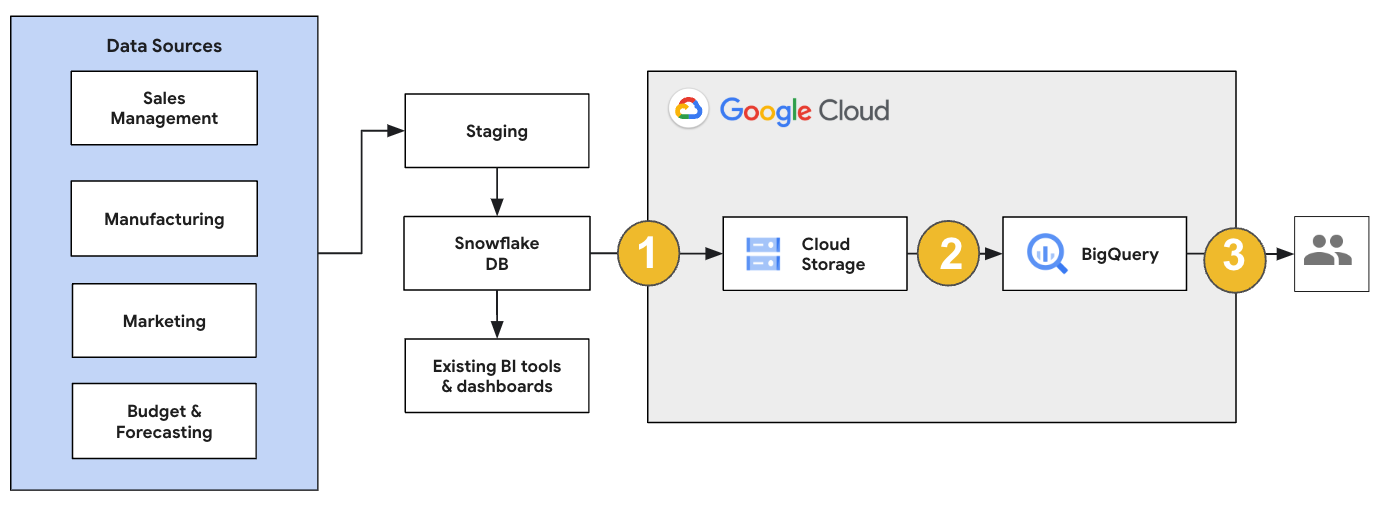
You can also validate reports and dashboards against earlier versions. For more information, see Migrating data warehouses to BigQuery: Verify and validate.
Migrate individual workloads
As you plan your Snowflake migration, we recommend migrating the following workloads individually in the following order:
Migrate schema
Start by replicating the necessary schemas from your Snowflake environment into BigQuery. We recommend using the BigQuery Migration Service to migrate your schema. The BigQuery Migration Service supports a wide range of data model design patterns, such as star schema or snowflake schema, which eliminates the need to update your upstream data pipelines for a new schema. The BigQuery Migration Service also offers automated schema migration, including schema extraction and translation capabilities, to streamline your migration process.
Migrate SQL queries
To migrate your SQL queries, the BigQuery Migration Service offers various SQL translation features to automate the conversion of your Snowflake SQL queries to GoogleSQL SQL, such as the batch SQL translator to translate queries in bulk, the interactive SQL translator to translate individual queries, and the SQL translation API. These translation services also include Gemini-enhanced functionality to further simplify your SQL query migration process.
As you are translating your SQL queries, carefully review the translated queries to verify that data types and table structures are correctly handled. To do so, we recommend creating a wide range of test cases with different scenarios and data. Then run these test cases on BigQuery to compare the results to the original Snowflake results. If there are any differences, analyze and fix the converted queries.
Migrate data
There are several ways to set up your data migration pipeline to transfer your data to BigQuery. Generally, these pipelines follow the same pattern:
Extract the data from your source: Copy the extracted files from your source into staging storage in your on-premises environment. For more information, see Migrating data warehouses to BigQuery: Extracting the source data.
Transfer data to a staging Cloud Storage bucket: After you finish extracting data from your source, you transfer it to a temporary bucket in Cloud Storage. Depending on the amount of data you're transferring and the network bandwidth available, you have several options.
It's important to verify that the location of your BigQuery dataset and your external data source, or your Cloud Storage bucket, are in the same region.
Load data from the Cloud Storage bucket into BigQuery: Your data is now in a Cloud Storage bucket. There are several options to upload the data into BigQuery. Those options depend on how much the data has to transform. Alternatively, you can transform your data within BigQuery by following the ELT approach.
When you import your data in bulk from a JSON file, an Avro file, or a CSV file, BigQuery auto-detects the schema, so you don't need to predefine it. To get a detailed overview of the schema migration process for EDW workloads, see Schema and data migration process.
For a list of tools that support a Snowflake data migration, see Migration tools.
For end-to-end examples of setting up a Snowflake data migration pipeline, see Snowflake migration pipeline examples.
Optimize schema and queries
After the schema migration, you can test performance and make optimizations based on the results. For example, you can introduce partitioning to make your data more efficient to manage and query. Table partitioning lets you improve query performance and cost control by partitioning by ingestion time, timestamp, or integer range. For more information, see Introduction to partitioned tables.
Clustered tables are another schema optimization. You can cluster your tables to organize table data based on the contents in the table's schema, improving the performance of queries that use filter clauses or queries that aggregate data. For more information, see Introduction to clustered tables.
Supported data types, properties, and file formats
Snowflake and BigQuery support most of the same data types, though they sometimes use different names. For a complete list of supported data types in Snowflake and BigQuery, see Data types. You can also use SQL translation tools, such as the interactive SQL translator, the SQL translation API, or the batch SQL translator, to translate different SQL dialects into GoogleSQL.
For more information about supported data types in BigQuery, see GoogleSQL data types.
Snowflake can export data in the following file formats. You can load the following formats directly into BigQuery:
- Loading CSV data from Cloud Storage.
- Loading Parquet data from Cloud Storage.
- Loading JSON data from Cloud Storage.
- Query data from Apache Iceberg.
Migration tools
The following list describes the tools that you can use to migrate data from Snowflake to BigQuery. For examples of how these tools can be used together in a Snowflake migration pipeline, see Snowflake migration pipeline examples.
COPY INTO <location>command: Use this command in Snowflake to extract data from a Snowflake table directly into a specified Cloud Storage bucket. For an end-to-end example, see Snowflake to BigQuery (snowflake2bq) on GitHub.- Apache Sqoop: To extract data from Snowflake into either HDFS or Cloud Storage, submit Hadoop jobs with the JDBC driver from Sqoop and Snowflake. Sqoop runs in a Dataproc environment.
- Snowflake JDBC: Use this driver with most client tools or applications that support JDBC.
You can use the following generic tools to migrate data from Snowflake to BigQuery:
- The BigQuery Data Transfer Service for Snowflake connector Preview: Perform an automated batch transfer of Cloud Storage data into BigQuery.
- The Google Cloud CLI: Copy downloaded Snowflake files into Cloud Storage with this command-line tool.
- bq command-line tool: Interact with BigQuery using this command-line tool. Common use cases include creating BigQuery table schemas, loading Cloud Storage data into tables, and running queries.
- Cloud Storage client libraries: Copy downloaded Snowflake files into Cloud Storage with a custom tool that uses the Cloud Storage client libraries.
- BigQuery client libraries: Interact with BigQuery with a custom tool built on top of the BigQuery client library.
- BigQuery query scheduler: Schedule recurring SQL queries with this built-in BigQuery feature.
- Cloud Composer: Use this fully managed Apache Airflow environment to orchestrate BigQuery load jobs and transformations.
For more information on loading data into BigQuery, see Loading data into BigQuery.
Snowflake migration pipeline examples
The following sections show examples of how to migrate your data from Snowflake to BigQuery using three different processes: ELT, ETL, and partner tools.
Extract, load, and transform
You can set up an extract, load, and transform (ELT) process with two methods:
- Use a pipeline to extract data from Snowflake and load the data to BigQuery
- Extract data from Snowflake using other Google Cloud products.
Use a pipeline to extract data from Snowflake
To extract data from Snowflake and load directly into Cloud Storage, use the snowflake2bq tool.
You can then load your data from Cloud Storage to BigQuery using one of the following tools:
- The BigQuery Data Transfer Service for Cloud Storage connector
- The
LOADcommand using the bq command-line tool - BigQuery API client libraries
Other tools to extract data from Snowflake
You can also use the following tools to extract data from Snowflake:
- Dataflow
- Cloud Data Fusion
- Dataproc
- Apache Spark BigQuery connector
- Snowflake connector for Apache Spark
- Hadoop BigQuery connector
- The JDBC driver from Snowflake and Sqoop to extract data from Snowflake into Cloud Storage:
Other tools to load data to BigQuery
You can also use the following tools to load data to BigQuery:
- Dataflow
- Cloud Data Fusion
- Dataproc
- Dataprep by Trifacta
Extract, transform, and load
If you want to transform your data before loading it into BigQuery, consider the following tools:
- Dataflow
- Clone the JDBC to BigQuery template code and modify the template to add Apache Beam transforms.
- Cloud Data Fusion
- Create a reusable pipeline and transform your data using CDAP plugins.
- Dataproc
- Transform your data using Spark SQL or custom code in any of the supported Spark languages, such as Scala, Java, Python, or R.
Partner tools for migration
There are multiple vendors that specialize in the EDW migration space. For a list of key partners and their provided solutions, see BigQuery partners.
Snowflake export tutorial
The following tutorial show a sample data export from Snowflake to
BigQuery that uses the COPY INTO <location> Snowflake command.
For a detailed, step-by step process that includes code samples, see
the Google Cloud professional services Snowflake to BigQuery tool
Prepare for the export
You can prepare your Snowflake data for an export by extracting your Snowflake data into a Cloud Storage or an Amazon Simple Storage Service (Amazon S3) bucket with the following steps:
Cloud Storage
This tutorial prepares the file in PARQUET format.
Use Snowflake SQL statements to create a named file format specification.
create or replace file format NAMED_FILE_FORMAT
    type = 'PARQUET'
Replace
NAMED_FILE_FORMATwith a name for the file format. For example,my_parquet_unload_format.Create an integration with the
CREATE STORAGE INTEGRATIONcommand.create storage integration INTEGRATION_NAME type = external_stage storage_provider = gcs enabled = true storage_allowed_locations = ('BUCKET_NAME')
Replace the following:
INTEGRATION_NAME: a name for the storage integration. For example,gcs_intBUCKET_NAME: the path to the Cloud Storage bucket. For example,gcs://mybucket/extract/
Retrieve the Cloud Storage service account for Snowflake with the
DESCRIBE INTEGRATIONcommand.desc storage integration INTEGRATION_NAME;
The output is similar to the following:
+-----------------------------+---------------+-----------------------------------------------------------------------------+------------------+
| property                    | property_type | property_value                                                              | property_default |
+-----------------------------+---------------+-----------------------------------------------------------------------------+------------------|
| ENABLED                     | Boolean       | true                                                                        | false            |
| STORAGE_ALLOWED_LOCATIONS   | List          | gcs://mybucket1/path1/,gcs://mybucket2/path2/                               | []               |
| STORAGE_BLOCKED_LOCATIONS   | List          | gcs://mybucket1/path1/sensitivedata/,gcs://mybucket2/path2/sensitivedata/   | []               |
| STORAGE_GCP_SERVICE_ACCOUNT | String        | service-account-id@iam.gserviceaccount.com                 |                  |
+-----------------------------+---------------+-----------------------------------------------------------------------------+------------------+
Grant the service account listed as
STORAGE_GCP_SERVICE_ACCOUNTread and write access to the bucket specified in the storage integration command. In this example, grant theservice-account-id@service account read and write access to the<var>UNLOAD_BUCKET</var>bucket.Create an external Cloud Storage stage that references the integration that you created previously.
create or replace stage STAGE_NAME
    url='UNLOAD_BUCKET'
    storage_integration = INTEGRATION_NAME
    file_format = NAMED_FILE_FORMAT;
Replace the following:
STAGE_NAME: a name for the Cloud Storage stage object. For example,my_ext_unload_stage
Amazon S3
The following example shows how to move data from a Snowflake table to an Amazon S3 bucket:
In Snowflake, configure a storage integration object to allow Snowflake to write to an Amazon S3 bucket referenced in an external Cloud Storage stage.
This step involves configuring access permissions to the Amazon S3 bucket, creating the Amazon Web Services (AWS) IAM role, and creating a storage integration in Snowflake with the
CREATE STORAGE INTEGRATIONcommand:create storage integration INTEGRATION_NAME type = external_stage storage_provider = s3 enabled = true storage_aws_role_arn = 'arn:aws:iam::001234567890:role/myrole' storage_allowed_locations = ('BUCKET_NAME')
Replace the following:
INTEGRATION_NAME: a name for the storage integration. For example,s3_intBUCKET_NAME: the path to the Amazon S3 bucket to load files to. For example,s3://unload/files/
Retrieve the AWS IAM user with the
DESCRIBE INTEGRATIONcommand.desc integration INTEGRATION_NAME;
The output is similar to the following:
+---------------------------+---------------+================================================================================+------------------+
| property                  | property_type | property_value                                                                 | property_default |
+---------------------------+---------------+================================================================================+------------------|
| ENABLED                   | Boolean       | true                                                                           | false            |
| STORAGE_ALLOWED_LOCATIONS | List          | s3://mybucket1/mypath1/,s3://mybucket2/mypath2/                                | []               |
| STORAGE_BLOCKED_LOCATIONS | List          | s3://mybucket1/mypath1/sensitivedata/,s3://mybucket2/mypath2/sensitivedata/    | []               |
| STORAGE_AWS_IAM_USER_ARN  | String        | arn:aws:iam::123456789001:user/abc1-b-self1234                                 |                  |
| STORAGE_AWS_ROLE_ARN      | String        | arn:aws:iam::001234567890:role/myrole                                          |                  |
| STORAGE_AWS_EXTERNAL_ID   | String        | MYACCOUNT_SFCRole=                                                   |                  |
+---------------------------+---------------+================================================================================+------------------+
Create a role that has the
CREATE STAGEprivilege for the schema, and theUSAGEprivilege for the storage integration:CREATE role ROLE_NAME; GRANT CREATE STAGE ON SCHEMA public TO ROLE ROLE_NAME; GRANT USAGE ON INTEGRATION s3_int TO ROLE ROLE_NAME;
Replace
ROLE_NAMEwith a name for the role. For example,myrole.Grant the AWS IAM user permissions to access the Amazon S3 bucket, and create an external stage with the
CREATE STAGEcommand:USE SCHEMA mydb.public; create or replace stage STAGE_NAME url='BUCKET_NAME' storage_integration = INTEGRATION_NAMEt file_format = NAMED_FILE_FORMAT;
Replace the following:
STAGE_NAME: a name for the Cloud Storage stage object. For example,my_ext_unload_stage
Export Snowflake data
After you have prepared your data, you can move your data to Google Cloud.
Use the COPY INTO command to copy data from the Snowflake database table into a Cloud Storage or Amazon S3 bucket by specifying the external stage object, STAGE_NAME.
    copy into @STAGE_NAME/d1
    from TABLE_NAME;
Replace TABLE_NAME with the name of your Snowflake database table.
As a result of this command, the table data is copied to the stage object, which is linked to the Cloud Storage or Amazon S3 bucket. The file includes the d1 prefix.
Other export methods
To use Azure Blob Storage for your data exports, follow the steps detailed in Unloading into Microsoft Azure. Then, transfer the exported files into Cloud Storage using Storage Transfer Service.
Pricing
When planning your Snowflake migration, consider the cost of transferring data, storing data, and using services in BigQuery. For more information, see Pricing.
There can be egress costs for moving data out of Snowflake or AWS. There can also be additional costs when transferring data across regions, or transferring data across different cloud providers.
What's next
- Post migration performance and optimization.