Create a custom connector
Use this document to learn how the SOAR SDK builds custom integrations for third-party tools that may not be available in the Google Security Operations Marketplace. Connectors are used to ingest data from data sources that usually, but not always, have some sort of alert queue. Cases, alerts, and events are created in the platform using the connector's interaction with the Google SecOps application. A connector will ingest base event data, assign that data to an alert and then send the alert to the Google SecOps application and its Data Processing Pipeline.
To create a custom connector, follow these high-level steps:
- Create a Manager class that contains the API logic for the third-party tool.
- Build the connector using the IDE.
Create the Manager
The first step in creating a connector is to build a Manager class that contains all the required API logic for the technology you're integrating with. As an example, the Netskope integration in Google SecOps includes a prebuilt Manager. This Manager contains all the logic necessary to interact with the Netskope API, and can be used as a model for your own implementation.
Create the Connector
In the IDE, create a new connector by following the instructions in Building a Custom Integration. The IDE will generate a generic template that includes code comments describing the basic structure and requirements of a connector script.
While connector logic can vary, the process generally includes these core steps:
- Use the third-party tool's API to retrieve alerts, detections, or events. In the case of Netskope, this is handled by the
get_alerts()method. To make sure alerts aren't duplicated, send a query by timestamp and update it after each run. - Build an alert using the
AlertInfo(formerlyCaseInfo) class, assigning all required fields - Retrieve and flatten associated event data to prevent issues with nested lists and dictionaries, and then append the flattened events to the alert.
- Sort the alerts by time and store the latest timestamp to use in the next query.
Imports and the SDK
Every connector must do the following:
- Import the
SiemplifyConnectorExecutionclass fromSiemplifyConnectors. This class is typically instantiated in the connector'smain()function. The script ends when this object passes a list of alerts to the Google SecOps application using thereturn_package()method. - Import the
AlertInfoclass fromSiemplifyConnectorsDataModel. Instantiating this class creates the alert object. In this example, it's renamed toSiemplifyAlertInfoto avoid confusion with the source system's built-in alert objects (Netskope), where this renaming is optional.
The SiemplifyUtils module provides commonly used methods for logging, handling data formats, time conversions, and more. We recommend that you import output_handler, dict_to_flat, and unix_now, as they are essential for core functionality, including time handling.
Most connectors also import the integration's Manager class. Some integrations include more than one Manager. Additional standard Python libraries can also be imported, depending on your use case.
Constant variables
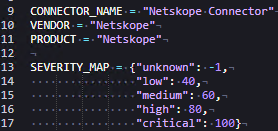
It's good practice to declare a few constant
variables for later use.
Example of script to create the Google SecOps alert
An alert is created by instantiating an object of the AlertInfo
class as discussed previously. In this example, it's renamed to SiemplifyAlertInfo() to avoid confusion with the source system. The alert_info object includes several required properties
that must be defined for the application to correctly process the alert.
The build_alert_info function receives a Netskope alert
(in raw JSON format, received from the API) and the Siemplify object
as inputs. It then parses the Netskope alert and assigns
the relevant values to the `alert_info` fields.
This function also uses previously defined constants. All properties set on the alert_info object become part of the alert object within the Google SecOps application.
Line 35 (in Figure 2) highlights an important part of this process: the alert is flattened using the dict_to_flat method, then appended to the events property.
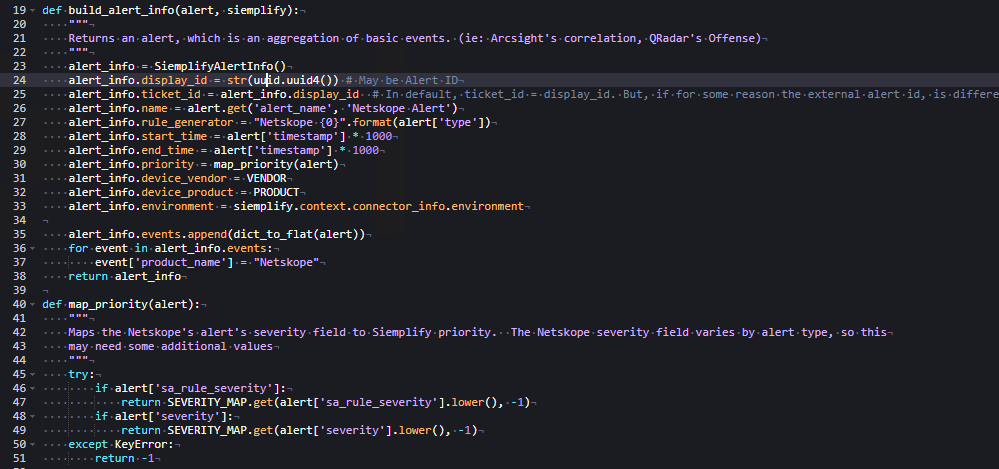
An alert can contain multiple events, If that's the case, you must include logic to handle each event appropriately. In this example, each alert contains only one event, so the default implementation is sufficient.
The dict_to_flat method is used to flatten the raw JSON structure. This helps avoid issues with nested lists and dictionaries. Flattened key-value pairs are slightly modified versions of the originals.
Review the following logic in Figure 2:
display_idis assigned a randomly generated value using theuuidlibrary. Netskope alerts doN't provide a UUID field, but if one were available, it could be used instead.ticket_idis set to matchdisplay_id. Both fields must be unique per alert in the system. This uniqueness is ensured by generating a random UUID.nameis the Alert Name and will be displayed in the GUI.rule_generatorrefers to the rule that generated the alert in the source system. This field may not always be present in the raw data. If it's missing, you can assign any string value—but it must not be left empty.start_timeandend_timerepresent the alert's timestamps. In this example, the Netskope alert provides a Unix epoch timestamp, which must be multiplied by 1000 to convert it to milliseconds. This is the expected format for Google SecOps. If the source uses a different format, you must convert it. Refer to theSiemplifyUtils.pymodule for helpful time conversion methods.priority: the Google SecOps application assigns a Priority to each case based on the priority of its alert. The Google SecOps API maps numerical values to the visual labels using the following scheme, where the integer value is passed in the connector:{"Informative": -1, "Low": 40, "Medium": 60, "High": 80, "Critical": 100}where the integer value is what's passed in the Connector. For example, passing `100` marks the alert as Critical in the GUI. In this connector, an additional helper function maps Netskope's severity values to this priority scale using the `SEVERITY_MAP` constant. However, because Netskope's severity fields are inconsistent, the mapping requires extra logic to evaluate multiple fields.device_vendoranddevice_productare assigned values from constants defined earlier in the script.environmentis critical when using multiple environments in Google SecOps. In this case, it comes from thesiemplifyobject and aligns with the environment selected for the connector in the platform.- In Line 37 (Figure 3), the connector modifies the base event dictionary
by adding a new key,
product_name, with the value `"Netskope"`. This is necessary because the raw data does not include a consistent product field that can be used for mapping and modeling in the platform's ontology.
Figure 3: Modifying the base event
Example of script to run the Connector
The main function contains the core execution logic for the connector:
- The
output_handlerdecorator is used for debugging purposes and is not covered in this document. - The
mainfunction includes an optional parameter,is_test_run, which defaults toFalse. As the name implies, this parameter determines whether the connector should ingest alerts in production or run in test mode from the Connector Testing tab in the application.
Review the breakdown of the core execution logic per script line:
- Lines 56 and 57 initialize two empty lists used during execution.
- In line 58, the
SiemplifyConnectorExecutionclass instantiates thesiemplifyobject. This object manages most of the connector's runtime behavior. - In line 61, an instance of Connector Allowlist is created. Although not used in this connector, it's commonly used in other connectors and is not discussed in this guide.
- In lines 67–69, variables are defined for connector parameters, such as authentication credentials or configuration settings.
- In line 71, it instantiates the
NetskopeManagerobject and passes in the relevant parameters to enable successful authentication. The internal Manager logic handling the authentication is not shown in this example. - In line 73, it retrieves a timestamp from a local file created during previous connector executions. This timestamp is used to avoid reprocessing the same alerts.
- In lines 74 and 75, it handles the case where the connector is running for the first time and the timestamp is not yet set (for example, when it defaults to `0`). Because Netskope requires Unix epoch time and does not accept `0` as a valid start time, the `unix_now` function is used to retrieve the current time in milliseconds. This value is divided by `1,000` to convert it to Unix epoch seconds. The resulting start and end times are then passed to the `get_alerts` method in the Manager. While many APIs accept only a start time, the Netskope API requires both start and end times for time-based alert queries.
- In line 77, it retrieves a list of alerts from Netskope. If the connector is running in test mode, only the last alert in the list is selected (lines 79–80).
Overflow Logic
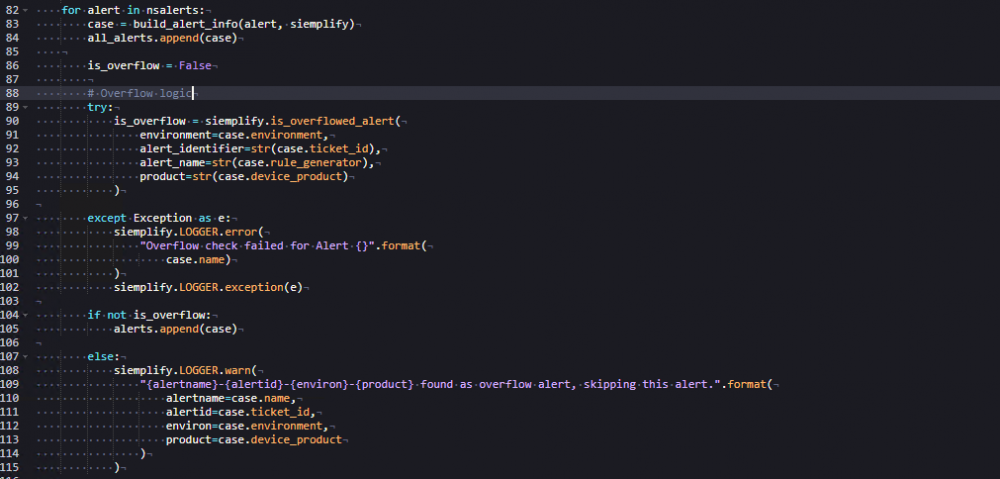
The Connector then iterates through the retrieved alerts and builds an
alert out of each alert using the build_alert_info function defined earlier. It appends each alert to the all_alerts list, initialized previously. The next part of the connector logic handles overflow.
Overflow is a threshold mechanism that prevents too many alerts from being ingested within a short period, especially when alerts share the same environment, product, and rule generator. While not mandatory, we recommend implementing overflow logic as a best practice to prevent performance degradation.
Review the overflow logic breakdown per script line in Figure 4:
- In lines 104–105, if an
alertis not classified as overflow, it's appended to the list of alerts to ingest.
Ending the connector execution
If the connector isn't running in test mode, the timestamp must be updated to reflect the last alert retrieved. This ensures that the same alerts aren't re-ingested during the next execution cycle. The all_alerts list is sorted by timestamp so that even overflowed alerts contribute to determining the latest timestamp.
Review the connector execution logic breakdown per script line in Figure 5:
- In line 126, the list of non-overflowed alerts is submitted to the application, where the alerts are then created and displayed in the GUI.
- In lines 128–131, they determine whether the connector is running in test mode. System arguments passed by the application, such as when clicking Run Connector Once on the Testing tab, are used to make this determination.
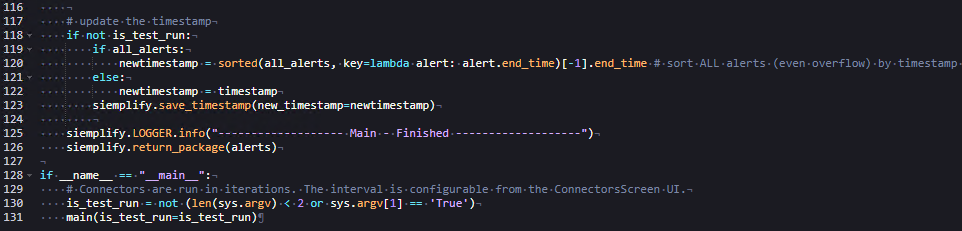
Figure 5: Ending the connector execution
Need more help? Get answers from Community members and Google SecOps professionals.