This document shows how to set up authentication to access Google Cloud when your SAP system is running on a host that is on premises, on another cloud provider, in another environment outside of Google Cloud, or managed by SAP through the SAP RISE program.
For authentication to Google Cloud, you use Google Cloud signed JSON Web Tokens (JWT) to obtain access tokens from Google Cloud. The high-level configuration steps are as follows:
- Enable the Google Cloud APIs.
- Create a service account for JWT based token retrieval.
- Configure security settings for Google Cloud on the SAP LT Replication Server host.
- Create another service account for authorization.
- Create a BigQuery dataset.
- Set up TLS/SSL certificates and HTTPS.
- Specify access settings in
/GOOG/CLIENT_KEY.
Enable the Google Cloud APIs
In your Google Cloud project, enable the required Google Cloud APIs.
For CDC replication through Pub/Sub, enable the following APIs:
- Pub/Sub API
- BigQuery API
- IAM Service Account Credentials API
For streaming data replication, enable the following APIs:
- BigQuery API
- IAM Service Account Credentials API
For information about how to enable Google Cloud APIs, see Enabling APIs.
Create a service account for JWT based token retrieval
For JWT based authentication to Google Cloud, BigQuery Connector for SAP needs an IAM service account.
Create a service account
To create a service account for JWT based token retrieval, complete the following steps:
In the Google Cloud console, go to the IAM & Admin Service accounts page.
If prompted, select your Google Cloud project.
Click Create Service Account.
Specify a name for the service account and, optionally, a description.
Click Create and Continue.
In the Grant this service account access to project panel, select the Service Account Token Creator role.
Click Continue.
As appropriate, grant other users access to the service account.
Click Done. The service account appears in the list of service accounts for the Google Cloud project.
Create a service account key
You need to create a P12 service account key for the service account used for JWT based token retrieval.
To create a service account key, complete the following steps:
In the Google Cloud console, go to the IAM & Admin Service accounts page.
Select your Google Cloud project.
Click the email address of the service account that you created for JWT based token retrieval in the previous section, Create a service account.
Under the service account name, click the Keys tab.
Click the Add Key drop-down menu, and then select Create new key to create a service account key.
Accept P12 as the key type and click Create.
A private key is saved to your computer.
Make a note of the password for the private key file,
notasecret.Provide the private key and password to your SAP administrator to import the private key into
STRUST, as described in Import the service account key into STRUST.
Enable JWT signing for the service account on the SAP LT Replication Server host
To enable JWT signing for the service account that you created for JWT based
token retrieval, you need to add the parameter
JWT_SERVC_ACCT to the table /GOOG/BQ_PARAM and configure the service account.
To enable JWT signing for a service account, complete the following steps:
In the SAP GUI, enter the
/GOOG/SLT_SETTINGStransaction preceded by/n:/n/GOOG/SLT_SETTINGSFrom the Settings Table drop-down menu in the launch screen for the
/GOOG/SLT_SETTINGStransaction, select Parameters.Click the Execute icon. The BigQuery Settings Maintenance - Parameters screen displays.
Click the Insert Row icon.
In the displayed row, specify the following settings:
- In the Parameter Name field, enter
JWT_SERVC_ACCT. The parameter description is automatically populated. - In the Parameter Value field, enter the email address of the service account that you created for JWT based token retrieval in the previous section, Create a service account.
- In the Parameter Name field, enter
Click Save.
Your settings are stored as a record in the
/GOOG/BQ_PARAMconfiguration table and the Changed By, Changed On, and Changed At fields are automatically populated.
Configure security settings for Google Cloud on the SAP LT Replication Server host
This section describes how to configure security settings for Google Cloud
on the SAP LT Replication Server host, which involves creating an SSF Application entry
and importing the service account key into STRUST.
Create a new Secure Store and Forward (SSF) Application
In the table SSFAPPLIC, the ZG_JWT entry is imported as
part of the BigQuery Connector for SAP transport. In case, the ZG_JWT entry
is not imported, you need to create a new entry with the name ZG_JWT
by using transaction SE16.
To create a new entry in the table SSFAPPLIC, complete the following steps:
- In the SAP GUI, enter transaction code
SE16. - In the Table Name field, enter
SSFAPPLIC, and then create a new entry. - For the APPLIC field, enter
ZG_JWT. - Except the B_INCCERTS, B_DETACHED, B_ASKPWD, and B_DISTRIB fields, select all other fields.
- In the DESCRIPT field, enter
JWT Signature for GCP. Save the new entry.
This entry becomes a new node in transaction
STRUST, where you import the service account key.
Enable the STRUST node
Use transaction SSFA to enable the STRUST node for JWT Signature for GCP.
To enable the STRUST node, complete the following steps:
- In the SAP GUI, enter transaction
SSFA. - Click New Entries.
In the SSF Application drop-down list, select
JWT Signature for GCP. This is the new entry that you created in the tableSSFAPPLIC.The following screenshot shows the application-specific SSF parameters that are automatically populated by SAP.
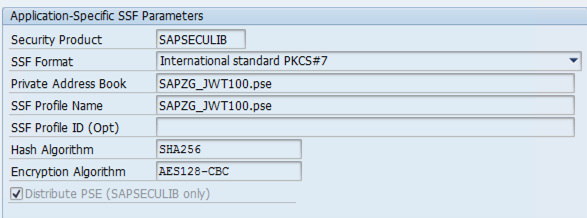
Save the new entry.
A new node
SSF JWT Signature for GCPis enabled in transactionSTRUST. Now you import the service account key into this node.
Import the service account key into STRUST
To import the service account key into STRUST, complete the following steps:
In the SAP GUI, enter transaction code
STRUST.Verify the new node in transaction
STRUSTisSSF JWT Signature for GCP.Import the private key file:
- Select PSE > Import from the menu bar.
- Depending on your source system type, select the appropriate private key:
- S4/HANA
- Select the P12 private key.
- Enter the file password
notasecret, and then click OK.
- ECC
- Select the PSE private key. You need to convert the P12 private key that you downloaded earlier into a PSE private key. For more information about converting a P12 key into a PSE key, see Convert P12 key into PSE key.
- Enter the file PIN that you created during the private key conversion from P12 key to PSE key, and then click OK.
- S4/HANA
Select PSE > Save as.
Select the SSF Application option button, and in the corresponding field, select the new SSF Application node that you created in Create a new Secure Store and Forward (SSF) Application.
Save the new entry.
The service key is attached to the SSF application node
SSF JWT Signature for GCP.
Convert the P12 private key into PSE key
If your source system is SAP NetWeaver 7.0x (SAP ECC), then you need to convert the P12 key into a PSE key.
To convert the P12 key into a PSE key, complete the following steps:
Go to the path:
/usr/sap/SID/SYS/exe/run/
Replace SID with the SAP system ID.
Run the following command after replacing the placeholders:
sapgenpse import_p12 -p PSE_PATH_AND_FILE_NAME P12_PATH_AND_FILE_NAME.p12
Replace the following:
PSE_PATH_AND_FILE_NAME: Specify the path and filename for the PSE file.P12_PATH_AND_FILE_NAME: Specify the path and filename for the P12 key file.
Enter the password of P12 private key file,
notasecret.Create a new PIN for the PSE private key and re-enter your PIN.
Make a note of the PIN, you need to provide this PIN when importing the PSE private key file into
STRUST.
For information from SAP about about how to convert a P12 key into a PSE key, see:
- SAP Note 2148457 - How to convert the keypair of a PKCS#12 / PFX container into a PSE file
- SAP Note 2976401 - "import_p12: Error creating PSE" error during converting keypair of PKCS#12 / PFX container into PSE file
Create a service account for authorization
The section describes the process of creating a service account for authorization and setting up TLS/SSL certificates for secure communication.
Create a service account
BigQuery Connector for SAP needs an IAM service account for authentication and authorization to access Google Cloud resources.
This service account must be a principal in the Google Cloud project that contains your enabled Google Cloud APIs. If you create the service account in the same project as the Google Cloud APIs, the service account is added as a principal to the project automatically.
If you create the service account in a project other than the project that contains the enabled Google Cloud APIs, then you need to add the service account to the enabled Google Cloud APIs project in an additional step.
To create a service account, do the following:
In the Google Cloud console, go to the IAM & Admin Service accounts page.
If prompted, select your Google Cloud project.
Click Create Service Account.
Specify a name for the service account and, optionally, a description.
Click Create and Continue.
If you are creating the service account in the same project as the enabled Google Cloud APIs, in the Grant this service account access to project panel, select the roles as appropriate:
For CDC replication through Pub/Sub, select the following roles:
- Pub/Sub Editor
- BigQuery Data Editor
- BigQuery Job User
For streaming data replication, select the following roles:
- BigQuery Data Editor
- BigQuery Job User
If you are creating the service account in a different project than the enabled Google Cloud APIs project, don't grant any roles to the service account.
Click Continue.
As appropriate, grant other users access to the service account.
Click Done. The service account appears in the list of service accounts for the project.
If you created the service account in a different project than the project that contains the enabled Google Cloud APIs, note the name of the service account. You specify the name when you add the service account to the enabled Google Cloud APIs project. For more information, see Add the service account to the BigQuery project.
The service account is now listed as a principal on the IAM Permissions page of the Google Cloud project in which the service account was created.
Add the service account to the target project
If you created the service account for BigQuery Connector for SAP in a project other than the project that contains the enabled Google Cloud APIs, then you need to add the service account to the enabled Google Cloud APIs project.
If you created the service account in the same project as the enabled Google Cloud APIs, then you can skip this step.
To add an existing service account to the BigQuery dataset project, complete the following steps:
In the Google Cloud console, go to the IAM Permissions page:
Confirm that the name of the project that contains the enabled Google Cloud APIs is displayed near the top of the page. For example:
Permissions for project "
PROJECT_NAME"If it is not, switch projects.
On the IAM page, click Add. The Add principals to "
PROJECT_NAME" dialog opens.In the Add principals to "
PROJECT_NAME" dialog, complete the following steps:- In the New principals field, specify the name of the service account.
- In the Select a role field, specify BigQuery Data Editor.
- Click ADD ANOTHER ROLE. The Select a role field displays again.
- In the Select a role field, specify BigQuery Job User.
- For CDC replication through Pub/Sub, repeat the preceding step, and specify Pub/Sub Editor.
- Click Save. The service account appears in the list of project principals on the IAM page.
Create a BigQuery dataset
To create a BigQuery dataset, your user account must have the proper IAM permissions for BigQuery. For more information, see Required permissions.
In the Google Cloud console, go to the BigQuery page:
Next to your project ID, click the View actions icon, , and then click Create dataset.
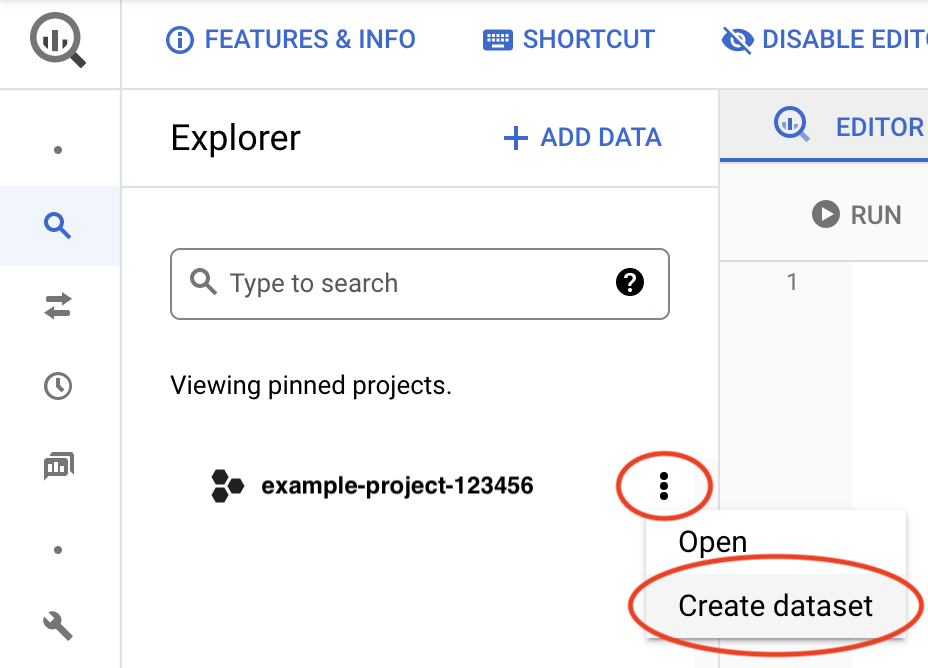
In the Dataset ID field, enter a unique name. For more information, see Name datasets.
For more information about creating BigQuery datasets, see Creating datasets.
Set up TLS/SSL certificates and HTTPS
Communication between BigQuery Connector for SAP and Google services is secured by using TLS/SSL and HTTPS.
For connecting to Google services, follow the Google Trust Services advice. At a minimum, you must download all root CA certificates from the Google Trust Services repository.
To make sure that you're using the latest trusted root CA certificates, we recommend that you update your system's root certificate store every six months. Google announces new and removed root CA certificates at Google Trust Services. For receiving automatic notifications, subscribe to the RSS feed on Google Trust Services.
In the SAP GUI, use the
STRUSTtransaction to import the root CA certificates into theSSL client SSL Client (Standard)PSE folder.For more information from SAP, see SAP Help - Maintain PSE Certification list.
On the SAP LT Replication Server host, confirm that any firewall rules or proxies are configured to allow egress traffic from the HTTPS port to the BigQuery API.
Specifically, SAP LT Replication Server needs to be able to access the following Google Cloud APIs:
https://bigquery.googleapis.comhttps://iamcredentials.googleapis.comhttps://pubsub.googleapis.com
If you want BigQuery Connector for SAP to access Google Cloud APIs through Private Service Connect endpoints in your VPC network, then you must configure RFC destinations and specify your Private Service Connect endpoints in those RFC destinations. For more information, see RFC destinations.
For more information from SAP about setting up TLS/SSL, see SAP Note 510007 - Additional considerations for setting up TLS/SSL on Application Server ABAP.
Specify access settings in /GOOG/CLIENT_KEY
Use transaction SM30 to specify settings for access to
Google Cloud. BigQuery Connector for SAP stores the settings
as a record in the /GOOG/CLIENT_KEY custom configuration table.
To specify the access settings, do the following:
In the SAP GUI, enter transaction code
SM30.Select the
/GOOG/CLIENT_KEYconfiguration table.Enter values for the following table fields:
Field Data type Description Name String Specify a descriptive name for the
CLIENT_KEYconfiguration, such asBQC_CKEY.A client key name is a unique identifier that is used by the BigQuery Connector for SAP to identify the configurations for accessing Google Cloud.
Service Account Name String The name of the service account, in email address format, that was created for BigQuery Connector for SAP in the step Create a service account. For example:
sap-example-svc-acct@example-project-123456.iam.gserviceaccount.com.Scope String The access scope. Specify the
https://www.googleapis.com/auth/cloud-platformAPI access scope, as recommended by Compute Engine.Project ID String The ID of the project that contains your target BigQuery dataset. Command name String Leave this field blank.
Authorization Class String /GOOG/CL_GCP_AUTH_JWTAuthorization Field Not applicable Leave this field blank. Token Refresh Seconds Integer Leave this field blank. Token Caching Boolean Leave this field blank.
Configure RFC destinations
To connect the BigQuery Connector for SAP to Google Cloud, we recommend that you use RFC destinations.
Sample RFC destinations GOOG_OAUTH2_TOKEN, GOOG_IAMCREDENTIALS, and GOOG_BIGQUERY
are imported as part of the BigQuery Connector for SAP transport.
You need to create new RFC destinations by copying the sample RFC destinations.
To configure the RFC destinations, do the following:
In the SAP GUI, enter transaction code
SM59.(Recommended) Create new RFC destinations by copying the sample RFC destinations, and then make a note of the new RFC destination names. You use them in later steps.
The BigQuery Connector for SAP uses RFC destinations to connect to Google Cloud APIs.
If you want to test RFC destination based connectivity, then you can skip this step and use the sample RFC destinations.
For the RFC destinations that you created, do the following:
Go to the Technical Settings tab and make sure that the Service No. field is set with the value
443. This is the port that is used by the RFC destination for secure communication.Go to the Logon & Security tab and make sure that the SSL Certificate field is set with the option DFAULT SSL Client (Standard).
Optionally, you can configure proxy settings, enable HTTP compression, and specify Private Service Connect endpoints.
Save your changes.
To test the connection, click Connection Test.
A response containing
404 Not Foundis acceptable and expected because the endpoint specified in the RFC destination corresponds to a Google Cloud service and not a specific resource hosted by the service. Such a response indicates that the target Google Cloud service is reachable and that no target resource was found.
In the SAP GUI, enter transaction code
SM30.In the
/GOOG/CLIENT_KEYtable that you created in the preceding section, note the value for the Name field.In the table
/GOOG/SERVIC_MAP, create entries with the following field values:Google Cloud Key Name Google Service Name RFC Destination CLIENT_KEY_TABLE_NAMEbigquery.googleapis.comSpecify the name of your RFC destination that targets BigQuery. If you're using the sample RFC destination for testing purposes, then specify GOOG_BIGQUERY.CLIENT_KEY_TABLE_NAMEpubsub.googleapis.comSpecify the name of your RFC destination that targets Pub/Sub. If you're using the sample RFC destination for testing purposes, then specify GOOG_PUBSUB.CLIENT_KEY_TABLE_NAMEiamcredentials.googleapis.comSpecify the name of your RFC destination that targets IAM. If you're using the sample RFC destination for testing purposes, then specify GOOG_IAMCREDENTIALS.CLIENT_KEY_TABLE_NAMEgoogleapis.com/oauth2Specify the name of your RFC destination that targets the Google OAuth 2.0 Token endpoint, used for exchanging JWTs for access tokens. If you're using the sample RFC destination for testing purposes, then specify GOOG_OAUTH2_TOKEN.Replace
CLIENT_KEY_TABLE_NAMEwith the client key name that you noted in the preceding step.
Configure proxy settings
When you use RFC destinations to connect to Google Cloud, you can route communication from BigQuery Connector for SAP through the proxy server that you're using in your SAP landscape.
If you don't want to use a proxy server or don't have one in your SAP landscape, then you can skip this step.
To configure proxy server settings for BigQuery Connector for SAP, complete the following steps:
In the SAP GUI, enter transaction code
SM59.Select your RFC destination that targets IAM.
Go to the Technical Settings tab, and then enter values for the fields in the HTTP Proxy Options section.
Repeat the previous step for your RFC destination that targets BigQuery.
Enable HTTP compression
When you use RFC destinations to connect to Google Cloud, you can enable HTTP compression.
If you don't want to enable this feature, then you can skip this step.
To enable HTTP compression, do the following:
In the SAP GUI, enter transaction code
SM59.Select your RFC destination that targets BigQuery.
Go to the Special Options tab.
For the HTTP Version field, select HTTP 1.1.
For the Compression field, select an appropriate value.
For information about the compression options, see SAP Note 1037677 - HTTP compression compresses certain documents only
Specify Private Service Connect endpoints
If you want BigQuery Connector for SAP to use Private Service Connect endpoints to allow private consumption of BigQuery and IAM, then you need to create those endpoints in your Google Cloud project and specify them in the respective RFC destinations.
If you want BigQuery Connector for SAP to continue using the default, public API endpoints to connect to BigQuery and IAM, then skip this step.
To configure BigQuery Connector for SAP to use your Private Service Connect endpoints, do the following:
In the SAP GUI, enter transaction code
SM59.Validate that you have created new RFC destinations for BigQuery and IAM. For instructions to create these RFC destinations, see Configure RFC destinations.
Select the RFC destination that targets BigQuery and then do the following:
Go to the Technical Settings tab.
For the Target Host field, enter the name of the Private Service Connect endpoint that you created to access BigQuery.
Go to the Logon and Security tab.
For the Service No. field, make sure that value
443is specified.For the SSL Certificate field, make sure that the option DFAULT SSL Client (Standard) is selected.
Select the RFC destination that targets IAM and then do the following:
Go to the Technical Settings tab.
For the Target Host field, enter the name of the Private Service Connect endpoint that you created to access IAM.
Go to the Logon and Security tab.
For the Service No. field, make sure that value
443is specified.For the SSL Certificate field, make sure that the option DFAULT SSL Client (Standard) is selected.