Anda mungkin mendapati bahwa deteksi pilihan yang disediakan oleh tim Google Cloud Threat Intelligence (GCTI)
menghasilkan terlalu banyak deteksi. Anda dapat mengonfigurasi pengecualian pada aturan deteksi pilihan untuk membantu mengurangi volume deteksi ini. Pengecualian aturan hanya digunakan dengan deteksi yang dikurasi Google Security Operations.
Untuk mengonfigurasi pengecualian pada aturan deteksi yang dikurasi, selesaikan langkah-langkah berikut:
Di menu navigasi, pilih Rules & Detections. Klik tab Pengecualian.
Klik Buat Pengecualian untuk membuat pengecualian baru. Jendela Buat Pengecualian akan terbuka.
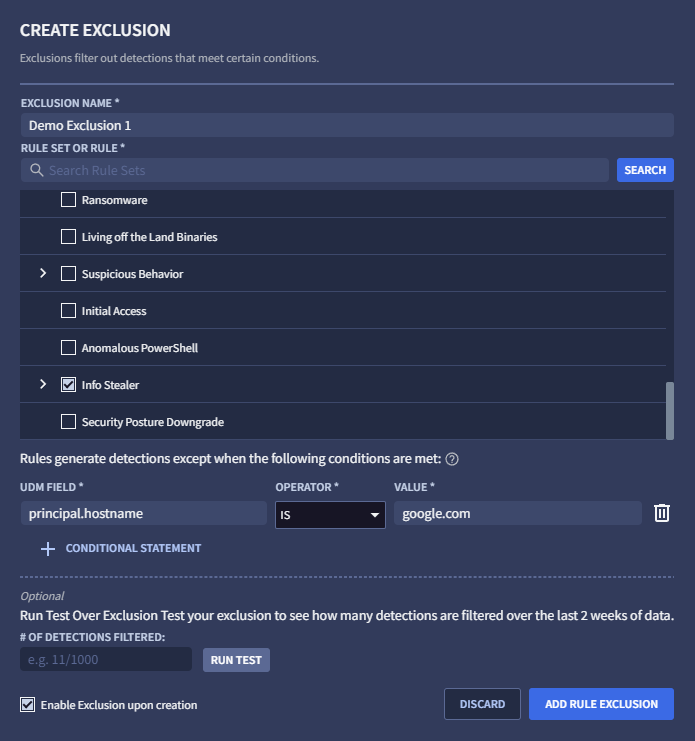
Gambar 1: Buat Pengecualian
Tentukan nama pengecualian yang unik. Nama ini akan muncul dalam daftar pengecualian di tab Pengecualian.
Pilih Aturan atau Kumpulan Aturan untuk menerapkan pengecualian. Anda dapat men-scroll daftar aturan atau menelusuri aturan tertentu menggunakan kolom penelusuran dan mengklik Telusuri.
Aturan dalam set aturan hanya ditampilkan jika memicu deteksi.
Masukkan nilai UDM yang akan dikecualikan dengan memilih Kolom UDM, menentukan operator, dan memasukkan nilai. Anda harus menekan tombol Enter untuk setiap nilai, jika tidak, Anda akan menerima pesan error saat mengklik + Pernyataan Bersyarat. Misalnya, Anda mungkin ingin mengonfigurasi pengecualian saat principal.hostname = google.com.
Anda dapat memasukkan nilai tambahan ke dalam ketentuan. Setiap kali Anda menekan tombol Enter, nilai akan dicatat dan Anda dapat memasukkan nilai lain. Beberapa nilai untuk satu kondisi digabungkan menggunakan OR logis, yang berarti pengecualian cocok jika salah satu nilai cocok.
Anda dapat menambahkan kondisi tambahan ke pengecualian ini dengan mengklik + Pernyataan Bersyarat. Jika Anda mencoba menentukan kondisi yang tidak valid, Anda akan menerima pesan error. Beberapa kondisi digabungkan menggunakan AND logis, yang berarti pengecualian hanya cocok jika setiap kondisi juga cocok.
(Opsional) Klik Jalankan Tes untuk menentukan jumlah pengecualian yang akan dilakukan jika diaktifkan, yang dihitung dengan mengevaluasi pengecualian selama dua minggu terakhir dari deteksi yang tercatat.
(Opsional) Hapus centang Aktifkan Pengecualian setelah Pembuatan jika Anda ingin menonaktifkan pengecualian untuk saat ini (opsi ini diaktifkan secara default).
Klik Tambahkan Pengecualian Aturan jika sudah siap.
Membuat pengecualian dari penampil UDM
Anda juga dapat membuat pengecualian dari dalam penampil UDM dengan menyelesaikan langkah-langkah berikut:
Di menu navigasi, pilih Rules & Detections. Klik tab Deteksi yang Dikurasi.
Klik Dasbor, lalu pilih aturan dengan deteksi.
Buka acara di Linimasa, lalu klik ikon penampil Peristiwa UDM dan Log Mentah.
Di tampilan Peristiwa UDM, pilih kolom UDM yang akan dikecualikan, pilih Opsi Tampilan, lalu pilih Kecualikan. Jendela Buat Pengecualian akan terbuka. Jendela ini sudah diisi sebelumnya dengan aturan, kolom UDM, dan nilai yang diambil dari pilihan UDM Anda.
Beri nama unik untuk pengecualian baru.
(Opsional) Klik Jalankan Tes untuk menentukan jumlah pengecualian yang akan dilakukan jika diaktifkan, yang dihitung dengan mengevaluasi pengecualian selama dua minggu terakhir dari deteksi yang tercatat.
Klik Tambahkan Pengecualian Aturan jika sudah siap.
Mengelola pengecualian
Setelah membuat satu atau beberapa pengecualian, Anda memiliki opsi berikut dari tab Pengecualian (di menu navigasi, pilih Aturan & Deteksi. Klik tab Pengecualian.):
Pengecualian tercantum dalam tabel pengecualian. Anda dapat menonaktifkan pengecualian yang tercantum dengan menyetel tombol Diaktifkan ke Dinonaktifkan.
Anda dapat memfilter pengecualian yang ditampilkan dengan mengklik ikon filter filter_alt. Pilih opsi Diaktifkan, Dinonaktifkan, atau Diarsipkan sesuai kebutuhan.
Untuk mengedit pengecualian, klik ikon menu more_vert, lalu pilih Edit.
Untuk mengarsipkan pengecualian, klik ikon menu more_vert, lalu pilih Arsipkan.
Untuk mengembalikan pengecualian dari arsip, klik ikon menu more_vert, lalu pilih Kembalikan dari arsip.
[[["Mudah dipahami","easyToUnderstand","thumb-up"],["Memecahkan masalah saya","solvedMyProblem","thumb-up"],["Lainnya","otherUp","thumb-up"]],[["Sulit dipahami","hardToUnderstand","thumb-down"],["Informasi atau kode contoh salah","incorrectInformationOrSampleCode","thumb-down"],["Informasi/contoh yang saya butuhkan tidak ada","missingTheInformationSamplesINeed","thumb-down"],["Masalah terjemahan","translationIssue","thumb-down"],["Lainnya","otherDown","thumb-down"]],["Terakhir diperbarui pada 2025-08-21 UTC."],[[["\u003cp\u003eRule exclusions in Google Security Operations allow you to reduce the volume of detections generated by Google Cloud Threat Intelligence (GCTI) curated detection rules.\u003c/p\u003e\n"],["\u003cp\u003eExclusions can be created from the Exclusions tab in the Rules & Detections section by specifying a unique name, selecting the rule or rule set, and entering the UDM field values to exclude.\u003c/p\u003e\n"],["\u003cp\u003eYou can create exclusions directly from the UDM viewer by selecting a UDM field within an event, and the exclusion window will be pre-populated with relevant information.\u003c/p\u003e\n"],["\u003cp\u003eExclusions can be managed from the Exclusions tab, where you can enable, disable, filter, edit, archive, or unarchive them.\u003c/p\u003e\n"],["\u003cp\u003eBefore finalizing an exclusion, you have the option to run a test to see how many detections would have been excluded in the past two weeks.\u003c/p\u003e\n"]]],[],null,["Configure rule exclusions \nSupported in: \nGoogle secops [SIEM](/chronicle/docs/secops/google-secops-siem-toc)\n\nCreate exclusions from the Exclusions tab\n\nYou might find that the curated detections provided by the Google Cloud Threat Intelligence (GCTI) team\nare generating too many detections. You can configure exclusions to the curated detection\nrules to help reduce the volume of these detections. Rule exclusions are used only with Google Security Operations\ncurated detections.\n\nTo configure an exclusion to a curated detection rule, complete the following steps:\n\n1. In the navigation bar, select **Rules \\& Detections** . Click the **Exclusions** tab.\n\n2. Click **Create Exclusion** to create a new exclusion. The **Create Exclusion** window opens.\n\n **Figure 1: Create Exclusion**\n3. Specify a unique exclusion name. This name will appear in the list of exclusions on the Exclusions tab.\n\n4. Select the Rule or Rule Set to apply the exclusion to. You can either scroll through the list of rules or search for a particular rule using the search field and clicking **Search**.\n Rules in a rule set are displayed only if they triggered a detection.\n\n5. Enter the UDM value to exclude by selecting a **UDM Field** , specifying an operator, and entering a value. You must press the Enter key for each value, otherwise you receive an error message when you click **+ Conditional Statement** . For example, you might want to configure an exclusion when `principal.hostname = google.com`.\n\n You can enter additional values to a condition. Each time you press the Enter key, the value is recorded and you are able to enter another value. Multiple values for one condition are joined using a logical OR, meaning an exclusion matches if any of the values matches.\n\n You can add additional conditions to this exclusion by clicking **+ Conditional Statement**. If you attempt to specify an invalid condition, you will receive an error message. Multiple conditions are joined using a logical AND, meaning an exclusion only matches if every one of the conditions also matches.\n6. (Optional) Click **Run Test** to determine how many exclusions would be made if enabled, computed by evaluating the exclusion over the past two weeks of recorded detections.\n\n7. (Optional) Uncheck **Enable Exclusion Upon Creation** if you want to disable the exclusion for the time being (this option is enabled by default).\n\n8. Click **Add Rule Exclusion** when ready.\n\nCreate exclusions from the UDM viewer\n\nYou can also create exclusions from within the UDM viewer by completing the following steps:\n\n1. In the navigation bar, select **Rules \\& Detections** . Click the **Curated Detections** tab.\n\n2. Click **Dashboard** and then select a rule with detections.\n\n3. Navigate to an event in the **Timeline** and click the Raw Log and UDM Event viewer icon.\n\n4. In the UDM Event view, select the UDM field to exclude, select **View Options** , and then select **Exclude** . The **Create Exclusion** window opens. The window is pre-populated with the rule, UDM field, and value drawn from your UDM selection.\n\n5. Give the new exclusion a unique name.\n\n6. (Optional) Click **Run Test** to determine how many exclusions would be made if enabled, computed by evaluating the exclusion over the past two weeks of recorded detections.\n\n7. Click **Add Rule Exclusion** when ready.\n\nManage exclusions\n\nOnce you have created one or more exclusions, you have the following options from the **Exclusions** tab (in the navigation bar, select **Rules \\& Detections** . Click the **Exclusions** tab.):\n\n- The exclusions are listed in the exclusions table. You can disable any of the exclusions listed by setting the **Enabled** toggle to the **Disabled**.\n- You can filter which exclusions are displayed by clicking the filter icon filter_alt. Select the **Enabled** , **Disabled** , or **Archived** options as needed.\n- To edit an exclusion, click the menu icon more_vert and select **Edit**.\n- To archive an exclusion, click the menu icon more_vert and select **Archive**.\n- To unarchive an exclusion, click the menu icon more_vert and select **Unarchive**.\n\n**Need more help?** [Get answers from Community members and Google SecOps professionals.](https://security.googlecloudcommunity.com/google-security-operations-2)"]]