Talvez as detecções selecionadas fornecidas pela equipe do Google Cloud Google Cyber Threat Intelligence (GCTI)
estejam gerando muitas detecções. É possível configurar exclusões nas regras de detecção selecionadas para reduzir o volume dessas detecções. As exclusões de regra são usadas apenas com detecções selecionadas do Google Security Operations.
Para configurar uma exclusão em uma regra de detecção selecionada, siga estas etapas:
Na barra de navegação, selecione Regras e detecções. Clique na guia Exclusões.
Clique em Criar exclusão para criar uma exclusão. A janela Criar exclusão é aberta.
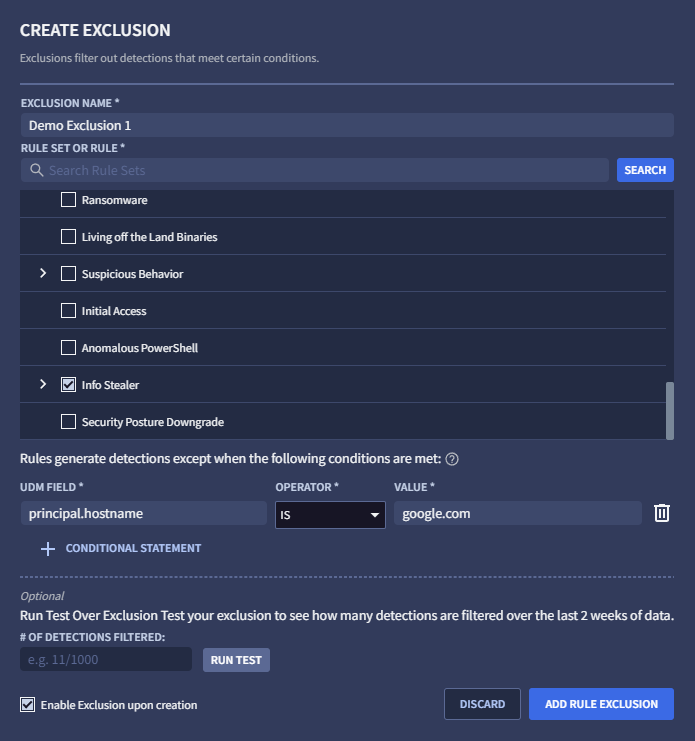
Figura 1: criar exclusão
Especifique um nome de exclusão exclusivo. Esse nome vai aparecer na lista de exclusões na guia "Exclusões".
Selecione a regra ou o conjunto de regras a que você quer aplicar a exclusão. Role a lista de regras ou pesquise uma regra específica usando o campo de pesquisa e clicando em Pesquisar.
As regras em um conjunto de regras só são mostradas se acionarem uma detecção.
Para excluir um valor da UDM, selecione um Campo da UDM, especifique um operador e insira um valor. É necessário pressionar a tecla "Enter" para cada valor. Caso contrário, você vai receber uma mensagem de erro ao clicar em + Instrução condicional. Por exemplo, talvez você queira configurar uma exclusão quando principal.hostname = google.com.
É possível inserir outros valores em uma condição. Cada vez que você pressiona a tecla "Enter", o valor é registrado, e você pode inserir outro valor. Vários valores para uma condição são unidos usando um OR lógico, o que significa que uma exclusão corresponde se algum dos valores corresponder.
Para adicionar outras condições a essa exclusão, clique em + Instrução condicional. Se você tentar especificar uma condição inválida, vai receber uma mensagem de erro. Várias condições são unidas usando um AND lógico, o que significa que uma exclusão só corresponde se todas as condições também corresponderem.
(Opcional) Clique em Executar teste para determinar quantas exclusões seriam feitas se ativadas, calculadas avaliando a exclusão nas últimas duas semanas de detecções registradas.
(Opcional) Desmarque Ativar exclusão após a criação se quiser desativar a exclusão por enquanto. Essa opção fica ativada por padrão.
Clique em Adicionar exclusão de regra quando terminar.
Criar exclusões no visualizador da UDM
Também é possível criar exclusões no visualizador de UDM seguindo estas etapas:
Na barra de navegação, selecione Regras e detecções. Clique na guia Detecções selecionadas.
Clique em Painel e selecione uma regra com detecções.
Navegue até um evento na Linha do tempo e clique no ícone do visualizador de eventos UDM e registros brutos.
Na visualização de eventos da UDM, selecione o campo que você quer excluir, clique em Opções de visualização e em Excluir. A janela Criar exclusão é aberta. A janela é pré-preenchida com a regra, o campo da UDM e o valor extraído da sua seleção de UDM.
Dê um nome exclusivo à nova exclusão.
(Opcional) Clique em Executar teste para determinar quantas exclusões seriam feitas se ativadas, calculadas avaliando a exclusão nas últimas duas semanas de detecções registradas.
Clique em Adicionar exclusão de regra quando terminar.
Gerenciar exclusões
Depois de criar uma ou mais exclusões, você terá as seguintes opções na guia Exclusões. Na barra de navegação, selecione Regras e detecções. Clique na guia Exclusões:
As exclusões estão listadas na tabela de exclusões. Para desativar qualquer uma das exclusões listadas, defina a opção Ativada como Desativada.
Para filtrar as exclusões mostradas, clique no ícone de filtro filter_alt. Selecione as opções Ativado, Desativado ou Arquivado conforme necessário.
Para editar uma exclusão, clique no ícone de menu more_vert e selecione Editar.
Para arquivar uma exclusão, clique no ícone de menu more_vert e selecione Arquivar.
Para desarquivar uma exclusão, clique no ícone de menu more_vert e selecione Desarquivar.
[[["Fácil de entender","easyToUnderstand","thumb-up"],["Meu problema foi resolvido","solvedMyProblem","thumb-up"],["Outro","otherUp","thumb-up"]],[["Difícil de entender","hardToUnderstand","thumb-down"],["Informações incorretas ou exemplo de código","incorrectInformationOrSampleCode","thumb-down"],["Não contém as informações/amostras de que eu preciso","missingTheInformationSamplesINeed","thumb-down"],["Problema na tradução","translationIssue","thumb-down"],["Outro","otherDown","thumb-down"]],["Última atualização 2025-08-21 UTC."],[[["\u003cp\u003eRule exclusions in Google Security Operations allow you to reduce the volume of detections generated by Google Cloud Threat Intelligence (GCTI) curated detection rules.\u003c/p\u003e\n"],["\u003cp\u003eExclusions can be created from the Exclusions tab in the Rules & Detections section by specifying a unique name, selecting the rule or rule set, and entering the UDM field values to exclude.\u003c/p\u003e\n"],["\u003cp\u003eYou can create exclusions directly from the UDM viewer by selecting a UDM field within an event, and the exclusion window will be pre-populated with relevant information.\u003c/p\u003e\n"],["\u003cp\u003eExclusions can be managed from the Exclusions tab, where you can enable, disable, filter, edit, archive, or unarchive them.\u003c/p\u003e\n"],["\u003cp\u003eBefore finalizing an exclusion, you have the option to run a test to see how many detections would have been excluded in the past two weeks.\u003c/p\u003e\n"]]],[],null,["Configure rule exclusions \nSupported in: \nGoogle secops [SIEM](/chronicle/docs/secops/google-secops-siem-toc)\n\nCreate exclusions from the Exclusions tab\n\nYou might find that the curated detections provided by the Google Cloud Threat Intelligence (GCTI) team\nare generating too many detections. You can configure exclusions to the curated detection\nrules to help reduce the volume of these detections. Rule exclusions are used only with Google Security Operations\ncurated detections.\n\nTo configure an exclusion to a curated detection rule, complete the following steps:\n\n1. In the navigation bar, select **Rules \\& Detections** . Click the **Exclusions** tab.\n\n2. Click **Create Exclusion** to create a new exclusion. The **Create Exclusion** window opens.\n\n **Figure 1: Create Exclusion**\n3. Specify a unique exclusion name. This name will appear in the list of exclusions on the Exclusions tab.\n\n4. Select the Rule or Rule Set to apply the exclusion to. You can either scroll through the list of rules or search for a particular rule using the search field and clicking **Search**.\n Rules in a rule set are displayed only if they triggered a detection.\n\n5. Enter the UDM value to exclude by selecting a **UDM Field** , specifying an operator, and entering a value. You must press the Enter key for each value, otherwise you receive an error message when you click **+ Conditional Statement** . For example, you might want to configure an exclusion when `principal.hostname = google.com`.\n\n You can enter additional values to a condition. Each time you press the Enter key, the value is recorded and you are able to enter another value. Multiple values for one condition are joined using a logical OR, meaning an exclusion matches if any of the values matches.\n\n You can add additional conditions to this exclusion by clicking **+ Conditional Statement**. If you attempt to specify an invalid condition, you will receive an error message. Multiple conditions are joined using a logical AND, meaning an exclusion only matches if every one of the conditions also matches.\n6. (Optional) Click **Run Test** to determine how many exclusions would be made if enabled, computed by evaluating the exclusion over the past two weeks of recorded detections.\n\n7. (Optional) Uncheck **Enable Exclusion Upon Creation** if you want to disable the exclusion for the time being (this option is enabled by default).\n\n8. Click **Add Rule Exclusion** when ready.\n\nCreate exclusions from the UDM viewer\n\nYou can also create exclusions from within the UDM viewer by completing the following steps:\n\n1. In the navigation bar, select **Rules \\& Detections** . Click the **Curated Detections** tab.\n\n2. Click **Dashboard** and then select a rule with detections.\n\n3. Navigate to an event in the **Timeline** and click the Raw Log and UDM Event viewer icon.\n\n4. In the UDM Event view, select the UDM field to exclude, select **View Options** , and then select **Exclude** . The **Create Exclusion** window opens. The window is pre-populated with the rule, UDM field, and value drawn from your UDM selection.\n\n5. Give the new exclusion a unique name.\n\n6. (Optional) Click **Run Test** to determine how many exclusions would be made if enabled, computed by evaluating the exclusion over the past two weeks of recorded detections.\n\n7. Click **Add Rule Exclusion** when ready.\n\nManage exclusions\n\nOnce you have created one or more exclusions, you have the following options from the **Exclusions** tab (in the navigation bar, select **Rules \\& Detections** . Click the **Exclusions** tab.):\n\n- The exclusions are listed in the exclusions table. You can disable any of the exclusions listed by setting the **Enabled** toggle to the **Disabled**.\n- You can filter which exclusions are displayed by clicking the filter icon filter_alt. Select the **Enabled** , **Disabled** , or **Archived** options as needed.\n- To edit an exclusion, click the menu icon more_vert and select **Edit**.\n- To archive an exclusion, click the menu icon more_vert and select **Archive**.\n- To unarchive an exclusion, click the menu icon more_vert and select **Unarchive**.\n\n**Need more help?** [Get answers from Community members and Google SecOps professionals.](https://security.googlecloudcommunity.com/google-security-operations-2)"]]