Topik ini hanya dimaksudkan sebagai contoh. Panduan ini menjelaskan cara mendapatkan sertifikat TLS dari
certificate authority (CA) Let's Encrypt.
Langkah-langkah ini disediakan terutama sebagai contoh untuk diikuti jika Anda tidak memiliki
cara siap pakai lain untuk mendapatkan pasangan sertifikat/kunci
yang diotorisasi oleh CA. Contoh ini menunjukkan cara membuat sertifikat
menggunakan CA Let's Encrypt, klien Certbot, dan Cloud DNS Google Cloud Platform.
Tempat Anda dapat menggunakan sertifikat ini
Anda harus menyediakan sertifikat TLS untuk dua gateway masuk Istio yang ditampilkan
di luar cluster:
Gateway
Persyaratan TLS
Gateway traffic masuk runtime
Anda dapat menggunakan pasangan kunci/sertifikat yang ditandatangani sendiri atau sertifikat TLS resmi.
Gateway ingress MART (opsional jika tidak menggunakan Apigee Connect)
Memerlukan pasangan kunci/sertifikat TLS resmi atau secret Kubernetes.
Anda memerlukan nama domain yang diperoleh melalui registrar nama domain. Anda dapat mendaftarkan nama domain melalui Google Domains atau registrar domain lain pilihan Anda.
Mengonfigurasi Cloud DNS
Untuk mendapatkan sertifikat TLS resmi, Anda harus memiliki nama domain yang memenuhi syarat. Langkah-langkah berikut menjelaskan cara menggunakan Google Cloud DNS untuk mendapatkan nama domain dan mengelola server domain Anda.
Jika Anda belum melakukannya, aktifkan Cloud DNS API. Lihat
Mengaktifkan API.
Buat alamat IP statis:
Jika Anda menggunakan GKE, ikuti petunjuk di
Menyiapkan alamat IP eksternal statis untuk membuat alamat IP statis yang dapat digunakan proses eksternal
untuk berkomunikasi dengan ingress runtime campuran. Anda dapat memberi alamat nama apa pun
yang diinginkan, misalnya: apigee-hybrid-runtime. Setelah selesai, Anda akan menggunakan nomor IP dalam konfigurasi cluster pada langkah berikutnya. Contoh: 34.66.75.196
Jika Anda menggunakan Anthos GKE, ikuti petunjuk dalam
dokumentasi Anthos GKE untuk membuat alamat IP statis.
Dapatkan IP Eksternal yang baru saja Anda cadangkan.
Buat kumpulan data untuk endpoint ingress Istio runtime. Ini adalah alamat untuk melakukan panggilan API ke gateway campuran. Masukkan IP Eksternal yang Anda dapatkan di langkah sebelumnya dan tambahkan awalan ke nama domain, seperti example-endpoint. Untuk mengetahui petunjuknya, lihat
Membuat data baru.
DNS Name: Nama endpoint yang akan dikomunikasikan dengan panggilan API eksternal, seperti
api-services atau example-endpoint
Resource Record Type: A
TTL dan TTL Unit: Terima default
Alamat IP: IP statis yang Anda buat.
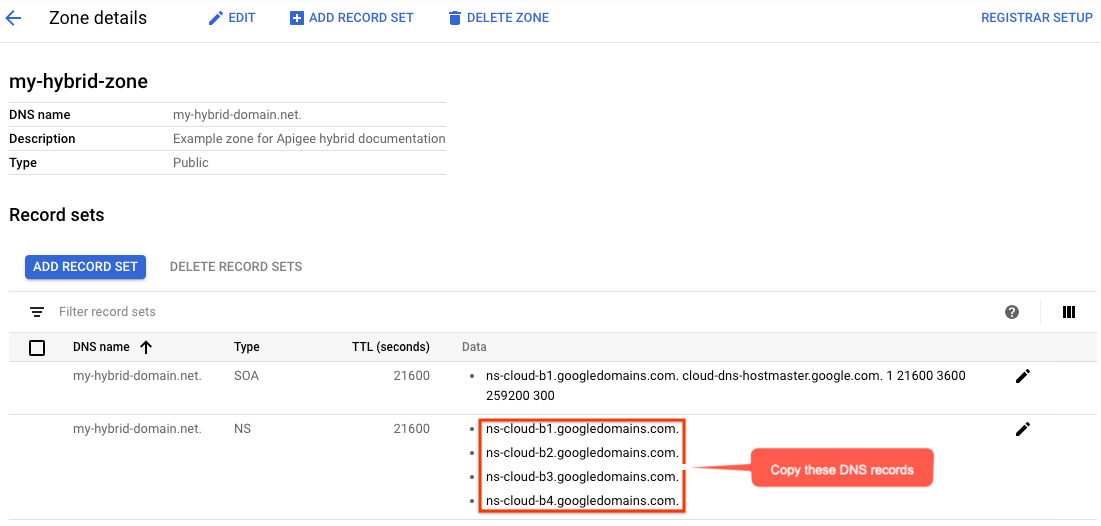
Tampilan Detail zona akan mencantumkan empat server DNS sebagai data NS untuk zona baru Anda. Salin data data DNS, seperti yang ditunjukkan dalam contoh berikut:
Kembali ke halaman domain Anda di registrar (misalnya, Google Domains).
Pilih domain Anda.
Pilih DNS.
Di bagian Server Nama, klik Edit.
Masukkan server nama domain yang Anda salin dari halaman Network Services Cloud DNS. Contoh:
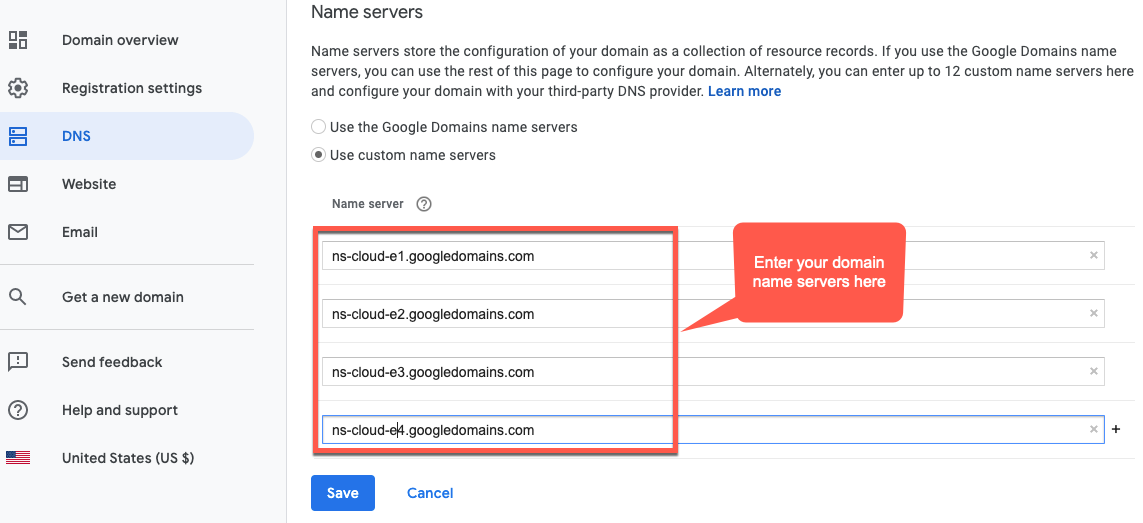
Sekarang, Google Cloud DNS akan mengelola data DNS untuk domain Anda.
Menginstal Certbot di VM
Setelah menyiapkan Cloud DNS untuk mengelola server domain, Anda akan menginstal
klien Certbot dengan
plugin dns_google di Cloud VM. Klien ini memungkinkan Anda mendapatkan sertifikat resmi untuk domain dari endpoint Let's Encrypt.
Tampilan Akun layanan menampilkan daftar akun layanan project.
Untuk membuat akun layanan baru, klik +Create Service Account di bagian atas tampilan.
Tampilan Detail akun layanan akan ditampilkan.
Di kolom Nama akun layanan, masukkan nama akun layanan.
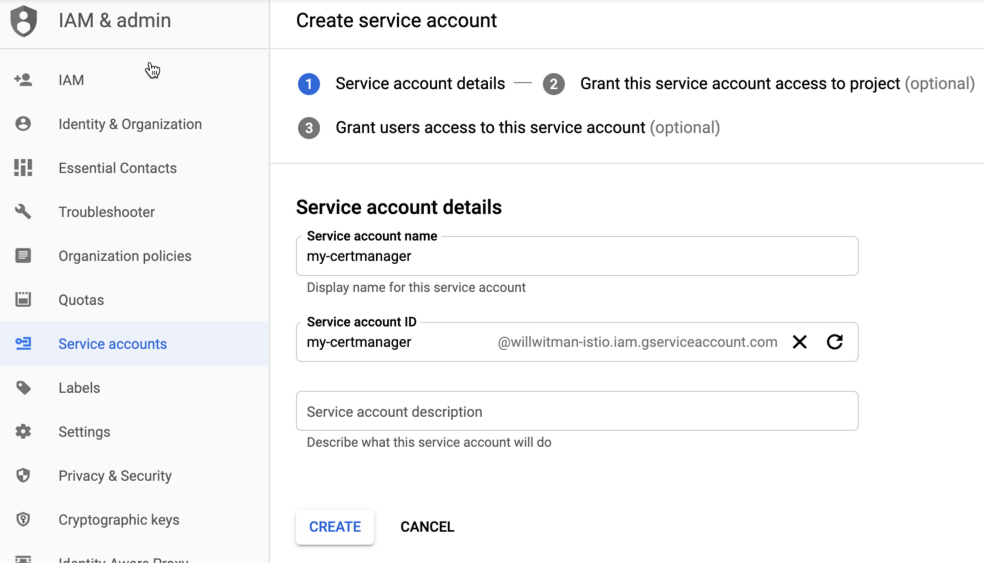
Anda dapat menambahkan deskripsi secara opsional di kolom Deskripsi akun layanan. Deskripsi membantu mengingatkan Anda tentang tujuan penggunaan akun layanan tertentu.
Klik Buat.
GCP akan membuat akun layanan baru dan menampilkan tampilan Izin akun layanan. Gunakan tampilan ini untuk menetapkan peran ke akun layanan baru Anda.
Klik menu drop-down Select a role.
Pilih peran Project Owner.
Klik Lanjutkan.
Klik Selesai.
Di konsol GCP, pilih Compute Engine > VM Instances.
Buat instance VM bernama certmanager.
Di bagian Boot Disk, pilih CentOS7 dan 20 GB untuk drive persisten SSD.
Tetapkan Akun Layanan ke akun yang Anda buat di atas.
Instal Certbot dan plugin dns_google di mesin, lalu jalankan klien Certbot:
Perbarui file penggantian Anda agar mengarah ke sertifikat dan kunci pribadi. Untuk
hostAliases, gunakan nama DNS yang Anda buat sebelumnya.
Contoh:
...
envs:
- name: test
serviceAccountPaths:
synchronizer: "your_keypath/synchronizer-manager-service-account.json
udca: "your_keypath/analytic-agent-service-account.json
virtualhosts:
- name: my-env-group
sslCertPath: "$HOME/hybrid/apigee-hybrid-setup/tls/fullchain.pem"
sslKeyPath: "$HOME/hybrid/apigee-hybrid-setup/tls/privkey.pem"
mart: # Assuming you are not using Apigee Connect
nodeSelector:
key: cloud.google.com/gke-nodepool
value: apigee-runtime
sslCertPath: "$HOME/hybrid/apigee-hybrid-setup/tls/fullchain.pem"
sslKeyPath: "$HOME/hybrid/apigee-hybrid-setup/tls/privkey.pem"
replicaCountMin: 1
replicaCountMax: 1
Atau jika menggunakan secret Kubernetes:
...
envs:
- name: test
serviceAccountPaths:
synchronizer: "your_keypath/synchronizer-manager-service-account.json
udca: "your_keypath/analytic-agent-service-account.json
virtualhosts:
- name: my-env-group
tlsMode: SIMPLE # Note: SIMPLE is the default, MUTUAL is also an available value.
sslSecret: myorg-test-policy-secret"
mart: # Assuming you are not using Apigee Connect
nodeSelector:
key: cloud.google.com/gke-nodepool
value: apigee-runtime
sslSecret: myorg-test-policy-secret"
replicaCountMin: 1
replicaCountMax: 1
...
Terapkan perubahan:
Jika Anda mengubah konfigurasi mart, terapkan perubahan tersebut:
apigeectl apply -f your_overrides_file --all-envs
Jika Anda mengubah konfigurasi envs, terapkan perubahan tersebut:
[[["Mudah dipahami","easyToUnderstand","thumb-up"],["Memecahkan masalah saya","solvedMyProblem","thumb-up"],["Lainnya","otherUp","thumb-up"]],[["Sulit dipahami","hardToUnderstand","thumb-down"],["Informasi atau kode contoh salah","incorrectInformationOrSampleCode","thumb-down"],["Informasi/contoh yang saya butuhkan tidak ada","missingTheInformationSamplesINeed","thumb-down"],["Masalah terjemahan","translationIssue","thumb-down"],["Lainnya","otherDown","thumb-down"]],["Terakhir diperbarui pada 2025-08-21 UTC."],[[["\u003cp\u003eThis document provides an example of how to obtain a TLS certificate from Let's Encrypt using Certbot and Google Cloud DNS for use with Apigee hybrid.\u003c/p\u003e\n"],["\u003cp\u003eTLS certificates are required for two Istio ingress gateways: the runtime ingress gateway (which can use self-signed certificates in non-production environments) and the MART ingress gateway.\u003c/p\u003e\n"],["\u003cp\u003eTo obtain TLS certificates, you must have a registered domain name and configure Google Cloud DNS to manage your domain's DNS records.\u003c/p\u003e\n"],["\u003cp\u003eCertbot, along with the dns_google plugin, is used on a Cloud VM to obtain authorized certificates from Let's Encrypt, which are then stored in a directory on the VM.\u003c/p\u003e\n"],["\u003cp\u003eThe authorized certificate files, 'fullchain.pem' and 'privkey.pem', can either be used by directly referencing the file paths in the overrides file or optionally used to create a kubernetes secret.\u003c/p\u003e\n"]]],[],null,["# Obtain TLS certificates: An example\n\n| You are currently viewing version 1.3 of the Apigee hybrid documentation. **This version is end of life.** You should upgrade to a newer version. For more information, see [Supported versions](/apigee/docs/hybrid/supported-platforms#supported-versions).\n\n\nThis topic is intended as an example only. It explains how to obtain a TLS certificate from\nthe certificate authority (CA) [Let's Encrypt](https://letsencrypt.org).\nThese steps are provided primarily as an example to follow if you do not have\nanother ready way to obtain a certificate/key\npair that is authorized by a CA. The example shows how to generate certificates\nusing the [Let's Encrypt](https://letsencrypt.org) CA, the\n[Certbot client](https://certbot.eff.org/about/), and Google Cloud Platform [Cloud DNS](https://cloud.google.com/dns/docs/).\n| **Note:** See also this [Apigee Community article](https://community.apigee.com/articles/86322/free-trusted-ssl-certificates-for-apigee-hybrid-in.html) on using Let's Encrypt with Apigee hybrid.\n\nWhere you can use these certificates\n------------------------------------\n\n\nYou must provide TLS certificates for two Istio ingress gateways that are exposed\noutside the cluster:\n\nSee also [External connections](/apigee/docs/hybrid/v1.3/ports#external).\n\nRequirements\n------------\n\nYou will need a domain name obtained through a domain name registrar. You can register a domain name through\nGoogle Domains or another domain registrar of your choice.\n\nConfigure Cloud DNS\n-------------------\n\nTo obtain authorized TLS certificates, you must have a qualified domain name. The following steps explain how to use [Google Cloud DNS](https://cloud.google.com/dns/) to obtain a domain name and manage your domain servers.\n\n1. Open the [Google Cloud console](https://console.cloud.google.com) and log in with the account you created in [Step 1: Create a Google Cloud account](/apigee/docs/hybrid/v1.3/precog-gcpaccount).\n2. Select the project that you created in [Step 2: Create a GCP project](/apigee/docs/hybrid/v1.3/precog-gcpproject).\n3. If you have not already done so, enable the **Cloud DNS API** . See [Enabling APIs](https://cloud.google.com/apis/docs/getting-started#enabling_apis).\n4. Create a static IP address:\n - If you are on GKE, follow the instructions in [Reserving a static external IP address](https://cloud.google.com/compute/docs/ip-addresses/reserve-static-external-ip-address) to create a static IP addresses that external processes can use to communicate with the hybrid runtime ingress. You can give the address any name you wish, for example: `apigee-hybrid-runtime`. When you finish, you will use the IP number in the cluster configuration in the next step. For example: `34.66.75.196`\n - If you are on Anthos GKE, follow instructions in the [Anthos GKE documentation](/anthos/clusters/docs/on-prem/1.6/how-to/create-admin-cluster#network) to create a static IP address.\n5. Get the External IP you just reserved.\n6. Create record set for the runtime Istio ingress endpoint. This is the address for making API calls to the hybrid gateway. Enter the External IP you obtained in the previous step and add a prefix to the domain name, such as `example-endpoint`. For instructions, see [Create a new record](https://cloud.google.com/dns/docs/set-up-dns-records-domain-name#create_a_new_record).\n 1. Create a managed public zone. For instructions, see [Create a managed public zone](https://cloud.google.com/dns/docs/set-up-dns-records-domain-name#create_a_managed_public_zone).\n 2. Create a new record set with:\n - **DNS Name** : The name of the endpoint external API calls will communicate with, like `\n api-services` or `example-endpoint`\n - **Resource Record Type** : **A**\n - **TTL** and **TTL Unit**: Accept defaults\n - **IP Adddress**: The static IP you created.\n7. The **Zone details** view will list foour DNS servers as the NS data for your new zone. Copy the DNS record data, as shown in the following example:\n\n8. Return to your domain page at your registrar (for example, [Google\n Domains](https://domains.google.com)).\n9. Select your domain.\n10. Select **DNS**.\n11. In the Name Servers section, click **Edit**.\n12. Enter the domain name servers that you copied from the Network Services Cloud DNS\n page. For example:\n\n\nNow, your Google Cloud DNS will manage the DNS records for your domain.\n\nInstall Certbot on a VM\n-----------------------\n\n\nNow that you have Cloud DNS set up to manage your domain servers, you will install the\nCertbot client with the\n[dns_google](https://certbot-dns-google.readthedocs.io/en/stable/) plugin on a Cloud VM. The client enables\nyou to get authorized certificates for your domain from a Let's Encrypt endpoint.\n\n1. Open the [Google Cloud console](https://console.cloud.google.com) and log in with the account you created in [Step 1: Create a Google Cloud account](/apigee/docs/hybrid/v1.3/precog-gcpaccount).\n2. Select the project that you created in [Step 2: Create a GCP project](/apigee/docs/hybrid/v1.3/precog-gcpproject).\n3. Select **IAM \\& admin \\\u003e Service accounts** .\n\n The **Service accounts view** displays a list of the project's service accounts.\n4. To create a new service account, click **+Create Service Account** at the top of the view.\n\n The **Service account details** view displays.\n5. In the **Service account name** field, enter the name of the service account.\n\n You can optionally add a description in the **Service account description**\n field. Descriptions are helpful at reminding you what a particular service account is used\n for.\n6. Click **Create** .\n\n GCP creates a new service account and displays the **Service account\n permissions** view. Use this view to assign a role to your new service account.\n7. Click the **Select a role** drop-down list.\n8. Select the **Project Owner** role.\n9. Click **Continue**.\n10. Click **Done**.\n11. In the GCP console, select **Compute Engine \\\u003e VM Instances**.\n12. Create a VM instance named **certmanager**.\n13. Under the Boot Disk section, choose CentOS7 and 20 GB for the SSD persistent drive.\n14. Set the Service Account to the one you created above.\n15. Install Certbot and the [dns_google](https://certbot-dns-google.readthedocs.io/en/stable/) plugin on the machine and run the Certbot client: \n\n sudo su -\n yum -y install yum-utils\n yum install certbot -y\n yum install certbot-dns-google -y\n certbot certonly --dns-google -d *.\u003cvar translate=\"no\"\u003eyour_domain_name\u003c/var\u003e,*.\u003cvar translate=\"no\"\u003eyour_domain_name\u003c/var\u003e --server https://acme-v02.api.letsencrypt.org/directory\n \n\n For example: \n\n sudo su -\n yum -y install yum-utils\n yum install certbot -y\n yum install certbot-dns-google -y\n certbot certonly --dns-google -d *.apigee-hybrid-docs.net,*.apigee-hybrid-docs.net --server https://acme-v02.api.letsencrypt.org/directory\n\n16. You can now find your authorized certificate and private key files in this directory: `cd /etc/letsencrypt/live/`\u003cvar translate=\"no\"\u003eyour_domain_name\u003c/var\u003e`/`\n\n\n For example: \n\n cd /etc/letsencrypt/live/apigee-hybrid-docs.net\n ls\n cert.pem chain.pem fullchain.pem privkey.pem README\n\n17. Copy the files `fullchain.pem` and `privkey.pem` to your local machine.\n18. *Optional* : Create a Kubernetes secret with the certificate/key pair. See the instructions in [Option 2: Kubernetes Secret](/apigee/docs/hybrid/v1.3/ingress-tls#option-2:-kubernetes-secret) in [Configuring TLS and mTLS on the Istio ingress](/apigee/docs/hybrid/v1.3/ingress-tls).\n19. Update your overrides file to point to the certificate and private key. For the `hostAliases`, use the DNS name that you created previously.\n\n\n For example: \n\n ```\n ...\n envs:\n - name: test\n serviceAccountPaths:\n synchronizer: \"your_keypath/synchronizer-manager-service-account.json\n udca: \"your_keypath/analytic-agent-service-account.json\n\n virtualhosts:\n - name: my-env-group\n sslCertPath: \"$HOME/hybrid/apigee-hybrid-setup/tls/fullchain.pem\"\n sslKeyPath: \"$HOME/hybrid/apigee-hybrid-setup/tls/privkey.pem\"\n\n mart: # Assuming you are not using Apigee Connect\n nodeSelector:\n key: cloud.google.com/gke-nodepool\n value: apigee-runtime\n sslCertPath: \"$HOME/hybrid/apigee-hybrid-setup/tls/fullchain.pem\"\n sslKeyPath: \"$HOME/hybrid/apigee-hybrid-setup/tls/privkey.pem\"\n replicaCountMin: 1\n replicaCountMax: 1\n ```\n\n\n Or if using Kubernetes secrets: \n\n ```\n ...\n envs:\n - name: test\n serviceAccountPaths:\n synchronizer: \"your_keypath/synchronizer-manager-service-account.json\n udca: \"your_keypath/analytic-agent-service-account.json\n\n virtualhosts:\n - name: my-env-group\n tlsMode: SIMPLE # Note: SIMPLE is the default, MUTUAL is also an available value.\n sslSecret: myorg-test-policy-secret\"\n\n mart: # Assuming you are not using Apigee Connect\n nodeSelector:\n key: cloud.google.com/gke-nodepool\n value: apigee-runtime\n sslSecret: myorg-test-policy-secret\"\n replicaCountMin: 1\n replicaCountMax: 1\n\n ... \n ```\n20. Apply the changes:\n If you changed the `mart` configuration, apply the changes:\n\n ```\n apigeectl apply -f your_overrides_file --all-envs\n ```\n\n\n If you changed the `envs` configuration, apply the changes: \n\n ```\n apigeectl apply -f your_overrides_file --all-envs\n ```\n\nTest the configuration\n----------------------\n\n21. Deploy and test a proxy, as explained in [Create and deploy a new API proxy](/apigee/docs/hybrid/v1.3/test-new-proxy)."]]