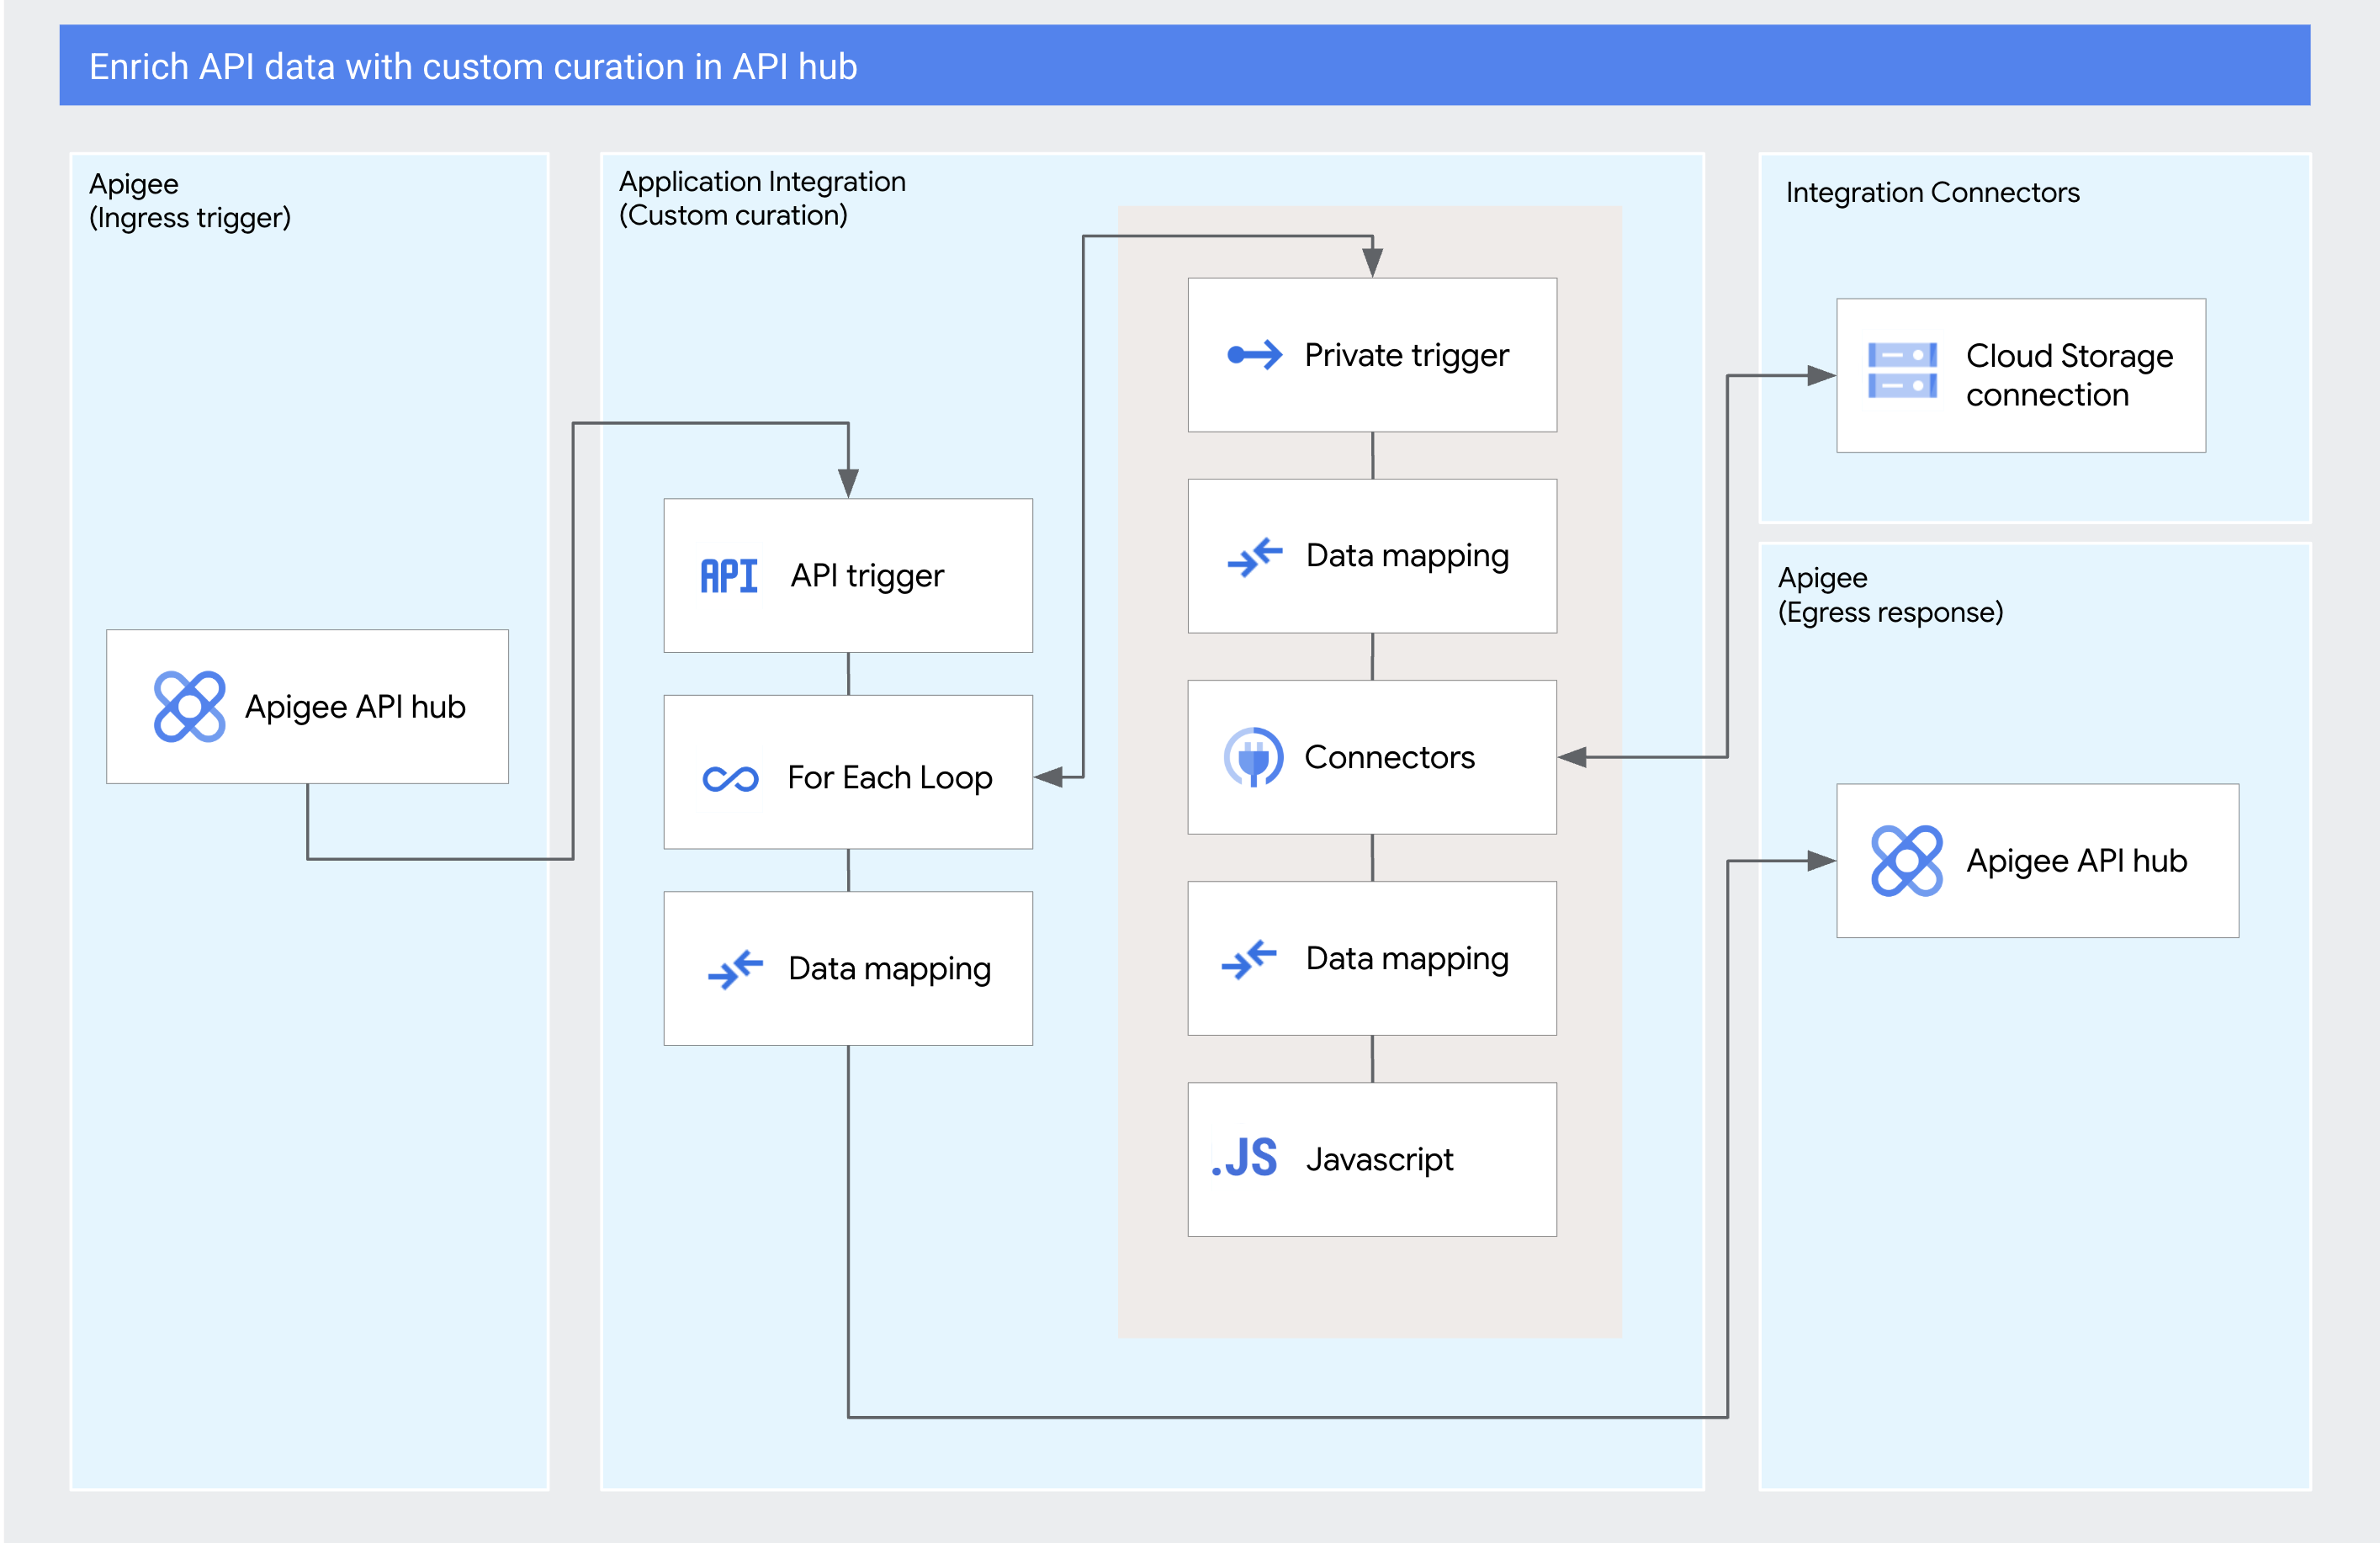
This tutorial shows you how to enrich API data in Apigee API hub with API specifications, like OpenAPI specs, that are stored outside of API hub. You'll use API hub's custom curation features to automatically fetch API specifications from a Cloud Storage bucket and associate them with their corresponding Apigee API proxies. The logic for this custom curation is defined using an integration in Application Integration.
Throughout the tutorial, you'll set up the required Google Cloud services, configure a custom curation integration, create a new plugin instance in API hub, and verify the enriched API data.
Objectives
In this tutorial, you will complete the following steps:
- Step 1: Create an integration for custom curation
- Step 2: Set up custom curation in API hub
- Step 3: Edit existing plugin instance
- Step 4: Verify enriched API data
Costs
In this document, you use the following billable components of Google Cloud:
To generate a cost estimate based on your projected usage,
use the pricing calculator.
When you finish the tasks that are described in this document, you can avoid continued billing by deleting the resources that you created. For more information, see Clean up.
Before you begin
Before you begin this tutorial, ensure you have completed the following:
- Grant the following IAM roles to the service account that you want to use to create the connection:
roles/secretmanager.viewer,roles/secretmanager.secretAccessorroles/storage.admin
For information on granting roles, see Granting, changing, and revoking access.
- If you do not have an existing Apigee setup, provision an Apigee eval org.
- Provision API hub in your Google Cloud project.
- Provision Application Integration in your Google Cloud project.
- Provision Integration Connectors in your Google Cloud project.
Prepare the environment
Now, lets prepare the environment for our custom curation. This involves creating the necessary API proxies in Apigee and setting up Cloud Storage with your API specification files.
Create API proxies in Apigee
To get started, you'll first need to register the following sample API proxies in your Apigee project:
| API proxy name | Configuration details | |
|---|---|---|
| Base config | Revision config | |
| Orders API |
|
Change target endpoint to: https://mocktarget.apigee.net/xml
|
| Products API | ||
| Users API | ||
For more information about how to register a proxy in Apigee, see Create an API proxy.
Set up Cloud Storage
Next, you'll set up Cloud Storage by creating a bucket and uploading the sample API specification files that will be used in the custom curation process.
Create Cloud Storage bucket
To create a Cloud Storage bucket that will hold your API specifications, do the following:
- In the Google Cloud console, go to the Cloud Storage Buckets page.
- Click Create.
- On the Create a bucket page, enter
curation_bucketas the bucket name. Click Create.
A confirmation dialog appears to set the access level of the bucket.
Click Confirm.
A new Cloud Storage bucket named
curation_bucketis created and is listed in the Buckets page.
Upload API specification files
With your Cloud Storage bucket ready, you can now upload the sample API specification files.
Download the following specification files and use them for the purpose of this tutorial:
| Spec file | Description | Download link |
|---|---|---|
| orders-api.yaml | This specification defines an API for managing customer orders. | Click to download |
| products-api.yaml | This specification describes an API for managing products. | Click to download |
| users-api.yaml | This specification outlines an API for managing user accounts. | Click to download |
To upload the API specification files into your Cloud Storage bucket, do the following:
- In the Google Cloud console, go to the Cloud Storage Buckets page.
- Click the
curation_bucketbucket that you created to open the Bucket details page. - In the Objects tab, click Upload > Upload files.
- In the file dialog, go to the API specification files that you downloaded and select them. After the upload completes, you should see them listed in your bucket folder browser.
Configure Cloud Storage connection
To allow your curation integration to access the files in your bucket, you will now configure a Cloud Storage connection in Integration Connectors.
To configure a Cloud Storage connection, do the following:
- In the Google Cloud console, go to the Integration Connectors page.
- Click Connections from the left navigation menu to open the Connections page.
Click Create New and provide the following details in the Create Connection page:
- Location: select a desired location and click Next.
- Connector: select
Cloud Storagefrom the drop-down list and click Next. - Connector version: enter the version of your connector.
- Connection name: enter
fetch-specs. - Service Account: select the service account that you had created earlier.
- Project ID: enter the ID of your Google Cloud project. For information about how to find your project ID, see Find the project name, number, and ID.
Review your connection details and click Create. A new connection is created and is listed in the Connections page.
Step 1: Create an integration for custom curation
With the environment ready, you can now define the custom curation logic using Application Integration, which will handle the process of identifying, enriching, and transforming the API metadata.
Download the following prebuilt integration JSON file and use it for the purpose of this tutorial:
| Integration file | Download link |
|---|---|
| enrich-with-spec-yaml.json | Click to download |
Create and upload an integration
To begin, you'll create a new integration in Application Integration and then upload the downloaded JSON file to define the curation logic:
- In the Google Cloud console, go to the Application Integration page.
- Click Integrations from the left navigation menu to open the Integrations page.
- Click Create integration and provide the following details in the Create Integration page:
- Integration name: enter
test-curation. - Description: enter
Demo integration created for custom curation tutorial. - Region: select a desired location .
- Click Create. The new integration opens in the integration editor.
- Integration name: enter
- In the designer toolbar, click (Actions menu) and select Upload.
In the file browser dialog, select the downloaded JSON file, and then click Open.
A new version of the integration is created as shown in the following image:
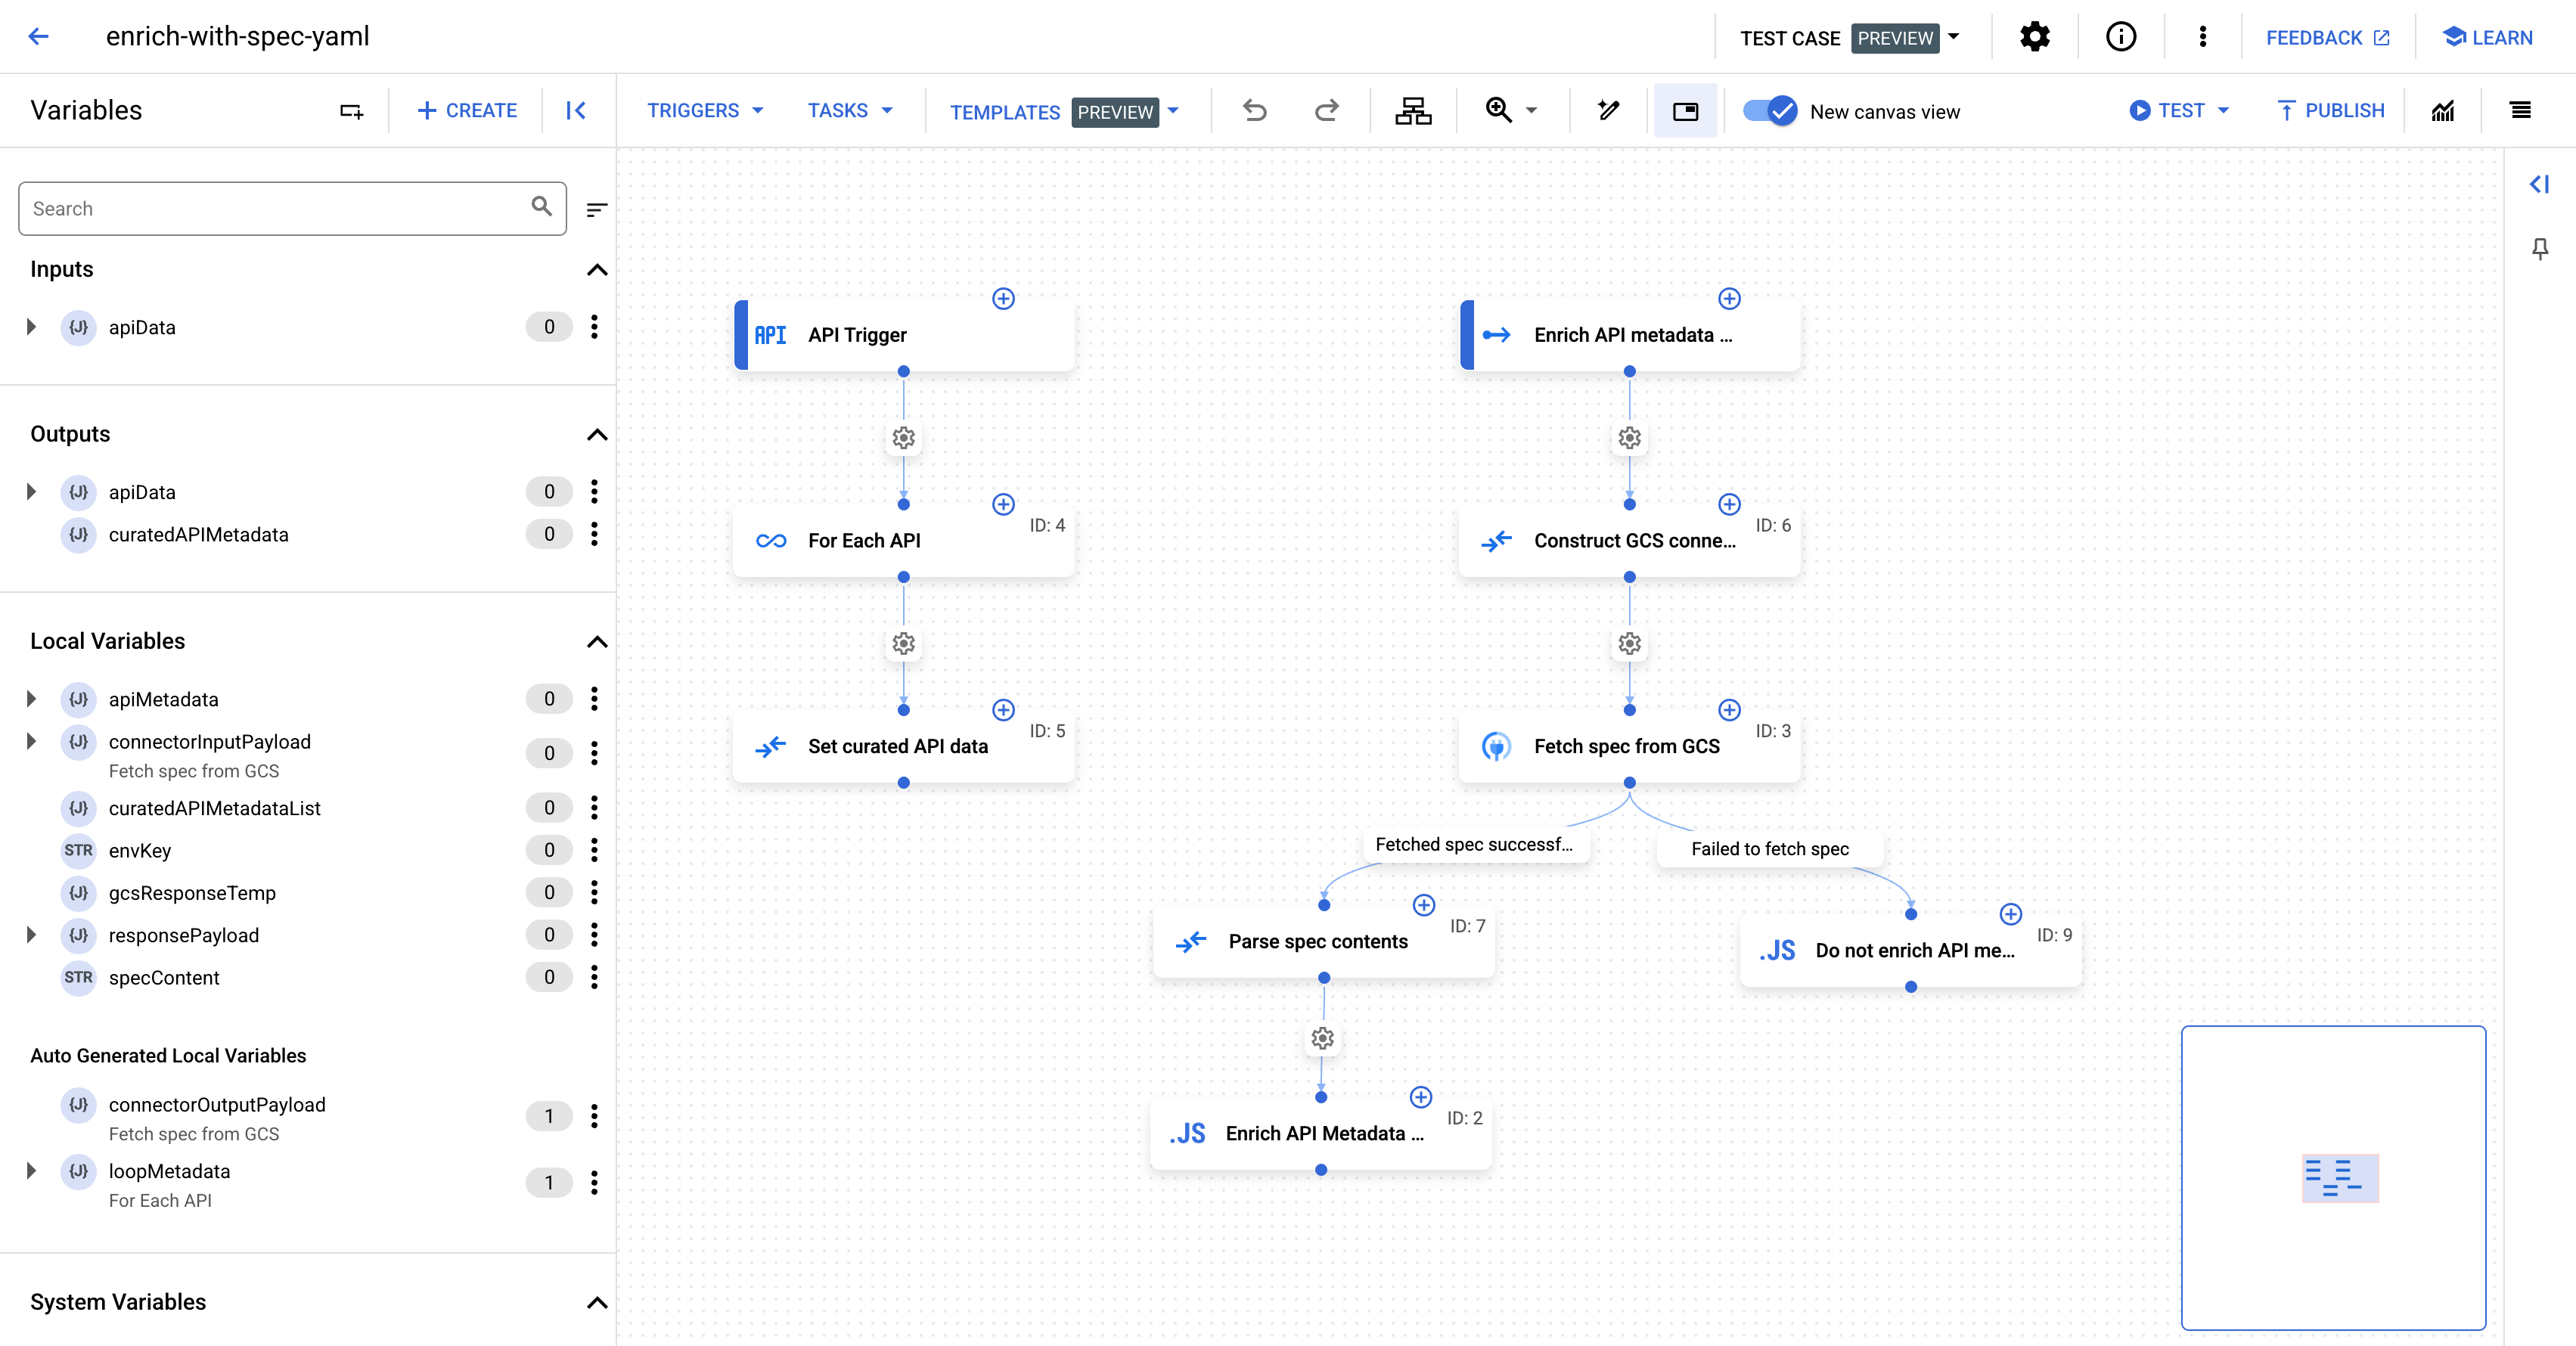
Configure connector task in the integration
After uploading the integration, the next step is to configure the Connectors task to connect to your Cloud Storage bucket:
- Click the Connectors task named
Fetch spec from GCSto view the connector configuration pane. - Click Configure Connector.
- Configure the following details in the Connectors Task Editor page:
- Region: select a desired location .
- Connection: Select
fetch-specs. - Type: Select Actions.
- Set entities/actions: Select
DownloadObjectas the action. - Click Done.
View integration components
The integration you uploaded contains several pre-configured components. The following table provides details about each element to help you understand how the curation logic works:
| Component | Configuration | Description |
|---|---|---|
| API trigger | API Trigger ID: api_trigger/test-custom-curation_API_1 |
Receives data from the API hub plugin instance to invoke the integration for custom curation. |
| For Each Loop Task (For Each API) |
List to iterate: apiData.apiMetadataList.apiMetadata
Sub-integration details:
|
Iterates over the apiMetadata list and calls the sub-integration for each API resource. It also collates the response of each run in curatedAPIMetadataList, where each element of the array has the response from one particular run. |
| Private Trigger
(Enrich each API with spec) |
Trigger ID: private_trigger/test-curate-1_Private_1 |
Invokes the sub-integration for each element in apiMetaData. |
| Data mapping task
(Construct GCS request payload) |
Input:
connectorInputPayload (Fetch spec from GCS)
.SET_PROPERTY(
apiMetadata
.GET_PROPERTY("api")
.GET_PROPERTY("displayName")
.TO_STRING()
.CONCAT(".yaml")
.TO_LOWERCASE()
   ,
"ObjectFilePath"
)
ConnectorInputPayload (Fetch spec from GCS)
|
Constructs the input payload for ConnectorInputPayload. |
| Connectors task
(Fetch spec from GCS) |
Task input: connectorInputPayload (Fetch spec from GCS)
Task output: |
Connects to a Cloud Storage bucket created and performs file transfer operations. |
| Edge condition
(Fetched spec successfully) |
Condition: $`ErrorInfo`.code$ = 0 |
Checks for successful connection execution and payload retrieval. If yes, proceeds to parse the spec contents. |
| Edge condition
(Failed to fetch spec) |
Condition: $`ErrorInfo`.code$ != 0 |
Checks the connectorOutputPayload for empty payload; if yes, skips the curation logic. |
| Data mapping task
(Parse spec contents) |
Input 1:
connectorOutputPayload (Fetch spec from GCS)
.GET_ELEMENT(
"0"
)
gcsResponseTemp
Input 2:
gcsResponseTemp
.GET_PROPERTY(
"Content"
)
.TO_STRING()
.TO_BASE_64()
specContent
|
Parses the API specification content from the connectorOutputPayload and encodes it to base64 format. |
| JavaScript task
(Enrich API metadata with spec contents) |
Script:
/**
 * Processes and curates API metadata with spec contents.
 * @param {object} event
 * The event object containing API data and spec content.
 */
function executeScript(event) {
  let apiMetadata = event.getParameter('apiMetadata');
  let specContent = event.getParameter('specContent');

  // Initialize curatedAPIMetadata directly from apiMetadata
  const curatedAPIMetadata = { ...apiMetadata
  };

  // Construct the 'spec' object efficiently
  const spec = {
    displayName: "open-api-spec",
    specType: {
      enumValues: {
        values: [{
          id: "openapi"
        }]
      }
    },
    contents: {
      mimeType: "application/yaml",
      contents: specContent,
    },
  };

  // Create the specMetadata object
  const specMetadata = {
    // Ensure originalUpdateTime exists before assigning
    // provide a fallback if needed
    originalModifiedTime: curatedAPIMetadata.originalUpdateTime
    || new Date().toISOString(),
    spec: spec,
  };

  // Initialize or update the specs array within the first version
  // This assumes versions[0] always exists. Add checks if it might not.
  if (!curatedAPIMetadata.versions ||
    curatedAPIMetadata.versions.length === 0) {
    curatedAPIMetadata.versions = [{
      specs: []
    }];
  } else if (!curatedAPIMetadata.versions[0].specs) {
    curatedAPIMetadata.versions[0].specs = [];
  }

  curatedAPIMetadata.versions[0].specs.push(specMetadata);

  // Set the modified apiData parameter
  event.setParameter('curatedAPIMetadata', curatedAPIMetadata);
}
|
The script demonstrates how the API metadata is enriched using the parsed specContent output from the Data Mapping task. The function constructs an updated curatedAPIMetadata object. It structures the provided specification content into a new spec object, identifies it as an OpenAPI YAML, and embeds it into a specMetadata object along with its modification timestamp. This specMetadata is then integrated into the specs array of the API's first version within curatedAPIMetadata, effectively linking the API proxy with its detailed specification. Finally, the enriched curatedAPIMetadata is returned through the event object for subsequent steps in the custom curation workflow.
|
| JavaScript task
(Do not enrich API metadata) |
Script:
function executeScript(event) {
  // Retrieve the apiData parameter.
  let apiMetadata = event.getParameter('apiMetadata');


  // Set the curated API metadata parameter same as API data.
  event.setParameter('curatedAPIMetadata', apiMetadata);
}
|
The script sets the curated API metadata parameter to be the same as the API data. |
| Data mapping task
(Set curated API data) |
Input:
apiData
.SET_PROPERTY(
curatedAPIMetadataList,
"apiMetadataList.apiMetadata"
)
apiData
|
Constructs the curated apiData which is configured as the response payload of the integration. |
Test and publish the integration
With the configuration complete, you can now test the integration with a sample input to ensure it's working correctly before publishing it for use in API hub. To test the integration, click Test in the integration editor toolbar.
Sample test input
Use the following sample input:
{
  "apiMetadataList": {
    "apiMetadata": [
      {
        "api": {
          "name": "projects/api-hub-demo-5/locations/us-central1/apis/api-hub-demo-5-Products-API",
          "displayName": "Products-API",
          "fingerprint": "products-api"
        },
        "versions": [
          {
            "version": {
              "name": "projects/api-hub-demo-5/locations/us-central1/apis/api-hub-demo-5-Products-API/versions/version-1",
              "displayName": "version-1"
            },
            "deployments": [
              {
                "deployment": {
                  "displayName": "Products-API",
                  "description": "API for managing product inventory. This API allows for the creation, retrieval, update, and deletion of product records.",
                  "deploymentType": {
                    "enumValues": {
                      "values": [
                        {
                          "id": "apigee"
                        }
                      ]
                    },
                    "attribute": "projects/api-hub-demo-5/locations/us-central1/attributes/system-deployment-type"
                  },
                  "resourceUri": "organizations/api-hub-demo-5/apis/Products-API/revisions/1/environments/test-env",
                  "endpoints": [
                    "https://googleapis.com/products-api"
                  ],
                  "attributes": {
                    "projects/api-hub-demo-5/locations/us-central1/attributes/plugin-system-apigee-x-and-hybrid-environment": {
                      "stringValues": {
                        "values": [
                          "test-env"
                        ]
                      },
                      "attribute": "projects/api-hub-demo-5/locations/us-central1/attributes/plugin-system-apigee-x-and-hybrid-environment"
                    },
                    "projects/api-hub-demo-5/locations/us-central1/attributes/plugin-system-apigee-x-and-hybrid-organization": {
                      "stringValues": {
                        "values": [
                          "api-hub-demo-5"
                        ]
                      },
                      "attribute": "projects/api-hub-demo-5/locations/us-central1/attributes/plugin-system-apigee-x-and-hybrid-organization"
                    }
                  }
                },
                "originalId": "apis/Products-API/revisions/1/environments/test-env",
                "originalCreateTime": "2025-07-07T05:23:51.617Z",
                "originalUpdateTime": "2025-07-07T05:23:51.617Z"
              }
            ],
            "originalId": "apis/Products-API/revisions/1",
            "originalCreateTime": "2025-07-07T05:23:47.982Z",
            "originalUpdateTime": "2025-07-07T05:23:47.982Z"
          }
        ],
        "originalId": "apis/Products-API",
        "originalUpdateTime": "2025-07-07T05:23:47.982Z"
      }
    ]
  }
}
Sample Output
You should see the following test output:
{
  "apiMetadataList": {
    "apiMetadata": [
      {
        "api": {
          "name": "projects/api-hub-demo-5/locations/us-central1/apis/api-hub-demo-5-Products-API",
          "displayName": "Products-API",
          "fingerprint": "products-api"
        },
        "versions": [
          {
            "version": {
              "name": "projects/api-hub-demo-5/locations/us-central1/apis/api-hub-demo-5-Products-API/versions/version-1",
              "displayName": "version-1"
            },
            "deployments": [
              {
                "deployment": {
                  "displayName": "Products-API",
                  "description": "API for managing product inventory. This API allows for the creation, retrieval, update, and deletion of product records.",
                  "deploymentType": {
                    "enumValues": {
                      "values": [
                        {
                          "id": "apigee"
                        }
                      ]
                    },
                    "attribute": "projects/api-hub-demo-5/locations/us-central1/attributes/system-deployment-type"
                  },
                  "resourceUri": "organizations/api-hub-demo-5/apis/Products-API/revisions/1/environments/test-env",
                  "endpoints": [
                    "https://googleapis.com/products-api"
                  ],
                  "attributes": {
                    "projects/api-hub-demo-5/locations/us-central1/attributes/plugin-system-apigee-x-and-hybrid-environment": {
                      "stringValues": {
                        "values": [
                          "test-env"
                        ]
                      },
                      "attribute": "projects/api-hub-demo-5/locations/us-central1/attributes/plugin-system-apigee-x-and-hybrid-environment"
                    },
                    "projects/api-hub-demo-5/locations/us-central1/attributes/plugin-system-apigee-x-and-hybrid-organization": {
                      "stringValues": {
                        "values": [
                          "api-hub-demo-5"
                        ]
                      },
                      "attribute": "projects/api-hub-demo-5/locations/us-central1/attributes/plugin-system-apigee-x-and-hybrid-organization"
                    }
                  }
                },
                "originalId": "apis/Products-API/revisions/1/environments/test-env",
                "originalCreateTime": "2025-07-07T05:23:51.617Z",
                "originalUpdateTime": "2025-07-07T05:23:51.617Z"
              }
            ],
            "originalId": "apis/Products-API/revisions/1",
            "originalCreateTime": "2025-07-07T05:23:47.982Z",
            "originalUpdateTime": "2025-07-07T05:23:47.982Z",
            "specs": [
              {
                "originalModifiedTime": "2025-07-07T05:23:47.982Z",
                "spec": {
                  "displayName": "open-api-spec",
                  "specType": {
                    "enumValues": {
                      "values": [
                        {
                          "id": "openapi"
                        }
                      ]
                    }
                  },
                  "contents": {
                    "mimeType": "application/yaml",
                    "contents": "b3BlbmFwaTogMy4wLjAKaW5mbzoKICB0aXRsZTogUHJvZHVjdHMgQVBJCiAgdmVyc2lvbjogMS4wLjAKICBkZXNjcmlwdGlvbjogQVBJIGZvciBtYW5hZ2luZyBwcm9kdWN0IGludmVudG9yeS4gVGhpcyBBUEkgYWxsb3dzIGZvciB0aGUgY3JlYXRpb24sIHJldHJpZXZhbCwgdXBkYXRlLCBhbmQgZGVsZXRpb24gb2YgcHJvZHVjdCByZWNvcmRzLgpzZXJ2ZXJzOgogIC0gdXJsOiBodHRwczovL2FwaS5leGFtcGxlLmNvbS9wcm9kdWN0cy92MQogICAgZGVzY3JpcHRpb246IFByb2R1Y3Rpb24gc2VydmVyIGZvciB0aGUgUHJvZHVjdHMgQVBJLgpwYXRoczoKICAvcHJvZHVjdHM6CiAgICBnZXQ6CiAgICAgIHN1bW1hcnk6IEdldCBhbGwgcHJvZHVjdHMKICAgICAgb3BlcmF0aW9uSWQ6IGdldEFsbFByb2R1Y3RzCiAgICAgIHJlc3BvbnNlczoKICAgICAgICAnMjAwJzoKICAgICAgICAgIGRlc2NyaXB0aW9uOiBBIGxpc3Qgb2YgcHJvZHVjdHMgc3VjY2Vzc2Z1bGx5IHJldHJpZXZlZC4KICAgICAgICAgIGNvbnRlbnQ6CiAgICAgICAgICAgIGFwcGxpY2F0aW9uL2pzb246CiAgICAgICAgICAgICAgc2NoZW1hOgogICAgICAgICAgICAgICAgdHlwZTogYXJyYXkKICAgICAgICAgICAgICAgIGl0ZW1zOgogICAgICAgICAgICAgICAgICAkcmVmOiAnIy9jb21wb25lbnRzL3NjaGVtYXMvUHJvZHVjdCcKICAgIHBvc3Q6CiAgICAgIHN1bW1hcnk6IEFkZCBhIG5ldyBwcm9kdWN0CiAgICAgIG9wZXJhdGlvbklkOiBhZGRQcm9kdWN0CiAgICAgIHJlcXVlc3RCb2R5OgogICAgICAgIHJlcXVpcmVkOiB0cnVlCiAgICAgICAgZGVzY3JpcHRpb246IFByb2R1Y3QgZGF0YSB0byBiZSBhZGRlZC4KICAgICAgICBjb250ZW50OgogICAgICAgICAgYXBwbGljYXRpb24vanNvbjoKICAgICAgICAgICAgc2NoZW1hOgogICAgICAgICAgICAgICRyZWY6ICcjL2NvbXBvbmVudHMvc2NoZW1hcy9Qcm9kdWN0SW5wdXQnCiAgICAgIHJlc3BvbnNlczoKICAgICAgICAnMjAxJzoKICAgICAgICAgIGRlc2NyaXB0aW9uOiBQcm9kdWN0IHN1Y2Nlc3NmdWxseSBjcmVhdGVkLgogICAgICAgICAgY29udGVudDoKICAgICAgICAgICAgYXBwbGljYXRpb24vanNvbjoKICAgICAgICAgICAgICBzY2hlbWE6CiAgICAgICAgICAgICAgICAkcmVmOiAnIy9jb21wb25lbnRzL3NjaGVtYXMvUHJvZHVjdCcKICAgICAgICAnNDAwJzoKICAgICAgICAgIGRlc2NyaXB0aW9uOiBJbnZhbGlkIGlucHV0IHByb3ZpZGVkIGZvciBwcm9kdWN0IGNyZWF0aW9uLgogIC9wcm9kdWN0cy97cHJvZHVjdElkfToKICAgIGdldDoKICAgICAgc3VtbWFyeTogR2V0IGEgcHJvZHVjdCBieSBJRAogICAgICBvcGVyYXRpb25JZDogZ2V0UHJvZHVjdEJ5SWQKICAgICAgcGFyYW1ldGVyczoKICAgICAgICAtIG5hbWU6IHByb2R1Y3RJZAogICAgICAgICAgaW46IHBhdGgKICAgICAgICAgIHJlcXVpcmVkOiB0cnVlCiAgICAgICAgICBkZXNjcmlwdGlvbjogVW5pcXVlIGlkZW50aWZpZXIgb2YgdGhlIHByb2R1Y3QgdG8gcmV0cmlldmUuCiAgICAgICAgICBzY2hlbWE6CiAgICAgICAgICAgIHR5cGU6IHN0cmluZwogICAgICAgICAgICBmb3JtYXQ6IHV1aWQKICAgICAgcmVzcG9uc2VzOgogICAgICAgICcyMDAnOgogICAgICAgICAgZGVzY3JpcHRpb246IFByb2R1Y3QgZGV0YWlscyBzdWNjZXNzZnVsbHkgcmV0cmlldmVkLgogICAgICAgICAgY29udGVudDoKICAgICAgICAgICAgYXBwbGljYXRpb24vanNvbjoKICAgICAgICAgICAgICBzY2hlbWE6CiAgICAgICAgICAgICAgICAkcmVmOiAnIy9jb21wb25lbnRzL3NjaGVtYXMvUHJvZHVjdCcKICAgICAgICAnNDA0JzoKICAgICAgICAgIGRlc2NyaXB0aW9uOiBQcm9kdWN0IG5vdCBmb3VuZCB3aXRoIHRoZSBnaXZlbiBJRC4KICAgIHB1dDoKICAgICAgc3VtbWFyeTogVXBkYXRlIGFuIGV4aXN0aW5nIHByb2R1Y3QKICAgICAgb3BlcmF0aW9uSWQ6IHVwZGF0ZVByb2R1Y3QKICAgICAgcGFyYW1ldGVyczoKICAgICAgICAtIG5hbWU6IHByb2R1Y3RJZAogICAgICAgICAgaW46IHBhdGgKICAgICAgICAgIHJlcXVpcmVkOiB0cnVlCiAgICAgICAgICBkZXNjcmlwdGlvbjogVW5pcXVlIGlkZW50aWZpZXIgb2YgdGhlIHByb2R1Y3QgdG8gdXBkYXRlLgogICAgICAgICAgc2NoZW1hOgogICAgICAgICAgICB0eXBlOiBzdHJpbmcKICAgICAgICAgICAgZm9ybWF0OiB1dWlkCiAgICAgIHJlcXVlc3RCb2R5OgogICAgICAgIHJlcXVpcmVkOiB0cnVlCiAgICAgICAgZGVzY3JpcHRpb246IFVwZGF0ZWQgcHJvZHVjdCBkYXRhLgogICAgICAgIGNvbnRlbnQ6CiAgICAgICAgICBhcHBsaWNhdGlvbi9qc29uOgogICAgICAgICAgICBzY2hlbWE6CiAgICAgICAgICAgICAgJHJlZjogJyMvY29tcG9uZW50cy9zY2hlbWFzL1Byb2R1Y3RJbnB1dCcKICAgICAgcmVzcG9uc2VzOgogICAgICAgICcyMDAnOgogICAgICAgICAgZGVzY3JpcHRpb246IFByb2R1Y3Qgc3VjY2Vzc2Z1bGx5IHVwZGF0ZWQuCiAgICAgICAgJzQwMCc6CiAgICAgICAgICBkZXNjcmlwdGlvbjogSW52YWxpZCBpbnB1dCBwcm92aWRlZCBmb3IgcHJvZHVjdCB1cGRhdGUuCiAgICAgICAgJzQwNCc6CiAgICAgICAgICBkZXNjcmlwdGlvbjogUHJvZHVjdCBub3QgZm91bmQgd2l0aCB0aGUgZ2l2ZW4gSUQuCiAgICBkZWxldGU6CiAgICAgIHN1bW1hcnk6IERlbGV0ZSBhIHByb2R1Y3QKICAgICAgb3BlcmF0aW9uSWQ6IGRlbGV0ZVByb2R1Y3QKICAgICAgcGFyYW1ldGVyczoKICAgICAgICAtIG5hbWU6IHByb2R1Y3RJZAogICAgICAgICAgaW46IHBhdGgKICAgICAgICAgIHJlcXVpcmVkOiB0cnVlCiAgICAgICAgICBkZXNjcmlwdGlvbjogVW5pcXVlIGlkZW50aWZpZXIgb2YgdGhlIHByb2R1Y3QgdG8gZGVsZXRlLgogICAgICAgICAgc2NoZW1hOgogICAgICAgICAgICB0eXBlOiBzdHJpbmcKICAgICAgICAgICAgZm9ybWF0OiB1dWlkCiAgICAgIHJlc3BvbnNlczoKICAgICAgICAnMjA0JzoKICAgICAgICAgIGRlc2NyaXB0aW9uOiBQcm9kdWN0IHN1Y2Nlc3NmdWxseSBkZWxldGVkLiBObyBjb250ZW50LgogICAgICAgICc0MDQnOgogICAgICAgICAgZGVzY3JpcHRpb246IFByb2R1Y3Qgbm90IGZvdW5kIHdpdGggdGhlIGdpdmVuIElELgpjb21wb25lbnRzOgogIHNjaGVtYXM6CiAgICBQcm9kdWN0OgogICAgICB0eXBlOiBvYmplY3QKICAgICAgcmVxdWlyZWQ6CiAgICAgICAgLSBpZAogICAgICAgIC0gbmFtZQogICAgICAgIC0gcHJpY2UKICAgICAgcHJvcGVydGllczoKICAgICAgICBpZDoKICAgICAgICAgIHR5cGU6IHN0cmluZwogICAgICAgICAgZm9ybWF0OiB1dWlkCiAgICAgICAgICBkZXNjcmlwdGlvbjogVW5pcXVlIHByb2R1Y3QgaWRlbnRpZmllci4KICAgICAgICBuYW1lOgogICAgICAgICAgdHlwZTogc3RyaW5nCiAgICAgICAgICBkZXNjcmlwdGlvbjogTmFtZSBvZiB0aGUgcHJvZHVjdC4KICAgICAgICBkZXNjcmlwdGlvbjoKICAgICAgICAgIHR5cGU6IHN0cmluZwogICAgICAgICAgbnVsbGFibGU6IHRydWUKICAgICAgICAgIGRlc2NyaXB0aW9uOiBEZXRhaWxlZCBkZXNjcmlwdGlvbiBvZiB0aGUgcHJvZHVjdC4KICAgICAgICBwcmljZToKICAgICAgICAgIHR5cGU6IG51bWJlcgogICAgICAgICAgZm9ybWF0OiBmbG9hdAogICAgICAgICAgZGVzY3JpcHRpb246IFByaWNlIG9mIHRoZSBwcm9kdWN0LgogICAgICAgIHN0b2NrOgogICAgICAgICAgdHlwZTogaW50ZWdlcgogICAgICAgICAgZm9ybWF0OiBpbnQzMgogICAgICAgICAgZGVzY3JpcHRpb246IEN1cnJlbnQgc3RvY2sgcXVhbnRpdHkuCiAgICAgICAgICBkZWZhdWx0OiAwCiAgICBQcm9kdWN0SW5wdXQ6CiAgICAgIHR5cGU6IG9iamVjdAogICAgICByZXF1aXJlZDoKICAgICAgICAtIG5hbWUKICAgICAgICAtIHByaWNlCiAgICAgIHByb3BlcnRpZXM6CiAgICAgICAgbmFtZToKICAgICAgICAgIHR5cGU6IHN0cmluZwogICAgICAgICAgZGVzY3JpcHRpb246IE5hbWUgb2YgdGhlIHByb2R1Y3QuCiAgICAgICAgZGVzY3JpcHRpb246CiAgICAgICAgICB0eXBlOiBzdHJpbmcKICAgICAgICAgIG51bGxhYmxlOiB0cnVlCiAgICAgICAgICBkZXNjcmlwdGlvbjogRGV0YWlsZWQgZGVzY3JpcHRpb24gb2YgdGhlIHByb2R1Y3QuCiAgICAgICAgcHJpY2U6CiAgICAgICAgICB0eXBlOiBudW1iZXIKICAgICAgICAgIGZvcm1hdDogZmxvYXQKICAgICAgICAgIGRlc2NyaXB0aW9uOiBQcmljZSBvZiB0aGUgcHJvZHVjdC4KICAgICAgICBzdG9jazoKICAgICAgICAgIHR5cGU6IGludGVnZXIKICAgICAgICAgIGZvcm1hdDogaW50MzIKICAgICAgICAgIGRlc2NyaXB0aW9uOiBJbml0aWFsIHN0b2NrIHF1YW50aXR5LgogICAgICAgICAgZGVmYXVsdDogMA=="
                  }
                }
              }
            ]
          }
        ],
        "originalId": "apis/Products-API",
        "originalUpdateTime": "2025-07-07T05:23:47.982Z"
      }
    ]
  }
}
Now that you have successfully tested the integration, lets publish it to make it active and available for use in API hub. To publish the integration, click Publish in the integration editor toolbar.
Upon successfully publishing your integration, you can view and inspect the execution logs of the published integration. To view logs, click View execution logs for this integration.
Step 2: Set up custom curation in API hub
Now that your integration is published, it's time to connect your custom curation logic to API hub.
- In the Google Cloud console, go to the API hub page.
- Click Settings from the left navigation menu to open the Settings page.
- Go to the Curations tab and click Set up a new curation.
In the Set up curation pane, provide the following details:
- Display name: enter
enrich-curation. - Description: enter
Custom curation to enrich API using spec files in GCS bucket. - Under Associate an existing integration section:
- Integration: choose
enrich-with-spec-yaml. - Trigger ID: Choose
api_trigger/test-custom-curation_API_1.
- Integration: choose
- Click Create curation to initiate the creation of the custom curation.
A Curation created successfully notification appears when complete.
- Display name: enter
Step 3: Edit existing plugin instance
API hub creates a default plugin instance for Apigee and Apigee hybrid upon provisioning. To apply your new logic, you will now edit this instance to use the custom curation you just created.
To edit the curation settings of the existing Apigee and hybrid plugin instance, do the following:
- In the Google Cloud console, go to the API hub page.
- Click Settings from the left navigation menu to open the Settings page.
- Click the Plugins tab and go to the Manage instances section to view the list of plugin instances in your project.
- Find the Apigee X and Hybrid plugin instance, click (Plugin instance actions) and then select See details.
- In the Plugin details pane, modify the Curation logic to Custom curation and choose enrich-with-spec-yaml as the curation logic.
- Click Save to apply your changes.
Step 4: Verify enriched API data
As the final step, lets verify that the custom curation is working as expected by checking API hub to see the newly enriched API data.
To verify the enriched data, do the following:
- In the Google Cloud console, go to the APIs page in API hub.
Go to API hub
A list of all the available APIs are listed on the APIs home page.
Use Filter to filter the following list of APIs:
- Orders API
- Products API
- Users API
Click an API to view the API details page. Verify the API details and check if it is enriched with the specification files from the Cloud Storage bucket.
The following image shows a sample products API with the enriched details:

Clean up
To avoid incurring charges to your Google Cloud account for the resources used in this tutorial, either delete the project that contains the resources, or keep the project and delete the individual resources.
Delete the project
Delete a Google Cloud project:
gcloud projects delete PROJECT_ID
Delete individual resources
-
Delete the bucket:
gcloud storage buckets delete BUCKET_NAME
Except as otherwise noted, the content of this page is licensed under the Creative Commons Attribution 4.0 License, and code samples are licensed under the Apache 2.0 License. For details, see the Google Developers Site Policies. Java is a registered trademark of Oracle and/or its affiliates.
Last updated 2025-11-11 UTC.