This topic is intended as an example only. It explains how to obtain a TLS certificate from the certificate authority (CA) Let's Encrypt. These steps are provided primarily as an example to follow if you do not have another ready way to obtain a certificate/key pair that is authorized by a CA. The example shows how to generate certificates using the Let's Encrypt CA, the Certbot client, and Google Cloud Platform Cloud DNS.
Where you can use these certificates
You must provide TLS certificates for two Istio ingress gateways that are exposed outside the cluster:
| Gateway | TLS requirement |
|---|---|
| Runtime ingress gateway | You can use a self-signed certificate/key pair or authorized TLS certificates. |
| MART ingress gateway (optional when not using Apigee Connect) | Requires an authorized TLS certificate/key pair or Kubernetes secret. |
Requirements
You will need a domain name obtained through a domain name registrar. You can register a domain name through Google Domains or another domain registrar of your choice.
Configure Cloud DNS
To obtain authorized TLS certificates, you must have a qualified domain name. The following steps explain how to use Google Cloud DNS to obtain a domain name and manage your domain servers.- Open the Google Cloud console and log in to your account.
- Select the project where Apigee hybrid is installed.
- If you have not already done so, enable the Cloud DNS API. See Enabling APIs.
- Create a static IP address:
- If you are on GKE, follow the instructions in
Reserving a static external IP address to create a static IP addresses that external processes
can use to communicate with the hybrid runtime ingress. You can give the address any name
you wish, for example:
apigee-hybrid-runtime. When you finish, you will use the IP number in the cluster configuration in the next step. For example:34.66.75.196 - If you are on Anthos GKE, follow instructions in the Anthos GKE documentation to create a static IP address.
- If you are on GKE, follow the instructions in
Reserving a static external IP address to create a static IP addresses that external processes
can use to communicate with the hybrid runtime ingress. You can give the address any name
you wish, for example:
- Get the External IP you just reserved.
- Create record set for the runtime Istio ingress endpoint. This is the address for making API
calls to the hybrid gateway. Enter the External IP you obtained in the previous
step and add a prefix to the domain name, such as
example-endpoint. For instructions, see Create a new record.- Create a managed public zone. For instructions, see Create a managed public zone.
- Create a new record set with:
- DNS Name: The name of the endpoint external API calls will communicate with, like
api-servicesorexample-endpoint - Resource Record Type: A
- TTL and TTL Unit: Accept defaults
- IP Adddress: The static IP you created.
- DNS Name: The name of the endpoint external API calls will communicate with, like
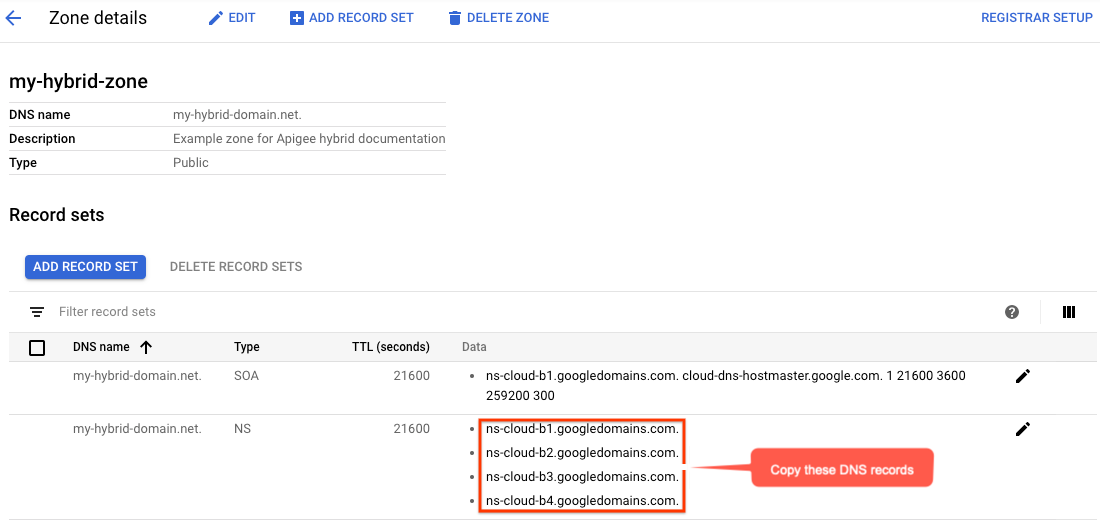
- The Zone details view will list foour DNS servers as the NS data for your new
zone. Copy the DNS record data, as shown in the following example:
- Return to your domain page at your registrar (for example, Google Domains).
- Select your domain.
- Select DNS.
- In the Name Servers section, click Edit.
Enter the domain name servers that you copied from the Network Services Cloud DNS page. For example:
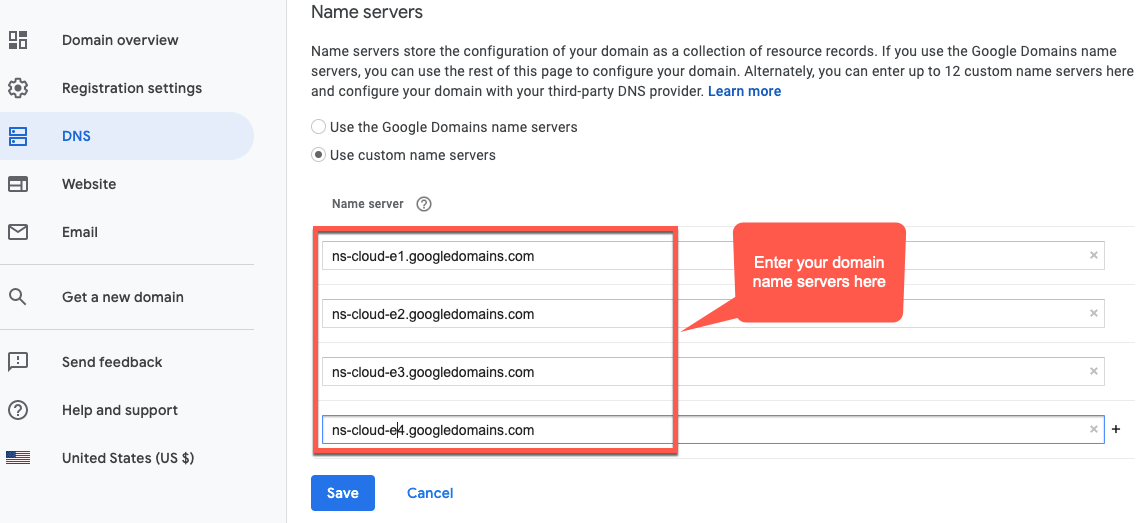
Now, your Google Cloud DNS will manage the DNS records for your domain.
Install Certbot on a VM
Now that you have Cloud DNS set up to manage your domain servers, you will install the Certbot client with the dns_google plugin on a Cloud VM. The client enables you to get authorized certificates for your domain from a Let's Encrypt endpoint.
- Open the Google Cloud console and log in with the account you created in Step 1: Create a Google Cloud account.
- Select the project that you created in Step 2: Create a Google Cloud project.
- Select IAM & admin > Service accounts.
The Service accounts view displays a list of the project's service accounts.
- To create a new service account, click +Create Service Account at the top of
the view.
The Service account details view displays.
- In the Service account name field, enter the name of the service account.
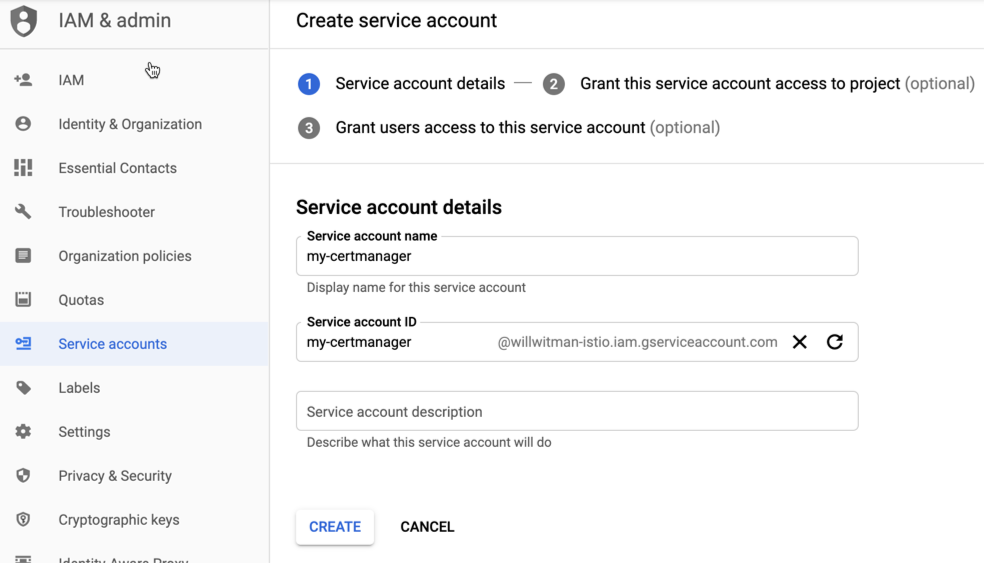
You can optionally add a description in the Service account description field. Descriptions are helpful at reminding you what a particular service account is used for.
- Click Create.
Google Cloud creates a new service account and displays the Service account permissions view. Use this view to assign a role to your new service account.
- Click the Select a role drop-down list.
- Select the Project Owner role.
- Click Continue.
- Click Done.
- In the Google Cloud console, select Compute Engine > VM Instances.
- Create a VM instance named certmanager.
- Under the Boot Disk section, choose CentOS7 and 20 GB for the SSD persistent drive.
- Set the Service Account to the one you created above.
- Install Certbot and the dns_google
plugin on the machine and run the Certbot client:
sudo su -yum -y install yum-utilsyum install certbot -yyum install certbot-dns-google -ycertbot certonly --dns-google -d *.your_domain_name,*.your_domain_name --server https://acme-v02.api.letsencrypt.org/directoryFor example:
sudo su -yum -y install yum-utilsyum install certbot -yyum install certbot-dns-google -ycertbot certonly --dns-google -d *.apigee-hybrid-docs.net,*.apigee-hybrid-docs.net --server https://acme-v02.api.letsencrypt.org/directory - You can now find your authorized certificate and private key files in this directory:
cd /etc/letsencrypt/live/your_domain_name/For example:
cd /etc/letsencrypt/live/apigee-hybrid-docs.netlscert.pem chain.pem fullchain.pem privkey.pem README - Copy the files
fullchain.pemandprivkey.pemto your local machine. - Optional: Create a Kubernetes secret with the certificate/key pair. See the instructions in Option 2: Kubernetes Secret in Configuring TLS and mTLS on the Istio ingress.
- Update your overrides file to point to the certificate and private key.
For example:
...
envs:
  - name: test
    serviceAccountPaths:
      synchronizer: "your_keypath/synchronizer-manager-service-account.json
      udca: "your_keypath/analytic-agent-service-account.json

virtualhosts:
  - name: my-env-group
    sslCertPath: "$HOME/hybrid/apigee-hybrid-setup/tls/fullchain.pem"
    sslKeyPath: "$HOME/hybrid/apigee-hybrid-setup/tls/privkey.pem"

mart: # Assuming you are not using Apigee Connect
  nodeSelector:
    key: cloud.google.com/gke-nodepool
    value: apigee-runtime
  sslCertPath: "$HOME/hybrid/apigee-hybrid-setup/tls/fullchain.pem"
  sslKeyPath: "$HOME/hybrid/apigee-hybrid-setup/tls/privkey.pem"
  replicaCountMin: 1
  replicaCountMax: 1
Or if using Kubernetes secrets:
...
envs:
  - name: test
    serviceAccountPaths:
      synchronizer: "your_keypath/synchronizer-manager-service-account.json
      udca: "your_keypath/analytic-agent-service-account.json

virtualhosts:
  - name: my-env-group
    tlsMode: SIMPLE  # Note: SIMPLE is the default, MUTUAL is also an available value.
    sslSecret: myorg-test-policy-secret"

mart: # Assuming you are not using Apigee Connect
  nodeSelector:
    key: cloud.google.com/gke-nodepool
    value: apigee-runtime
    sslSecret: myorg-test-policy-secret"
  replicaCountMin: 1
  replicaCountMax: 1

...
- Apply the changes:
If you changed the
martconfiguration, apply the changes:apigeectl apply -f your_overrides_file --all-envs
If you changed the
envsconfiguration, apply the changes:apigeectl apply -f your_overrides_file --all-envs
Test the configuration
Deploy and test a proxy. See Build your first API proxy overview.