A Apigee híbrida exige que você tenha um projeto do Google Cloud, que pode ser criado depois de
criar uma conta do Google Cloud.
Nesta seção, descrevemos como criar um novo projeto do Google Cloud. Para usar um projeto atual do Google Cloud
(de que é proprietário) com híbrido, pule para a Etapa 3: ativar APIs.
Para criar um novo projeto do Google Cloud, siga estas etapas:
Clique no seletor do projeto Selecionar um projeto:
A caixa de diálogo "Seletor de projetos" é exibida:
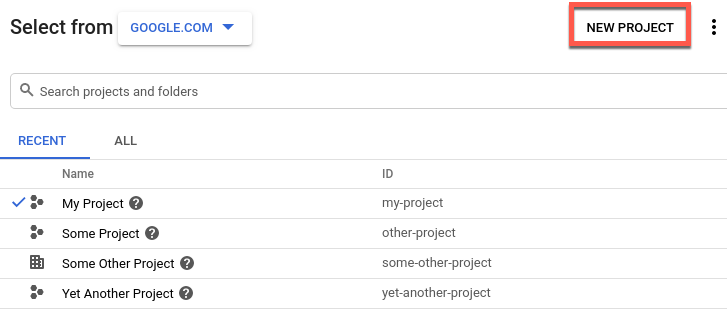
Clique em New project.
A visualização Novo projeto é exibida.
Digite um nome intuitivo para seu projeto no campo Nome do projeto.
O nome do projeto pode conter apenas letras, números, aspas simples, hífens, espaços ou
pontos de exclamação.
O Google Cloud gera um ID do projeto correspondente abaixo do campo Nome do projeto, como mostrado no
exemplo a seguir.
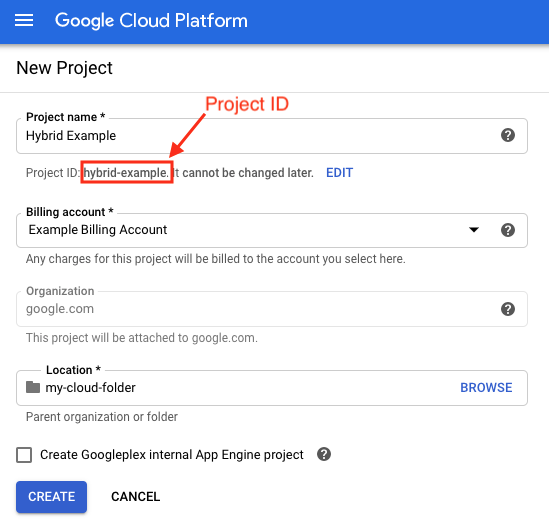
É possível alterar o ID do projeto gerado clicando em Editar,
mas ele precisa ser exclusivo. O ID do projeto pode ter letras minúsculas, dígitos ou hífens e tem que começar
com uma letra minúscula.
Anote o ID do projeto. Você o usará posteriormente neste processo de configuração.
No campo Conta de faturamento, selecione a conta que será usada para pagar
pelo projeto. Se ainda não tiver uma conta de faturamento do Google Cloud, consulte:
[[["Fácil de entender","easyToUnderstand","thumb-up"],["Meu problema foi resolvido","solvedMyProblem","thumb-up"],["Outro","otherUp","thumb-up"]],[["Difícil de entender","hardToUnderstand","thumb-down"],["Informações incorretas ou exemplo de código","incorrectInformationOrSampleCode","thumb-down"],["Não contém as informações/amostras de que eu preciso","missingTheInformationSamplesINeed","thumb-down"],["Problema na tradução","translationIssue","thumb-down"],["Outro","otherDown","thumb-down"]],["Última atualização 2025-08-21 UTC."],[[["\u003cp\u003eThis documentation pertains to Apigee hybrid version 1.7, which is now end-of-life and requires an upgrade to a newer version.\u003c/p\u003e\n"],["\u003cp\u003eCreating a new Google Cloud project is necessary for Apigee hybrid, but if you have an existing project and are its owner, you can skip to the "Enable APIs" step.\u003c/p\u003e\n"],["\u003cp\u003eTo create a new Google Cloud project, you will need to access the Google Cloud console, and there will be options to name it and generate a project ID, which must be noted as it cannot be changed after creation.\u003c/p\u003e\n"],["\u003cp\u003eWhen creating a Google Cloud project, a billing account must be assigned to it, and you may choose a location folder, which is optional, in which your project will reside.\u003c/p\u003e\n"],["\u003cp\u003eThe project ID can only have lowercase letters, digits, or hyphens, and must start with a lowercase letter.\u003c/p\u003e\n"]]],[],null,["# Step 2: Create a Google Cloud project\n\n| You are currently viewing version 1.7 of the Apigee hybrid documentation. **This version is end of life.** You should upgrade to a newer version. For more information, see [Supported versions](/apigee/docs/hybrid/supported-platforms#supported-versions).\n\nApigee hybrid requires that you have a project, which you can create after you\ncreate a Google Cloud account.\n\nThis section describes how to create a new Google Cloud project. If you want to use an existing Google Cloud\nproject (of which you are an owner) with hybrid, skip to [Step 3: Enable APIs](/apigee/docs/hybrid/v1.7/precog-enableapi).\n\n**To create a new Google Cloud project:**\n\n1. Open the [Google Cloud console](https://console.cloud.google.com) and log in with the account you created in [Step 1: Create a Google Cloud account](/apigee/docs/hybrid/v1.7/precog-gcpaccount).\n2. Click the project selector **Select a project**:\n\n The project selector dialog box displays:\n\n3. Click **New Project**.\n\n The **New Project** view displays.\n4. Enter a friendly name for your project in the **Project name** field.\n The project name can contain only letters, numbers, single quotes, hyphens, spaces, or\n exclamation points.\n\n Google Cloud generates a corresponding project ID below the **Project name** field, as\n the following example shows.\n\n You can change the generated **Project ID** by clicking **Edit**, but the project\n ID must be unique. The project ID can have lowercase letters, digits, or hyphens, and must start\n with a lowercase letter.\n\n Take note of the **Project ID**. You will use it later in this setup process.\n | **Note:** After you create the project, you *cannot* change the project ID.\n5. In the **Billing account** field, select the Google Cloud billing account to use to pay for your project. If you do not yet have a Google Cloud billing account, see the following:\n - To add a new billing account: [Cloud console billing\n page](https://cloud.google.com/billing/docs/how-to/manage-billing-account)\n - To learn about Google Cloud Billing accounts: [Create,\n modify, or close your Cloud Billing account](https://cloud.google.com/billing/docs/how-to/manage-billing-account)\n6. In the **Location** field, select a folder for your project. Folders are an optional part of the Google Cloud project resource tree.\n7. Click **Create**.\n\n Google Cloud creates your new project.\n\n[1](/apigee/docs/hybrid/v1.7/precog-gcpaccount) [2](/apigee/docs/hybrid/v1.7/precog-gcpproject) [(NEXT) Step 3: Enable APIs](/apigee/docs/hybrid/v1.7/precog-enableapi) [4](/apigee/docs/hybrid/v1.7/precog-provision) [5](/apigee/docs/hybrid/v1.7/precog-add-environment)\n\n\u003cbr /\u003e\n\n*[Google Cloud]: Google Cloud"]]