Setelah menginstal dan mengonfigurasi runtime Apigee hybrid dan gateway ingress, Anda siap melihat cara kerjanya.
1. Membuat proxy API baru menggunakan UI Apigee
Bagian ini menjelaskan cara membuat proxy API baru di UI menggunakan Wizard Proxy API.
Apigee di Konsol Cloud
Untuk membuat proxy API baru menggunakan Apigee di konsol Cloud:
- Buka UI Apigee di Konsol Cloud di browser.
- Pilih organisasi Anda dari menu dropdown di pojok kiri atas.
- Pilih Proxy development > API proxies di tampilan utama.
- Klik Buat.Wizard Proxy API akan dimulai.
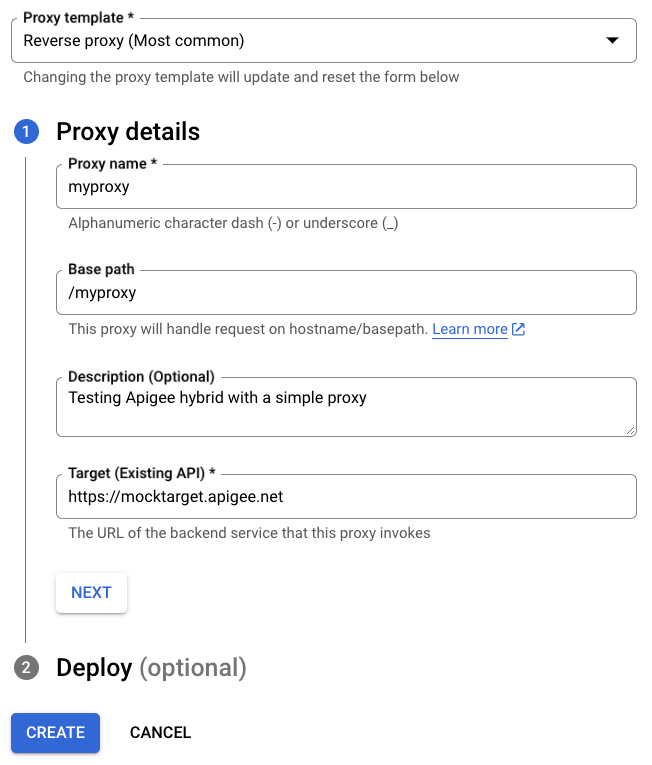
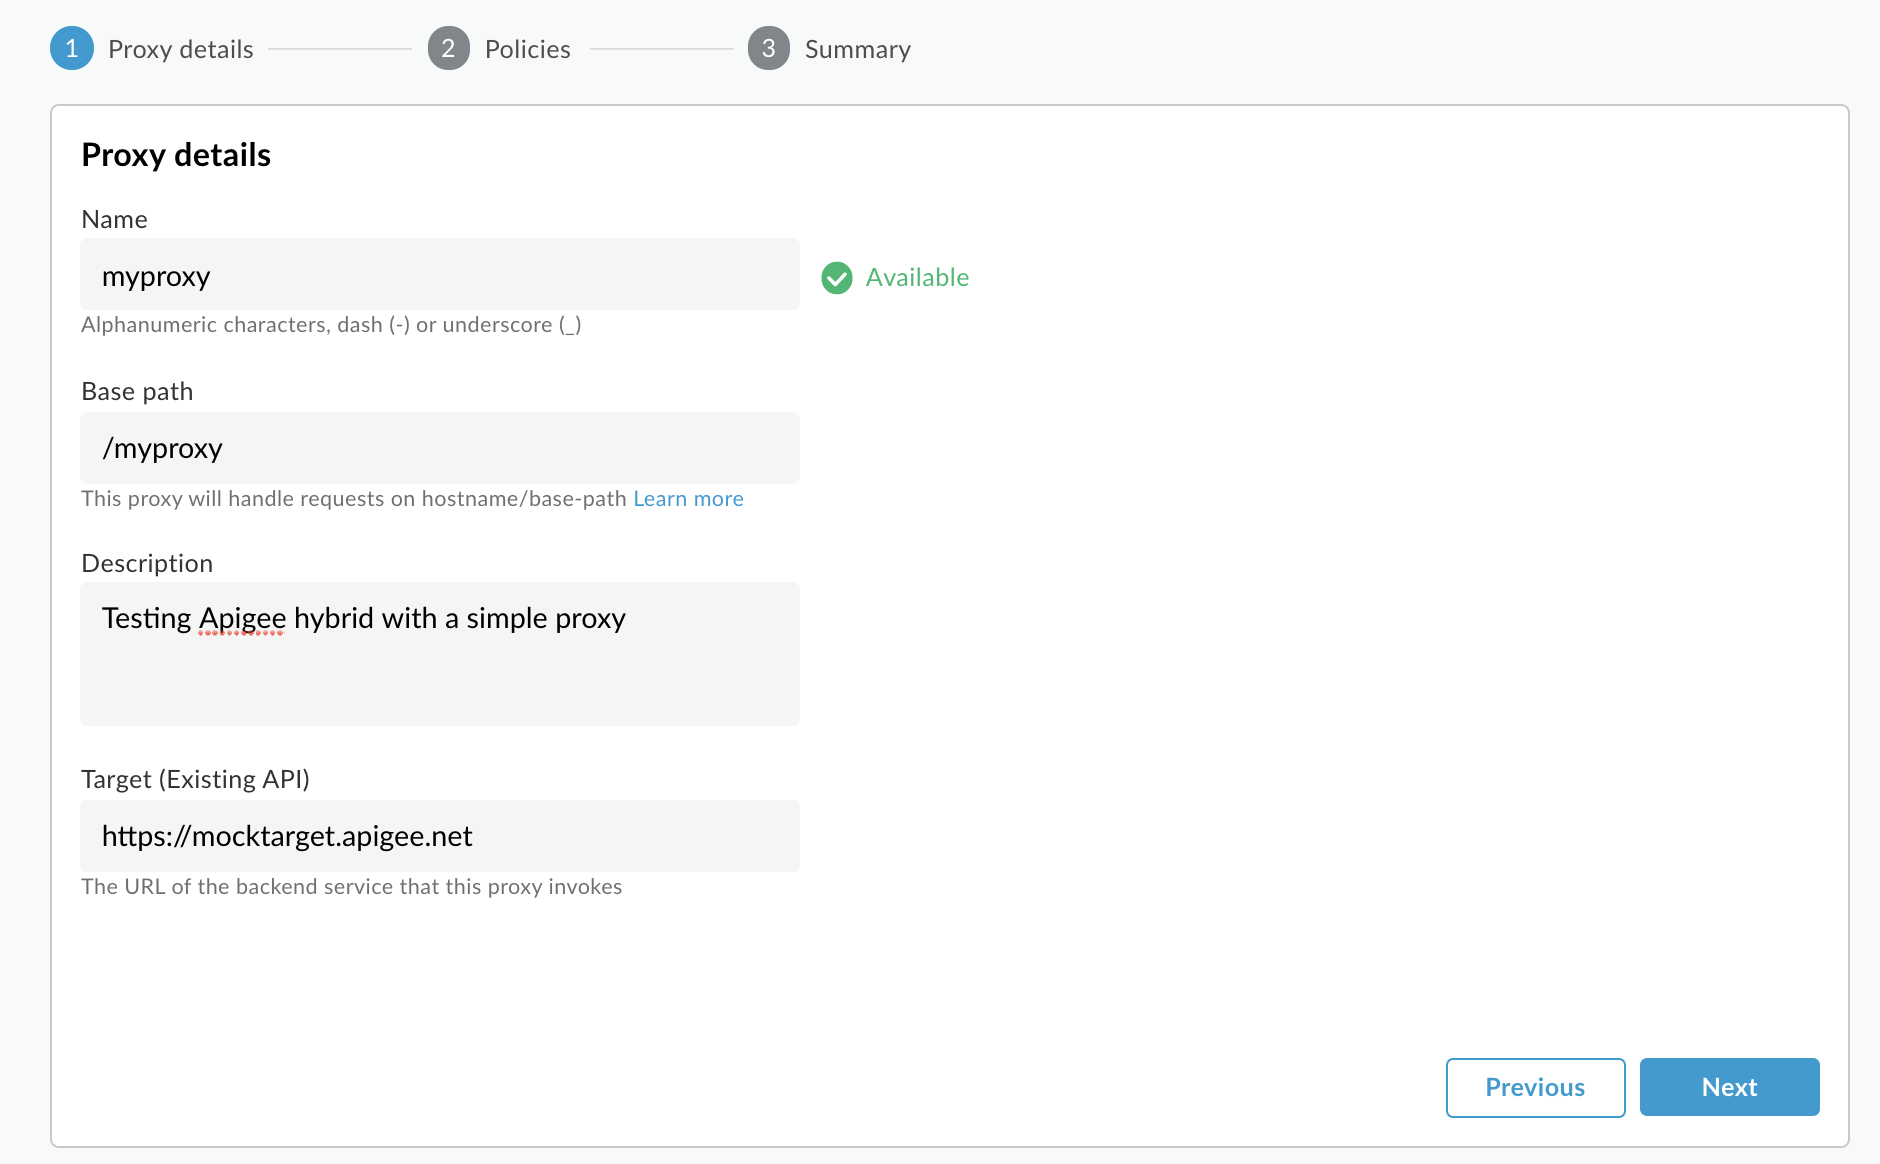
- Pilih Reverse proxy (paling umum).
Tampilan Proxy details akan ditampilkan.
- Konfigurasi proxy Anda dengan setelan berikut:
- Nama proxy: Masukkan myproxy. Langkah-langkah yang tersisa di bagian ini mengasumsikan bahwa ini adalah ID proxy Anda.
- Jalur dasar: Otomatis ditetapkan ke / diikuti dengan nama proxy, yang dalam contoh ini adalah /myproxy. Jalur dasar adalah bagian dari URL yang digunakan untuk membuat permintaan ke API Anda. Apigee menggunakan URL untuk mencocokkan dan merutekan permintaan masuk ke proxy API yang tepat.
- (Opsional) Deskripsi: Masukkan deskripsi untuk proxy API baru Anda, seperti "Menguji hybrid Apigee dengan proxy sederhana".
- Target (API yang Ada): Masukkan "https://mocktarget.apigee.net". Ini menentukan URL target yang dipanggil Apigee pada permintaan ke proxy API. Layanan mocktarget dihosting di Apigee dan menampilkan data sederhana. Tidak memerlukan kunci API atau token akses.
Detail proxy API Anda akan terlihat seperti berikut:
- Klik Berikutnya.
- Di bagian Deploy (opsional), Anda memiliki opsi untuk memilih satu atau beberapa lingkungan tempat men-deploy proxy, di kolom Lingkungan deployment. Jika Anda memilih untuk tidak men-deploy proxy pada saat ini, biarkan kolom Lingkungan deployment kosong. Anda selalu dapat men-deploy proxy nanti.
- Klik Buat. Apigee membuat proxy (terkadang disebut sebagai paket proxy).
Apigee menampilkan tampilan Proxy summary. Jika Anda memilih untuk men-deploy proxy, bagian Deployments akan menampilkan nomor Revision, yaitu 1 saat Anda pertama kali men-deploy. Kolom Status menampilkan lingkungan tempat proxy di-deploy dengan indikator status hijau.
Di bawahnya, bagian Revisi menampilkan semua revisi yang dilakukan pada proxy ini. Dengan mengklik salah satu item LIHAT di kolom Ringkasan endpoint, bagian Endpoint akan menampilkan:
- Endpoint proxy: Basepath yang Anda tetapkan untuk proxy, yang dalam contoh ini adalah
/myproxy. - Target endpoint: Basepath yang Anda tetapkan untuk target, yang dalam contoh ini adalah
https://mocktarget.apigee.net.
Apigee Klasik
Untuk membuat proxy API baru menggunakan Apigee Klasik:
- Buka UI Apigee di browser.
- Pilih organisasi Anda dari menu dropdown di pojok kiri atas.
- Pilih Develop > API Proxies di tampilan utama.
- Klik Create New.Wizard Proxy API akan dimulai.
- Pilih Reverse proxy (paling umum).
Tampilan Proxy details akan ditampilkan.
- Konfigurasi proxy Anda dengan setelan berikut:
- Nama Proxy: Masukkan "myproxy". Langkah-langkah yang tersisa di bagian ini mengasumsikan bahwa ini adalah ID proxy Anda.
- Jalur Dasar Proxy: Otomatis disetel ke "/myproxy". Jalur Dasar Proxy adalah bagian dari URL yang digunakan untuk membuat permintaan ke API Anda. Apigee menggunakan URL untuk mencocokkan dan merutekan permintaan masuk ke proxy API yang tepat.
- (Opsional) Deskripsi: Masukkan deskripsi untuk proxy API baru Anda, seperti "Menguji hybrid Apigee dengan proxy sederhana".
- Target (API yang Ada): Masukkan "https://mocktarget.apigee.net". Ini menentukan URL target yang dipanggil Apigee pada permintaan ke proxy API. Layanan mocktarget dihosting di Apigee dan menampilkan data sederhana. Tidak memerlukan kunci API atau token akses.
Detail proxy API Anda akan terlihat seperti berikut:
- Klik Berikutnya.
- Di layar Kebijakan umum, pilih Teruskan (tanpa otorisasi) sebagai opsi keamanan.
- Klik Berikutnya.
- Di layar Ringkasan, pilih lingkungan untuk men-deploy proxy Anda, lalu
klik Buat dan Deploy.
Hybrid membuat proxy (terkadang disebut sebagai paket proxy) dan men-deploy-nya ke lingkungan yang Anda pilih.
- Klik Go to proxy list.
Apigee menampilkan tampilan Proxies, yang menampilkan daftar proxy API. Proxy baru Anda akan ditampilkan dengan indikator status hijau, yang berarti proxy telah di-deploy.
2. Memanggil proxy API
Saat UI menunjukkan bahwa proxy Anda di-deploy, Anda dapat mencoba memanggilnya menggunakan cURL atau klien REST pilihan Anda. Contoh:
- Pastikan variabel lingkungan
DOMAINAnda disetel ke nama domain yang Anda gunakan untuk nama host untuk grup lingkungan Anda di Penyiapan project dan org - Langkah 3: Buat grup lingkungan.echo $DOMAIN
-
Temukan alamat IP eksternal dan port gateway ingress Apigee dengan perintah berikut:
kubectl get svc -n APIGEE_NAMESPACE -l app=apigee-ingressgateway
Output Anda akan terlihat seperti ini:
NAME                                        TYPE           CLUSTER-IP    EXTERNAL-IP     PORT(S)                                      AGE
apigee-ingressgateway-prod-hybrid-37a39bd   LoadBalancer   192.0.2.123   233.252.0.123   15021:32049/TCP,80:31624/TCP,443:30723/TCP   16h
- Ekspor IP dan port eksternal Anda ke variabel:
export INGRESS_IP_ADDRESS=EXTERNAL_IP_ADDRESS
export INGRESS_PORT=PORT_NUMBER - Panggil proxy API:
curl  -H Host:$DOMAIN --resolve \
  $DOMAIN:$INGRESS_PORT:$INGRESS_IP_ADDRESS  \
  https://$DOMAIN:$INGRESS_PORT/myproxy -k -v
Contoh:
curl -v -H Host:example.com --resolve example.com:443:233.252.0.123 https://example.com:443/myproxy -k -v
- Panggilan yang berhasil ke proxy akan menampilkan kode respons HTTP 200 dan output berikut.
Hello, Guest!
Untuk mempelajari lebih lanjut cara membangun dan men-deploy proxy API, lihat Ringkasan membangun proxy pertama Anda.