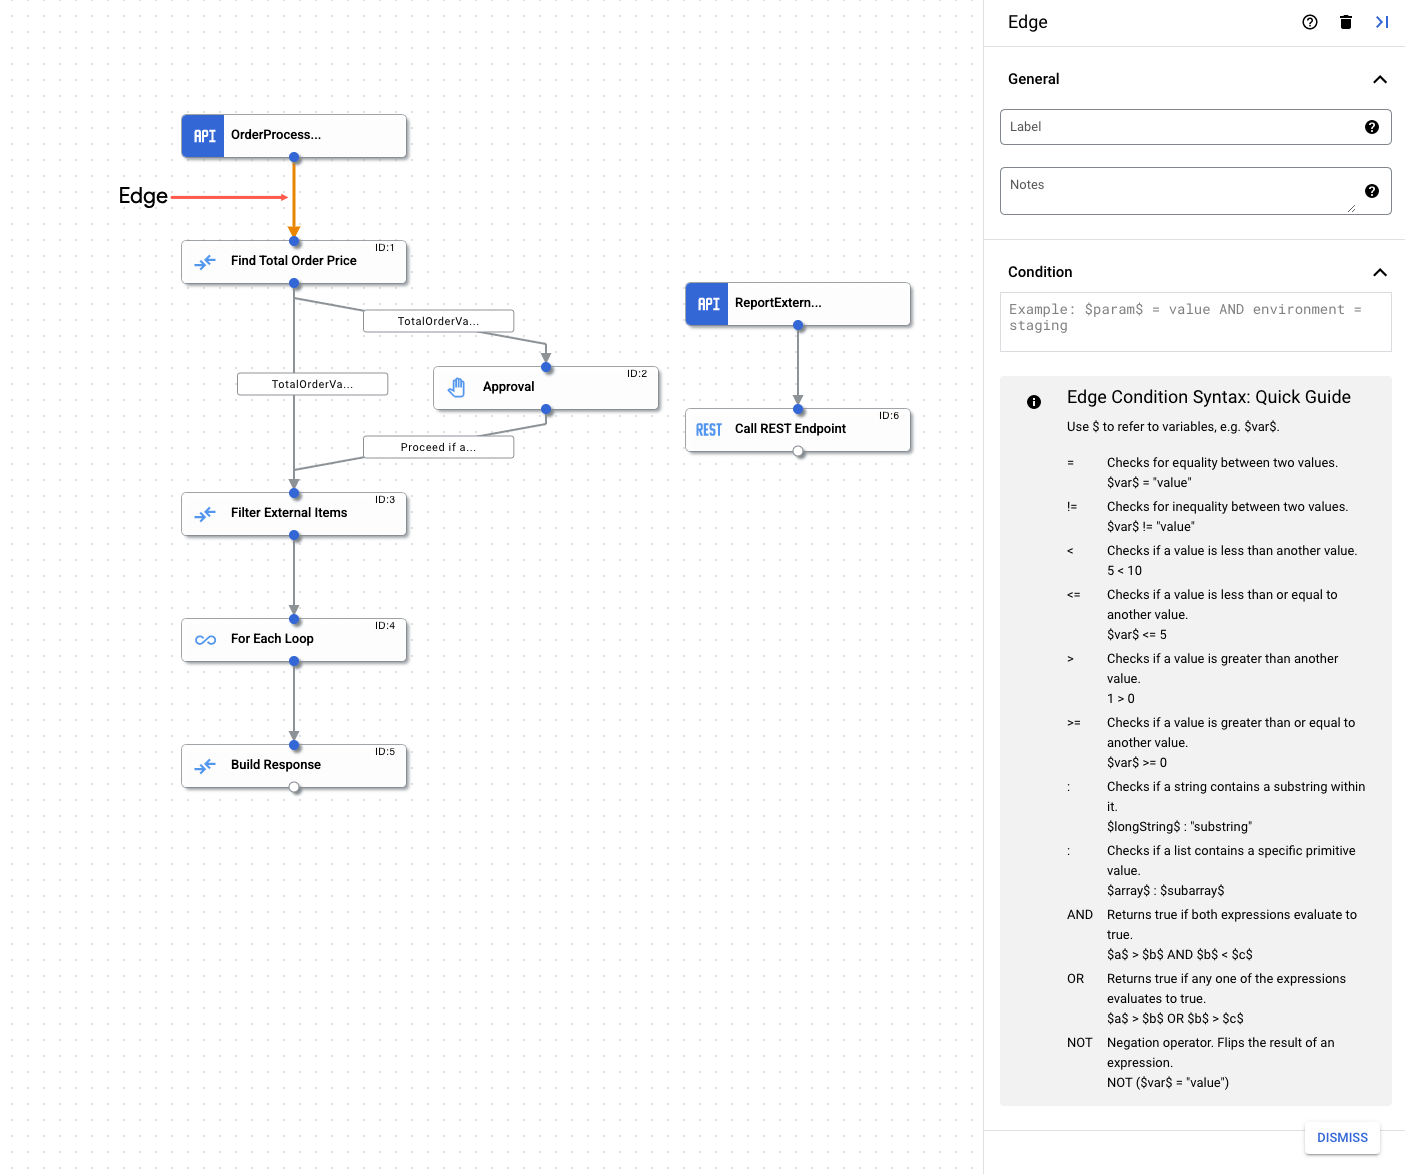
An edge is a connection between any two elements in an integration.
The connection denotes the direction of the control flow from one element(task or trigger) to another.
The connection can be between a trigger and a task or between a task and another task.
By using an edge along with fork and join, you can implement
complex branching and conditions in your integration. For more information, see
Forks and joins.
For example, if there is an edge from a Send Email task to a
Call Integration task, it means that after the Send Email task is run,
the next task to run is the Call Integration task. An edge also supports
conditional checks. Before the control passes to the next task, you can check for a
condition in the edge and based on the result, decide to run the task or not.
For more information about the supported conditional checks, see Edge conditions.
Edge conditions
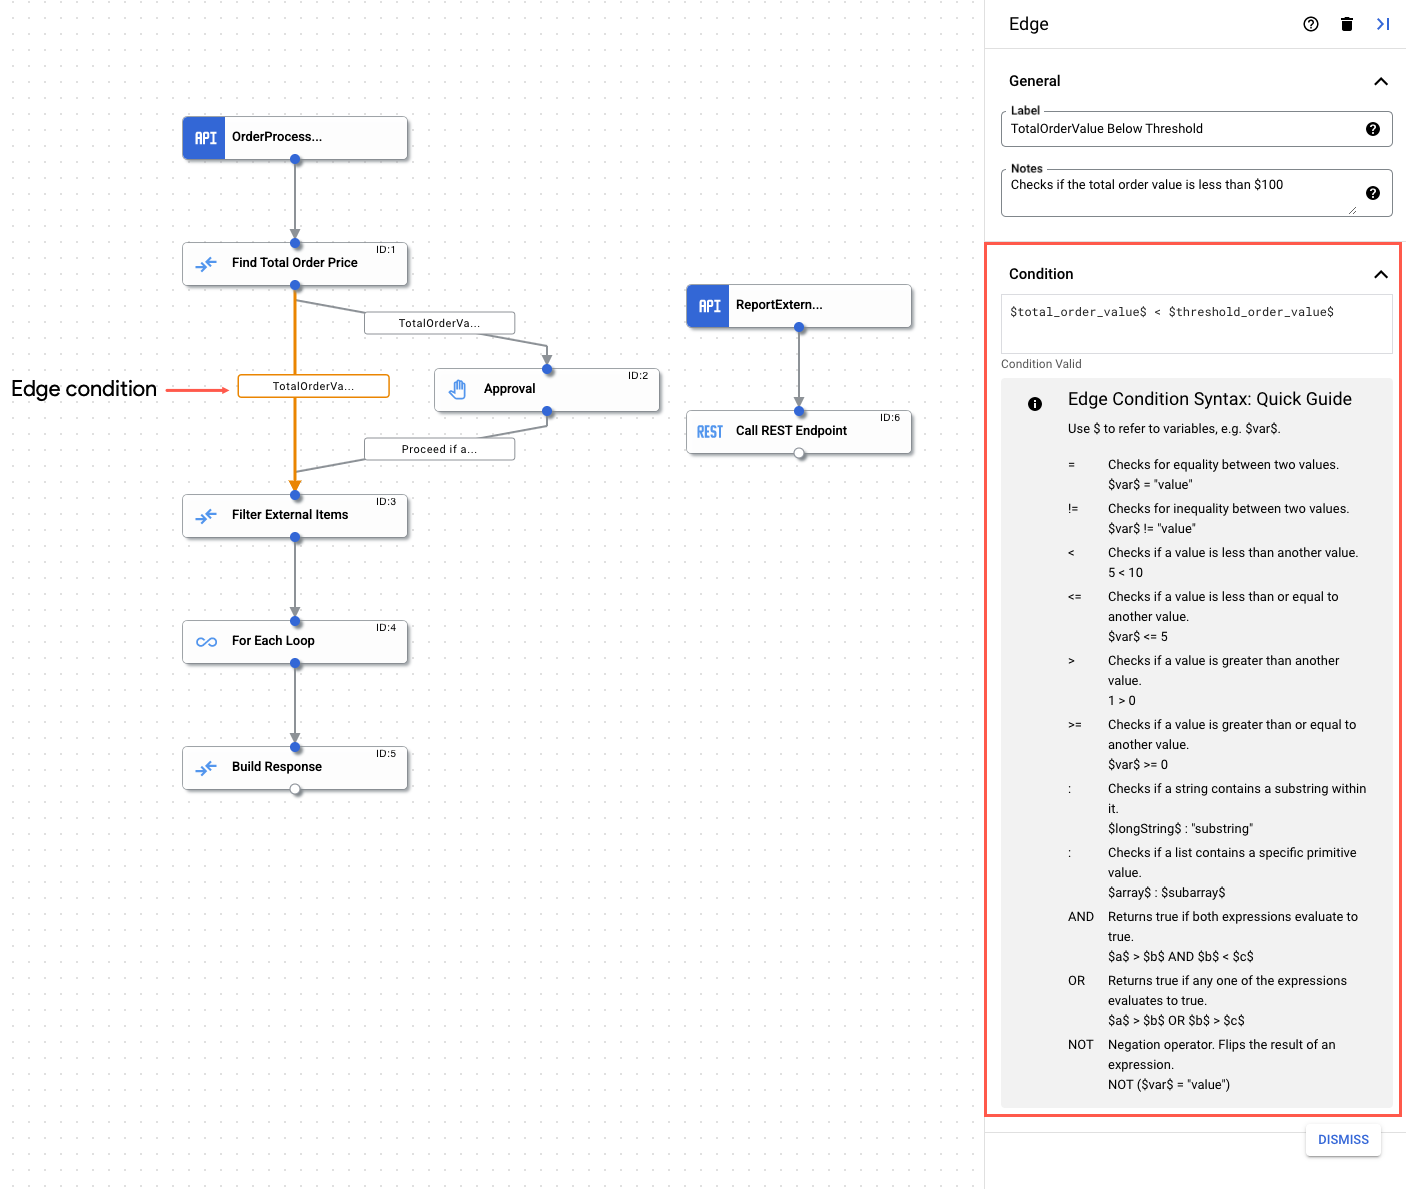
Edge conditions let you specify the conditions that must be met
for control of an integration to pass to the task connected by the edge. The task is run only if
the specified conditions are met. Edge conditions are useful in cases where there are multiple incoming edges
to a task, where each edge checks for specific conditions before the task.
Specify edge conditions using the following steps:
In the Google Cloud console, go to the Application Integration page.
The Integrations page appears listing all the integrations available in the Google Cloud project.
Select an existing integration or click Create integration to create a new one.
If you are creating a new integration:
Enter a name and description in the Create Integration pane.
Select a region for the integration.
Select a service account for the integration. You can change or update the service account details of an integration any time from the infoIntegration summary pane in the integration toolbar.
Click Create. The newly created integration opens in the integration editor.
In the integration editor navigation bar, click Tasks to view the list of available tasks and connectors.
Select an existing integration or create a new one.
In the integration editor, click on the edge to open the Edge configuration pane.
[[["Easy to understand","easyToUnderstand","thumb-up"],["Solved my problem","solvedMyProblem","thumb-up"],["Other","otherUp","thumb-up"]],[["Hard to understand","hardToUnderstand","thumb-down"],["Incorrect information or sample code","incorrectInformationOrSampleCode","thumb-down"],["Missing the information/samples I need","missingTheInformationSamplesINeed","thumb-down"],["Other","otherDown","thumb-down"]],["Last updated 2025-08-26 UTC."],[[["\u003cp\u003eEdges represent connections between elements in an integration, defining the control flow direction between triggers and tasks or between tasks themselves.\u003c/p\u003e\n"],["\u003cp\u003eEdge conditions allow you to set specific criteria that must be met for the control to pass to the task connected by the edge, enabling conditional execution.\u003c/p\u003e\n"],["\u003cp\u003eOperators such as \u003ccode\u003e=\u003c/code\u003e, \u003ccode\u003e!=\u003c/code\u003e, \u003ccode\u003e<\u003c/code\u003e, \u003ccode\u003e<=\u003c/code\u003e, \u003ccode\u003e>\u003c/code\u003e, \u003ccode\u003e>=\u003c/code\u003e, \u003ccode\u003e:\u003c/code\u003e, \u003ccode\u003eAND\u003c/code\u003e, \u003ccode\u003eOR\u003c/code\u003e, and \u003ccode\u003eNOT\u003c/code\u003e are supported for constructing edge conditions, allowing for a variety of logical checks.\u003c/p\u003e\n"],["\u003cp\u003eFunctions like \u003ccode\u003eexists\u003c/code\u003e, \u003ccode\u003edoes_not_exist\u003c/code\u003e, \u003ccode\u003eis_empty\u003c/code\u003e, and \u003ccode\u003eis_not_empty\u003c/code\u003e can be used within edge conditions to check for the presence, absence, or state of variables.\u003c/p\u003e\n"],["\u003cp\u003eTo use variables within the conditions, it is necessary to use dollar signs on either side of the variable name (i.e. \u003ccode\u003e$variableName$\u003c/code\u003e), and when checking multiple conditions they should be split into individual checks combined with AND/OR.\u003c/p\u003e\n"]]],[],null,["# Edge and edge conditions\n\nSee the [supported connectors](/integration-connectors/docs/connector-reference-overview) for Application Integration.\n\nEdge and edge conditions\n========================\n\nEdge\n----\n\n\nAn edge is a connection between any two elements in an integration.\nThe connection denotes the direction of the control flow from one element(task or trigger) to another.\nThe connection can be between a [trigger](/application-integration/docs/trigger-overview) and a [task](/application-integration/docs/task-overview) or between a task and another task.\nBy using an edge along with fork and join, you can implement\ncomplex branching and conditions in your integration. For more information, see\n[Forks and joins](/application-integration/docs/forks-joins).\n\n\nFor example, if there is an edge from a **Send Email** task to a\n**Call Integration** task, it means that after the **Send Email** task is run,\nthe next task to run is the **Call Integration** task. An edge also supports\nconditional checks. Before the control passes to the next task, you can check for a\ncondition in the edge and based on the result, decide to run the task or not.\nFor more information about the supported conditional checks, see [Edge conditions](#edge_condition).\n\nEdge conditions\n---------------\n\n\nEdge conditions let you specify the conditions that must be met\nfor control of an integration to pass to the task connected by the edge. The task is run *only if*\nthe specified conditions are met. Edge conditions are useful in cases where there are multiple incoming edges\nto a task, where each edge checks for specific conditions before the task.\n\nSpecify edge conditions using the following steps:\n\n1. In the Google Cloud console, go to the **Application Integration** page.\n\n [Go to Application Integration](https://console.cloud.google.com/integrations)\n2. In the navigation menu, click **Integrations** .\n\n\n The **Integrations** page appears listing all the integrations available in the Google Cloud project.\n3. Select an existing integration or click **Create integration** to create a new one.\n\n\n If you are creating a new integration:\n 1. Enter a name and description in the **Create Integration** pane.\n 2. Select a region for the integration. **Note:** The **Regions** dropdown only lists the regions provisioned in your Google Cloud project. To provision a new region, click **Enable Region** . See [Enable new region](/application-integration/docs/enable-new-region) for more information.\n 3. Select a service account for the integration. You can change or update the service account details of an integration any time from the info **Integration summary** pane in the integration toolbar. **Note:** The option to select a service account is displayed only if you have enabled integration governance for the selected region.\n 4. Click **Create** . The newly created integration opens in the *integration editor*.\n\n\n4. In the *integration editor* navigation bar, click **Tasks** to view the list of available tasks and connectors.\n5. Select an existing integration or create a new one.\n6. In the integration editor, click on the edge to open the Edge configuration pane.\n7. Configure the edge:\n - **Label** (optional): Add a custom name for the edge.\n - **Condition** : Set an edge condition using the [supported operators](#operators) and [functions](#functions).\n\n| Important tips for specifying conditions:\n|\n| - To reference a variable value, use dollar sign notation (`$`) before and after the variable name. For example, if you want to check if a variable `productId` is greater than 10, the syntax is `$productId$ \u003e 10`.\n| - Text without dollar sign notation is interpreted as a literal value. For example the text `customerId` is interpreted as a literal value.\n| - To check multiple conditions, split the conditions into individual checks and combine them using **AND** or **OR** . For example, instead of using `$productId$ \u003e 5 AND \u003c 9 `, use ` $productId$ \u003e 5 AND $productId$ \u003c 9`.\n\nSupported operators\n-------------------\n\n\nThe following table describes the supported operators available for use in edge conditions.\n\nSupported functions\n-------------------\n\n\nThe following table describes supported functions available for use in edge conditions.\n\nQuotas and limits\n-----------------\n\nFor information about quotas and limits, see [Quotas and limits](/application-integration/docs/quotas).\n\nWhat's next\n-----------\n\n- Learn about [all tasks and triggers](/application-integration/docs/all-triggers-tasks).\n- Learn how to [test and publish an integration](/application-integration/docs/test-publish-integrations).\n\n- Learn about [error handling](/application-integration/docs/error-handling-strategy).\n- Learn about [integration execution logs](/application-integration/docs/introduction-logs)."]]