Halaman ini berlaku untuk Apigee dan Apigee Hybrid.
Lihat dokumentasi
Apigee Edge.

Siapkan navigasi untuk menautkan halaman yang telah Anda kembangkan ke portal Anda, seperti yang dijelaskan di bagian berikut.
Menjelajahi halaman Menu
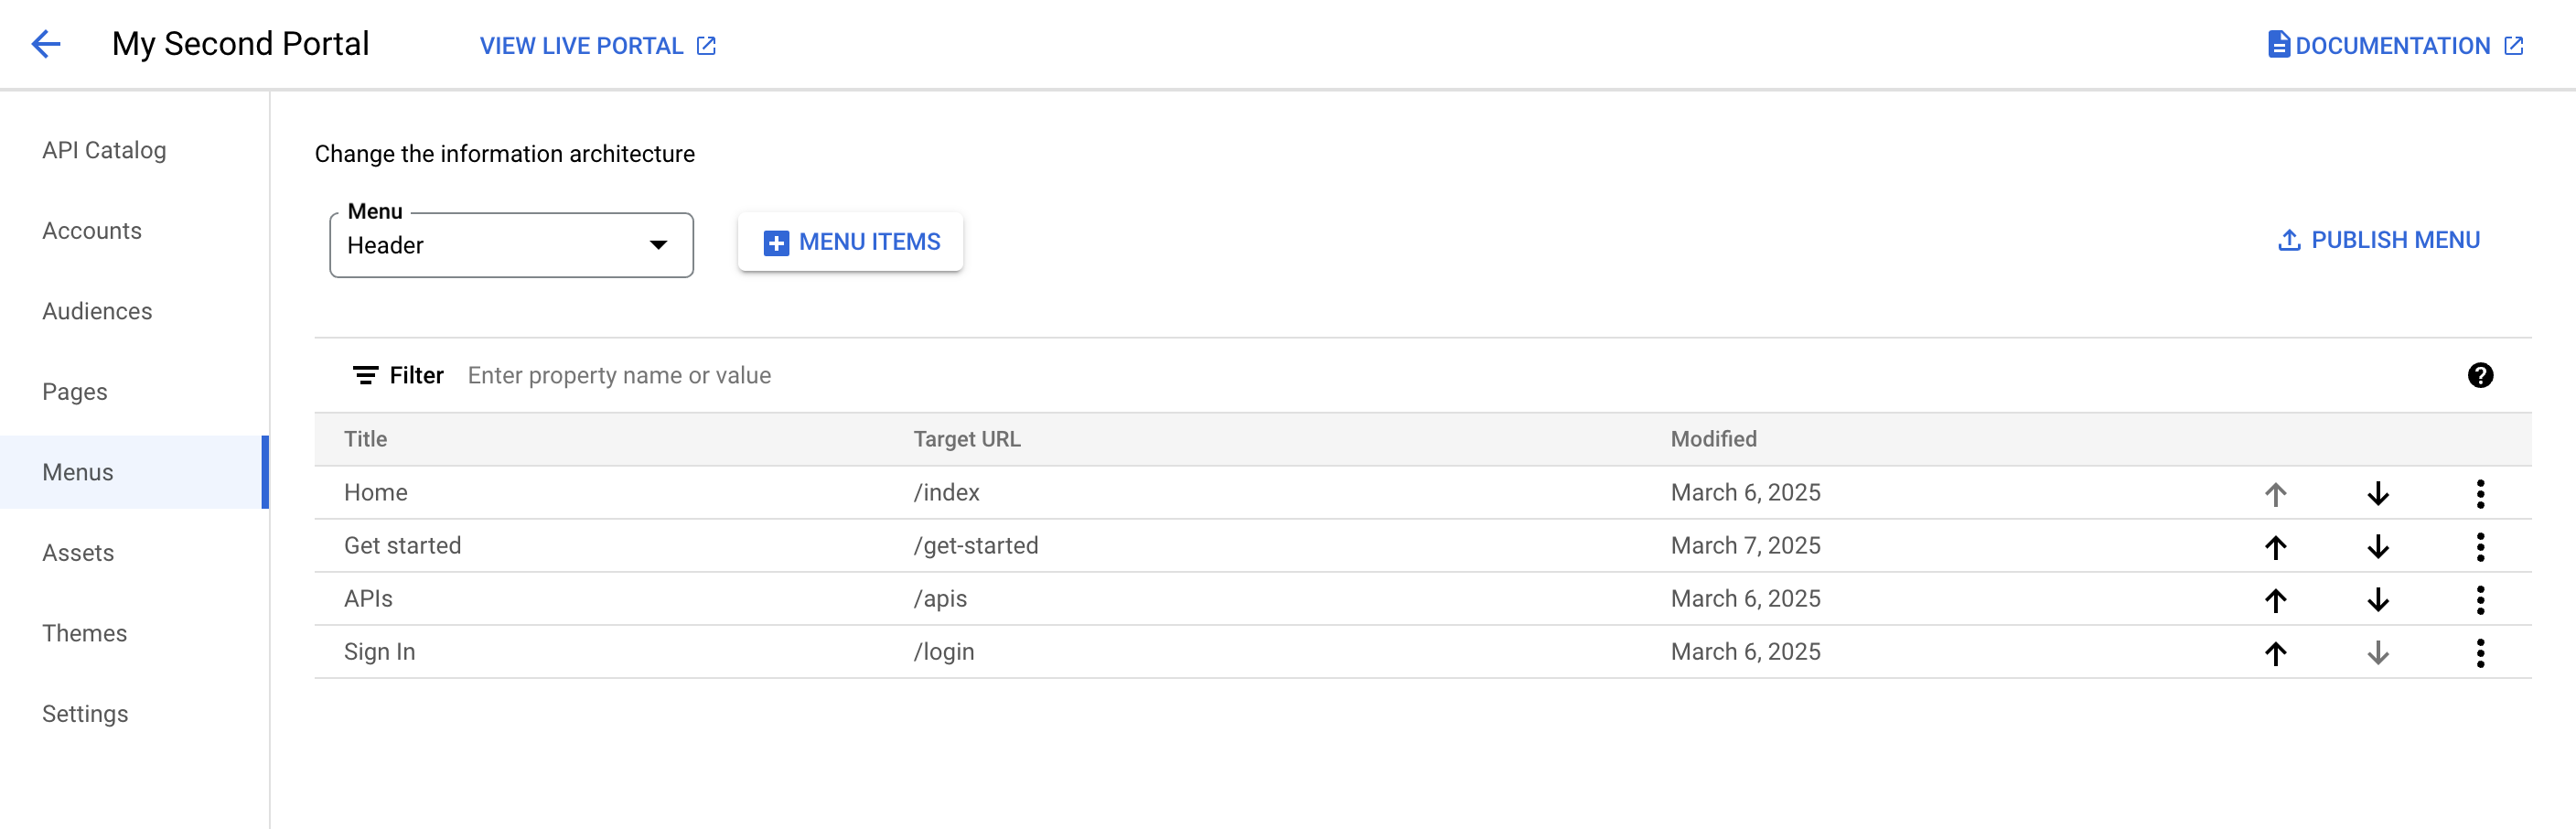
Siapkan dan publikasikan menu navigasi di portal Anda menggunakan editor menu navigasi di halaman Menu.
Untuk mengakses halaman Menu:
UI Konsol Cloud
- Di konsol Apigee di Cloud, buka halaman Distribution > Portals.
Buka Portal - Klik portal Anda.
Klik Menu.
UI Klasik
- Pilih Publikasikan > Portal di panel navigasi samping, pilih portal Anda, lalu klik Menu di halaman landing.
Saat mengedit portal, pilih Menu di menu drop-down pada menu navigasi atas.
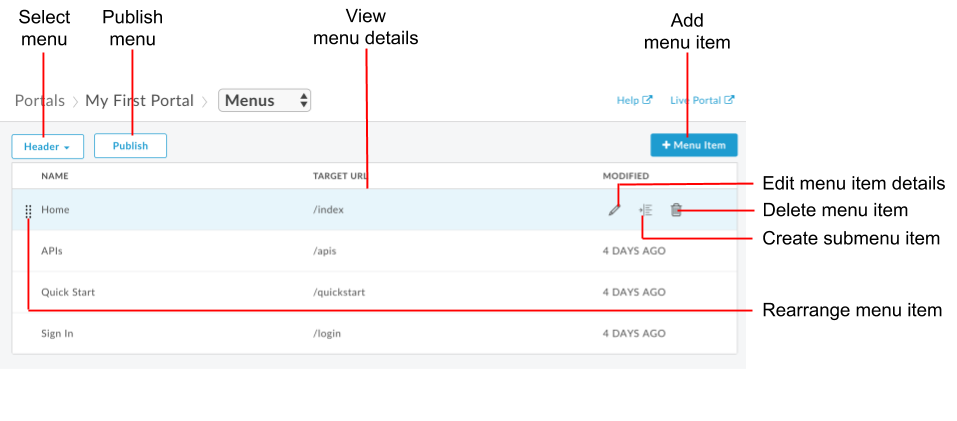
Editor menu navigasi memungkinkan Anda:
- Pilih menu yang ingin Anda edit (header atau footer) dan lihat detail item menu
- Menambahkan item ke menu navigasi
- Membuat submenu
- Mengedit atau menghapus item menu
- Menata ulang item menu
- Memublikasikan menu
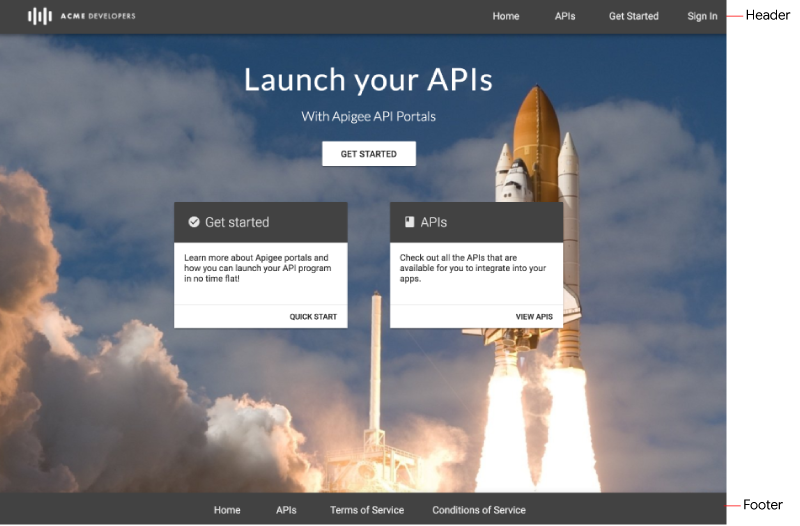
Tentang menu navigasi default
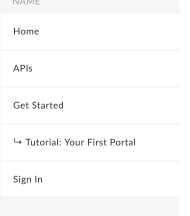
Dua menu navigasi disediakan secara default: Header dan Footer. Menu navigasi default muncul di dan ditautkan ke kumpulan halaman awal yang disediakan, seperti yang ditunjukkan pada gambar berikut.
Menambahkan item ke menu navigasi
Untuk menambahkan item ke menu navigasi:
- Akses halaman Menu.
- Pilih menu yang ingin Anda edit di daftar drop-down (Header atau Footer).
- Klik + Item Menu.
Dalam dialog menu navigasi, masukkan detail berikut:
Kolom Deskripsi Wajib? Nama Nama item menu seperti yang akan muncul di portal. Nilai ini dapat berbeda dari nama halaman sebenarnya. Ya Jalur Halaman atau URL Masukkan URL absolut ke halaman eksternal, URL absolut atau relatif ke halaman di portal Anda, atau klik kolom teks dan pilih halaman di portal Anda dari daftar drop-down. Ya Klik Buat.
Klik Publikasikan untuk memublikasikan perubahan Anda ke portal aktif.
Mengatur ulang item menu
Untuk menyusun ulang item di menu navigasi:
- Akses halaman Menu.
- Pilih menu yang ingin Anda edit di daftar drop-down.
Pindahkan item menu.
UI Konsol Cloud
Klik Panah atas pada baris untuk memindahkan item ke atas. Atau, klik Panah bawah pada baris untuk memindahkan item ke bawah.
UI Klasik
- Posisikan kursor Anda di atas item menu yang ingin Anda pindahkan untuk menampilkan tindakan.
- Klik dan tahan tombol mouse di atas
 , di sebelah kiri nama item menu.
 - Tarik item menu ke lokasi barunya dalam daftar item menu, lalu lepaskan tombol mouse.
Klik Publikasikan untuk memublikasikan perubahan Anda ke portal aktif.
Membuat submenu
Submenu ditampilkan sebagai menu drop-down saat Anda mengarahkan kursor ke item induk.
Untuk membuat submenu:
- Akses halaman Menu.
- Pilih menu yang ingin Anda edit di daftar drop-down.
- Tambahkan item menu yang akan berfungsi sebagai menu induk.
- Tambahkan item menu tambahan yang akan berfungsi sebagai submenu.
- Atur ulang item submenu agar berada di bawah menu induk dalam urutan yang Anda inginkan agar muncul di menu.
Mengubah item menu menjadi submenu.
UI Konsol Cloud
Klik Lainnya, Konversi ke item submenu.
Untuk memindahkan item submenu kembali ke hierarki menu tingkat teratas:
Klik Lainnya, Konversi ke item tingkat teratas.
UI Klasik
Posisikan kursor di atas item menu yang ingin Anda tambahkan sebagai submenu, lalu klik
 untuk mengindentasi item submenu satu tingkat di bawah menu induk.
Untuk memindahkan item submenu kembali ke hierarki menu tingkat teratas, klik
 .
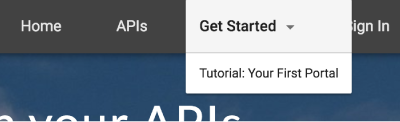
.Gambar berikut menunjukkan cara item submenu muncul dalam daftar menu:
Klik Publikasikan untuk memublikasikan perubahan Anda ke portal aktif.
Mengedit item menu navigasi
Untuk mengedit item di menu navigasi:
- Akses halaman Menu.
- Pilih menu yang ingin Anda edit di daftar drop-down.
Buka editor.
UI Konsol Cloud
Untuk item yang ingin Anda edit, klik Lainnya, Edit.
UI Klasik
Posisikan kursor di item menu yang ingin Anda edit, lalu klik
 .
.Edit detail item menu.
Klik Simpan.
Klik Publikasikan untuk memublikasikan perubahan Anda ke portal aktif.
Mempublikasikan menu navigasi
Untuk memublikasikan menu navigasi:
- Akses halaman Menu.
- Pilih menu yang ingin Anda publikasikan dari daftar drop-down.
- Klik Publikasikan untuk memublikasikan menu navigasi.
Menghapus item dari menu navigasi
Untuk menghapus item dari menu navigasi:
- Akses halaman Menu.
- Pilih menu yang ingin Anda edit dari daftar drop-down.
Hapus item menu.
UI Konsol Cloud
Untuk item yang ingin Anda hapus, klik Lainnya, Hapus.
UI Klasik
- Posisikan kursor Anda di atas item menu dalam daftar untuk menampilkan menu tindakan.
- Klik
 .
.
Klik Hapus untuk mengonfirmasi operasi penghapusan.
Klik Publikasikan untuk memublikasikan perubahan Anda ke portal aktif.
Menyesuaikan item menu dan panel navigasi
Sesuaikan ukuran dan gaya font item menu dan aspek lain dari tampilan panel navigasi, seperti yang dijelaskan dalam Menyesuaikan toolbar navigasi.