Halaman ini berlaku untuk Apigee dan Apigee Hybrid.
Lihat dokumentasi
Apigee Edge.

Buat dan kelola portal Anda, seperti yang dijelaskan di bagian berikut.
Tentang peran portal
Anda memerlukan salah satu peran berikut untuk mengelola portal. Untuk menetapkan peran kepada pengguna, lihat Mengubah peran pengguna di UI.
| Peran | Deskripsi |
|---|---|
| Administrator Portal | Izin CRUD penuh untuk portal terintegrasi. Catatan: Peran Administrator Portal saat ini tidak terlihat di UI. Untuk menetapkan peran kepada pengguna, gunakan perintah gcloud berikut: gcloud projects add-iam-policy-binding <project-id> --member=user:<user-email> --role=roles/apigee.portalAdmin |
| Organization Administrator | Super user. Memiliki akses CRUD penuh ke resource dalam organisasi. Ini adalah peran yang ditentukan Apigee. |
| Administrator Organisasi hanya baca | Memiliki akses hanya baca ke resource di organisasi. Ini adalah peran khusus Apigee. |
Menjelajahi halaman Portals
Untuk mengakses halaman Portal:
UI Konsol Cloud
Di konsol Apigee di Cloud, buka halaman Distribution > Portals.
Halaman portal akan terbuka dan mencantumkan portal saat ini.
Halaman Portal memungkinkan Anda:
UI Klasik
Gunakan salah satu metode berikut:
- Pilih Publikasikan > Portal di menu navigasi samping.
- Saat mengedit portal, klik Portal di menu navigasi atas.
Halaman portal akan terbuka dan mencantumkan portal saat ini.
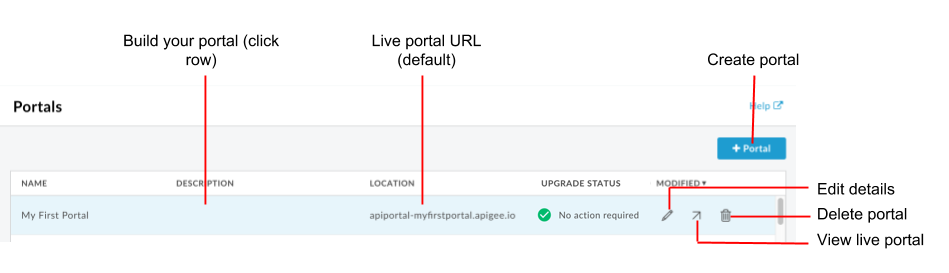
Seperti yang ditandai pada gambar sebelumnya, halaman Portals memungkinkan Anda untuk:
- Tentukan dengan cepat portal mana yang menggunakan front-end portal baru
- Membuat portal
- Membangun portal dan isinya
- Melihat portal aktif
- Mengedit detail portal
- Menghapus portal
Membuat portal
Buat beberapa portal untuk organisasi Anda, sesuai kebutuhan.
Saat Anda membuat portal baru, serangkaian halaman awal disediakan untuk Anda gunakan sebagai titik awal. Lihat Tentang portal contoh dan Tips cepat untuk menyesuaikan portal contoh.
Untuk membuat portal baru:
- Akses halaman Portals.
Buka Buat portal :
UI Konsol Cloud
Klik + Create.
UI Klasik
Klik + Portal.
Masukkan informasi berikut di Buat portal:
Kolom Deskripsi Nama Nama portal. Nama hanya boleh berisi huruf, angka, spasi, dan karakter khusus berikut: titik (.), koma (,), tanda hubung (-), atau garis bawah (_). Harus unik di semua organisasi.
Catatan: Jika Anda menghapus portal, Anda tidak dapat langsung membuat portal dengan nama yang sama karena portal yang dihapus akan disimpan sementara di folder Sampah.Domain (Hanya baca) Saat Anda memasukkan nama portal, domain default untuk portal akan ditampilkan. Misalnya: 'orgname-portalname.apigee.io', dengan 'orgname' adalah nama organisasi dan 'portalname' ditentukan menggunakan nama portal yang dikonversi menjadi huruf kecil semua dan tanpa spasi.
Catatan: Anda dapat menyesuaikan nama domain, seperti yang dijelaskan dalam Menyesuaikan domain Anda.Deskripsi Deskripsi portal Anda. Informasi ini hanya untuk penggunaan internal. URL tersebut tidak akan ditampilkan di portal live Anda. Klik Buat.
Membangun portal Anda
Untuk membuat portal dan isinya:
- Akses halaman Portals.
- Klik nama portal yang ingin Anda buat. Halaman landing portal akan ditampilkan.
- Buat portal dan kontennya, seperti yang dijelaskan dalam langkah-langkah untuk membuat portal Anda.
Mengedit nama dan deskripsi portal
Untuk mengedit detail portal, termasuk nama dan deskripsi:
UI Konsol Cloud
- Akses halaman Portals.
- Di baris portal yang ingin Anda edit, klik Lainnya > Edit
- Edit nama dan deskripsi portal.
- Klik Simpan.
UI Klasik
- Akses halaman Portals.
- Posisikan kursor Anda di atas portal yang ada untuk menampilkan menu tindakan.
- Klik
 .
. - Edit nama dan deskripsi portal.
- Klik Perbarui.
Melihat portal live
Untuk melihat portal aktif:
UI Konsol Cloud
- Akses halaman Portals.
- Di baris portal yang ingin Anda lihat, klik Lainnya > Lihat portal aktif.
UI Klasik
- Akses halaman Portals.
- Posisikan kursor Anda di atas portal yang ada untuk menampilkan menu tindakan.
- Klik
 .
.
Portal live akan terbuka di tab browser baru.
Menghapus portal
Terkadang Anda mungkin perlu menghapus portal. Misalnya, jika Anda telah membuat portal pengujian untuk mencoba fitur di lingkungan lokal, Anda dapat menghapusnya setelah fase pengujian selesai.
Untuk menghapus portal:
UI Konsol Cloud
- Akses halaman Portals.
- Di baris portal yang ingin Anda hapus, klik Lainnya > Hapus
- Untuk mengonfirmasi operasi penghapusan:
- Ketik HAPUS di kolom teks.
- Klik Konfirmasi.
UI Klasik
- Akses halaman Portals.
- Posisikan kursor Anda di atas portal yang ada untuk menampilkan menu tindakan.
- Klik
 .
. - Untuk mengonfirmasi operasi penghapusan:
- Ketik HAPUS di kolom teks.
- Klik Hapus.