Mengakses bucket dan file Cloud Storage di JupyterLab
Halaman ini menunjukkan cara memasang bucket Cloud Storage ke antarmuka JupyterLab instance Vertex AI Workbench Anda sehingga Anda dapat menjelajahi file yang disimpan di Cloud Storage. Anda juga dapat membuka dan mengedit file yang kompatibel dengan JupyterLab, seperti file teks dan file notebook (IPYNB).
Ringkasan
Instance Vertex AI Workbench menyertakan integrasi Cloud Storage yang memungkinkan Anda memasang bucket Cloud Storage. Artinya, Anda dapat menjelajahi konten bucket dan bekerja dengan file yang kompatibel dari dalam antarmuka JupyterLab.
Anda dapat mengakses bucket dan file Cloud Storage yang dapat diakses instance Anda dalam project yang sama dengan instance Vertex AI Workbench Anda.
Sebelum memulai
- Sign in to your Google Cloud account. If you're new to Google Cloud, create an account to evaluate how our products perform in real-world scenarios. New customers also get $300 in free credits to run, test, and deploy workloads.
-
In the Google Cloud console, on the project selector page, select or create a Google Cloud project.
Roles required to select or create a project
- Select a project: Selecting a project doesn't require a specific IAM role—you can select any project that you've been granted a role on.
-
Create a project: To create a project, you need the Project Creator
(
roles/resourcemanager.projectCreator), which contains theresourcemanager.projects.createpermission. Learn how to grant roles.
-
Verify that billing is enabled for your Google Cloud project.
-
Enable the Notebooks API.
Roles required to enable APIs
To enable APIs, you need the Service Usage Admin IAM role (
roles/serviceusage.serviceUsageAdmin), which contains theserviceusage.services.enablepermission. Learn how to grant roles. -
Notebooks Runner (
roles/notebooks.runner) di project -
Pengguna Objek Penyimpanan (
roles/storage.objectUser) di akun layanan instance Vertex AI Workbench - Jika Anda perlu membuat bucket Cloud Storage, lihat Membuat bucket.
- Jika belum melakukannya, buat instance Vertex AI Workbench dalam project yang sama dengan bucket Cloud Storage Anda.
-
Di konsol Google Cloud , buka halaman Instances.
-
Di samping nama instance Vertex AI Workbench, klik Open JupyterLab.
Instance Vertex AI Workbench akan membuka JupyterLab.
-
Di JupyterLab, pastikan tab File Browser dipilih.
-
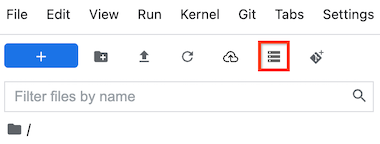
Di sidebar kiri, klik tombol Pasang penyimpanan bersama. Jika Anda tidak melihat tombol tersebut, tarik sisi kanan sidebar untuk meluaskan sidebar hingga Anda melihat tombol tersebut.

-
Di kolom Bucket name, masukkan nama bucket Cloud Storage yang ingin Anda pasang.
-
Klik Mount.
-
Bucket Cloud Storage Anda muncul sebagai folder di tab File browser pada sidebar kiri. Klik dua kali folder untuk membukanya dan menjelajahi isinya.
Pelajari Cloud Storage lebih lanjut.
Pelajari cara membuat kueri data di BigQuery dari dalam JupyterLab.
Peran yang diperlukan
Untuk mendapatkan izin yang Anda perlukan untuk memasang bucket Cloud Storage ke instance Vertex AI Workbench, minta administrator Anda untuk memberi Anda peran IAM berikut:
Untuk mengetahui informasi selengkapnya tentang pemberian peran, lihat Mengelola akses ke project, folder, dan organisasi.
Anda mungkin juga bisa mendapatkan izin yang diperlukan melalui peran kustom atau peran yang telah ditentukan lainnya.
Izin yang diperlukan untuk mengaktifkan pemasangan penyimpanan bersama
Untuk mengaktifkan pemasangan penyimpanan bersama di instance Vertex AI Workbench, minta administrator Anda untuk memberikan izin storage.buckets.list pada project ke akun layanan instance Vertex AI Workbench Anda.
Izin storage.buckets.list diperlukan agar tombol
Mount shared storage muncul di antarmuka JupyterLab instance
Vertex AI Workbench Anda.
Buat bucket dan instance Vertex AI Workbench
Anda harus memiliki akses ke setidaknya satu bucket Cloud Storage dalam project yang sama dengan instance Vertex AI Workbench Anda.Buka JupyterLab
Pasang bucket Cloud Storage
Untuk memasang, lalu mengakses bucket Cloud Storage, lakukan hal berikut:
Memecahkan masalah
Untuk menemukan metode mendiagnosis dan menyelesaikan masalah terkait pemasangan bucket Cloud Storage ke instance Anda, lihat Memecahkan Masalah Vertex AI Workbench.

