This document provides instructions for setting up a Ray cluster on Vertex AI to meet various needs. For example, to build your image, see Custom image. Some enterprises can use private networking. This document covers Private Service Connect interface for Ray on Vertex AI. Another use case involves accessing remote files as if they were local (see Ray on Vertex AI Network File System).
Overview
Topics covered here include:
- creating a Ray cluster on Vertex AI
- managing the lifecycle of a Ray cluster
- creating a custom image
- setting up Private and public connectivity (VPC)
- using Private Service Connect interface for Ray on Vertex AI
- setting up Ray on Vertex AI Network File System (NFS)
- setting up a Ray Dashboard and Interactive Shell with VPC-SC + VPC Peering
Create a Ray cluster
You can use the Google Cloud console or the Vertex AI SDK for Python to create a Ray cluster. A cluster can have up to 2,000 nodes. An upper limit of 1,000 nodes exists within one worker pool. No limit exists on the number of worker pools, but a large number of worker pools, such as 1,000 worker pools with one node each, can negatively affect cluster performance.
Before you begin, read the Ray on Vertex AI overview and set up all the prerequisite tools you need.
A Ray cluster on Vertex AI might take 10-20 minutes to start up after you create the cluster.
Console
In accordance with the OSS Ray best practice recommendation, setting the logical CPU count to 0 on the Ray head node is enforced in order to avoid running any workload on the head node.
In the Google Cloud console, go to the Ray on Vertex AI page.
Click Create Cluster to open the Create Cluster panel.
For each step in the Create Cluster panel, review or replace the default cluster information. Click Continue to complete each step:
For Name and region, specify a Name and choose a Location for your cluster.
For Compute settings, specify the configuration of the Ray cluster on the Vertex AI's head node, including its machine type, accelerator type and count, disk type and size, and replica count. Optionally, add a custom image URI to specify a custom container image to add Python dependencies not provided by the default container image. See Custom image.
Under Advanced options, you can:
- Specify your own encryption key.
- Specify a custom service account.
- Disable metrics collection, if you don't need to monitor the resource stats of your workload during training.
(Optional) To deploy a private endpoint for your cluster, the recommended method is to use Private Service Connect. For further details, see Private Service Connect interface for Ray on Vertex AI.
Click Create.
Ray on Vertex AI SDK
In accordance with the OSS Ray best practice recommendation, setting the logical CPU count to 0 on the Ray head node is enforced in order to avoid running any workload on the head node.
From an interactive Python environment, use the following to create the Ray cluster on Vertex AI:
import ray
import vertex_ray
from google.cloud import aiplatform
from vertex_ray import Resources
from vertex_ray.util.resources import NfsMount

# Define a default CPU cluster, machine_type is n1-standard-16, 1 head node and 1 worker node
head_node_type = Resources()
worker_node_types = [Resources()]

# Or define a GPU cluster.
head_node_type = Resources(
  machine_type="n1-standard-16",
  node_count=1,
  custom_image="us-docker.pkg.dev/my-project/ray-custom.2-9.py310:latest",  # Optional. When not specified, a prebuilt image is used.
)

worker_node_types = [Resources(
  machine_type="n1-standard-16",
  node_count=2,  # Must be >= 1
  accelerator_type="NVIDIA_TESLA_T4",
  accelerator_count=1,
  custom_image="us-docker.pkg.dev/my-project/ray-custom.2-9.py310:latest",  # When not specified, a prebuilt image is used.
)]
# Optional. Create cluster with Network File System (NFS) setup.
nfs_mount = NfsMount(
    server="10.10.10.10",
    path="nfs_path",
    mount_point="nfs_mount_point",
)
aiplatform.init()
# Initialize Vertex AI to retrieve projects for downstream operations.
# Create the Ray cluster on Vertex AI
CLUSTER_RESOURCE_NAME = vertex_ray.create_ray_cluster(
  head_node_type=head_node_type,
  network=NETWORK, #Optional
  worker_node_types=worker_node_types,
  python_version="3.10",  # Optional
  ray_version="2.47",  # Optional
  cluster_name=CLUSTER_NAME, # Optional
  service_account=SERVICE_ACCOUNT,  # Optional
  enable_metrics_collection=True,  # Optional. Enable metrics collection for monitoring.
  labels=LABELS,  # Optional.
  nfs_mounts=[nfs_mount],  # Optional.

)
Where:
CLUSTER_NAME: A name for the Ray cluster on Vertex AI that must be unique across your project.
NETWORK: (Optional) The full name of your VPC network, in the format of
projects/PROJECT_ID/global/networks/VPC_NAME. To set a private endpoint instead of a public endpoint for your cluster, specify a VPC network to use with Ray on Vertex AI. For more information, see Private and public connectivity.VPC_NAME: Optional: The VPC on which the VM operates.
PROJECT_ID: Your Google Cloud project ID. You can find the project ID on the Google Cloud console welcome page.
SERVICE_ACCOUNT: Optional: The service account to run Ray applications on the cluster. Grant required roles.
LABELS: (Optional) The labels with user-defined metadata used to organize Ray clusters. Label keys and values can be no longer than 64 characters (Unicode codepoints), and can only contain lowercase letters, numeric characters, underscores and dashes. International characters are allowed. See https://goo.gl/xmQnxf for more information and examples of labels.
You should see the following output until the status changes to RUNNING:
[Ray on Vertex AI]: Cluster State = State.PROVISIONING
Waiting for cluster provisioning; attempt 1; sleeping for 0:02:30 seconds
...
[Ray on Vertex AI]: Cluster State = State.RUNNING
Note the following:
The first node is the head node.
TPU machine types aren't supported.
Lifecycle management
During the lifecycle of a Ray cluster on Vertex AI, each action associates with a state. The following table summarizes the billing status and management option for each state. The reference documentation provides a definition for each of these states.
| Action | State | Billed? | Delete action available? | Cancel action available? |
|---|---|---|---|---|
| The user creates a cluster | PROVISIONING | No | No | No |
| The user manually scales up or down | UPDATING | Yes, per the real-time size | Yes | No |
| The cluster runs | RUNNING | Yes | Yes | Not applicable - you can delete |
| The cluster autoscales up or down | UPDATING | Yes, per the real-time size | Yes | No |
| The user deletes the cluster | STOPPING | No | No | Not applicable - already stopping |
| The cluster enters an Error state | ERROR | No | Yes | Not applicable - you can delete |
| Not applicable | STATE_UNSPECIFIED | No | Yes | Not applicable |
Custom Image (Optional)
Prebuilt images align with most use cases. If you want to build your image, use the Ray on Vertex AI prebuilt images as a base image. See the Docker documentation for how to build your images from a base image.
These base images include an installation of Python, Ubuntu, and Ray. They also include dependencies such as:
- python-json-logger
- google-cloud-resource-manager
- ca-certificates-java
- libatlas-base-dev
- liblapack-dev
- g++, libio-all-perl
- libyaml-0-2.
Private and public connectivity
By default, Ray on Vertex AI creates a public, secure endpoint for interactive development with the Ray Client on Ray clusters on Vertex AI. Use public connectivity for development or ephemeral use cases. This public endpoint is accessible through the internet. Only authorized users who have, at a minimum, Vertex AI user role permissions on the Ray cluster's user project can access the cluster.
If you require a private connection to your cluster or if you use VPC Service Controls, VPC peering is supported for Ray clusters on Vertex AI. Clusters with a private endpoint are only accessible from a client within a VPC network that is peered with Vertex AI.
To set up private connectivity with VPC Peering for Ray on Vertex AI, select a VPC network when you create your cluster. The VPC network requires a private services connection between your VPC network and Vertex AI. If you use Ray on Vertex AI in the console, you can set up your private services access connection when creating the cluster.
If you want to use VPC Service Controls and VPC peering with Ray clusters on Vertex AI, extra set up is required to use the Ray dashboard and interactive shell. Follow the instructions covered in Ray Dashboard and Interactive Shell with VPC-SC + VPC Peering to configure the interactive shell setup with VPC-SC and VPC Peering in your user project.
After you create your Ray cluster on Vertex AI, you can connect to the head node using the Vertex AI SDK for Python. The connecting environment, such as a Compute Engine VM or Vertex AI Workbench instance, must be in the VPC network that is peered with Vertex AI. Note that a private services connection has a limited number of IP addresses, which could result in IP address exhaustion. Therefore, we recommend using private connections for long-running clusters.
Private Service Connect interface for Ray on Vertex AI
Private Service Connect interface egress and Private Service Connect interface ingress are supported on Ray clusters on Vertex AI.
To use Private Service Connect interface egress, follow the instructions provided below. If VPC Service Controls is not enabled, clusters with Private Service Connect interface egress use the secure public endpoint for ingress with Ray Client.
If VPC Service Controls is enabled, Private Service Connect interface ingress is used by default with Private Service Connect interface egress. To connect with the Ray Client or submit jobs from a notebook for a cluster with Private Service Connect interface ingress, make sure that the notebook is within the user project VPC and subnetwork. For more details on how to set up VPC Service Controls, see VPC Service Controls with Vertex AI.
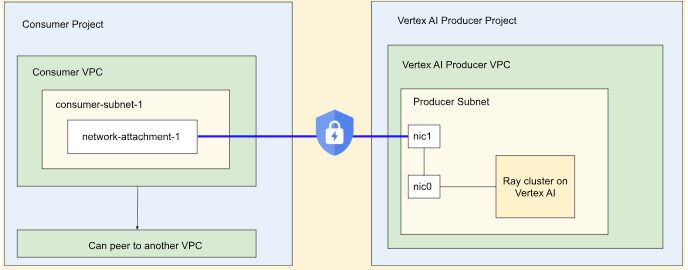
Enable Private Service Connect interface
Follow the setting up your resources guide to set up your Private Service Connect interface. After setting up your resources, you're ready to enable Private Service Connect interface on your Ray cluster on Vertex AI.
Console
While creating your cluster and after specifying Name and region and Compute settings, the Networking option appears.
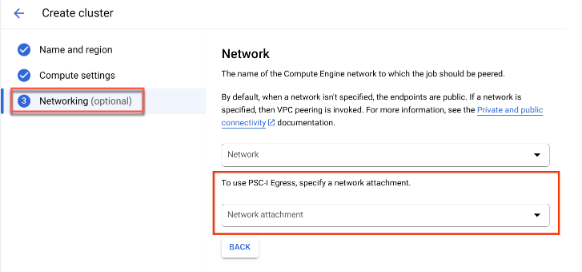
Set up a network attachment by doing one of the following:
- Use the NETWORK_ATTACHMENT_NAME name that you specified when setting up your resources for Private Service Connect.
- Create a new network attachment by clicking the Create network attachment button that appears in the drop-down.
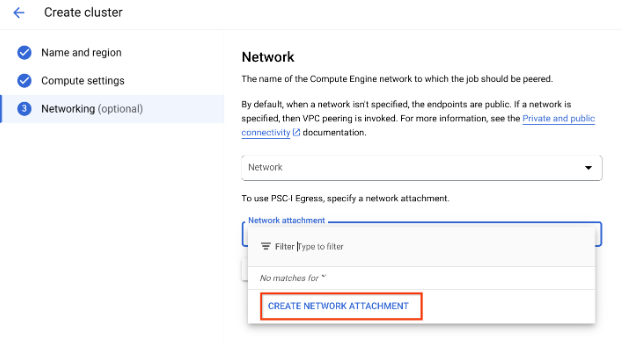
Click Create network attachment.
In the subtask that appears, specify a name, network, and subnetwork for the new network attachment.
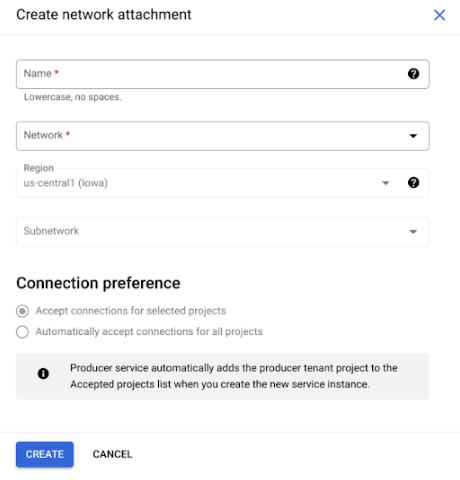
Click Create.
Ray on Vertex AI SDK
The Ray on Vertex AI SDK is a part of the Vertex AI SDK for Python. To learn how to install or update the Vertex AI SDK for Python, see Install the Vertex AI SDK for Python. For more information, see the Vertex AI SDK for Python API reference documentation.
from google.cloud import aiplatform
import vertex_ray

# Initialization
aiplatform.init()

# Create a default cluster with network attachment configuration

psc_config = vertex_ray.PscIConfig(network_attachment=NETWORK_ATTACHMENT_NAME)
cluster_resource_name = vertex_ray.create_ray_cluster(
   psc_interface_config=psc_config,
)
Where:
- NETWORK_ATTACHMENT_NAME: The name you specified when setting up your resources for Private Service Connect on your user project.
Ray on Vertex AI Network File System (NFS)
To make remote files available to your cluster, mount Network File System (NFS) shares. Your jobs can then access remote files as if they were local, which enables high throughput and low latency.
VPC setup
Two options exist for setting up VPC:
- Create a Private Service Connect interface Network Attachment. (Recommended)
- Set up VPC Network Peering.
Set up your NFS instance
For more details on how to create a Filestore instance, see Create an instance. If you use the Private Service Connect interface method, you don't have to select private service access mode when creating the filestore.
Use the Network File System (NFS)
To use the Network File System, specify either a network or a network attachment (recommended).
Console
In the Networking step of the create page, after specifying either a network or a network attachment. To do this, click Add NFS mount under the Network File System (NFS) section and specify an NFS mount (server, path and mount point).
Field Description serverThe IP address of your NFS server. This must be a private address in your VPC. pathThe NFS share path. This must be an absolute path that begins with /.mountPointThe local mount point. This must be a valid UNIX directory name. For example, if the local mount point is sourceData, then specify the path/mnt/nfs/ sourceDatafrom your training VM instance.For more information, see Where to specify compute resources.
Specify a server, path, and mount point.
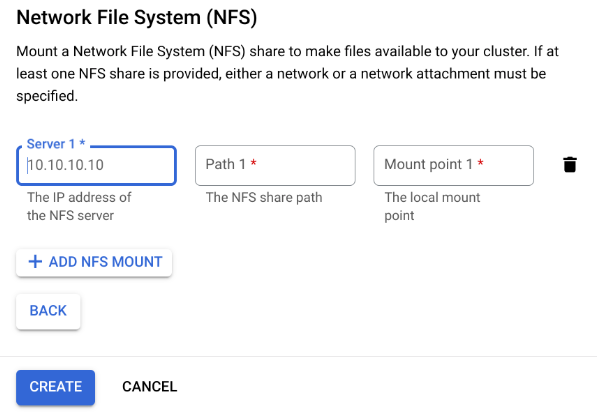
Click Create. This creates the Ray cluster.
Ray Dashboard and Interactive Shell with VPC-SC + VPC Peering
-
Configure
peered-dns-domains.{ VPC_NAME=NETWORK_NAME REGION=LOCATION gcloud services peered-dns-domains create training-cloud \ --network=$VPC_NAME \ --dns-suffix=$REGION.aiplatform-training.cloud.google.com. # Verify gcloud beta services peered-dns-domains list --network $VPC_NAME; }
-
NETWORK_NAME: Change to peered network.
-
LOCATION: Desired location (for example,
us-central1).
-
-
Configure
DNS managed zone.{ PROJECT_ID=PROJECT_ID ZONE_NAME=$PROJECT_ID-aiplatform-training-cloud-google-com DNS_NAME=aiplatform-training.cloud.google.com DESCRIPTION=aiplatform-training.cloud.google.com gcloud dns managed-zones create $ZONE_NAME \ --visibility=private \ --networks=https://www.googleapis.com/compute/v1/projects/$PROJECT_ID/global/networks/$VPC_NAME \ --dns-name=$DNS_NAME \ --description="Training $DESCRIPTION" }
-
PROJECT_ID: Your project ID. You can find these IDs in the Google Cloud console welcome page.
-
-
Record DNS transaction.
{
  gcloud dns record-sets transaction start --zone=$ZONE_NAME

  gcloud dns record-sets transaction add \
  --name=$DNS_NAME. \
  --type=A 199.36.153.4 199.36.153.5 199.36.153.6 199.36.153.7 \
  --zone=$ZONE_NAME \
  --ttl=300

  gcloud dns record-sets transaction add \
  --name=*.$DNS_NAME. \
  --type=CNAME $DNS_NAME. \
  --zone=$ZONE_NAME \
  --ttl=300

  gcloud dns record-sets transaction execute --zone=$ZONE_NAME
}
-
Submit a training job with the interactive shell + VPC-SC + VPC Peering enabled.
Shared Responsibility
Securing your workloads on Vertex AI is a shared responsibility. While Vertex AI regularly upgrades infrastructure configurations to address security vulnerabilities, Vertex AI doesn't automatically upgrade your existing Ray on Vertex AI clusters and persistent resources to avoid preempting running workloads. Therefore, you're responsible for tasks such as the following:
- Periodically delete and recreate your Ray on Vertex AI clusters and persistent resources to use the latest infrastructure versions. Vertex AI recommends recreating your clusters and persistent resources at least once every 30 days.
- Properly configure any custom images you use.
For more information, see Shared responsibility.
