Ray clusters on Vertex AI offer two scaling options: autoscaling and manual scaling. Autoscaling lets the cluster automatically adjust the number of worker nodes based on the resources the Ray tasks and actors require. If you run a heavy workload and are unsure of the resources needed, autoscaling is recommended. Manual scaling gives users more granular control of the nodes.
Autoscaling can reduce workload costs but adds node launch overhead and can be tricky to configure. If you are new to Ray, start with non-autoscaling clusters, and use the manual scaling feature.
Autoscaling
Enable a Ray cluster's autoscaling feature by specifying the minimum replica
count (min_replica_count) and maximum replica count (max_replica_count) of
a worker pool.
Note the following:
- Configure the autoscaling specification of all worker pools.
- Custom upscaling and downscaling speed is not supported. For default values, see Upscaling and downscaling speed in the Ray documentation.
Set worker pool autoscaling specification
Use the Google Cloud console or Vertex AI SDK for Python to enable a Ray cluster's autoscaling feature.
Ray on Vertex AI SDK
from google.cloud import aiplatform
import vertex_ray
from vertex_ray import AutoscalingSpec

autoscaling_spec = AutoscalingSpec(
 min_replica_count=1,
 max_replica_count=3,
)

head_node_type = Resources(
 machine_type="n1-standard-16",
 node_count=1,
)

worker_node_types = [Resources(
 machine_type="n1-standard-16",
 accelerator_type="NVIDIA_TESLA_T4",
 accelerator_count=1,
 autoscaling_spec=autoscaling_spec,
)]

# Create the Ray cluster on Vertex AI
CLUSTER_RESOURCE_NAME = vertex_ray.create_ray_cluster(
head_node_type=head_node_type,
worker_node_types=worker_node_types,
...
)
Console
In accordance with the OSS Ray best practice recommendation, setting the logical CPU count to 0 on the Ray head node is enforced in order to avoid running any workload on the head node.
In the Google Cloud console, go to the Ray on Vertex AI page.
Click Create cluster to open the Create cluster panel.
For each step in the Create cluster panel, review or replace the default cluster information. Click Continue to complete each step:
- For Name and region, specify a Name and choose a location for your cluster.
For Compute settings, specify the configuration of the Ray cluster on the head node, including its machine type, accelerator type and count, disk type and size, and replica count. Optionally, add a custom image URI to specify a custom container image to add Python dependencies not provided by the default container image. See Custom image.
Under Advanced options, you can:
- Specify your own encryption key.
- Specify a custom service account.
- If you don't need to monitor the resource statistics of your workload during training, disable the metrics collection.
To create a cluster with an autoscaling worker pool, provide a value for the worker pool's maximum replica count.

Click Create.
Manual scaling
As your workloads surge or decrease on your Ray clusters on Vertex AI, manually scale the number of replicas to match demand. For example, if you have excess capacity, scale down your worker pools to save costs.
Limitations with VPC Peering
When you scale clusters, you can change only the number of replicas in your existing worker pools. For example, you can't add or remove worker pools from your cluster or change the machine type of your worker pools. Also, the number of replicas for your worker pools can't be lower than one.
If you use a VPC peering connection to connect to your clusters, a limitation exists on the maximum number of nodes. The maximum number of nodes depends on the number of nodes the cluster had when you created the cluster. For more information, see Max number of nodes calculation. This maximum number includes not just your worker pools but also your head node. If you use the default network configuration, the number of nodes can't exceed the upper limits as described in the create clusters documentation.
Subnet allocation best practices
When deploying Ray on Vertex AI using private services access (PSA), it's crucial to ensure that your allocated IP address range is sufficiently large and contiguous to accommodate the maximum number of nodes your cluster might scale to. IP exhaustion can occur if the IP range reserved for your PSA connection is too small or fragmented, leading to deployment failures.
As an alternative, we recommend deploying Ray on Vertex AI with a Private Service Connect Interface, which reduces IP consumption to a /28 subnet.
Private Service Access monitoring
As a best practice use Network Analyzer a diagnostic tool within Google Cloud's Network Intelligence Center that automatically monitors your Virtual Private Cloud (VPC) network configurations to detect misconfigurations and suboptimal settings. Network Analyzer operates continuously, which proactively runs tests and generates insights to help you identify, diagnose, and resolve network issues before they impact service availability.
Network Analyzer has the ability to monitor subnets used for Private Service Access (PSA) and provides specific insights related to them. This is a critical function for managing services like Cloud SQL, Memorystore, and Vertex AI, which use PSA.
The primary way Network Analyzer monitors PSA subnets is by providing IP address utilization insights for the allocated ranges.
PSA Range Utilization: Network Analyzer actively tracks the allocation percentage of IP addresses within the dedicated CIDR blocks that you've allocated for PSA. This is important because when you create a managed service (such as Vertex AI), Google creates a service producer VPC and a subnet within it, drawing an IP range from your allocated block.
Proactive Alerts: If the IP address utilization for a PSA allocated range exceeds a certain threshold (for example, 75%), Network Analyzer generates a warning insight. This proactively alerts you to potential capacity issues, giving you time to expand the allocated IP range before you run out of available addresses for new service resources.
Private Service Access subnet updates
For Ray on Vertex AI deployments, Google recommends allocating a /16 or /17 CIDR block for your PSA connection. This provides a large enough contiguous block of IP addresses to support significant scaling, accommodating up to 65,536 or 32,768 unique IP addresses, respectively. This helps prevent IP exhaustion even with large Ray clusters.
If you exhaust your allocated IP address space, Google Cloud returns this error:
Failed to create subnetwork. Couldn't find free blocks in allocated IP ranges.
It's recommended that you expand the current subnet range or allocate a range that accommodates future growth.
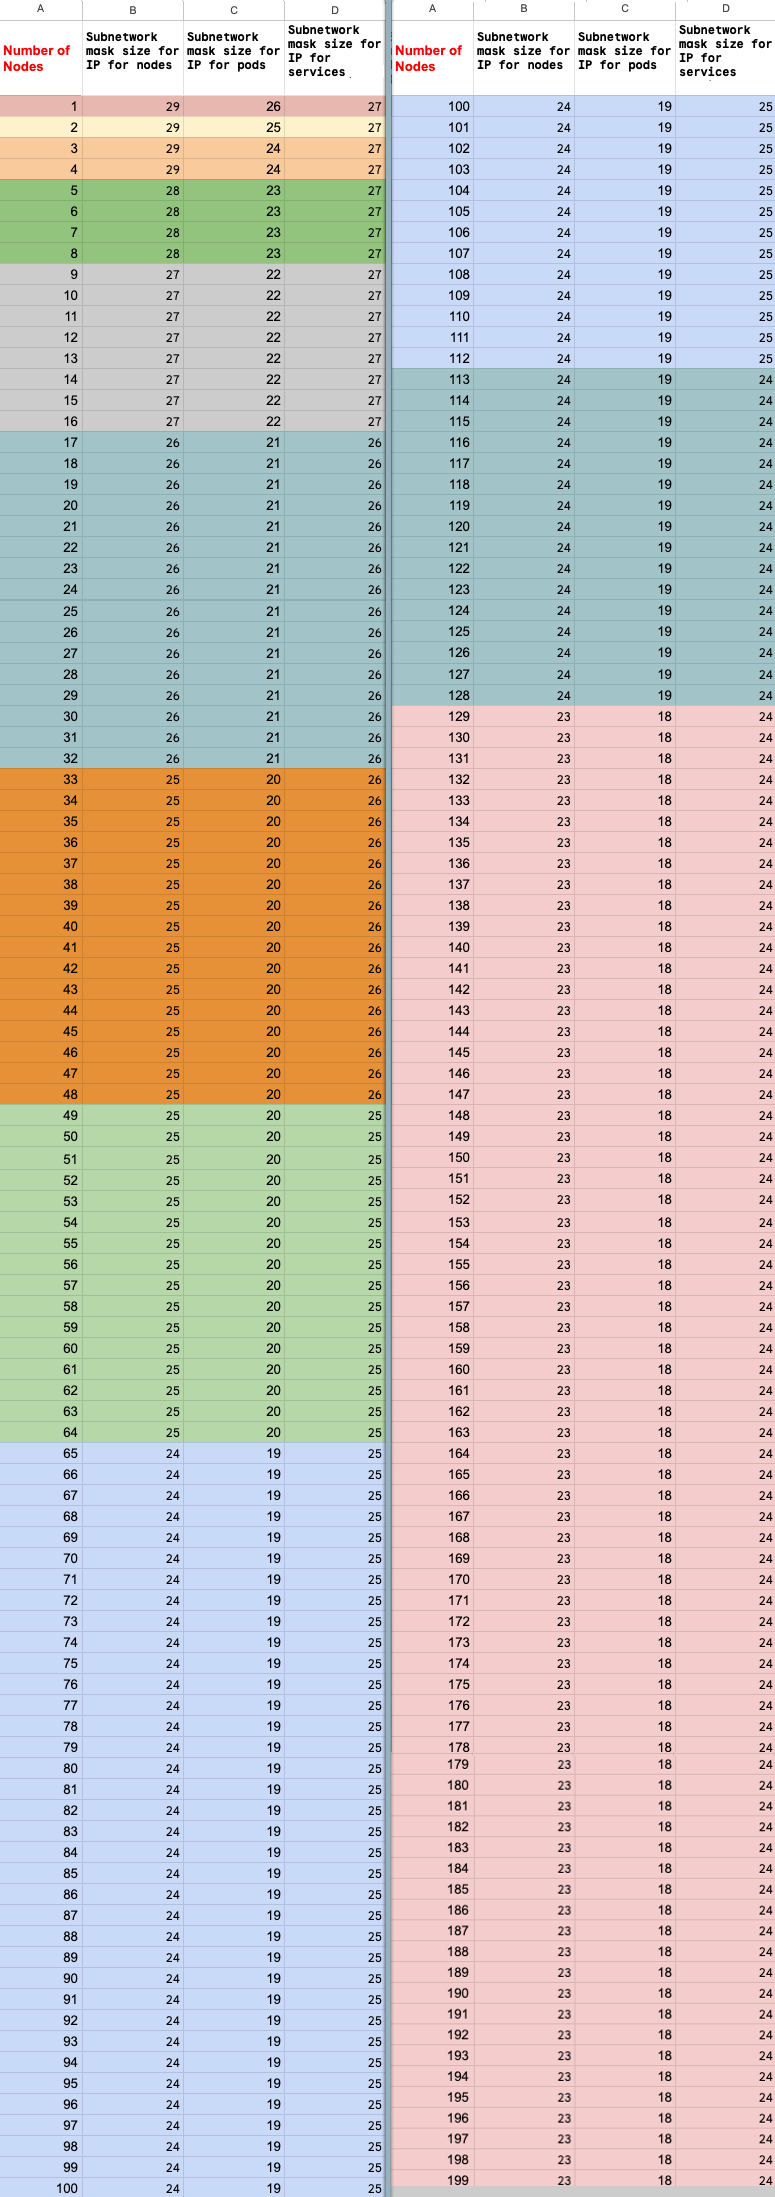
Maximum number of nodes calculation
If you use private services access (VPC peering) to connect to
your nodes, use the following formulas to check that you don't exceed the
maximum number of nodes (M), assuming f(x) = min(29, (32 -
ceiling(log2(x))):
f(2 * M) = f(2 * N)f(64 * M) = f(64 * N)f(max(32, 16 + M)) = f(max(32, 16 + N))
The maximum total number of nodes in the Ray on Vertex AI cluster you can
scale up to (M) depends on the initial total number of nodes you set up (N).
After you create the Ray on Vertex AI cluster, you can scale the total
number of nodes to any amount between P and M inclusive, where P is the
number of pools in your cluster.
The initial total number of nodes in the cluster and the scaling up target number must be in the same color block.
Update replica count
Use the Google Cloud console or Vertex AI SDK for Python to update your worker pool's replica count. If your cluster includes multiple worker pools, you can individually change each of their replica counts in a single request.
Ray on Vertex AI SDK
import vertexai
import vertex_ray

vertexai.init()
cluster = vertex_ray.get_ray_cluster("CLUSTER_NAME")

# Get the resource name.
cluster_resource_name = cluster.cluster_resource_name

# Create the new worker pools
new_worker_node_types = []
for worker_node_type in cluster.worker_node_types:
 worker_node_type.node_count = REPLICA_COUNT # new worker pool size
 new_worker_node_types.append(worker_node_type)

# Make update call
updated_cluster_resource_name = vertex_ray.update_ray_cluster(
 cluster_resource_name=cluster_resource_name,
 worker_node_types=new_worker_node_types,
)
Console
In the Google Cloud console, go to the Ray on Vertex AI page.
From the list of clusters, click the cluster to modify.
On the Cluster details page, click Edit cluster.
In the Edit cluster pane, select the worker pool to update and then modify the replica count.
Click Update.
Wait a few minutes for your cluster to update. When the update is complete, you can see the updated replica count on the Cluster details page.
Click Create.