Sie können jetzt die hybrid-UI ausprobieren und eine neue Umgebung hinzufügen. Sie benötigen eine Umgebung als Bereitstellungsort Ihrer API-Proxys. Wenn Sie keine Umgebung wie in diesem Abschnitt beschrieben erstellen, schlagen auch mehrere Schritte der Laufzeitinstallation von hybrid fehl.
Die hybrid-UI bietet Funktionen, die Ihnen Folgendes in einer hybrid-fähigen Organisation ermöglichen:
Umgebungen erstellen, bearbeiten und löschen
GCP-Projektnutzern eine Zugriffssteuerung auf Umgebungsebene zuweisen
API-Proxys im Cluster bereitstellen und Bereitstellung aufheben
Bereitstellungsstatus von Pods im Cluster abrufen
So greifen Sie auf die hybrid-UI zu und fügen eine Umgebung hinzu:
Wenn Sie sich das erste Mal anmelden, zeigt Hybrid einen Schutzdialog an.
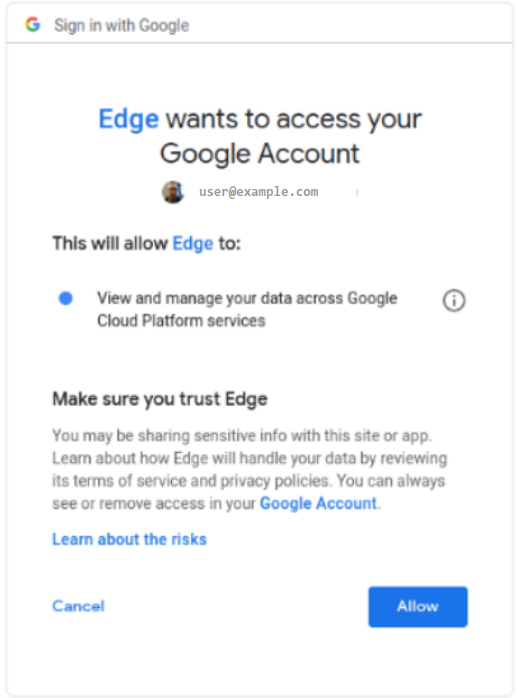
Wenn Sie aufgefordert werden, aus mehreren Konten auszuwählen, wählen Sie das Konto aus, zu dem das Projekt gehört, das Sie in Schritt 2: Google Cloud-Projekt erstellen erstellt haben.
Klicken Sie auf Zulassen.
In Ihrem Browser wird die Startseite der Hybrid-UI aufgerufen:
Achten Sie darauf, dass Ihre hybride Organisation aus der Drop-down-Liste der Organisation ausgewählt ist.
Falls nicht, wählen Sie sie aus der Drop-down-Liste aus, wie im folgenden Beispiel gezeigt:
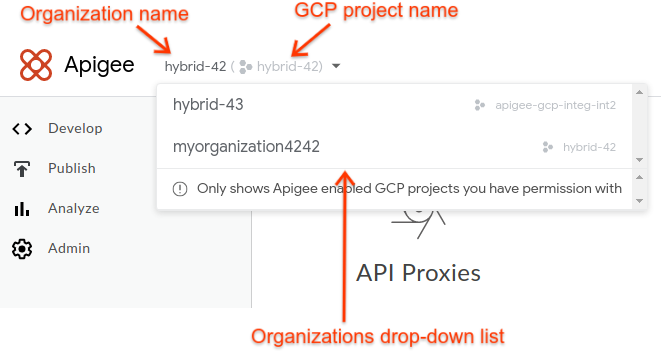
Hinweis: Wenn Sie in der Drop-down-Liste eine hybride Organisation auswählen, werden in der Hybrid-UI der Name der Apigee-Organisation und der Google Cloud-Projektname im Header angezeigt. In vielen Fällen sind der Apigee-Organisationsname und der GCP-Projektname identisch.
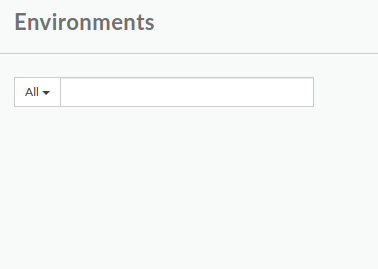
Klicken Sie auf Verwaltung > Umgebungen > Übersicht.
Die Ansicht Umgebungen wird noch ohne Umgebung angezeigt:
Klicken Sie oben rechts in der Benutzeroberfläche auf + Umgebung.
Das Dialogfeld Neue Umgebung definieren wird angezeigt:
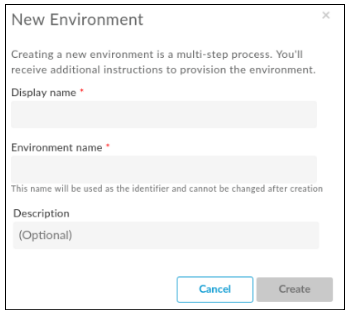
Geben Sie die folgenden Informationen in das Dialogfeld Neue Umgebung ein:
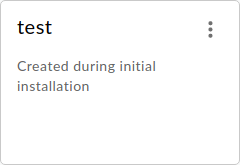
Anzeigename: Ein Anzeigename für die Umgebung, der in der Benutzeroberfläche verwendet wird.
Zum Beispiel "Meine erste Umgebung" oder "Test". Anders als der Umgebungsname kann der Anzeigename Großbuchstaben und andere Sonderzeichen enthalten. Erforderlich.
Umgebungsname: Der programmatische Name für die Umgebung, auch als Umgebungs-ID bezeichnet. Erforderlich.
Der Anzeigename und der Umgebungsname können unterschiedlich sein.
Beschreibung: Weitere Informationen zur Umgebung, die Sie als Erinnerung für den Zweck der Umgebung hinzufügen können. Beispiel: "Bei der ersten Installation erstellt". Optional:
Klicken Sie auf Erstellen.
Apigee erstellt die neue Umgebung und weist darauf hin, dass die Bereitstellung ausstehend ist:
Nach wenigen Augenblicken ist sie "bereitgestellt":
Das ist aber noch nicht alles. Sie müssen die neue Umgebung auch der Datei "overrides.yaml" der Laufzeit hinzufügen. Zuerst müssen Sie jedoch die Laufzeit installieren, aber wir möchten hier nicht vorgreifen.
[[["Leicht verständlich","easyToUnderstand","thumb-up"],["Mein Problem wurde gelöst","solvedMyProblem","thumb-up"],["Sonstiges","otherUp","thumb-up"]],[["Schwer verständlich","hardToUnderstand","thumb-down"],["Informationen oder Beispielcode falsch","incorrectInformationOrSampleCode","thumb-down"],["Benötigte Informationen/Beispiele nicht gefunden","missingTheInformationSamplesINeed","thumb-down"],["Problem mit der Übersetzung","translationIssue","thumb-down"],["Sonstiges","otherDown","thumb-down"]],["Zuletzt aktualisiert: 2025-08-18 (UTC)."],[[["\u003cp\u003eThe current Apigee hybrid documentation version 1.2 is end-of-life and users should upgrade to a newer version.\u003c/p\u003e\n"],["\u003cp\u003eCreating an environment in the hybrid UI is essential, as API proxies cannot be deployed without one, and it is required for the hybrid runtime installation process to succeed.\u003c/p\u003e\n"],["\u003cp\u003eThe hybrid UI enables users to create, edit, and delete environments, as well as manage environment-level access control, deploy and undeploy API proxies, and check the deployment status of pods.\u003c/p\u003e\n"],["\u003cp\u003eTo create a new environment, users should access the Apigee UI, navigate to \u003cstrong\u003eAdmin > Environments > Overview\u003c/strong\u003e, and then input a display name, environment name, and an optional description in the "Define a new environment" dialog box.\u003c/p\u003e\n"],["\u003cp\u003eAfter creating the environment, it will be initially "Pending Provisioning" and then "Provisioned," but the environment must also be added to the \u003ccode\u003eoverrides.yaml\u003c/code\u003e file to complete the process.\u003c/p\u003e\n"]]],[],null,["# Step 5: Add a new environment in the hybrid UI\n\n| You are currently viewing version 1.2 of the Apigee hybrid documentation. **This version is end of life.** You should upgrade to a newer version. For more information, see [Supported versions](/apigee/docs/hybrid/supported-platforms#supported-versions).\n\nYou can now try out the hybrid UI and add a new environment. Without an environment, you have\nnowhere to deploy your API proxies. Additionally, if you don't create an environment as described\nin this section, then several steps in the hybrid runtime installation process will fail.\n\nThe hybrid UI includes functionality that lets you do the following in a hybrid-enabled organization:\n\n- Create, edit, and delete environments\n- Assign environment-level access control to GCP project users\n- Deploy and undeploy API proxies to your cluster\n- Get the deployment status of pods in your cluster\n\n**To access the hybrid UI and add an environment:**\n\n1. Open the [Apigee UI](https://apigee.google.com).\n\n If this is the first time you are logging in, hybrid displays a consent dialog box:\n\n2. If you are prompted to select from more than one account, choose the account that owns the project you created in [Step 2: Create a Google Cloud project](/apigee/docs/hybrid/v1.2/precog-gcpproject).\n3. Click **Allow** .\n\n Your browser navigates to the hybrid UI main landing page:\n\n4. Ensure that your hybrid-enabled organization is selected from the organization drop-down list. If not, select it from the drop-down list, as the following example shows:\n\n Note that when you select a hybrid-enabled organization from the drop-down list, the hybrid\n UI displays the Apigee organization name and the GCP project name in the header. In many cases,\n the Apigee organization name and GCP project name are the same.\n5. Click **Admin \\\u003e Environments \\\u003e Overview** .\n\n The **Environments** view is displayed, with no environments (yet):\n\n6. Click **+Environment** in the upper right corner of the UI.\n\n The **Define a new environment** dialog box is displayed:\n\n7. Enter the following information in the **New Environment** dialog box:\n 1. **Display name:** A friendly name for the environment that is used in the UI. For example, \"My First Environment\" or \"test\". Unlike, the **Environment\n name** , the **Display name** can include upper case and other special characters. Required.\n 2. **Environment name:** The programmatic name for the environment; also known as the *environment ID* . Required.\n\n For example, \"my-environment\" or \"test\".\n | An environment name can contain only lower-case letters, numbers, and hyphens. You cannot use upper-case letters or any other special characters. In addition, the **Environment name** can be up to a maximum of 32 characters long. For example: `my-test-env` or `my-test-env-42`.\n\n You will also use this name in the `overrides.yaml` file when you\n [install the hybrid runtime](/apigee/docs/hybrid/v1.2/install-before-begin).\n\n The **Display name** and the **Environment name** can be\n different.\n 3. **Description:** Additional information about the environment that you want to add as a reminder of the purpose of the environment. For example, \"Created during initial installation\". Optional.\n8. Click **Create** .\n\n Apigee creates the new environment and indicates that it is \"Pending Provisioning\":\n\n In a few moments, it will be \"provisioned\":\n\n However, you're not quite done. You also need to add your new environment to the\n runtime's overrides.yaml file---but first you've got to install the runtime,\n so let's not get ahead of ourselves.\n\n| **Congratulations!**\n|\n| Now that you've created a GCP account and project, gotten an org provisioned, had a snack,\n| added some service accounts and other users, and created a new environment, you're ready to\n| install the hybrid runtime on your Kubernetes cluster.\n\nNext step\n---------\n\nTo continue with the installation, see\n[Runtime installation: Before you begin](/apigee/docs/hybrid/v1.2/install-before-begin)."]]