Dieses Thema ist nur als Beispiel vorgesehen. Es wird erläutert, wie Sie ein TLS-Zertifikat von der Zertifizierungsstelle Let's Encrypt abrufen. Diese Schritte dienen hauptsächlich als Beispiel, wenn Sie keine weitere Möglichkeit haben, ein Zertifikat/Schlüssel-Paar zu erhalten, das von einer CA autorisiert wurde. Das Beispiel zeigt, wie Zertifikate mit der Zertifizierungsstelle Let's Encrypt, dem Certbot-Client und Cloud DNS der Google Cloud Platform generiert werden.
Wo Sie diese Anmeldedaten verwenden können
Sie müssen TLS-Anmeldedaten für zwei Istio-Eingangsgateways angeben, die außerhalb des Clusters verfügbar sind:
| Gateway | TLS-Anforderung |
|---|---|
| Gateway für eingehenden MART-Traffic | Erfordert ein autorisiertes TLS-Zertifikat/Schlüsselpaar. |
| Gateway für eingehenden Traffic für die Laufzeit | Sie können ein selbst signiertes Zertifikat/Schlüsselpaare oder autorisierte TLS-Anmeldedaten verwenden. |
Anforderungen
Sie benötigen einen Domainnamen, der über einen Domainnamenregistrator ausgestellt wird. Domainnamen können über Google Domains oder über einen beliebigen anderen Registrator angemeldet werden.
Cloud DNS konfigurieren
Um autorisierte TLS-Anmeldedaten zu erhalten, benötigen Sie einen qualifizierten Domainnamen. In den folgenden Schritten wird erläutert, wie Sie mit Google Cloud DNS einen Domainnamen abrufen und Ihre Domainserver verwalten.- Öffnen Sie die Google Cloud Console und melden Sie sich mit dem Konto an, das Sie in Schritt 1: Google Cloud-Konto erstellen erstellt haben.
- Wählen Sie das Projekt aus, das Sie in Schritt 2: GCP-Projekt erstellen erstellt haben.
- Aktivieren Sie die Cloud DNS API: Siehe APIs aktivieren.
- Zwei statische IP-Adressen erstellen:
- Wenn Sie mit GKE arbeiten, folgen Sie der Anleitung unter
Statische externe IP-Adresse reservieren, um zwei statische IP-Adressen zu erstellen. Sie können den Adressen einen beliebigen Namen geben, z. B.
apigee-hybrid-martundapigee-hybrid-runtime. Nach Abschluss des Vorgangs haben Sie zwei IP-Adressen, die Sie im nächsten Schritt in der Clusterkonfiguration verwenden können. Zum Beispiel:35.225.131.189und34.66.75.196 - Wenn Sie mit Anthos GKE arbeiten, folgen Sie der Anleitung in der Anthos GKE-Dokumentation, um zwei statische IP-Adressen zu erstellen.
- Wenn Sie mit GKE arbeiten, folgen Sie der Anleitung unter
Statische externe IP-Adresse reservieren, um zwei statische IP-Adressen zu erstellen. Sie können den Adressen einen beliebigen Namen geben, z. B.
- Verwaltete öffentliche Zone erstellen. Eine Anleitung hierzu finden Sie unter Verwaltete öffentliche Zone erstellen.
- Rufen Sie die externe IP-Adresse ab, die Sie für
apigee-hybrid-martreserviert haben. - Erstellen Sie einen Datensatz für den MART-Endpunkt. Geben Sie die externe IP-Adresse ein, die Sie im vorherigen Schritt abgerufen haben, und fügen Sie dem Domainnamen ein Präfix hinzu, z. B.
mart. Eine Anleitung hierzu finden Sie unter Neuen Eintrag erstellen.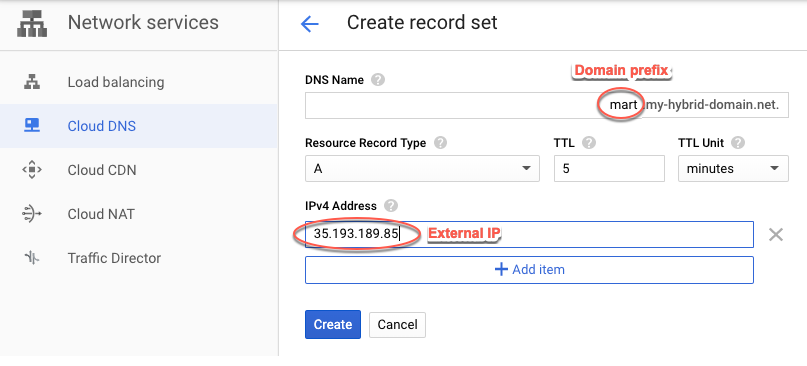
- Rufen Sie die externe IP-Adresse ab, die Sie für
apigee-hybrid-runtimereserviert haben. - Datensatz für den Istio-Endpunkt für eingehenden Traffic erstellen. Dies ist die Adresse für API-Aufrufe an das Hybridgateway. Geben Sie die externe IP-Adresse ein, die Sie im vorherigen Schritt erhalten haben, und fügen Sie dem Domainnamen ein Präfix hinzu, z. B.
apitest. Eine Anleitung hierzu finden Sie unter Neuen Eintrag erstellen.
- Kopieren Sie die DNS-Eintragsdaten, wie im folgenden Beispiel gezeigt:
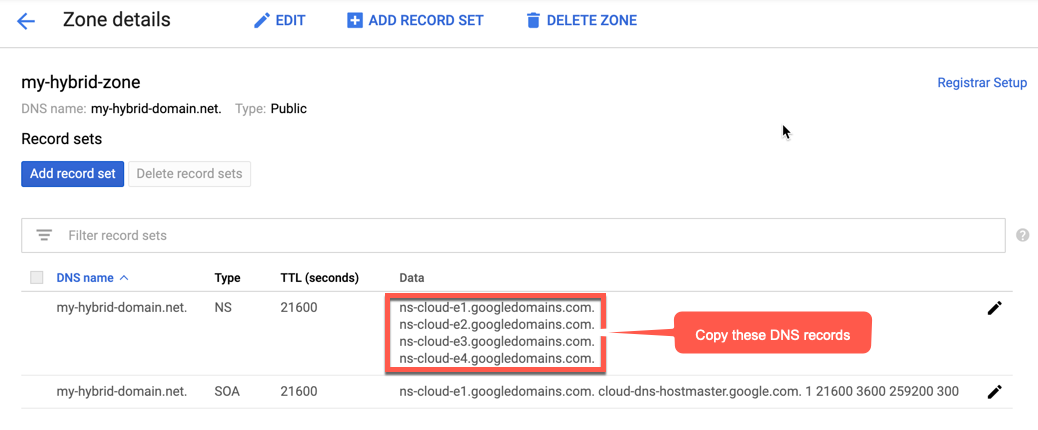
- Kehren Sie zu Ihrer Domainseite unter Google Domains zurück.
- Wählen Sie Ihre Domain aus.
- Wählen Sie DNS aus.
- Klicken Sie im Abschnitt Nameserver auf Bearbeiten.
Geben Sie die Domain-Nameserver ein, die Sie von der Seite "Network Services Cloud DNS" kopiert haben:
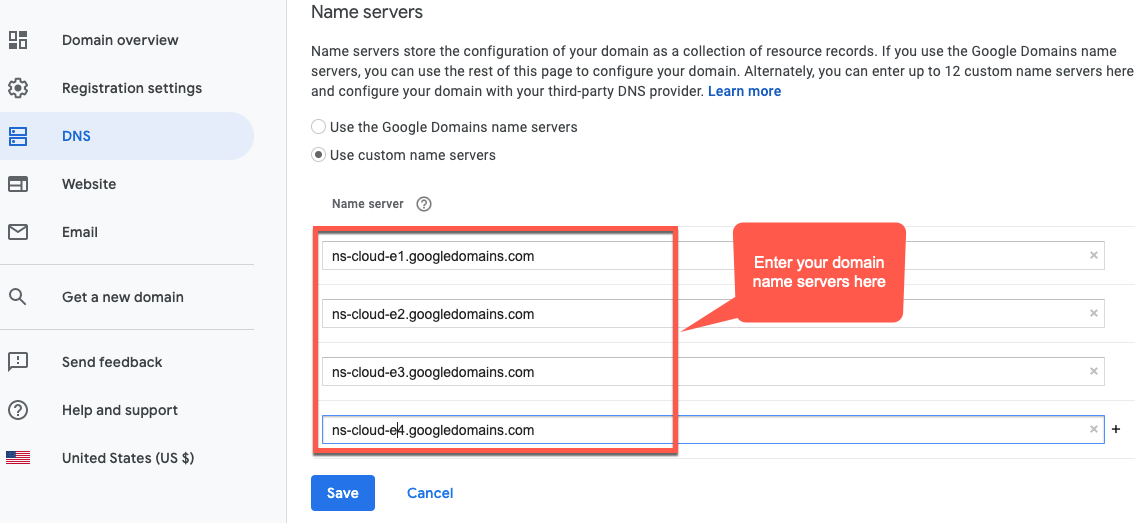
Nun verwaltet Google Cloud DNS die DNS-Einträge für Ihre Domain.
Installieren Sie Certbot auf einer VM
Nachdem Sie Cloud DNS für die Verwaltung Ihrer Domainserver eingerichtet haben, installieren Sie den Certbot-Client mit dem Plug-in dns_google auf einer Cloud-VM. Mit dem Client können Sie autorisierte Zertifikate für Ihre Domain von einem Let's Encrypt-Endpunkt abrufen.
- Öffnen Sie die Google Cloud Console und melden Sie sich mit dem Konto an, das Sie in Schritt 1: Google Cloud-Konto erstellen erstellt haben.
- Wählen Sie das Projekt aus, das Sie in Schritt 2: GCP-Projekt erstellen erstellt haben.
- Wählen Sie IAM und Verwaltung > Dienstkonten aus.
In der Dienstkontenansicht wird eine Liste der Dienstkonten des Projekts angezeigt.
- Klicken Sie oben in der Ansicht auf +Dienstkonto erstellen, um ein neues Dienstkonto zu erstellen.
Die Ansicht Dienstkontodetails wird angezeigt.
- Geben Sie im Feld Name des Dienstkontos den Namen des Dienstkontos ein.
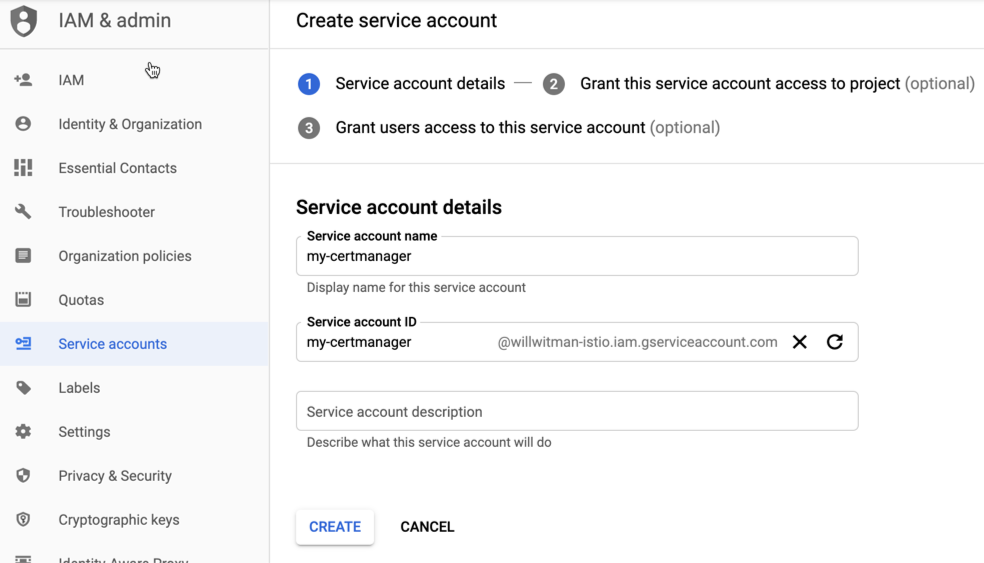
Optional können Sie im Feld Dienstkontobeschreibung eine Beschreibung eingeben. Beschreibungen helfen Ihnen, sich genau daran zu erinnern, wofür ein bestimmtes Dienstkonto verwendet wird.
- Klicken Sie auf Erstellen.
Die GCP erstellt ein neues Dienstkonto und zeigt die Ansicht Dienstkontoberechtigungen an. Verwenden Sie diese Ansicht, um Ihrem neuen Dienstkonto eine Rolle zuzuweisen.
- Klicken Sie auf die Drop-down-Liste Rolle auswählen.
- Wählen Sie die Rolle Projektinhaber aus.
- Klicken Sie auf Weiter.
- Klicken Sie auf Fertig.
- Wählen Sie in der GCP Console Compute Engine-Instanzen aus.
- Erstellen Sie eine VM-Instanz mit dem Namen certmanager.
- Wählen Sie im Abschnitt "Bootlaufwerk" CentOS7 und 20 GB als nichtflüchtigen SSD-Speicher aus.
- Legen Sie als Dienstkonto das oben erstellte fest.
- Installieren Sie Certbot und das Plug-in dns_google auf dem Computer und führen Sie den Certbot-Client aus:
sudo su -yum -y install yum-utilsyum install certbot -yyum install certbot-dns-google -ycertbot certonly --dns-google -d *.your_domain_name,*.your_domain_name --server https://acme-v02.api.letsencrypt.org/directoryBeispiel:
sudo su -yum -y install yum-utilsyum install certbot -yyum install certbot-dns-google -ycertbot certonly --dns-google -d *.apigee-hybrid-docs.net,*.apigee-hybrid-docs.net --server https://acme-v02.api.letsencrypt.org/directory - Sie finden jetzt Ihr autorisiertes Zertifikat und Ihre privaten Schlüsseldateien in diesem Verzeichnis:
cd /etc/letsencrypt/live/your_domain_name/Beispiel:
cd /etc/letsencrypt/live/apigee-hybrid-docs.netlscert.pem chain.pem fullchain.pem privkey.pem README - Kopieren Sie die Dateien
fullchain.pemundprivkey.pemauf Ihren lokalen Rechner. - Aktualisieren Sie Ihre Überschreibungsdatei so, dass sie auf das Zertifikat und den privaten Schlüssel verweist. Verwenden Sie für
hostAliasesden DNS-Namen, den Sie zuvor erstellt haben.Beispiel:
... envs: - name: test serviceAccountPaths: synchronizer: "your_keypath/synchronizer-manager-service-account.json udca: "your_keypath/analytic-agent-service-account.json virtualhosts: - name: default hostAliases: ["apitest.apigee-hybrid-docs.net"] sslCertPath: "$HOME/hybrid/apigee-hybrid-setup/tls/fullchain.pem" sslKeyPath: "$HOME/hybrid/apigee-hybrid-setup/tls/privkey.pem" routingRules: - env: test mart: nodeSelector: key: cloud.google.com/gke-nodepool value: apigee-runtime sslCertPath: "$HOME/hybrid/apigee-hybrid-setup/tls/fullchain.pem" sslKeyPath: "$HOME/hybrid/apigee-hybrid-setup/tls/privkey.pem" replicaCountMin: 1 replicaCountMax: 1 hostAlias: "mart.apigee-hybrid-docs.net" - Änderungen anwenden:
Wenn Sie die Konfiguration
martgeändert haben, wenden Sie die Änderungen an:apigeectl apply -f your_overrides_file -c mart
Wenn Sie die Konfiguration
envsgeändert haben, wenden Sie die Änderungen an:apigeectl apply -f your_overrides_file -c runtime
Konfiguration testen
Stellen Sie einen Proxy bereit und testen Sie ihn, wie unter Neuen API-Proxy erstellen und bereitstellen beschrieben.