Nachdem Sie Google Cloud und die Apigee-Benutzeroberfläche konfiguriert und die Laufzeit installiert und konfiguriert haben, können Sie sehen, wie sie zusammenwirken.
1. Einen neuen API-Proxy mithilfe der Apigee-Benutzeroberfläche erstellen
In diesem Abschnitt wird beschrieben, wie Sie einen neuen API-Proxy in der Benutzeroberfläche mithilfe des API-Proxy-Assistenten erstellen.
Apigee in der Cloud Console
So erstellen Sie einen neuen API-Proxy mit Apigee in der Cloud Console:
- Öffnen Sie die Apigee-UI in der Cloud Console in einem Browser.
- Wählen Sie Ihre Organisation links oben im Drop-down-Menü aus.
- Wählen Sie in der Hauptansicht Proxy-Entwicklung > API-Proxys aus.
- Klicken Sie auf Erstellen. Der API-Proxy-Assistent wird gestartet.
- Wählen Sie Reverse-Proxy (wird am häufigsten verwendet) aus.
Die Ansicht Proxy-Details wird angezeigt.
- Konfigurieren Sie den Proxy mit den folgenden Einstellungen:
- Proxyname: Geben Sie myproxy ein. In den verbleibenden Schritten in diesem Abschnitt wird davon ausgegangen, dass dies Ihre Proxy-ID ist.
- Basispfad: Wird automatisch auf / festgelegt, gefolgt vom Proxynamen, der in diesem Beispiel /myproxy lautet. Der Basispfad ist Teil der URL, die zum Senden von Anfragen an Ihre API verwendet wird. Apigee verwendet die URL, um eingehende Anfragen zuzuordnen und an den richtigen API-Proxy weiterzuleiten.
- (Optional) Beschreibung: Geben Sie eine Beschreibung für den neuen API-Proxy ein, z. B. "Apigee Hybrid mit einem einfachen Proxy testen".
- Ziel (vorhandene API): Geben Sie "https://mocktarget.apigee.net" ein. Dies definiert die Ziel-URL, die Apigee für eine Anfrage an den API-Proxy aufruft. Der simulierte Zieldienst wird bei Apigee gehostet und gibt einfache Daten zurück. Ein API-Schlüssel oder ein Zugriffstoken sind nicht erforderlich.
Die Details Ihres API-Proxys sollten so aussehen:
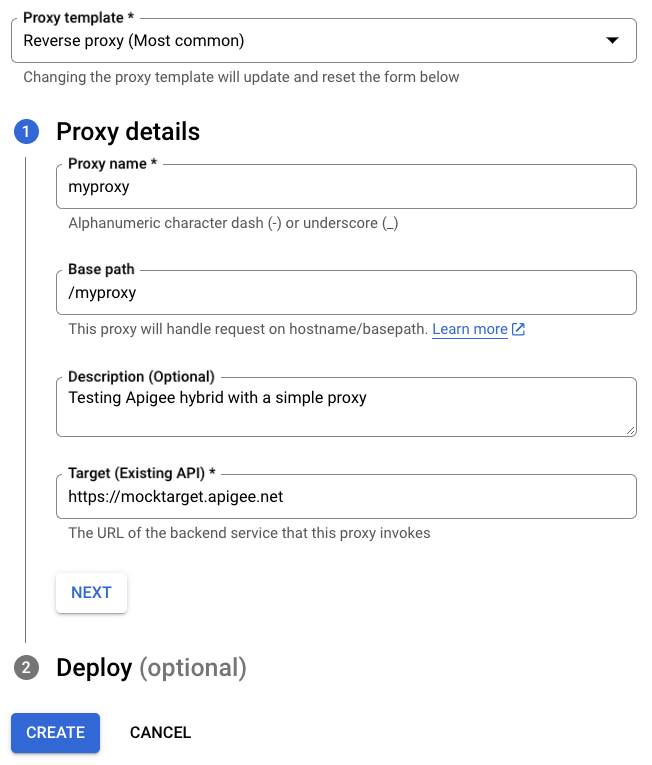
- Klicken Sie auf Weiter.
- Unter Bereitstellen (optional) haben Sie die Möglichkeit, im Feld Bereitstellungsumgebungen eine oder mehrere Umgebungen auszuwählen, in denen Sie Ihren Proxy bereitstellen können. Wenn Sie den Proxy zu diesem Zeitpunkt nicht bereitstellen möchten, lassen Sie das Feld Bereitstellungsumgebungen leer. Sie können den Proxy später jederzeit bereitstellen.
- Klicken Sie auf Erstellen. Apigee generiert den Proxy (manchmal auch als Proxy-Bundle bezeichnet).
Apigee zeigt die Ansicht Proxy-Zusammenfassung an. Wenn Sie den Proxy bereitstellen, wird im Abschnitt Bereitstellungen die Nummer der Überarbeitung angezeigt, die 1 ist, wenn Sie das erste Mal bereitstellen. In der Spalte Status werden mit einer grünen Statusanzeige die Umgebungen angezeigt, in denen der Proxy bereitgestellt wird.
Darunter sehen Sie im Abschnitt Überarbeitungen alle Änderungen, die an diesem Proxy vorgenommen wurden. Wenn Sie auf eines der ANSICHTS-Elemente in der Spalte Endpunktzusammenfassung klicken, wird der Abschnitt Endpunkt angezeigt:
- Proxy-Endpunkte: Der Basispfad, den Sie für den Proxy festgelegt haben. In diesem Beispiel ist das
/myproxy. - Zielendpunkte: Der Basispfad, den Sie für das Ziel festlegen. In diesem Beispiel ist das
https://mocktarget.apigee.net.
Klassisches Apigee
So erstellen Sie einen neuen API-Proxy mit dem klassischen Apigee:
- Öffnen Sie die Apigee-UI in einem Browser.
- Wählen Sie Ihre Organisation links oben im Drop-down-Menü aus.
- Wählen Sie in der Hauptansicht Develop > API Proxies aus.
- Klicken Sie auf Neu erstellen. Der API-Proxy-Assistent wird gestartet.
- Wählen Sie Reverse-Proxy (wird am häufigsten verwendet) aus.
Die Ansicht Proxy-Details wird angezeigt.
- Konfigurieren Sie den Proxy mit den folgenden Einstellungen:
- Proxy Name: Geben Sie "myproxy" ein. In den verbleibenden Schritten in diesem Abschnitt wird davon ausgegangen, dass dies Ihre Proxy-ID ist.
- Proxy-Basispfad: Wird automatisch auf "/myproxy" festgelegt. Der Proxy-Basispfad ist Teil der URL, die zum Senden von Anfragen an Ihre API verwendet wird. Apigee verwendet die URL, um eingehende Anfragen zuzuordnen und an den richtigen API-Proxy weiterzuleiten.
- (Optional) Beschreibung: Geben Sie eine Beschreibung für den neuen API-Proxy ein, z. B. "Apigee Hybrid mit einem einfachen Proxy testen".
- Ziel (vorhandene API): Geben Sie "https://mocktarget.apigee.net" ein. Dies definiert die Ziel-URL, die Apigee für eine Anfrage an den API-Proxy aufruft. Der simulierte Zieldienst wird bei Apigee gehostet und gibt einfache Daten zurück. Ein API-Schlüssel oder ein Zugriffstoken sind nicht erforderlich.
Die Details Ihres API-Proxys sollten so aussehen:
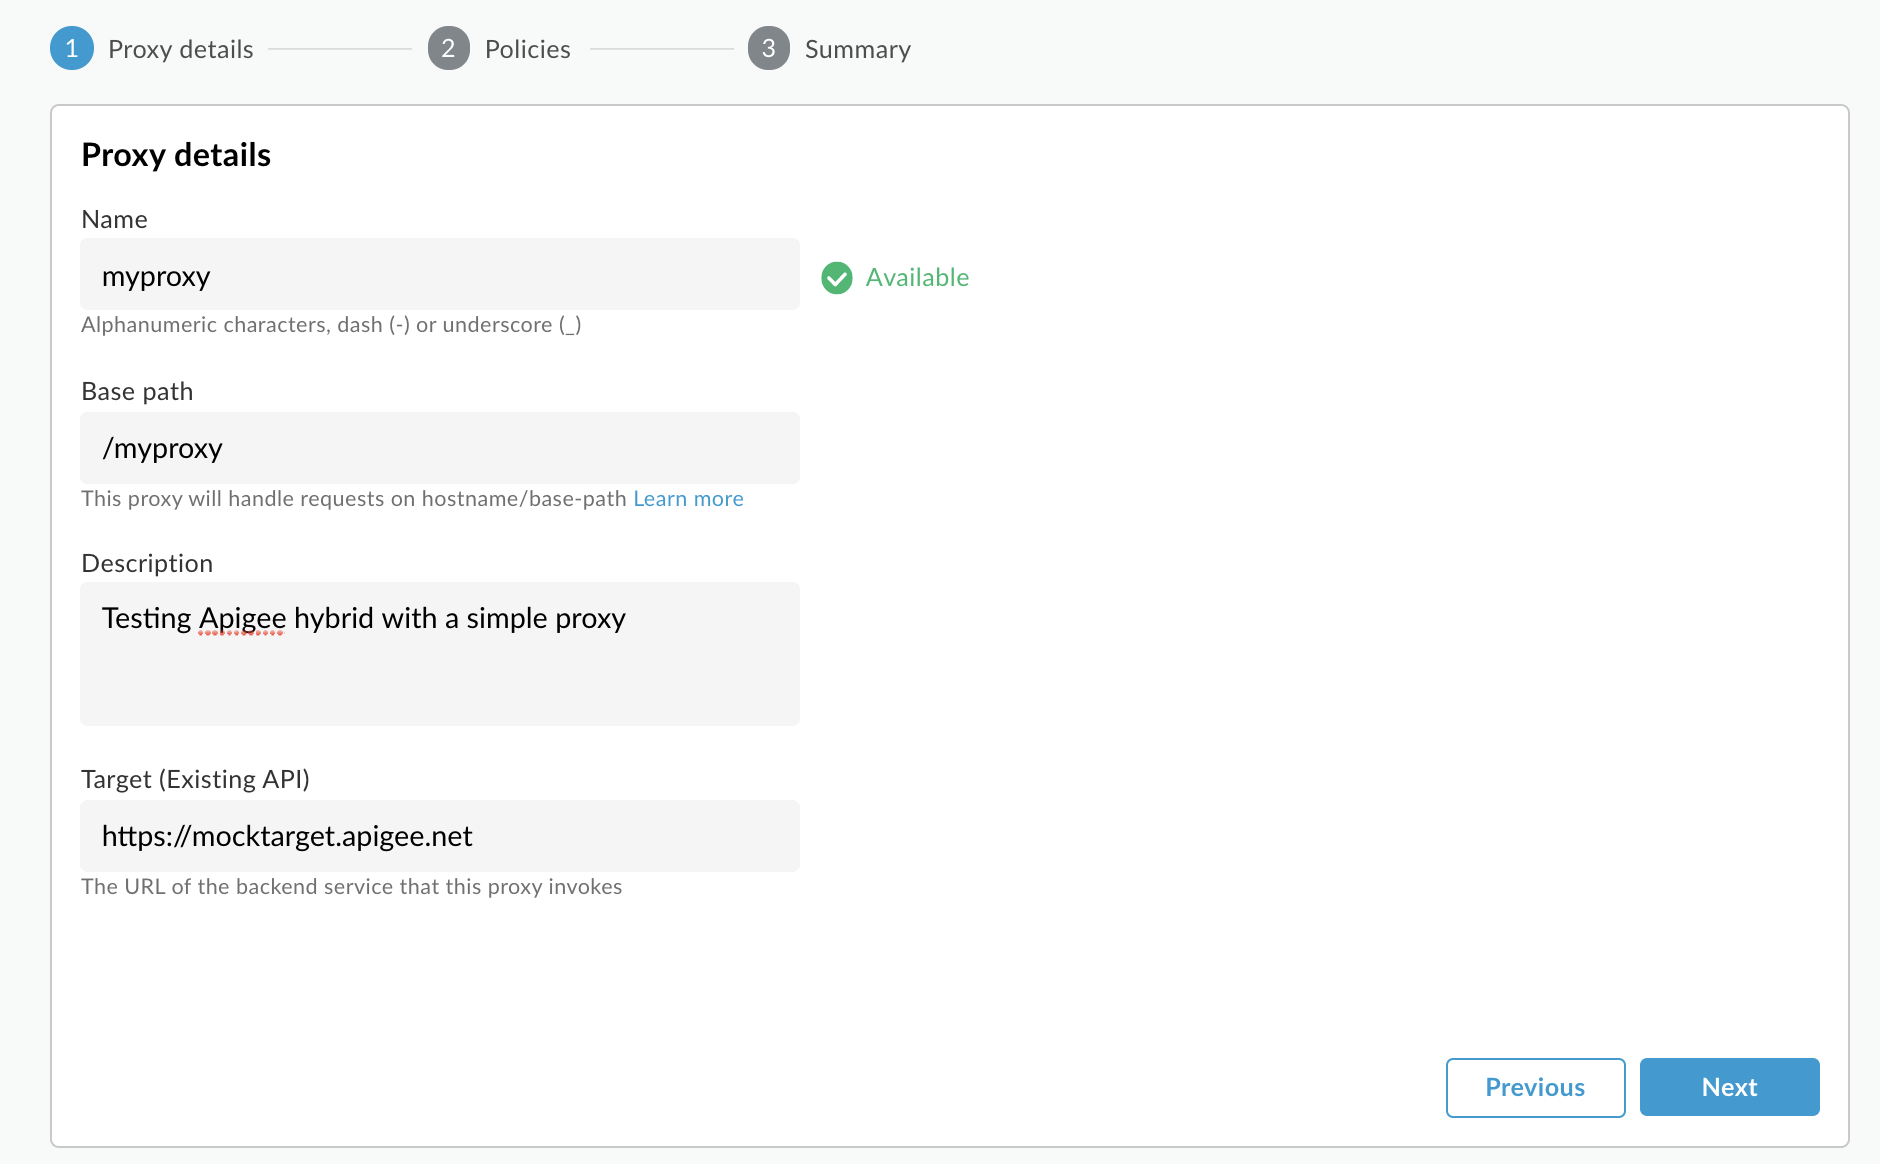
- Klicken Sie auf Weiter.
- Wählen Sie auf dem Bildschirm Allgemeine Richtlinien die Sicherheitsoption Passthrough (keine Autorisierung) aus.
- Klicken Sie auf Weiter.
- Wählen Sie auf dem Bildschirm Zusammenfassung eine Umgebung aus, in der Sie den Proxy bereitstellen möchten, und klicken Sie auf Erstellen und bereitstellen.
Hybrid generiert den Proxy (manchmal auch als Proxy-Bundle bezeichnet) und stellt ihn in der ausgewählten Umgebung bereit.
- Klicken Sie auf Zur Proxyliste.
Apigee zeigt die Ansicht Proxys an, in der eine Liste der API-Proxys angezeigt wird. Ihr neuer Proxy sollte mit einer grünen Statusanzeige angezeigt werden, was bedeutet, dass er bereitgestellt wurde.
2. Den API-Proxy aufrufen
Wenn die Benutzeroberfläche angibt, dass Ihr Proxy bereitgestellt ist, können Sie versuchen, diesen mit cURL oder dem REST-Client Ihrer Wahl aufzurufen: Beispiel:
- Prüfen Sie, ob die Umgebungsvariable
DOMAINauf den Domainnamen festgelegt ist, den Sie für den Hostnamen für Ihre Umgebungsgruppe in Projekt- und Organisationseinrichtung – Schritt 3: Umgebungsgruppe erstellen verwendet haben.echo $DOMAIN
-
Suchen Sie mit dem folgenden Befehl die externe IP-Adresse und den Port des Apigee Ingress-Gateways:
kubectl get svc -n APIGEE_NAMESPACE -l app=apigee-ingressgateway
Die Ausgabe sollte in etwa so aussehen:
NAME                                        TYPE           CLUSTER-IP    EXTERNAL-IP     PORT(S)                                      AGE
apigee-ingressgateway-prod-hybrid-37a39bd   LoadBalancer   192.0.2.123   233.252.0.123   15021:32049/TCP,80:31624/TCP,443:30723/TCP   16h
- Exportieren Sie Ihre externe IP-Adresse und Ihren Port in Variablen:
export INGRESS_IP_ADDRESS=EXTERNAL_IP_ADDRESS
export INGRESS_PORT=PORT_NUMBER - Den API-Proxy aufrufen
curl  -H Host:$DOMAIN --resolve \
  $DOMAIN:$INGRESS_PORT:$INGRESS_IP_ADDRESS  \
  https://$DOMAIN:$INGRESS_PORT/myproxy -k -v
Beispiel:
curl -v -H Host:example.com --resolve example.com:443:233.252.0.123 https://example.com:443/myproxy -k -v
- Ein erfolgreicher Aufruf des Proxys gibt den HTTP-Antwortcode 200 und die folgende Ausgabe zurück.
Hello, Guest!
Weitere Informationen zum Erstellen und Bereitstellen von API-Proxys finden Sie unter Ersten Proxy erstellen.