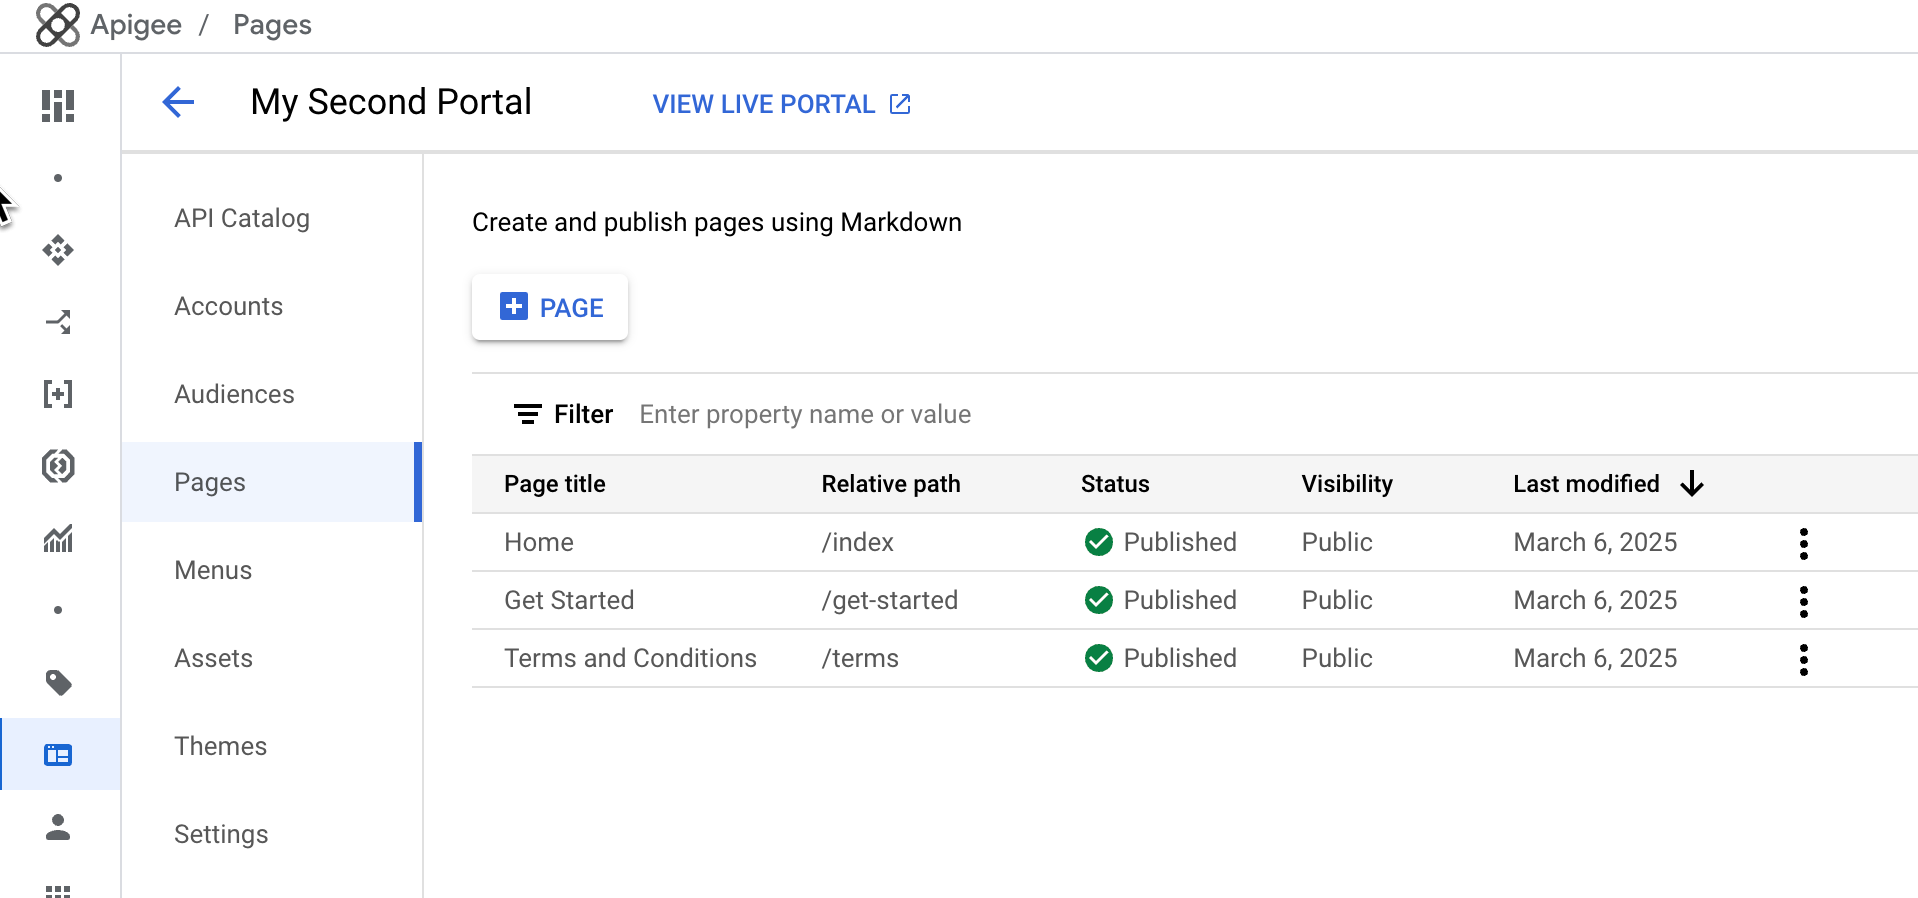
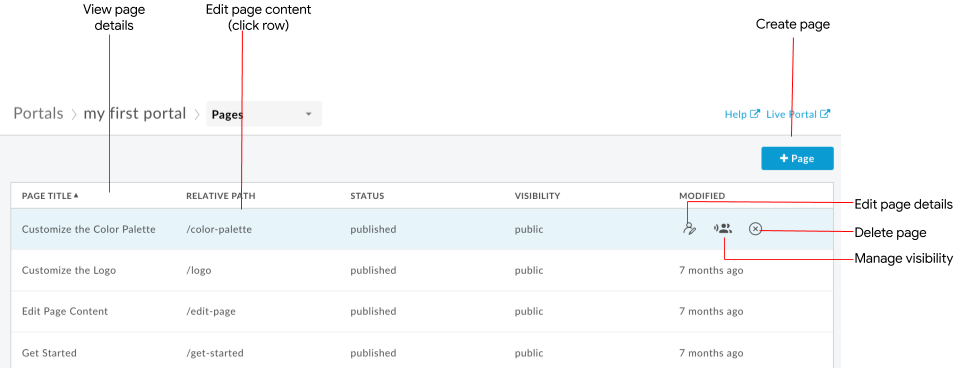
Gerencie as páginas no seu portal, conforme descrito nas seções a seguir.
Sobre os caminhos do URL reservados
Os caminhos do URL a seguir são reservados para uso pelo portal do desenvolvedor e
não podem ser especificados como o caminho da página ao criar páginas:
a
accounts/create
apis
create
docs
login
logout
my-apps
sites
teams
O caminho reservado /create pode ser usado como o URL de destino de um MenuItem ou
ser vinculado a uma página.
Na caixa de diálogo "Criar uma página", digite os seguintes detalhes:
Campo
Descrição
Obrigatório?
Nome
Nome da página. O nome da página precisa ser único no portal. O nome é usado no cabeçalho da página do portal e na guia do navegador.
Sim
Caminho
URL relativo fácil de usar da página. Para ver as práticas recomendadas, consulte Implementar a otimização de mecanismos de pesquisa (SEO). Use apenas caracteres alfanuméricos e traços. Espaços e caracteres especiais não permitidos. O padrão é o nome da página com os espaços convertidos em traços. Observação: evite especificar um caminho de URL reservado ao criar um portal. Para uma lista de caminhos de URL reservados, consulte Sobre os caminhos de URL reservados.
Na linha da página que você quer modificar, clique em
more_vertMais e
editEditar.
Na área Visibilidade, clique em Editar.
IU clássica
Posicione o cursor sobre a página que você quer gerenciar a visibilidade
e clique em
no menu de ações. A caixa de diálogo "Visibilidade" é aberta.
Selecione uma das seguintes opções:
Público (visível para todos) para permitir que todos os usuários visualizem a página.
Usuários autenticados para permitir que apenas usuários registrados vejam a página.
Públicos-alvo selecionados para selecionar os públicos-alvo específicos que poderão acessar a página. Para informações
sobre como gerenciar os públicos-alvo definidos para seu portal, consulte
Como gerenciar os públicos-alvo do seu portal.
[[["Fácil de entender","easyToUnderstand","thumb-up"],["Meu problema foi resolvido","solvedMyProblem","thumb-up"],["Outro","otherUp","thumb-up"]],[["Difícil de entender","hardToUnderstand","thumb-down"],["Informações incorretas ou exemplo de código","incorrectInformationOrSampleCode","thumb-down"],["Não contém as informações/amostras de que eu preciso","missingTheInformationSamplesINeed","thumb-down"],["Problema na tradução","translationIssue","thumb-down"],["Outro","otherDown","thumb-down"]],["Última atualização 2025-08-18 UTC."],[[["\u003cp\u003eThis page provides information on managing pages within Apigee and Apigee hybrid portals, including creating, viewing, editing, and deleting them.\u003c/p\u003e\n"],["\u003cp\u003eThere are reserved URL paths, such as \u003ccode\u003e/create\u003c/code\u003e, \u003ccode\u003elogin\u003c/code\u003e, and \u003ccode\u003edocs\u003c/code\u003e, that cannot be used when creating new pages but are used by the developer portal.\u003c/p\u003e\n"],["\u003cp\u003eThe Pages page, accessible through the "Publish > Portals" section, allows users to manage page details, content, and visibility, including setting pages to be public, visible to authenticated users, or selected audiences.\u003c/p\u003e\n"],["\u003cp\u003eA maximum of 1000 pages can be created in the portal and the home page cannot be deleted, and the visibility of a page set to \u003cstrong\u003eAuthenticated users\u003c/strong\u003e or \u003cstrong\u003eSelected audiences\u003c/strong\u003e will not be indexed by search engines.\u003c/p\u003e\n"],["\u003cp\u003eWhen deleting a page, it is recommended to delete any navigation menus or menu items linked to it first to avoid broken links.\u003c/p\u003e\n"]]],[],null,["# Managing the pages in your portal\n\n*This page\napplies to **Apigee** and **Apigee hybrid**.*\n\n\n*View [Apigee Edge](https://docs.apigee.com/api-platform/get-started/what-apigee-edge) documentation.*\n\n\u003cbr /\u003e\n\n| For information about editing, previewing, and publishing portal pages, and managing the audience for the pages in your portal, see [Developing portal\n| content using the page editor](/apigee/docs/api-platform/publish/portal/page-editor).\n\nManage the pages in your portal, as described in the following sections.\n\nAbout the reserved URL paths\n----------------------------\n\nThe following URL paths are reserved for use by the developer portal and\ncannot be specified as the page path when creating pages:\n\n- `a`\n- `accounts/create`\n- `apis`\n- `create`\n- `docs`\n- `login`\n- `logout`\n- `my-apps`\n- `sites`\n- `teams`\n\nThe reserved path `/create` can be used as the target URL of a `MenuItem` or\nbe linked to from a Page.\n\nThe `/create` reserved path will redirect to the\n[accounts creation page](/apigee/docs/api-platform/publish/portal/configure-register-sign-in).\n\nExploring the Pages page\n------------------------\n\nTo access the Pages page: \n\n### Cloud Console UI\n\n1. In the Apigee in Cloud console, go to the **Distribution \\\u003e Portals** page.\n\n [Go to Portals](https://console.cloud.google.com/apigee/portals)\n\n The list of pages in your portal is displayed.\n | **Note:** For a list of the default pages provided with the sample portal, see [About the sample portal](/apigee/docs/api-platform/publish/portal/build-integrated-portal#sample-portal).\n\n### Classic UI\n\n- Select **Publish \\\u003e Portals** in the side navigation bar, select your portal, and click **Pages** on the landing page.\n- When editing a portal, select **Pages** in the drop-down menu in the top navigation bar.\n\nThe list of pages in your portal is displayed.\n| **Note:** For a list of the default pages provided with the sample portal, see [About the sample portal](/apigee/docs/api-platform/publish/portal/build-integrated-portal#sample-portal).\n\nThe Pages page lets you:\n\n- [Create a page](#create-page)\n- View page details, including name, relative path, status, visibility, and amount of time since the page was last modified\n- Edit page [content](#edit-page-contents) and [details](#edit-page-details)\n- [Manage the visibility](#visibility) of a page in your portal\n- [Delete](#delete-page) pages in your portal\n- Sort the list of pages by column (the arrow indicates the active column and direction of the sorted content)\n\nCreating a page\n---------------\n\n\u003cbr /\u003e\n\n| **Note** : You can create a **maximum of 1000 pages** in your portal.\n\n\u003cbr /\u003e\n\nTo create a new page:\n\n1. [Access the Pages page](#explore-ui).\n2. Click **+Page**.\n3. In the Create a Page dialog, enter the following details:\n\n4. Save the page.\n\n ### Cloud Console UI\n\n Click **Save**.\n\n ### Classic UI\n\n\n Click **Create**.\n\nEditing the contents of a page\n------------------------------\n\nTo edit the contents of a page:\n\n1. [Access the Pages page](#explore-ui).\n2. Click the name of the page that you want to edit.\n3. Edit the contents of the page. See [Developing portal content using the page editor](/apigee/docs/api-platform/publish/portal/page-editor).\n\nEditing the page details\n------------------------\n\nTo edit the details for a page, including the name, description, and relative path:\n\n1. [Access the Pages page](#explore-ui).\n2. Open the editor.\n\n ### Cloud Console UI\n\n On the row for the page you want to edit, click\n more_vert **More** ,\n edit **Edit**.\n\n ### Classic UI\n\n\n Position the cursor over the page you want to edit and click in the actions menu.\n3. Edit the page details.\n\n4. Save the page.\n\n ### Cloud Console UI\n\n Click **Save**.\n\n ### Classic UI\n\n\n Click **Create**.\n\nManaging the visibility of a page in your portal\n------------------------------------------------\n\n| **Note:** To use all of the features described in this section, you must have [enrolled in the Preview release of the audience management feature](/apigee/docs/api-platform/publish/portal/portal-audience#enroll).\n\nTo manage the visibility of a page in your portal:\n\n1. [Access the Pages page](#explore-ui).\n\n2. Open the visibility editor:\n\n ### Cloud Console UI\n\n 1. On the row for the page you want to modify, click more_vert **More** , edit **Edit**.\n 2. In the **Visibility** area, click **Edit**.\n\n ### Classic UI\n\n Position the cursor over the page for which you want to manage visibility\n and click\n in the actions menu. The Visibility dialog opens.\n3. Select one of the following options:\n\n - **Public (visible to anyone)** to allow all users to view the page.\n - **Authenticated users** to allow only registered users to view the page.\n - **Selected audiences** to select the specific audiences that you want to be able to view the page. For information about managing the audiences defined for your portal, see [Managing the audiences for your portal](/apigee/docs/api-platform/publish/portal/portal-audience).\n\n | **Note:** If you set the visibility to **Authenticated users** or **Selected audiences**, the page will not be indexed by search engines.\n4. Save the visibility settings.\n\n ### Cloud Console UI\n\n Click **Apply**\n\n ### Classic UI\n\n Click **Save**.\n\nDeleting pages from your portal\n-------------------------------\n\n| **Notes** :\n|\n| - You cannot delete the Home page. The `index` URL path serves as the default landing page for your portal.\n| - To avoid having an orphaned navigation menu or menu item with a broken link to a page that has been removed, it is recommended that you delete any relevant navigation menus or menu items items first, then delete the page.\n\nTo delete a page from your portal:\n\n1. [Access the Pages page](#explore-ui).\n\n2. Delete the page.\n\n ### Cloud Console UI\n\n 1. Click more_vert **More** , delete **Delete**.\n 2. Type **Delete** and then click **Delete page** to confirm.\n\n ### Classic UI\n\n 1. Position the cursor over the page you want to edit and click in the actions menu.\n 2. Click **Delete** to confirm the operation."]]