Tetap teratur dengan koleksi
Simpan dan kategorikan konten berdasarkan preferensi Anda.
Membuat instance notebook terkelola
menggunakan Google Cloud konsol
Pelajari cara membuat instance notebook terkelola Vertex AI Workbench
dan membuka JupyterLab menggunakan Google Cloud konsol.
Halaman ini juga menjelaskan cara menghentikan, memulai, mereset, atau menghapus
instance notebook terkelola.
Untuk mengikuti panduan langkah demi langkah tugas ini langsung di
Google Cloud konsol, klik Pandu saya:
Sign in to your Google Cloud account. If you're new to
Google Cloud,
create an account to evaluate how our products perform in
real-world scenarios. New customers also get $300 in free credits to
run, test, and deploy workloads.
In the Google Cloud console, on the project selector page,
select or create a Google Cloud project.
Di jendela Create instance, di kolom Name,
masukkan my-instance.
Klik Buat.
Setelah menyelesaikan tugas yang dijelaskan dalam dokumen ini, Anda dapat menghindari penagihan berkelanjutan dengan menghapus resource yang Anda buat. Untuk mengetahui informasi selengkapnya, lihat
Pembersihan.
Buka JupyterLab
Setelah Anda membuat instance, Vertex AI Workbench akan otomatis memulai
instance tersebut. Saat instance siap digunakan, Vertex AI Workbench
akan mengaktifkan link Open JupyterLab.
Di samping nama instance notebook terkelola, klik Open JupyterLab.
Pada dialog Authenticate your managed notebook, klik tombol
untuk mendapatkan kode autentikasi.
Pilih akun, lalu klik Allow. Salin kode autentikasi.
Pada dialog Authenticate your Managed notebook,
tempel kode autentikasi, lalu klik Authentication.
Instance notebook terkelola Anda akan membuka JupyterLab.
Membuka file notebook baru
Pilih File > New > Notebook.
Dalam dialog Select kernel, pilih Python,
lalu klik Select.
File notebook baru akan terbuka.
Mengubah kernel
Anda dapat mengubah kernel file notebook JupyterLab dari menu
atau dalam file.
Menu
Di JupyterLab, pada menu Kernel, klik Change kernel.
Pada dialog Select kernel, pilih kernel lain untuk digunakan.
Klik Select.
Di dalam file
Di file notebook JupyterLab Anda, klik nama kernel.
Pada dialog Select kernel, pilih kernel lain untuk digunakan.
Klik Select.
Menghentikan instance
Di konsol Google Cloud , buka halaman Managed notebooks.
Mereset instance akan menghapus total isi memori instance Anda secara paksa dan
mereset instance ke status awal. Untuk mempelajari lebih lanjut cara kerja mereset
instance, lihat
Mereset instance.
Di konsol Google Cloud , buka halaman Managed notebooks.
Klik
Setel Ulang, lalu klik Setel Ulang untuk mengonfirmasi.
Pembersihan
Agar akun Google Cloud Anda tidak dikenai biaya untuk
resource yang digunakan pada halaman ini, ikuti langkah-langkah berikut.
Jika Anda membuat project baru untuk mempelajari
notebook terkelola Vertex AI Workbench
dan Anda tidak lagi memerlukan project tersebut, maka
hapus project tersebut.
Jika Anda menggunakan project yang sudah ada, hapus resource yang Anda buat untuk menghindari timbulnya biaya pada akun Anda: Google Cloud
Di konsol Google Cloud , buka halaman Managed notebooks.
Pilih baris yang berisi instance yang ingin dihapus.
Klik deleteDelete.
(Bergantung pada ukuran jendela,
tombol Delete mungkin ada di
menu opsi more_vert .)
Untuk mengonfirmasi, klik Delete.
Langkah berikutnya
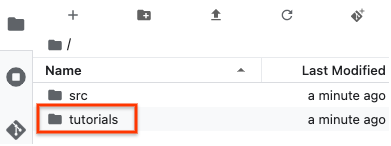
Coba salah satu tutorial yang disertakan
dalam instance notebook terkelola Anda yang baru.
Di JupyterLab folderFile Browser, buka folder tutorials, dan buka salah satu file notebook.
[[["Mudah dipahami","easyToUnderstand","thumb-up"],["Memecahkan masalah saya","solvedMyProblem","thumb-up"],["Lainnya","otherUp","thumb-up"]],[["Sulit dipahami","hardToUnderstand","thumb-down"],["Informasi atau kode contoh salah","incorrectInformationOrSampleCode","thumb-down"],["Informasi/contoh yang saya butuhkan tidak ada","missingTheInformationSamplesINeed","thumb-down"],["Masalah terjemahan","translationIssue","thumb-down"],["Lainnya","otherDown","thumb-down"]],["Terakhir diperbarui pada 2025-09-02 UTC."],[],[],null,["# Quickstart: Create a managed notebooks instance by using the Google Cloud console\n\nCreate a managed notebooks instance\nby using the Google Cloud console\n=====================================================================\n\n\n| Vertex AI Workbench managed notebooks is\n| [deprecated](/vertex-ai/docs/deprecations). On\n| April 14, 2025, support for\n| managed notebooks will end and the ability to create managed notebooks instances\n| will be removed. Existing instances will continue to function\n| but patches, updates, and upgrades won't be available. To continue using\n| Vertex AI Workbench, we recommend that you\n| [migrate\n| your managed notebooks instances to Vertex AI Workbench instances](/vertex-ai/docs/workbench/managed/migrate-to-instances).\n\n\u003cbr /\u003e\n\nLearn how to create a Vertex AI Workbench managed notebooks instance\nand open JupyterLab by using the Google Cloud console.\nThis page also describes how to stop, start, reset, or delete\na managed notebooks instance.\n\n*** ** * ** ***\n\nTo follow step-by-step guidance for this task directly in the\nGoogle Cloud console, click **Guide me**:\n\n[Guide me](https://console.cloud.google.com/freetrial?redirectPath=/?walkthrough_id=vertex-ai--workbench--managed--create-managed-notebooks-instance-console-quickstart)\n\n*** ** * ** ***\n\n\u003cbr /\u003e\n\nBefore you begin\n----------------\n\n- Sign in to your Google Cloud account. If you're new to Google Cloud, [create an account](https://console.cloud.google.com/freetrial) to evaluate how our products perform in real-world scenarios. New customers also get $300 in free credits to run, test, and deploy workloads.\n- In the Google Cloud console, on the project selector page,\n select or create a Google Cloud project.\n\n | **Note**: If you don't plan to keep the resources that you create in this procedure, create a project instead of selecting an existing project. After you finish these steps, you can delete the project, removing all resources associated with the project.\n\n [Go to project selector](https://console.cloud.google.com/projectselector2/home/dashboard)\n-\n [Verify that billing is enabled for your Google Cloud project](/billing/docs/how-to/verify-billing-enabled#confirm_billing_is_enabled_on_a_project).\n\n-\n\n\n Enable the Notebooks API.\n\n\n [Enable the API](https://console.cloud.google.com/flows/enableapi?apiid=notebooks.googleapis.com&redirect=https://console.cloud.google.com)\n\n- In the Google Cloud console, on the project selector page,\n select or create a Google Cloud project.\n\n | **Note**: If you don't plan to keep the resources that you create in this procedure, create a project instead of selecting an existing project. After you finish these steps, you can delete the project, removing all resources associated with the project.\n\n [Go to project selector](https://console.cloud.google.com/projectselector2/home/dashboard)\n-\n [Verify that billing is enabled for your Google Cloud project](/billing/docs/how-to/verify-billing-enabled#confirm_billing_is_enabled_on_a_project).\n\n-\n\n\n Enable the Notebooks API.\n\n\n [Enable the API](https://console.cloud.google.com/flows/enableapi?apiid=notebooks.googleapis.com&redirect=https://console.cloud.google.com)\n\n\u003cbr /\u003e\n\nCreate an instance\n------------------\n\n1. In the Google Cloud console,\n go to the **Managed notebooks** page.\n\n [Go to Managed notebooks](https://console.cloud.google.com/vertex-ai/workbench/managed)\n2. Click add_box **Create new**.\n\n3. In the **Create instance** window, in the **Name** field,\n enter `my-instance`.\n\n4. Click **Create**.\n\nWhen you finish the tasks that are described in this document, you can avoid\ncontinued billing by deleting the resources that you created. For more information, see\n[Clean up](#clean-up).\n\nOpen JupyterLab\n---------------\n\nAfter you create your instance, Vertex AI Workbench automatically starts\nthe instance. When the instance is ready to use, Vertex AI Workbench\nactivates an **Open JupyterLab** link.\n\n1. Next to your managed notebooks instance's name,\n click **Open JupyterLab**.\n\n2. In the **Authenticate your managed notebook** dialog, click the button\n to get an authentication code.\n\n3. Choose an account and click **Allow**. Copy the authentication code.\n\n4. In the **Authenticate your managed notebook** dialog,\n paste the authentication code, and then click **Authenticate**.\n\n Your managed notebooks instance opens JupyterLab.\n\nOpen a new notebook file\n------------------------\n\n1. Select **File \\\u003e New \\\u003e Notebook**.\n\n2. In the **Select kernel** dialog, select **Python** ,\n and then click **Select**.\n\n Your new notebook file opens.\n\nChange the kernel\n-----------------\n\nYou can change the kernel of your JupyterLab notebook file from the menu\nor in the file. \n\n### Menu\n\n1. In JupyterLab, on the **Kernel** menu, click **Change kernel**.\n\n2. In the **Select kernel** dialog, select another kernel to use.\n\n3. Click **Select**.\n\n### In the file\n\n1. In your JupyterLab notebook file, click the kernel name.\n\n2. In the **Select kernel** dialog, select another kernel to use.\n\n3. Click **Select**.\n\nStop your instance\n------------------\n\n1. In the Google Cloud console, go to the **Managed notebooks** page.\n\n [Go to Managed notebooks](https://console.cloud.google.com/vertex-ai/workbench/managed)\n2. Select the instance that you want to stop.\n\n3. Click square **Stop**.\n\nStart your instance\n-------------------\n\n1. In the Google Cloud console, go to the **Managed notebooks** page.\n\n [Go to Managed notebooks](https://console.cloud.google.com/vertex-ai/workbench/managed)\n2. Select the instance that you want to start.\n\n3. Click arrow_right **Start**.\n\nReset your instance\n-------------------\n\nResetting an instance forcibly wipes the memory contents of your instance and\nresets the instance to its initial state. To learn more about how resetting an\ninstance works, see\n[Resetting an instance](/compute/docs/instances/suspend-stop-reset-instances-overview#resetting-instance).\n\n1. In the Google Cloud console, go to the **Managed notebooks** page.\n\n [Go to Managed notebooks](https://console.cloud.google.com/vertex-ai/workbench/managed)\n2. Select the instance that you want to reset.\n\n3. Click\n\n **Reset** , and then click **Reset** to confirm.\n\nClean up\n--------\n\n\nTo avoid incurring charges to your Google Cloud account for\nthe resources used on this page, follow these steps.\n\nIf you created a new project to learn about\nVertex AI Workbench managed notebooks\nand you no longer need the project, then\n[delete the project](https://console.cloud.google.com/cloud-resource-manager).\n\nIf you used an existing Google Cloud project, then delete the resources\nyou created to avoid incurring charges to your account:\n\n1. In the Google Cloud console, go to the **Managed notebooks** page.\n\n [Go to Managed notebooks](https://console.cloud.google.com/vertex-ai/workbench/managed)\n2. Select the row containing the instance that you want to delete.\n\n3. Click delete **Delete** .\n (Depending on the size of your window,\n the **Delete** button might be in\n the more_vert options menu.)\n\n4. To confirm, click **Delete**.\n\nWhat's next\n-----------\n\n- Try one of the tutorials that is included\n in your new managed notebooks instance.\n In the JupyterLab folder **File Browser** , open the **tutorials** folder,\n and open one of the notebook files.\n\n- Read the [Introduction to managed notebooks](/vertex-ai/docs/workbench/managed/introduction).\n\n- To learn more about advanced settings\n for managed notebooks instances, see [Create\n a managed notebooks instance](/vertex-ai/docs/workbench/managed/create-instance)."]]

 Setel Ulang, lalu klik Setel Ulang untuk mengonfirmasi.