Setiap halaman mengasumsikan bahwa Anda telah menjalankan petunjuk dari
halaman tutorial sebelumnya.
Bagian selanjutnya dari dokumen ini mengasumsikan bahwa Anda menggunakan lingkungan
Cloud Shell yang sama dengan yang Anda buat saat mengikuti halaman pertama tutorial
ini. Jika sesi Cloud Shell asli Anda tidak lagi
terbuka, Anda dapat kembali ke lingkungan dengan melakukan tindakan berikut:
In the Google Cloud console, activate Cloud Shell.
Dalam sesi Cloud Shell, jalankan perintah berikut:
cdhello-custom-sample
Membuat endpoint
Untuk mendapatkan prediksi online dari model ML yang Anda latih saat mengikuti
halaman sebelumnya pada tutorial ini, buat endpoint Vertex AI.
Endpoint menyajikan prediksi online dari satu atau beberapa model.
Di konsol Google Cloud , di bagian Vertex AI, buka
halaman Models.
Temukan baris model yang Anda latih di langkah sebelumnya pada
tutorial ini, hello_custom, dan klik nama model
untuk membuka halaman detail model.
Pada tab Deploy & uji, klik Deploy ke endpoint untuk membuka
panel Deploy ke endpoint.
Pada langkah Menentukan endpoint, tambahkan beberapa informasi dasar untuk
endpoint:
Pilih Buat endpoint baru.
Di kolom Nama endpoint, masukkan hello_custom.
Di bagian Setelan model, pastikan Anda melihat nama
model, yang juga disebut hello_custom. Tentukan setelan model
berikut:
Di kolom Pemisahan traffic, masukkan 100. Vertex AI
mendukung pemisahan traffic untuk sebuah endpoint menjadi beberapa model, tetapi
tutorial ini tidak menggunakan fitur tersebut.
Di kolom Jumlah node komputasi minimum, masukkan 1.
Dalam menu drop-down Jenis mesin, pilih n1-standard-2 dari
bagian Standar.
Klik Selesai.
Di bagian Logging, pastikan kedua jenis logging prediksi
diaktifkan.
Klik Lanjutkan.
Pada langkah Detail endpoint, konfirmasi bahwa endpoint Anda akan di-deploy
ke us-central1 (Iowa).
Jangan centang kotak Gunakan kunci enkripsi yang dikelola pelanggan (CMEK).
Tutorial ini tidak menggunakan CMEK.
Klik Deploy untuk membuat endpoint dan men-deploy model Anda ke
endpoint.
Setelah beberapa menit, check_circle akan muncul di samping endpoint
baru dalam tabel Endpoint. Pada saat yang sama, Anda juga akan menerima email
yang menunjukkan bahwa Anda telah berhasil membuat endpoint dan men-deploy
model ke endpoint.
Men-deploy Cloud Run Function
Anda bisa mendapatkan prediksi dari endpoint Vertex AI yang baru saja
dibuat dengan mengirim permintaan ke antarmuka REST Vertex AI API. Namun, hanya
akun utama dengan izin
aiplatform.endpoints.predict yang dapat mengirim permintaan prediksi online. Anda
tidak dapat membuat endpoint menjadi publik agar dapat dikirimi permintaan siapa pun, misalnya melalui
aplikasi web.
Di bagian ini, deploy kode ke Cloud Run functions untuk menangani
permintaan yang tidak diautentikasi. Kode contoh yang Anda download saat membaca
halaman pertama tutorial ini berisi kode untuk
fungsi Cloud Run ini dalam direktori function/. Anda juga dapat menjalankan
perintah berikut untuk mempelajari kode fungsi Cloud Run:
lessfunction/main.py
Men-deploy fungsi memiliki fungsi berikut:
Anda dapat mengonfigurasi fungsi Cloud Run untuk menerima permintaan yang
tidak diautentikasi. Selain itu, fungsi dijalankan menggunakan akun layanan dengan peran
Editor secara default, yang menyertakan
izin aiplatform.endpoints.predict yang diperlukan untuk mendapatkan prediksi
dari endpoint Vertex AI Anda.
Fungsi ini juga melakukan pra-pemrosesan yang berguna terhadap permintaan. Endpoint
Vertex AI mengharapkan permintaan prediksi dalam format
lapisan pertama grafik TensorFlow Keras terlatih: tensor float yang
dinormalisasi dengan dimensi tetap. Fungsi ini mengambil URL gambar sebagai input
dan memproses gambar sebelumnya ke dalam format ini sebelum meminta prediksi
dari endpoint Vertex AI.
Untuk men-deploy fungsi Cloud Run, lakukan hal berikut:
Di konsol Google Cloud , di bagian Vertex AI, buka halaman Endpoints.
Temukan baris endpoint yang Anda buat di bagian sebelumnya, yang bernama
hello_custom. Di baris ini, klik Permintaan contoh untuk membuka panel
Permintaan contoh.
Di panel Permintaan contoh, temukan baris kode shell yang cocok dengan
pola berikut:
ENDPOINT_ID="ENDPOINT_ID"
ENDPOINT_ID adalah angka yang mengidentifikasi endpoint khusus ini.
Salin baris kode ini, lalu jalankan di sesi Cloud Shell Anda untuk
menetapkan variabel ENDPOINT_ID.
Jalankan perintah berikut dalam sesi Cloud Shell Anda untuk men-deploy
fungsi Cloud Run:
Men-deploy aplikasi web untuk mengirim permintaan prediksi
Terakhir, hosting aplikasi web statis di Cloud Storage untuk mendapatkan prediksi
dari model ML terlatih Anda. Aplikasi web mengirimkan permintaan ke
fungsi Cloud Run Anda, yang melakukan pra-pemrosesan dan mendapatkan prediksi dari
endpoint Vertex AI.
Direktori webapp kode contoh yang Anda download berisi aplikasi web
contoh. Di sesi Cloud Shell Anda, jalankan perintah
berikut untuk menyiapkan dan men-deploy aplikasi web:
Tetapkan beberapa variabel shell untuk perintah dalam langkah berikut yang akan digunakan:
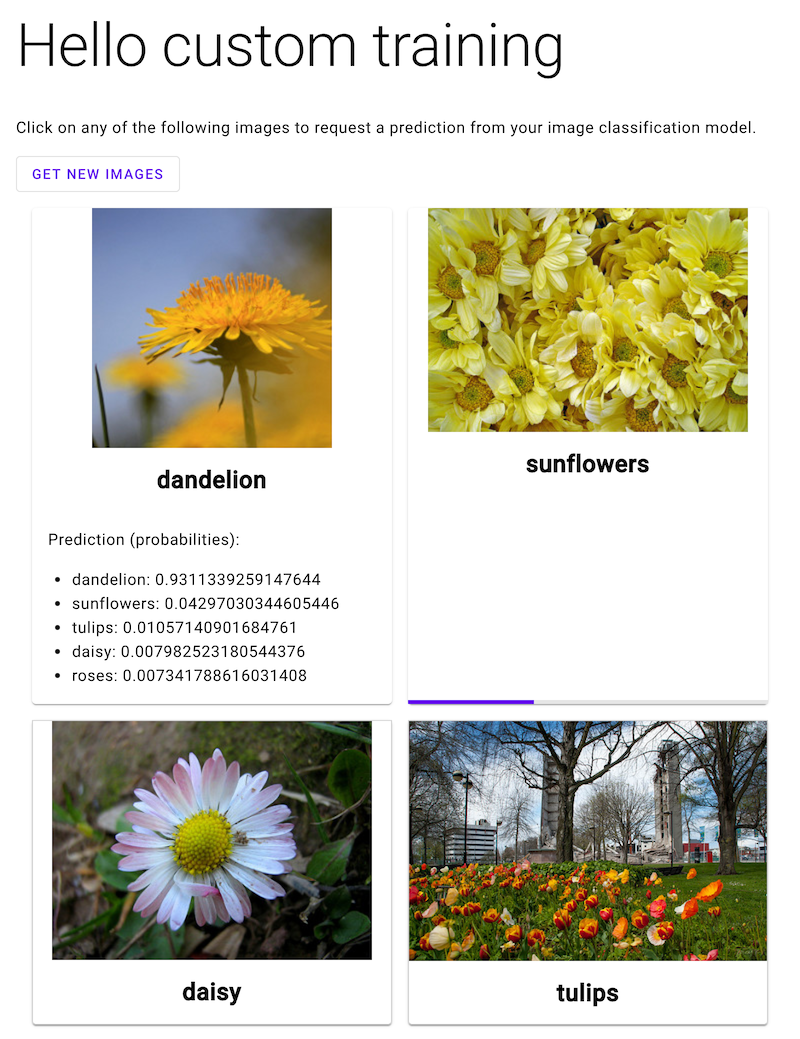
Buka aplikasi web, lalu klik gambar bunga untuk melihat
klasifikasi jenis bunga ML Anda. Aplikasi web menampilkan prediksi sebagai
daftar jenis bunga dan probabilitas bahwa gambar berisi setiap jenis
bunga.
Dalam screenshot berikut, aplikasi web telah mendapatkan satu
prediksi dan sedang dalam proses mengirimkan permintaan
prediksi lain.
[[["Mudah dipahami","easyToUnderstand","thumb-up"],["Memecahkan masalah saya","solvedMyProblem","thumb-up"],["Lainnya","otherUp","thumb-up"]],[["Sulit dipahami","hardToUnderstand","thumb-down"],["Informasi atau kode contoh salah","incorrectInformationOrSampleCode","thumb-down"],["Informasi/contoh yang saya butuhkan tidak ada","missingTheInformationSamplesINeed","thumb-down"],["Masalah terjemahan","translationIssue","thumb-down"],["Lainnya","otherDown","thumb-down"]],["Terakhir diperbarui pada 2025-08-19 UTC."],[],[],null,["# Hello custom training: Serve predictions from a custom image classification model\n\nThis page walks through serving predictions from your image classification model\nand viewing these predictions in a web app.\nThis tutorial has several pages:\n\n\u003cbr /\u003e\n\n1. [Setting up your project and environment.](/vertex-ai/docs/tutorials/image-classification-custom)\n\n2. [Training a custom image classification\n model.](/vertex-ai/docs/tutorials/image-classification-custom/training)\n\n3. Serving predictions from a custom image\n classification model.\n\n4. [Cleaning up your project.](/vertex-ai/docs/tutorials/image-classification-custom/cleanup)\n\nEach page assumes that you have already performed the instructions from the\nprevious pages of the tutorial.\nThe rest of this document assumes that you are using the same Cloud Shell environment that you created when following the [first page of this\ntutorial](/vertex-ai/docs/tutorials/image-classification-custom). If your original Cloud Shell session is no longer open, you can return to the environment by doing the following:\n\n\u003cbr /\u003e\n\n1. In the Google Cloud console, activate Cloud Shell.\n\n [Activate Cloud Shell](https://console.cloud.google.com/?cloudshell=true)\n2. In the Cloud Shell session, run the following command:\n\n ```bash\n cd hello-custom-sample\n ```\n\nCreate an endpoint\n------------------\n\nTo get online predictions from the ML model that you trained when following\nthe previous page of this tutorial, create a Vertex AI *endpoint*.\nEndpoints serve online predictions from one or more models.\n\n1. In the Google Cloud console, in the Vertex AI section, go to\n the **Models** page.\n\n [Go to Models](https://console.cloud.google.com/vertex-ai/models)\n2. Find the row of the model that you trained in the [previous step of this\n tutorial](/vertex-ai/docs/tutorials/image-classification-custom/training), `hello_custom`, and click the model's\n name to open the model detail page.\n\n3. On the **Deploy \\& test** tab, click **Deploy to endpoint** to open the\n **Deploy to endpoint** pane.\n\n4. On the **Define your endpoint** step, add some basic information for your\n endpoint:\n\n 1. Select **Create new endpoint**.\n\n 2. In the **Endpoint name** field, enter `hello_custom`.\n\n 3. In the **Model settings** section, ensure that you see the name of your\n model, which is also called `hello_custom`. Specify the following model\n settings:\n\n 1. In the **Traffic split** field, enter `100`. Vertex AI\n supports splitting traffic for an endpoint to multiple models, but\n this tutorial doesn't use that feature.\n\n 2. In the **Minimum number of compute nodes** field, enter `1`.\n\n 3. In the **Machine type** drop-down list, select **n1-standard-2** from\n the **Standard** section.\n\n 4. Click **Done**.\n\n 4. In the **Logging** section, ensure that both types of prediction logging\n are enabled.\n\n Click **Continue**.\n5. On the **Endpoint details** step, confirm that your endpoint will be deployed\n to `us-central1 (Iowa)`.\n\n Do not select the **Use a customer-managed encryption key (CMEK)** checkbox.\n This tutorial does not use [CMEK](/vertex-ai/docs/general/cmek).\n6. Click **Deploy** to create the endpoint and deploy your model to the\n endpoint.\n\nAfter a few minutes, check_circle appears next to the new\nendpoint in the **Endpoints** table. At the same time, you also receive an email\nindicating that you have successfully created the endpoint and deployed your\nmodel to the endpoint.\n\nDeploy a Cloud Run function\n---------------------------\n\nYou can get predictions from the Vertex AI endpoint that you just\ncreated by sending requests to the Vertex AI API's REST interface. However, only\nprincipals with the [`aiplatform.endpoints.predict`\npermission](/vertex-ai/docs/general/access-control) can send online prediction requests. You\ncannot make the endpoint public for anybody to send requests to, for example via\na web app.\n\nIn this section, deploy code to [Cloud Run functions](/functions/docs) to handle\nunauthenticated requests. The sample code that you downloaded when you read the\n[first page of this tutorial](/vertex-ai/docs/tutorials/image-classification-custom) contains code for this\nCloud Run function in the `function/` directory. Optionally, run the\nfollowing command to explore the Cloud Run function code: \n\n less function/main.py\n\nDeploying the function serves the following purposes:\n\n- You *can* configure a Cloud Run function to receive unauthenticated\n requests. Additionally, functions run using [a service account with the Editor\n role by default](/functions/docs/securing/function-identity), which includes\n the `aiplatform.endpoints.predict` permission necessary to get predictions\n from your Vertex AI endpoint.\n\n- This function also performs useful preprocessing on requests. The\n Vertex AI endpoint expects prediction requests in the format\n of the trained TensorFlow Keras graph's first layer: a tensor of normalized\n floats with fixed dimensions. The function takes the URL of an image as input\n and preprocesses the image into this format before requesting a prediction\n from the Vertex AI endpoint.\n\nTo deploy the Cloud Run function, do the following:\n\n1. In the Google Cloud console, in the Vertex AI section, go to\n the **Endpoints** page.\n\n [Go to Endpoints](https://console.cloud.google.com/vertex-ai/endpoints)\n2. Find the row of the endpoint that you created in the previous section, named\n `hello_custom`. In this row, click **Sample request** to open the\n **Sample request** pane.\n\n3. In the **Sample request** pane, find the line of shell code that matches the\n following pattern:\n\n ```bash\n ENDPOINT_ID=\"\u003cvar translate=\"no\"\u003eENDPOINT_ID\u003c/var\u003e\"\n ```\n\n \u003cvar translate=\"no\"\u003eENDPOINT_ID\u003c/var\u003e is a number that identifies this particular endpoint.\n\n Copy this line of code, and run it in your Cloud Shell session to\n set the `ENDPOINT_ID` variable.\n4. Run the following command in your Cloud Shell session to deploy the\n Cloud Run function:\n\n gcloud functions deploy classify_flower \\\n --region=us-central1 \\\n --source=function \\\n --runtime=python37 \\\n --memory=2048MB \\\n --trigger-http \\\n --allow-unauthenticated \\\n --set-env-vars=ENDPOINT_ID=${ENDPOINT_ID}\n\nDeploy a web app to send prediction requests\n--------------------------------------------\n\nFinally, host a static web app on Cloud Storage to get predictions\nfrom your trained ML model. The web app sends requests to your\nCloud Run function, which preprocesses them and gets predictions from the\nVertex AI endpoint.\n\nThe `webapp` directory of the sample code that you downloaded contains a sample\nweb app. In your Cloud Shell session, run the following commands\nto prepare and deploy the web app:\n\n1. Set a couple of shell variables for commands in following steps to use:\n\n PROJECT_ID=\u003cvar translate=\"no\"\u003ePROJECT_ID\u003c/var\u003e\n BUCKET_NAME=\u003cvar translate=\"no\"\u003eBUCKET_NAME\u003c/var\u003e\n\n Replace the following:\n - \u003cvar translate=\"no\"\u003ePROJECT_ID\u003c/var\u003e: Your Google Cloud [project\n ID](/resource-manager/docs/creating-managing-projects#identifying_projects).\n - \u003cvar translate=\"no\"\u003eBUCKET_NAME\u003c/var\u003e: The name of the Cloud Storage bucket that you created when following the [first page of this tutorial](/vertex-ai/docs/tutorials/image-classification-custom).\n2. Edit the app to provide it with the trigger URL of your\n Cloud Run function:\n\n echo \"export const CLOUD_FUNCTION_URL = 'https://us-central1-${PROJECT_ID}.cloudfunctions.net/classify_flower';\" \\\n \u003e webapp/function-url.js\n\n3. Upload the `webapp` directory to your Cloud Storage bucket:\n\n gcloud storage cp webapp gs://${BUCKET_NAME}/ --recursive\n\n4. Make the web app files that you just uploaded [publicly\n readable](/storage/docs/access-control/making-data-public):\n\n gcloud storage objects update gs://${BUCKET_NAME}/webapp/** --add-acl-grant=entity=allUsers,role=READER\n\n | **Note:** Shells (like bash, zsh) sometimes attempt to expand wildcards in ways that can be surprising. For more details, see [URI wildcards](/storage/docs/wildcards#surprising-behavior).\n5. You can now navigate to the following URL to open web app and get\n predictions:\n\n ```\n https://storage.googleapis.com/BUCKET_NAME/webapp/index.html\n ```\n\n Open the web app and click an image of a flower to see your ML model's\n classification of the flower type. The web app presents the prediction as a\n list of flower types and the probability that the image contains each type of\n flower.\n | **Note:** This web app gets predictions for images that were also included in the training dataset for the model. Therefore the model might appear more accurate than it actually is due to [overfitting](https://developers.google.com/machine-learning/glossary#overfitting).\n\nIn the following screenshot, the web app has already gotten one\nprediction and is in the process of sending another prediction\nrequest.\n\nWhat's next\n-----------\n\nFollow the [last page of the tutorial](/vertex-ai/docs/tutorials/image-classification-custom/cleanup) to clean up\nresources that you have created."]]