Tetap teratur dengan koleksi
Simpan dan kategorikan konten berdasarkan preferensi Anda.
Membuat notebook Colab Enterprise menggunakan konsol Google Cloud
Pelajari cara membuat notebook Colab Enterprise dan menjalankan kodenya
di runtime default menggunakan konsol Google Cloud .
Halaman ini juga menjelaskan cara mengganti nama, mengimpor, dan menghapus notebook.
Sebelum memulai
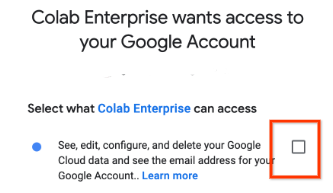
Sign in to your Google Cloud account. If you're new to
Google Cloud,
create an account to evaluate how our products perform in
real-world scenarios. New customers also get $300 in free credits to
run, test, and deploy workloads.
In the Google Cloud console, on the project selector page,
select or create a Google Cloud project.
Untuk mendapatkan izin yang diperlukan untuk membuat notebook Colab Enterprise dan menjalankan kode notebook di runtime, minta administrator untuk memberi Anda peran IAM Colab Enterprise User (roles/aiplatform.colabEnterpriseUser) di project.
Untuk mengetahui informasi selengkapnya tentang cara memberikan peran, lihat Mengelola akses ke project, folder, dan organisasi.
Di menu Region, pilih region tempat Anda ingin membuat notebook.
Klik add_boxNew
notebook.
Vertex AI akan membuat dan membuka notebook Anda.
Setelah menyelesaikan tugas yang dijelaskan dalam dokumen ini, Anda dapat menghindari penagihan berkelanjutan dengan menghapus resource yang Anda buat. Untuk mengetahui informasi selengkapnya, lihat
Pembersihan.
Menjalankan kode di runtime default
Untuk menjalankan kode notebook Colab Enterprise
di runtime default, lakukan hal berikut:
Di konsol Google Cloud , buka halaman Notebook saya Colab Enterprise.
Di menu Region, pilih region tempat Anda ingin
mengimpor notebook.
Klik
uploadImpor.
Di dialog Impor notebook, pilih
Sumber impor.
Jika Anda memilih:
Komputer Anda, buka dan pilih file notebook
yang akan diimpor.
Cloud Storage, buka dan pilih notebook
di Cloud Storage.
URL, masukkan URL file notebook yang akan diimpor.
Untuk menambahkan notebook lain, klik
add_boxTambahkan
notebook.
Setelah Anda menambahkan buku catatan yang ingin diimpor,
klik Impor.
Colab Enterprise akan mengimpor file notebook Anda.
Pembersihan
Agar akun Google Cloud Anda tidak dikenai biaya untuk
resource yang digunakan pada halaman ini, ikuti langkah-langkah berikut.
Agar tidak menimbulkan biaya pada akun Google Cloud Anda untuk resource yang digunakan dalam tutorial ini, hapus project yang berisi resource tersebut, atau simpan project dan hapus setiap resource.
Menghapus project
In the Google Cloud console, go to the Manage resources page.
[[["Mudah dipahami","easyToUnderstand","thumb-up"],["Memecahkan masalah saya","solvedMyProblem","thumb-up"],["Lainnya","otherUp","thumb-up"]],[["Sulit dipahami","hardToUnderstand","thumb-down"],["Informasi atau kode contoh salah","incorrectInformationOrSampleCode","thumb-down"],["Informasi/contoh yang saya butuhkan tidak ada","missingTheInformationSamplesINeed","thumb-down"],["Masalah terjemahan","translationIssue","thumb-down"],["Lainnya","otherDown","thumb-down"]],["Terakhir diperbarui pada 2025-09-02 UTC."],[],[],null,["# Quickstart: Create a Colab Enterprise notebook by using the Google Cloud console\n\nCreate a Colab Enterprise notebook by using the Google Cloud console\n====================================================================\n\nLearn how to create a Colab Enterprise notebook and run its code\non a default runtime by using the Google Cloud console.\nThis page also describes how to rename, import, and delete a notebook.\n\nBefore you begin\n----------------\n\n- Sign in to your Google Cloud account. If you're new to Google Cloud, [create an account](https://console.cloud.google.com/freetrial) to evaluate how our products perform in real-world scenarios. New customers also get $300 in free credits to run, test, and deploy workloads.\n- In the Google Cloud console, on the project selector page,\n select or create a Google Cloud project.\n\n | **Note**: If you don't plan to keep the resources that you create in this procedure, create a project instead of selecting an existing project. After you finish these steps, you can delete the project, removing all resources associated with the project.\n\n [Go to project selector](https://console.cloud.google.com/projectselector2/home/dashboard)\n-\n [Verify that billing is enabled for your Google Cloud project](/billing/docs/how-to/verify-billing-enabled#confirm_billing_is_enabled_on_a_project).\n\n-\n\n\n Enable the Vertex AI, Dataform, and Compute Engine APIs.\n\n\n [Enable the APIs](https://console.cloud.google.com/flows/enableapi?apiid=aiplatform.googleapis.com, dataform.googleapis.com, compute.googleapis.com&redirect=https://console.cloud.google.com)\n\n- In the Google Cloud console, on the project selector page,\n select or create a Google Cloud project.\n\n | **Note**: If you don't plan to keep the resources that you create in this procedure, create a project instead of selecting an existing project. After you finish these steps, you can delete the project, removing all resources associated with the project.\n\n [Go to project selector](https://console.cloud.google.com/projectselector2/home/dashboard)\n-\n [Verify that billing is enabled for your Google Cloud project](/billing/docs/how-to/verify-billing-enabled#confirm_billing_is_enabled_on_a_project).\n\n-\n\n\n Enable the Vertex AI, Dataform, and Compute Engine APIs.\n\n\n [Enable the APIs](https://console.cloud.google.com/flows/enableapi?apiid=aiplatform.googleapis.com, dataform.googleapis.com, compute.googleapis.com&redirect=https://console.cloud.google.com)\n\n### Required roles\n\n\nTo get the permissions that\nyou need to create a Colab Enterprise notebook and run the notebook's code on a runtime,\n\nask your administrator to grant you the\n\n\nColab Enterprise User ([`roles/aiplatform.colabEnterpriseUser`](/vertex-ai/docs/general/access-control#aiplatform.colabEnterpriseUser))\nIAM role on the project.\n\n\nFor more information about granting roles, see [Manage access to projects, folders, and organizations](/iam/docs/granting-changing-revoking-access).\n\n\nYou might also be able to get\nthe required permissions through [custom\nroles](/iam/docs/creating-custom-roles) or other [predefined\nroles](/iam/docs/roles-overview#predefined).\n| One or more of the required roles includes the `dataform.repositories.list` permission. Users who are granted the `dataform.repositories.list` permission or the [Code Creator\n| (`roles/dataform.codeCreator`)](/iam/docs/understanding-roles#dataform.codeCreator) role in a project can list the names of code assets in that project by using the Dataform API or the Dataform command-line interface (CLI). Non-administrators using BigQuery Studio can only see code assets that they created or that were shared with them.\n\nCreate a notebook\n-----------------\n\nTo create a Colab Enterprise notebook by using the Google Cloud console:\n\n1. In the Google Cloud console, go to\n the Colab Enterprise **My notebooks** page.\n\n [Go to My notebooks](https://console.cloud.google.com/vertex-ai/colab/notebooks)\n2. In the **Region** menu, select the region where you want to\n create your notebook.\n\n3. Click add_box **New\n notebook**.\n\n Vertex AI creates and opens your notebook.\n\nWhen you finish the tasks that are described in this document, you can avoid\ncontinued billing by deleting the resources that you created. For more information, see\n[Clean up](#clean-up).\n\nRun code in a default runtime\n-----------------------------\n\nTo run a Colab Enterprise notebook's code\non the default runtime, do the following:\n\n1. In the Google Cloud console, go to\n the Colab Enterprise **My notebooks** page.\n\n [Go to My notebooks](https://console.cloud.google.com/vertex-ai/colab/notebooks)\n2. In the **Region** menu, select the region that contains your notebook.\n\n3. Click the notebook that you want to open.\n\n4. Hold the pointer over the code cell that you want to run,\n and then click the\n **Run cell** button.\n\n5. If this is your first time connecting to a runtime with\n end-user credentials enabled, a **Sign in** dialog appears.\n\n | The default runtime has end-user credentials enabled to make it easier to [run code that interacts\n | with Google Cloud](/colab/docs/run-code-adc).\n\n To grant Colab Enterprise access to your user credentials,\n complete the following steps:\n 1. In the **Sign in** dialog, click your user account.\n\n 2. Select **See, edit, configure, and delete your\n Google Cloud data...** to grant Colab Enterprise\n access to your user credentials.\n\n 3. Click **Continue**.\n\nAfter your runtime starts, Colab Enterprise connects\nto the runtime and runs the code in the cell.\n\nRename your notebook\n--------------------\n\nTo rename a Colab Enterprise notebook:\n\n1. In the Google Cloud console, go to\n the Colab Enterprise **My notebooks** page.\n\n [Go to My notebooks](https://console.cloud.google.com/vertex-ai/colab/notebooks)\n2. In the **Region** menu, select the region that contains your notebook.\n\n3. Next to the notebook that you want to rename, click the\n more_vert**Actions** menu,\n and then select **Rename**.\n\n4. In the **Rename notebook** dialog,\n change the name of the notebook, and then click **Rename**.\n\nImport a notebook\n-----------------\n\nTo import a notebook into Colab Enterprise:\n\n1. In the Google Cloud console, go to\n the Colab Enterprise **My notebooks** page.\n\n [Go to My notebooks](https://console.cloud.google.com/vertex-ai/colab/notebooks)\n2. In the **Region** menu, select the region where you want to\n import your notebook.\n\n3. Click\n upload **Import**.\n\n4. In the **Import notebooks** dialog, select an\n **Import source**.\n\n5. If you selected:\n\n - **Your computer**, navigate to and select a notebook file to import.\n - **Cloud Storage**, navigate to and select a notebook in Cloud Storage.\n - **URL**, enter the URL of the notebook file to import.\n\n | The notebook must be fewer than 20 MB.\n6. To add another notebook, click\n add_box **Add\n notebook**.\n\n7. After you've added the notebooks that you want to import,\n click **Import**.\n\n Colab Enterprise imports your notebook files.\n\nClean up\n--------\n\n\nTo avoid incurring charges to your Google Cloud account for\nthe resources used on this page, follow these steps.\n\nTo avoid incurring charges to your Google Cloud account for the resources\nused in this tutorial, either delete the project that contains the resources,\nor keep the project and delete the individual resources. \n\n### Delete the project\n\n| **Caution** : Deleting a project has the following effects:\n|\n| - **Everything in the project is deleted.** If you used an existing project for the tasks in this document, when you delete it, you also delete any other work you've done in the project.\n| - **Custom project IDs are lost.** When you created this project, you might have created a custom project ID that you want to use in the future. To preserve the URLs that use the project ID, such as an `appspot.com` URL, delete selected resources inside the project instead of deleting the whole project.\n|\n|\n| If you plan to explore multiple architectures, tutorials, or quickstarts, reusing projects\n| can help you avoid exceeding project quota limits.\n1. In the Google Cloud console, go to the **Manage resources** page.\n\n [Go to Manage resources](https://console.cloud.google.com/iam-admin/projects)\n2. In the project list, select the project that you want to delete, and then click **Delete**.\n3. In the dialog, type the project ID, and then click **Shut down** to delete the project. \n\n### Delete your notebook\n\nTo delete a Colab Enterprise notebook:\n\n1. In the Google Cloud console, go to\n the Colab Enterprise **My notebooks** page.\n\n [Go to My notebooks](https://console.cloud.google.com/vertex-ai/colab/notebooks)\n2. In the **Region** menu, select the region that contains\n the notebook that you want to delete.\n\n3. Next to the notebook that you want to delete, click the\n more_vert**Actions** menu,\n and then select\n delete **Delete\n notebook**.\n\n4. In the **Delete notebook** dialog,\n click **Confirm**.\n\nWhat's next\n-----------\n\n- Read the [Introduction to\n Colab Enterprise](/colab/docs/introduction).\n\n- To find a notebook that can help you get your project started quickly,\n see the [notebook gallery](https://console.cloud.google.com/vertex-ai/colab/notebook-gallery).\n\n- [Connect to a runtime](/colab/docs/connect-to-runtime)."]]