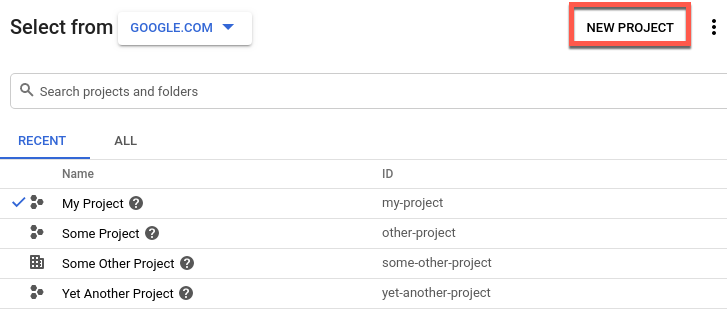
Apigee hybrid requires that you have a Google Cloud project, which you can create after you
create a Google Cloud account.
This section describes how to create a new Google Cloud project. If you want to use an existing Google Cloud
project (of which you are an owner) with hybrid, skip to Step 3: Enable APIs.
Enter a friendly name for your project in the Project name field.
The project name can contain only letters, numbers, single quotes, hyphens, spaces, or
exclamation points.
Google Cloud generates a corresponding project ID below the Project name field, as
the following example shows.
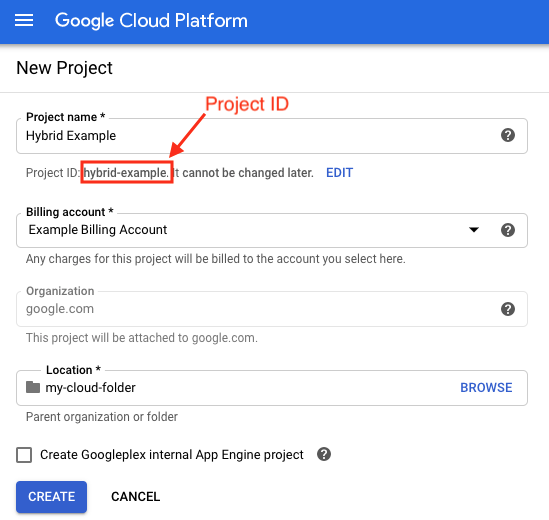
You can change the generated Project ID by clicking Edit, but the project
ID must be unique. The project ID can have lowercase letters, digits, or hyphens, and must start
with a lowercase letter.
Take note of the Project ID. You will use it later in this setup process.
In the Billing account field, select the Google Cloud billing account to use to pay
for your project. If you do not yet have a Google Cloud billing account, see the following:
[[["Easy to understand","easyToUnderstand","thumb-up"],["Solved my problem","solvedMyProblem","thumb-up"],["Other","otherUp","thumb-up"]],[["Hard to understand","hardToUnderstand","thumb-down"],["Incorrect information or sample code","incorrectInformationOrSampleCode","thumb-down"],["Missing the information/samples I need","missingTheInformationSamplesINeed","thumb-down"],["Other","otherDown","thumb-down"]],["Last updated 2025-08-29 UTC."],[[["\u003cp\u003eThe current Apigee hybrid documentation version (1.3) is end-of-life and users are advised to upgrade to a newer version.\u003c/p\u003e\n"],["\u003cp\u003eCreating a new Google Cloud project is necessary for Apigee hybrid, but existing projects can be used if the user is an owner.\u003c/p\u003e\n"],["\u003cp\u003eWhen creating a project you will need to enter a friendly name, but it is the Project ID that will be used later in the process.\u003c/p\u003e\n"],["\u003cp\u003eDuring the creation of a Google Cloud project, a billing account and a location must be selected, both being vital to the process.\u003c/p\u003e\n"],["\u003cp\u003eYou will need to log in to your Google Cloud account to create a project, where you will then be prompted to fill out some basic project information.\u003c/p\u003e\n"]]],[],null,["# Step 2: Create a Google Cloud project\n\n| You are currently viewing version 1.3 of the Apigee hybrid documentation. **This version is end of life.** You should upgrade to a newer version. For more information, see [Supported versions](/apigee/docs/hybrid/supported-platforms#supported-versions).\n\nApigee hybrid requires that you have a project, which you can create after you\ncreate a Google Cloud account.\n\nThis section describes how to create a new Google Cloud project. If you want to use an existing Google Cloud\nproject (of which you are an owner) with hybrid, skip to [Step 3: Enable APIs](/apigee/docs/hybrid/v1.3/precog-enableapi).\n| **Note:** In Part 1, you will create these management plane components: an organization, environment, and environment group. As project owner, you can create these entities. However, if you want to delegate creation of these entities to a user who is not a project owner, the user must be granted [Apigee Organization Admin](https://cloud.google.com/iam/docs/understanding-roles?_ga=2.8757749.-1584768454.1611847561#apigee-roles) role. For information on granting roles, see [Granting, changing, and revoking access to resources](https://cloud.google.com/iam/docs/granting-changing-revoking-access).\n\n**To create a new Google Cloud project:**\n\n1. Open the [Google Cloud console](https://console.cloud.google.com) and log in with the account you created in [Step 1: Create a Google Cloud account](/apigee/docs/hybrid/v1.3/precog-gcpaccount).\n2. Click the project selector **Select a project**:\n\n The project selector dialog box displays:\n\n3. Click **New Project**.\n\n The **New Project** view displays.\n4. Enter a friendly name for your project in the **Project name** field.\n The project name can contain only letters, numbers, single quotes, hyphens, spaces, or\n exclamation points.\n\n Google Cloud generates a corresponding project ID below the **Project name** field, as\n the following example shows.\n\n You can change the generated **Project ID** by clicking **Edit**, but the project\n ID must be unique. The project ID can have lowercase letters, digits, or hyphens, and must start\n with a lowercase letter.\n\n Take note of the **Project ID**. You will use it later in this setup process.\n | **Note:** After you create the project, you *cannot* change the project ID.\n5. In the **Billing account** field, select the Google Cloud billing account to use to pay for your project. If you do not yet have a Google Cloud billing account, see the following:\n - To add a new billing account: [Cloud console billing\n page](https://pantheon.corp.google.com/billing)\n - To learn about Google Cloud Billing accounts: [Create,\n modify, or close your Cloud Billing account](https://cloud.google.com/billing/docs/how-to/manage-billing-account)\n6. In the **Location** field, select a folder for your project. Folders are an optional part of the Google Cloud project resource tree.\n7. Click **Create**.\n\n Google Cloud creates your new project.\n\n[1](/apigee/docs/hybrid/v1.3/precog-gcpaccount) [2](/apigee/docs/hybrid/v1.3/precog-gcpproject) [(NEXT) Step 3: Enable APIs](/apigee/docs/hybrid/v1.3/precog-enableapi) [4](/apigee/docs/hybrid/v1.3/precog-provision) [5](/apigee/docs/hybrid/v1.3/precog-add-dns) [6](/apigee/docs/hybrid/v1.3/precog-add-environment)\n\n\u003cbr /\u003e\n\n*[Google Cloud]: Google Cloud"]]