Este tópico é apenas um exemplo. Ele explica como conseguir um certificado TLS da
autoridade de certificação (CA, na sigla em inglês) Let's Encrypt (em inglês).
Essas etapas são fornecidas principalmente como um exemplo a ser seguido se você não
tiver outra maneira pronta de obter um par de certificado/chave
autorizado por uma CA. No exemplo, mostramos como gerar certificados
usando a CA Let's Encrypt, o
cliente Certbot e o Cloud DNS do Google Cloud Platform.
Onde usar esses certificados
Você precisa fornecer certificados TLS para dois gateways de entrada do Istio expostos
fora do cluster:
Gateway
Requisito de TLS
Gateway de entrada do ambiente de execução
Você pode usar um par de certificado/chave autoassinado ou certificados TLS autorizados.
Gateway de entrada MART (opcional quando não estiver usando o Apigee Connect)
Requer um certificado/par de chaves TLS autorizado ou um secret do Kubernetes.
Você precisará de um nome de domínio proveniente de um registrador de nomes de domínio. É possível registrar um nome de domínio por meio
do Google Domains ou outro registro de domínios da sua escolha.
Configurar o Cloud DNS
Para conseguir os certificados TLS autorizados, é necessário ter um nome de domínio qualificado. As etapas a seguir
explicam como usar o Google Cloud DNS para
conseguir um nome de domínio e gerenciar seus servidores de domínio.
Se você ainda não tiver feito isso, ative a API Cloud DNS. Consulte
Como ativar APIs.
Crie um endereço IP estático:
Se você estiver no GKE, siga as instruções em
Como reservar um endereço IP externo estático para criar um endereço IP estático que os processos externos
possam usar para se comunicar com a entrada de ambiente de execução híbrido. Você pode dar o nome que quiser ao
nome, por exemplo: apigee-hybrid-runtime. Quando terminar, você usará o número
do IP na configuração do cluster na próxima etapa. Por exemplo: 34.66.75.196
Se você estiver no Anthos GKE, siga as instruções na
Documentação do Anthos GKE para criar um endereço IP estático.
Receba o IP externo que você acabou de reservar.
Crie o conjunto de registros para o endpoint do ambiente de execução de entrada do Istio. Esse é o endereço para fazer
chamadas de API para o gateway híbrido. Insira o IP externo que você recebeu na etapa anterior
e adicione um prefixo ao nome do domínio, como example-endpoint. Para mais instruções, consulte
Criar um novo registro.
Nome do DNS: o nome das chamadas de API externas do endpoint que se comunicarão, como
api-services ou example-endpoint
Tipo de registro de recurso: A
TTL e Unidade TTL: aceitar padrões
IP Addhook: o IP estático que você criou.
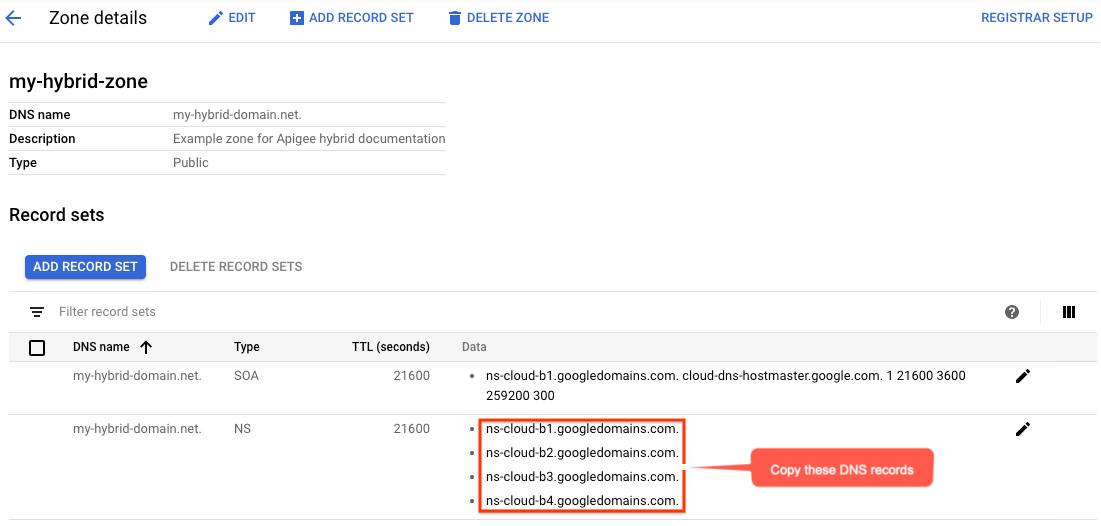
A visualização Detalhes da zona listará os servidores DNS como os dados NS da nova
zona. Copie os dados do registro DNS, conforme mostrado no exemplo a seguir:
Retorne à página do seu domínio no registrador, por exemplo, o Google
Domains.
Selecione seu domínio.
Selecione DNS.
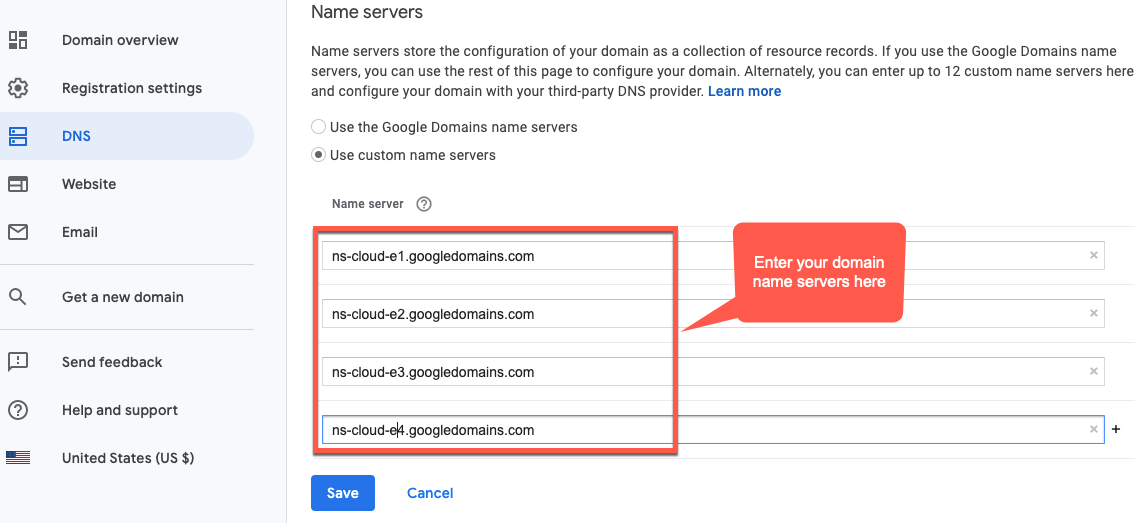
Na seção "Servidores de nomes", clique em Editar.
Insira os servidores de nomes de domínio que você copiou da página Serviços de rede do
Cloud DNS. Por exemplo:
Agora o Google Cloud DNS gerenciará os registros DNS do seu domínio.
Instalar o Certbot em uma VM
Agora que o Cloud DNS está configurado para gerenciar os servidores de domínio, instale o
cliente Certbot com o
plug-in dns_google em uma VM do Cloud. O cliente permite
que você receba certificados autorizados para seu domínio a partir de um endpoint Let's Encrypt.
Selecione IAM e administrador > Contas de serviço.
A visualização "Contas de serviço" exibe uma lista das contas de serviço do projeto.
Para criar uma nova conta de serviço, clique em +Criar conta de serviço na parte superior
da visualização.
A visualização Detalhes da conta de serviço é exibida.
No campo Nome da conta de serviço, insira o nome da conta de serviço.
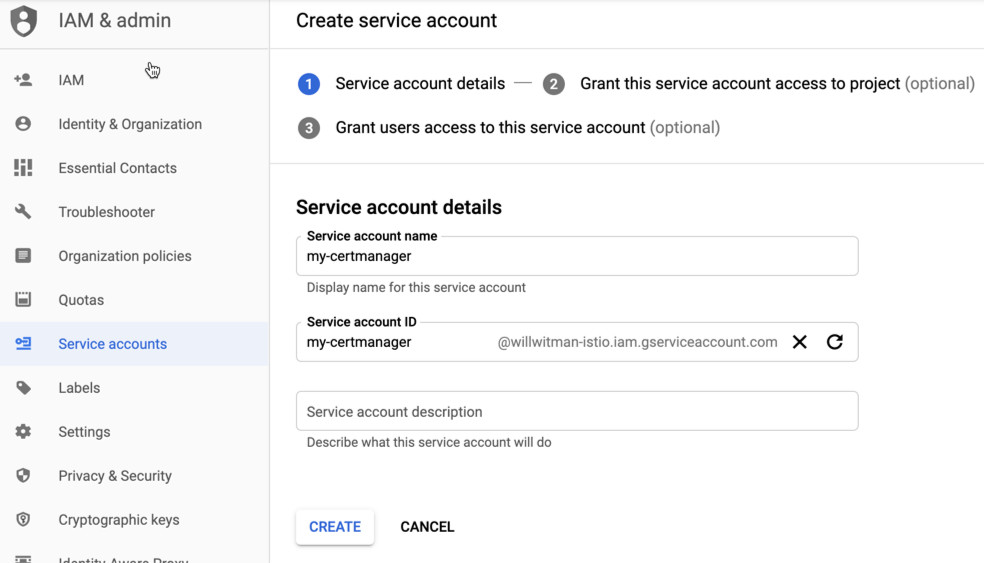
Se quiser, adicione uma descrição no campo Descrição da conta de
serviço. As descrições são úteis para lembrar você sobre como uma conta de serviço específica
é usada.
Clique em Criar
O GCP cria uma nova conta de serviço e exibe a visualização Permissões da
conta de serviço. Use essa visualização para atribuir um papel à sua nova conta de serviço.
Clique na lista suspensa Selecionar um papel.
Selecione o papel Proprietário do projeto.
Clique em Continuar.
Clique em Concluído.
No console do GCP, selecione Compute Engine > Instâncias de VM.
Crie uma instância de VM chamada certmanager.
Na seção "Disco de inicialização", escolha CentOS7 e 20 GB para a
unidade permanente SSD.
Defina a conta de serviço como a que você criou acima.
Instale o Certbot e o plug-in dns_google
na máquina e execute o cliente do Certbot:
Atualize seu arquivo de modificação para apontar para o certificado e a chave privada. Para o
hostAliases, use o nome do DNS que você criou anteriormente.
Exemplo:
...
envs:
- name: test
serviceAccountPaths:
synchronizer: "your_keypath/synchronizer-manager-service-account.json
udca: "your_keypath/analytic-agent-service-account.json
virtualhosts:
- name: my-env-group
sslCertPath: "$HOME/hybrid/apigee-hybrid-setup/tls/fullchain.pem"
sslKeyPath: "$HOME/hybrid/apigee-hybrid-setup/tls/privkey.pem"
mart: # Assuming you are not using Apigee Connect
nodeSelector:
key: cloud.google.com/gke-nodepool
value: apigee-runtime
sslCertPath: "$HOME/hybrid/apigee-hybrid-setup/tls/fullchain.pem"
sslKeyPath: "$HOME/hybrid/apigee-hybrid-setup/tls/privkey.pem"
replicaCountMin: 1
replicaCountMax: 1
Ou se estiver usando o secrets do Kubernetes:
...
envs:
- name: test
serviceAccountPaths:
synchronizer: "your_keypath/synchronizer-manager-service-account.json
udca: "your_keypath/analytic-agent-service-account.json
virtualhosts:
- name: my-env-group
tlsMode: SIMPLE # Note: SIMPLE is the default, MUTUAL is also an available value.
sslSecret: myorg-test-policy-secret"
mart: # Assuming you are not using Apigee Connect
nodeSelector:
key: cloud.google.com/gke-nodepool
value: apigee-runtime
sslSecret: myorg-test-policy-secret"
replicaCountMin: 1
replicaCountMax: 1
...
Aplique as alterações:
Se você alterou a configuração mart, aplique as alterações:
apigeectl apply -f your_overrides_file --all-envs
Se você alterou a configuração envs, aplique as alterações:
[[["Fácil de entender","easyToUnderstand","thumb-up"],["Meu problema foi resolvido","solvedMyProblem","thumb-up"],["Outro","otherUp","thumb-up"]],[["Difícil de entender","hardToUnderstand","thumb-down"],["Informações incorretas ou exemplo de código","incorrectInformationOrSampleCode","thumb-down"],["Não contém as informações/amostras de que eu preciso","missingTheInformationSamplesINeed","thumb-down"],["Problema na tradução","translationIssue","thumb-down"],["Outro","otherDown","thumb-down"]],["Última atualização 2025-08-28 UTC."],[[["\u003cp\u003eThis document provides an example of how to obtain a TLS certificate from Let's Encrypt using Certbot and Google Cloud DNS for use with Apigee hybrid.\u003c/p\u003e\n"],["\u003cp\u003eTLS certificates are required for two Istio ingress gateways: the runtime ingress gateway (which can use self-signed certificates in non-production environments) and the MART ingress gateway.\u003c/p\u003e\n"],["\u003cp\u003eTo obtain TLS certificates, you must have a registered domain name and configure Google Cloud DNS to manage your domain's DNS records.\u003c/p\u003e\n"],["\u003cp\u003eCertbot, along with the dns_google plugin, is used on a Cloud VM to obtain authorized certificates from Let's Encrypt, which are then stored in a directory on the VM.\u003c/p\u003e\n"],["\u003cp\u003eThe authorized certificate files, 'fullchain.pem' and 'privkey.pem', can either be used by directly referencing the file paths in the overrides file or optionally used to create a kubernetes secret.\u003c/p\u003e\n"]]],[],null,["# Obtain TLS certificates: An example\n\n| You are currently viewing version 1.3 of the Apigee hybrid documentation. **This version is end of life.** You should upgrade to a newer version. For more information, see [Supported versions](/apigee/docs/hybrid/supported-platforms#supported-versions).\n\n\nThis topic is intended as an example only. It explains how to obtain a TLS certificate from\nthe certificate authority (CA) [Let's Encrypt](https://letsencrypt.org).\nThese steps are provided primarily as an example to follow if you do not have\nanother ready way to obtain a certificate/key\npair that is authorized by a CA. The example shows how to generate certificates\nusing the [Let's Encrypt](https://letsencrypt.org) CA, the\n[Certbot client](https://certbot.eff.org/about/), and Google Cloud Platform [Cloud DNS](https://cloud.google.com/dns/docs/).\n| **Note:** See also this [Apigee Community article](https://community.apigee.com/articles/86322/free-trusted-ssl-certificates-for-apigee-hybrid-in.html) on using Let's Encrypt with Apigee hybrid.\n\nWhere you can use these certificates\n------------------------------------\n\n\nYou must provide TLS certificates for two Istio ingress gateways that are exposed\noutside the cluster:\n\nSee also [External connections](/apigee/docs/hybrid/v1.3/ports#external).\n\nRequirements\n------------\n\nYou will need a domain name obtained through a domain name registrar. You can register a domain name through\nGoogle Domains or another domain registrar of your choice.\n\nConfigure Cloud DNS\n-------------------\n\nTo obtain authorized TLS certificates, you must have a qualified domain name. The following steps explain how to use [Google Cloud DNS](https://cloud.google.com/dns/) to obtain a domain name and manage your domain servers.\n\n1. Open the [Google Cloud console](https://console.cloud.google.com) and log in with the account you created in [Step 1: Create a Google Cloud account](/apigee/docs/hybrid/v1.3/precog-gcpaccount).\n2. Select the project that you created in [Step 2: Create a GCP project](/apigee/docs/hybrid/v1.3/precog-gcpproject).\n3. If you have not already done so, enable the **Cloud DNS API** . See [Enabling APIs](https://cloud.google.com/apis/docs/getting-started#enabling_apis).\n4. Create a static IP address:\n - If you are on GKE, follow the instructions in [Reserving a static external IP address](https://cloud.google.com/compute/docs/ip-addresses/reserve-static-external-ip-address) to create a static IP addresses that external processes can use to communicate with the hybrid runtime ingress. You can give the address any name you wish, for example: `apigee-hybrid-runtime`. When you finish, you will use the IP number in the cluster configuration in the next step. For example: `34.66.75.196`\n - If you are on Anthos GKE, follow instructions in the [Anthos GKE documentation](/anthos/clusters/docs/on-prem/1.6/how-to/create-admin-cluster#network) to create a static IP address.\n5. Get the External IP you just reserved.\n6. Create record set for the runtime Istio ingress endpoint. This is the address for making API calls to the hybrid gateway. Enter the External IP you obtained in the previous step and add a prefix to the domain name, such as `example-endpoint`. For instructions, see [Create a new record](https://cloud.google.com/dns/docs/set-up-dns-records-domain-name#create_a_new_record).\n 1. Create a managed public zone. For instructions, see [Create a managed public zone](https://cloud.google.com/dns/docs/set-up-dns-records-domain-name#create_a_managed_public_zone).\n 2. Create a new record set with:\n - **DNS Name** : The name of the endpoint external API calls will communicate with, like `\n api-services` or `example-endpoint`\n - **Resource Record Type** : **A**\n - **TTL** and **TTL Unit**: Accept defaults\n - **IP Adddress**: The static IP you created.\n7. The **Zone details** view will list foour DNS servers as the NS data for your new zone. Copy the DNS record data, as shown in the following example:\n\n8. Return to your domain page at your registrar (for example, [Google\n Domains](https://domains.google.com)).\n9. Select your domain.\n10. Select **DNS**.\n11. In the Name Servers section, click **Edit**.\n12. Enter the domain name servers that you copied from the Network Services Cloud DNS\n page. For example:\n\n\nNow, your Google Cloud DNS will manage the DNS records for your domain.\n\nInstall Certbot on a VM\n-----------------------\n\n\nNow that you have Cloud DNS set up to manage your domain servers, you will install the\nCertbot client with the\n[dns_google](https://certbot-dns-google.readthedocs.io/en/stable/) plugin on a Cloud VM. The client enables\nyou to get authorized certificates for your domain from a Let's Encrypt endpoint.\n\n1. Open the [Google Cloud console](https://console.cloud.google.com) and log in with the account you created in [Step 1: Create a Google Cloud account](/apigee/docs/hybrid/v1.3/precog-gcpaccount).\n2. Select the project that you created in [Step 2: Create a GCP project](/apigee/docs/hybrid/v1.3/precog-gcpproject).\n3. Select **IAM \\& admin \\\u003e Service accounts** .\n\n The **Service accounts view** displays a list of the project's service accounts.\n4. To create a new service account, click **+Create Service Account** at the top of the view.\n\n The **Service account details** view displays.\n5. In the **Service account name** field, enter the name of the service account.\n\n You can optionally add a description in the **Service account description**\n field. Descriptions are helpful at reminding you what a particular service account is used\n for.\n6. Click **Create** .\n\n GCP creates a new service account and displays the **Service account\n permissions** view. Use this view to assign a role to your new service account.\n7. Click the **Select a role** drop-down list.\n8. Select the **Project Owner** role.\n9. Click **Continue**.\n10. Click **Done**.\n11. In the GCP console, select **Compute Engine \\\u003e VM Instances**.\n12. Create a VM instance named **certmanager**.\n13. Under the Boot Disk section, choose CentOS7 and 20 GB for the SSD persistent drive.\n14. Set the Service Account to the one you created above.\n15. Install Certbot and the [dns_google](https://certbot-dns-google.readthedocs.io/en/stable/) plugin on the machine and run the Certbot client: \n\n sudo su -\n yum -y install yum-utils\n yum install certbot -y\n yum install certbot-dns-google -y\n certbot certonly --dns-google -d *.\u003cvar translate=\"no\"\u003eyour_domain_name\u003c/var\u003e,*.\u003cvar translate=\"no\"\u003eyour_domain_name\u003c/var\u003e --server https://acme-v02.api.letsencrypt.org/directory\n \n\n For example: \n\n sudo su -\n yum -y install yum-utils\n yum install certbot -y\n yum install certbot-dns-google -y\n certbot certonly --dns-google -d *.apigee-hybrid-docs.net,*.apigee-hybrid-docs.net --server https://acme-v02.api.letsencrypt.org/directory\n\n16. You can now find your authorized certificate and private key files in this directory: `cd /etc/letsencrypt/live/`\u003cvar translate=\"no\"\u003eyour_domain_name\u003c/var\u003e`/`\n\n\n For example: \n\n cd /etc/letsencrypt/live/apigee-hybrid-docs.net\n ls\n cert.pem chain.pem fullchain.pem privkey.pem README\n\n17. Copy the files `fullchain.pem` and `privkey.pem` to your local machine.\n18. *Optional* : Create a Kubernetes secret with the certificate/key pair. See the instructions in [Option 2: Kubernetes Secret](/apigee/docs/hybrid/v1.3/ingress-tls#option-2:-kubernetes-secret) in [Configuring TLS and mTLS on the Istio ingress](/apigee/docs/hybrid/v1.3/ingress-tls).\n19. Update your overrides file to point to the certificate and private key. For the `hostAliases`, use the DNS name that you created previously.\n\n\n For example: \n\n ```\n ...\n envs:\n - name: test\n serviceAccountPaths:\n synchronizer: \"your_keypath/synchronizer-manager-service-account.json\n udca: \"your_keypath/analytic-agent-service-account.json\n\n virtualhosts:\n - name: my-env-group\n sslCertPath: \"$HOME/hybrid/apigee-hybrid-setup/tls/fullchain.pem\"\n sslKeyPath: \"$HOME/hybrid/apigee-hybrid-setup/tls/privkey.pem\"\n\n mart: # Assuming you are not using Apigee Connect\n nodeSelector:\n key: cloud.google.com/gke-nodepool\n value: apigee-runtime\n sslCertPath: \"$HOME/hybrid/apigee-hybrid-setup/tls/fullchain.pem\"\n sslKeyPath: \"$HOME/hybrid/apigee-hybrid-setup/tls/privkey.pem\"\n replicaCountMin: 1\n replicaCountMax: 1\n ```\n\n\n Or if using Kubernetes secrets: \n\n ```\n ...\n envs:\n - name: test\n serviceAccountPaths:\n synchronizer: \"your_keypath/synchronizer-manager-service-account.json\n udca: \"your_keypath/analytic-agent-service-account.json\n\n virtualhosts:\n - name: my-env-group\n tlsMode: SIMPLE # Note: SIMPLE is the default, MUTUAL is also an available value.\n sslSecret: myorg-test-policy-secret\"\n\n mart: # Assuming you are not using Apigee Connect\n nodeSelector:\n key: cloud.google.com/gke-nodepool\n value: apigee-runtime\n sslSecret: myorg-test-policy-secret\"\n replicaCountMin: 1\n replicaCountMax: 1\n\n ... \n ```\n20. Apply the changes:\n If you changed the `mart` configuration, apply the changes:\n\n ```\n apigeectl apply -f your_overrides_file --all-envs\n ```\n\n\n If you changed the `envs` configuration, apply the changes: \n\n ```\n apigeectl apply -f your_overrides_file --all-envs\n ```\n\nTest the configuration\n----------------------\n\n21. Deploy and test a proxy, as explained in [Create and deploy a new API proxy](/apigee/docs/hybrid/v1.3/test-new-proxy)."]]