Apigee hybrid requires that you have a Google Cloud project, which you can create after you
create a Google Cloud account.
This section describes how to create a new Google Cloud project. If you want to use an existing Google Cloud
project (of which you are an owner) with hybrid, skip to Step 3: Enable APIs.
Click the Project Selector at the top of the view.
The Project Selector dialog box displays:
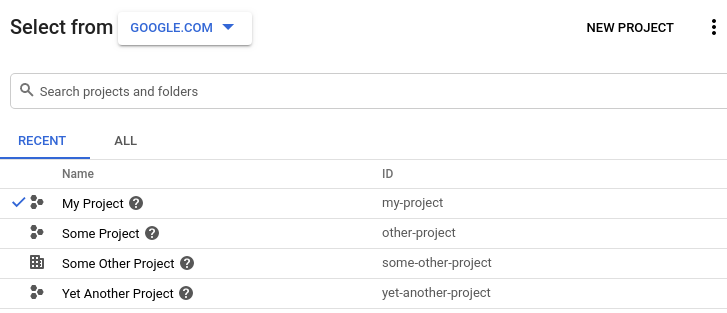
Click New Project in the upper right.
The New Project view displays.
Enter a friendly name for your project in the Project name field.
Google Cloud Platform generates a corresponding project ID below the Project name field, as
the following example shows:
You can change the generated project ID by clicking Edit, but the project
ID must be unique.
Take note of the project ID. You will use it later in this setup process.
In the Billing account field, select the account that you will use to pay
for your project. If you do not yet have a paid or trial account, contact Apigee Sales.
In the Location field, select a folder for your project. Folders are an
optional part of the Google Cloud Platform project resource tree.
Click Create.
Google Cloud Platform creates your new project.
After you create your project, you must enable the Apigee API to it, as described in the next
step.
[[["Easy to understand","easyToUnderstand","thumb-up"],["Solved my problem","solvedMyProblem","thumb-up"],["Other","otherUp","thumb-up"]],[["Hard to understand","hardToUnderstand","thumb-down"],["Incorrect information or sample code","incorrectInformationOrSampleCode","thumb-down"],["Missing the information/samples I need","missingTheInformationSamplesINeed","thumb-down"],["Other","otherDown","thumb-down"]],["Last updated 2025-08-29 UTC."],[[["\u003cp\u003eThe current Apigee hybrid documentation version (1.2) is end-of-life and requires an upgrade to a newer version for continued support.\u003c/p\u003e\n"],["\u003cp\u003eSetting up Apigee hybrid requires a Google Cloud project, which can be newly created or an existing project (of which you are an owner) can be used.\u003c/p\u003e\n"],["\u003cp\u003eCreating a new Google Cloud project involves accessing the Google Cloud console, entering a unique project name and ID, selecting a billing account, choosing a location folder, and then creating the project.\u003c/p\u003e\n"],["\u003cp\u003eThe project ID cannot be altered once the project is created, so it is an important step to note the ID.\u003c/p\u003e\n"],["\u003cp\u003eAfter creating the Google Cloud Project, the Apigee API must be enabled, as per the next step.\u003c/p\u003e\n"]]],[],null,["# Step 2: Create a Google Cloud project\n\n| You are currently viewing version 1.2 of the Apigee hybrid documentation. **This version is end of life.** You should upgrade to a newer version. For more information, see [Supported versions](/apigee/docs/hybrid/supported-platforms#supported-versions).\n\nApigee hybrid requires that you have a project, which you can create after you\ncreate a Google Cloud account.\n\nThis section describes how to create a new Google Cloud project. If you want to use an existing Google Cloud\nproject (of which you are an owner) with hybrid, skip to [Step 3: Enable APIs](/apigee/docs/hybrid/v1.2/precog-enableapi).\n\n**To create a new Google Cloud project:**\n\n1. Open the [Google Cloud console](https://console.cloud.google.com) and log in with the account you created in [Step 1: Create a Google Cloud account](/apigee/docs/hybrid/v1.2/precog-gcpaccount).\n2. Click the **Project Selector** at the top of the view.\n\n The **Project Selector** dialog box displays:\n\n3. Click **New Project** in the upper right.\n\n The **New Project** view displays.\n4. Enter a friendly name for your project in the **Project name** field.\n\n Google Cloud Platform generates a corresponding project ID below the **Project name** field, as\n the following example shows:\n\n You can change the generated project ID by clicking **Edit**, but the project\n ID must be unique.\n\n Take note of the **project ID**. You will use it later in this setup process.\n | **NOTE:** After you create the project, you *cannot* change the project ID.\n5. In the **Billing account** field, select the account that you will use to pay for your project. If you do not yet have a paid or trial account, contact [Apigee Sales](https://pages.apigee.com/contact-sales-reg.html).\n6. In the **Location** field, select a folder for your project. Folders are an optional part of the Google Cloud Platform project resource tree.\n7. Click **Create**.\n\n Google Cloud Platform creates your new project.\n\nAfter you create your project, you must enable the Apigee API to it, as described in the next\nstep.\n[1](/apigee/docs/hybrid/v1.2/precog-gcpaccount) [2](/apigee/docs/hybrid/v1.2/precog-gcpproject) [(NEXT) Step 3: Enable APIs](/apigee/docs/hybrid/v1.2/precog-enableapi) [4](/apigee/docs/hybrid/v1.2/precog-provision) [5](/apigee/docs/hybrid/v1.2/precog-add-environment)\n\n\u003cbr /\u003e\n\n*[Google Cloud]: Google Cloud"]]