Esta página se aplica à Apigee e à Apigee híbrida.
Confira a documentação da
Apigee Edge.
![]()
Configure a navegação para vincular as páginas que você desenvolveu ao seu portal, conforme descrito nas seções a seguir.
Explorar a página "Menus"
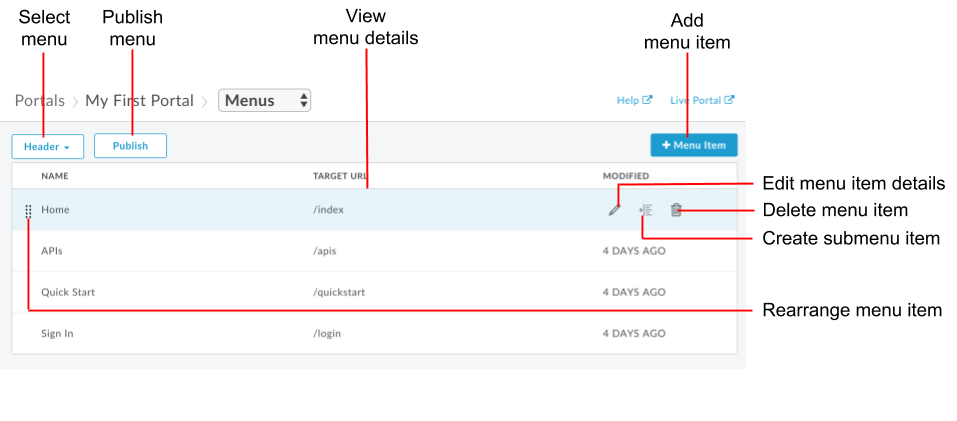
Configure e publique os menus de navegação no seu portal usando o editor do menu de navegação na página "Menus".
Para acessar a página "Menus":
IU do Console do Cloud
- No console do Apigee no Cloud, acesse a página Distribuição > Portais.
Acessar "Portais" - Clique no seu portal.
Clique em Menus.


IU clássica
- Selecione Publicar > Portais na barra de navegação lateral, escolha seu portal e clique em Menus na página de destino.
Ao editar o portal, selecione Menus no menu suspenso na barra de navegação superior.

Com o editor de menu de navegação, é possível:
- selecionar o menu que você quer editar (cabeçalho ou rodapé) e visualizar os detalhes do item do menu;
- adicionar itens a um menu de navegação;
- criar submenus;
- editar ou excluir um item de menu;
- reorganizar itens de menu;
- Publicar um menu
Sobre os menus de navegação padrão
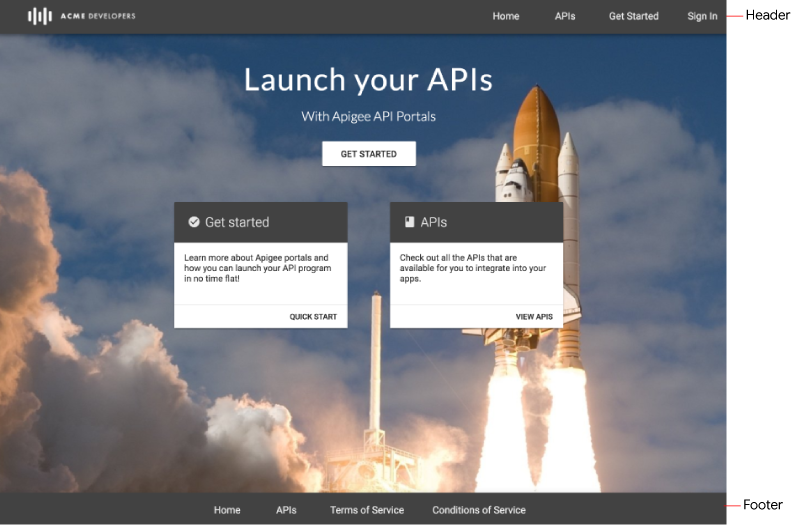
Dois menus de navegação são fornecidos por padrão: Cabeçalho e Rodapé. Os menus de navegação padrão aparecem e contêm um link para o conjunto de páginas iniciais fornecido, conforme mostrado na figura a seguir.

Como adicionar itens a um menu de navegação
Para adicionar um item a um menu de navegação:
- Acessar a página "Menus".
- Selecione o menu que você quer editar na lista suspensa (cabeçalho ou rodapé).
- Clique em + Item do menu.
Na caixa de diálogo do menu de navegação, insira os seguintes detalhes:
Campo Descrição Obrigatório? Nome Nome do item de menu conforme ele aparecerá no portal. Esse valor pode ser diferente do nome real da página. Sim URL ou caminho da página Insira um URL absoluto para uma página externa, um URL absoluto ou relativo para uma página no seu portal ou clique no campo de texto e selecione uma página no seu portal na lista suspensa. Sim Clique em Criar.
Clique em Publicar para publicar as alterações no portal ao vivo.
Como reorganizar os itens de menu
Para reorganizar um item em um menu de navegação:
- Acessar a página "Menus".
- Selecione o menu que você quer editar na lista suspensa.
Mova o item de menu.
IU do Console do Cloud
Clique na seta para cima em uma linha para mover o item para cima. Ou clique na seta para baixo em uma linha para mover o item para baixo.
IU clássica
- Posicione o cursor sobre o item de menu que você quer mover para exibir as ações.
- Clique e mantenha o botão do mouse pressionado sobre
 , à esquerda do nome do item.
 - Arraste o item de menu para o novo local na lista de itens do menu e solte o botão do mouse.
Clique em Publicar para publicar as alterações no portal ao vivo.
Como criar um submenu
Um submenu é exibido como um menu suspenso quando você sobrepõe o item pai.

Para criar um submenu:
- Acessar a página "Menus".
- Selecione o menu que você quer editar na lista suspensa.
- Adicione um item de menu que servirá como menu principal.
- Adicione outros itens de menu que servirão como submenus.
- Reorganize os itens de submenu para que eles estejam no menu pai na ordem que você quer que eles apareçam no menu.
Mude um item de menu para um submenu.
IU do Console do Cloud
Clique em Mais e em Converter em item de submenu.
Para mover um item de submenu de volta para a hierarquia de menu de nível superior:
Clique em Mais e em Converter para item de nível superior.
IU clássica
Posicione o cursor sobre o item de menu que você quer adicionar como um submenu e clique em
 para recuar os itens do submenu um nível no menu pai.
Para mover um item de submenu de volta para a hierarquia de menu de nível superior, clique em
 .
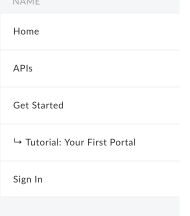
.A figura a seguir mostra como um item de submenu aparece na lista de menus:

Clique em Publicar para publicar as alterações no portal ao vivo.
Como editar um item do menu de navegação
Para editar um item no menu de navegação:
- Acessar a página "Menus".
- Selecione o menu que você quer editar na lista suspensa.
Abra o editor.
IU do Console do Cloud
No item que você quer editar, clique em Mais, Editar.
IU clássica
Posicione o cursor sobre o item de menu que você quer editar e clique em
 .
.Edite os detalhes do item de menu.
Clique em Salvar.
Clique em Publicar para publicar as alterações no portal ao vivo.
Como publicar um menu de navegação
Para publicar um menu de navegação:
- Acessar a página "Menus".
- Selecione o menu que você quer publicar na lista suspensa.
- Clique em Publicar para publicar o menu de navegação.
Como excluir um item de um menu de navegação
Para excluir um item de um menu de navegação:
- Acessar a página "Menus".
- Selecione o menu que você quer editar na lista suspensa.
Exclua o item do cardápio.
IU do Console do Cloud
No item que você quer excluir, clique em Mais, Excluir.
IU clássica
- Posicione o cursor sobre o item de menu na lista para exibir o menu de ações.
- Clique em
 .
.
Clique em Excluir para confirmar a operação de exclusão.
Clique em Publicar para publicar as alterações no portal ao vivo.
Como personalizar os itens de menu e a barra de navegação
Personalize o tamanho da fonte e o estilo dos itens de menu e outros aspectos da aparência da barra de navegação, conforme descrito em Como personalizar a barra de ferramentas de navegação.

