Mit Sammlungen den Überblick behalten
Sie können Inhalte basierend auf Ihren Einstellungen speichern und kategorisieren.
Nutzerverwaltete Notebookinstanz mithilfe der Google Cloud Console erstellen
In diesem Artikel wird gezeigt, wie Sie mithilfe der Google Cloud Console eine nutzerverwaltete Notebookinstanz von Vertex AI Workbench erstellen und JupyterLab öffnen.
Auf dieser Seite wird auch beschrieben, wie Sie eine vom Nutzer verwaltete Notebook-Instanz beenden, starten, zurücksetzen oder löschen.
Eine detaillierte Anleitung dazu finden Sie direkt in der Google Cloud Console. Klicken Sie dazu einfach auf Anleitung:
Sign in to your Google Cloud account. If you're new to
Google Cloud,
create an account to evaluate how our products perform in
real-world scenarios. New customers also get $300 in free credits to
run, test, and deploy workloads.
In the Google Cloud console, on the project selector page,
select or create a Google Cloud project.
Nach Abschluss der in diesem Dokument beschriebenen Aufgaben können Sie weitere Kosten vermeiden, indem Sie die erstellten Ressourcen löschen. Weitere Informationen finden Sie unter Bereinigen.
JupyterLab öffnen
Nachdem Sie die Instanz erstellt haben, startet Vertex AI Workbench die Instanz automatisch. Sobald die Instanz einsatzbereit ist, aktiviert Vertex AI Workbench den Link JupyterLab öffnen.
Klicken Sie neben dem Namen der nutzerverwalteten Notebooks-Instanz auf JupyterLab öffnen.
Ihre nutzerverwaltete Notebooks-Instanz öffnet JupyterLab.
Neue Notebook-Datei öffnen
Wählen Sie File > New > Notebook aus.
Wählen Sie im Dialogfeld Select Kernel die Option Python 3 aus und klicken Sie dann auf Select.
Ihre neue Notebookdatei wird geöffnet.
Kernel ändern
Sie können den Kernel Ihrer JupyterLab-Notebookdatei über das Menü oder in der Datei ändern.
Menü
Klicken Sie in JupyterLab im Menü Kernel auf Change Kernel.
Wählen Sie im Dialogfeld Select Kernel einen weiteren Kernel aus, der verwendet werden soll, und klicken Sie dann auf Select.
In der Datei
Klicken Sie in Ihrer JupyterLab-Notebookdatei auf den Kernel-Namen.
Wählen Sie im Dialogfeld Select Kernel einen weiteren Kernel aus, der verwendet werden soll, und klicken Sie dann auf Select.
Instanz beenden
Rufen Sie in der Google Cloud Console die Seite Nutzerverwaltete Notebooks auf.
Wählen Sie die Instanz aus, die Sie starten möchten.
Klicken Sie auf play_arrowStart.
Instanz zurücksetzen
Durch das Zurücksetzen einer Instanz wird das Löschen des Speicherinhalts Ihrer virtuellen Maschine (VM) erzwungen und die VM auf ihren Ausgangszustand zurückgesetzt.
Weitere Informationen finden Sie unter VM zurücksetzen.
Rufen Sie in der Google Cloud Console die Seite Nutzerverwaltete Notebooks auf.
Wählen Sie die Instanz aus, die Sie zurücksetzen möchten.
Klicken Sie auf Zurücksetzen.
Bereinigen
Mit den folgenden Schritten vermeiden Sie, dass Ihrem Google Cloud-Konto die in dieser Anleitung verwendeten Ressourcen in Rechnung gestellt werden:
Wenn Sie ein neues Projekt erstellt haben, um mehr über nutzerverwaltete Vertex-AI-Workbench-Notebooks zu erfahren, und dieses Projekt nicht mehr benötigen, sollten Sie es löschen.
Wenn Sie ein vorhandenes Google Cloud-Projekt verwendet haben, löschen Sie die von Ihnen erstellten Ressourcen. So vermeiden Sie, dass Ihrem Konto Gebühren in Rechnung gestellt werden:
Rufen Sie in der Google Cloud Console die Seite Nutzerverwaltete Notebooks auf.
Wählen Sie die Zeile aus, die die zu löschende Instanz enthält.
Klicken Sie auf deleteLöschen.
Je nach Größe des Fensters befindet sich die Schaltfläche Löschen möglicherweise im Optionsmenü more_vert.
Klicken Sie zur Bestätigung auf Löschen.
Nächste Schritte
Beachten Sie die Anleitungen, die in Ihrer neuen nutzerverwalteten Notebooks-Instanz enthalten sind.
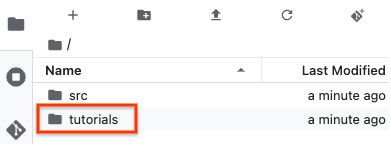
Im JupyterLab folderDateibrowser öffnen Sie den Ordner Tutorials und eine der Notebookdateien.
[[["Leicht verständlich","easyToUnderstand","thumb-up"],["Mein Problem wurde gelöst","solvedMyProblem","thumb-up"],["Sonstiges","otherUp","thumb-up"]],[["Schwer verständlich","hardToUnderstand","thumb-down"],["Informationen oder Beispielcode falsch","incorrectInformationOrSampleCode","thumb-down"],["Benötigte Informationen/Beispiele nicht gefunden","missingTheInformationSamplesINeed","thumb-down"],["Problem mit der Übersetzung","translationIssue","thumb-down"],["Sonstiges","otherDown","thumb-down"]],["Zuletzt aktualisiert: 2025-08-18 (UTC)."],[],[],null,["# Quickstart: Create a user-managed notebooks instance by using the Google Cloud console\n\nCreate a user-managed notebooks instance\nby using the Google Cloud console\n==========================================================================\n\n\n| Vertex AI Workbench user-managed notebooks is\n| [deprecated](/vertex-ai/docs/deprecations). On\n| April 14, 2025, support for\n| user-managed notebooks will end and the ability to create user-managed notebooks instances\n| will be removed. Existing instances will continue to function\n| but patches, updates, and upgrades won't be available. To continue using\n| Vertex AI Workbench, we recommend that you\n| [migrate\n| your user-managed notebooks instances to Vertex AI Workbench instances](/vertex-ai/docs/workbench/user-managed/migrate-to-instances).\n\n\u003cbr /\u003e\n\nLearn how to create\na Vertex AI Workbench user-managed notebooks instance\nand open JupyterLab by using the Google Cloud console.\nThis page also describes how to stop, start, reset, or delete\na user-managed notebooks instance.\n\n*** ** * ** ***\n\nTo follow step-by-step guidance for this task directly in the\nGoogle Cloud console, click **Guide me**:\n\n[Guide me](https://console.cloud.google.com/freetrial?redirectPath=/?walkthrough_id=vertex-ai--workbench--user-managed--create-user-managed-notebooks-instance-console-quickstart)\n\n*** ** * ** ***\n\n\u003cbr /\u003e\n\nBefore you begin\n----------------\n\n- Sign in to your Google Cloud account. If you're new to Google Cloud, [create an account](https://console.cloud.google.com/freetrial) to evaluate how our products perform in real-world scenarios. New customers also get $300 in free credits to run, test, and deploy workloads.\n- In the Google Cloud console, on the project selector page,\n select or create a Google Cloud project.\n\n | **Note**: If you don't plan to keep the resources that you create in this procedure, create a project instead of selecting an existing project. After you finish these steps, you can delete the project, removing all resources associated with the project.\n\n [Go to project selector](https://console.cloud.google.com/projectselector2/home/dashboard)\n-\n [Verify that billing is enabled for your Google Cloud project](/billing/docs/how-to/verify-billing-enabled#confirm_billing_is_enabled_on_a_project).\n\n-\n\n\n Enable the Notebooks API.\n\n\n [Enable the API](https://console.cloud.google.com/flows/enableapi?apiid=notebooks.googleapis.com&redirect=https://console.cloud.google.com)\n\n- In the Google Cloud console, on the project selector page,\n select or create a Google Cloud project.\n\n | **Note**: If you don't plan to keep the resources that you create in this procedure, create a project instead of selecting an existing project. After you finish these steps, you can delete the project, removing all resources associated with the project.\n\n [Go to project selector](https://console.cloud.google.com/projectselector2/home/dashboard)\n-\n [Verify that billing is enabled for your Google Cloud project](/billing/docs/how-to/verify-billing-enabled#confirm_billing_is_enabled_on_a_project).\n\n-\n\n\n Enable the Notebooks API.\n\n\n [Enable the API](https://console.cloud.google.com/flows/enableapi?apiid=notebooks.googleapis.com&redirect=https://console.cloud.google.com)\n\n\u003cbr /\u003e\n\nCreate an instance\n------------------\n\n1. In the Google Cloud console, go to the **User-managed notebooks** page.\n\n [Go to User-managed notebooks](https://console.cloud.google.com/vertex-ai/workbench/user-managed)\n2. Click add_box **Create new**.\n\n3. For **Name** , enter `my-instance`.\n\n4. Click **Create**.\n\nWhen you finish the tasks that are described in this document, you can avoid\ncontinued billing by deleting the resources that you created. For more information, see\n[Clean up](#clean-up).\n\nOpen JupyterLab\n---------------\n\nAfter you create your instance, Vertex AI Workbench automatically starts\nthe instance. When the instance is ready to use, Vertex AI Workbench\nactivates an **Open JupyterLab** link.\n\n1. Next to your user-managed notebooks instance's name,\n click **Open JupyterLab**.\n\n Your user-managed notebooks instance opens JupyterLab.\n\nOpen a new notebook file\n------------------------\n\n1. Select **File \\\u003e New \\\u003e Notebook**.\n\n2. In the **Select Kernel** dialog, select **Python 3** ,\n and then click **Select**.\n\n3. Your new notebook file opens.\n\nChange the kernel\n-----------------\n\nYou can change the kernel of your JupyterLab notebook file from the menu\nor in the file. \n\n### Menu\n\n1. In JupyterLab, on the **Kernel** menu, click **Change kernel**.\n\n2. In the **Select Kernel** dialog, select another kernel to use\n and then click **Select**.\n\n### In the file\n\n1. In your JupyterLab notebook file, click the kernel name.\n\n2. In the **Select Kernel** dialog, select another kernel to use\n and then click **Select**.\n\nStop your instance\n------------------\n\n1. In the Google Cloud console, go to the **User-managed notebooks** page.\n\n [Go to User-managed notebooks](https://console.cloud.google.com/vertex-ai/workbench/user-managed)\n2. Select the instance that you want to stop.\n\n3. Click stop **Stop**.\n\nStart your instance\n-------------------\n\n1. In the Google Cloud console, go to the **User-managed notebooks** page.\n\n [Go to User-managed notebooks](https://console.cloud.google.com/vertex-ai/workbench/user-managed)\n2. Select the instance that you want to start.\n\n3. Click play_arrow **Start**.\n\nReset your instance\n-------------------\n\nResetting a compute instance forcibly wipes the memory contents of your instance\nand resets the instance to its initial state. To learn more about how resetting\nan instance works, see\n[Resetting an instance](/compute/docs/instances/suspend-stop-reset-instances-overview#resetting-instance).\n\n1. In the Google Cloud console, go to the **User-managed notebooks** page.\n\n [Go to User-managed notebooks](https://console.cloud.google.com/vertex-ai/workbench/user-managed)\n2. Select the instance that you want to reset.\n\n3. Click\n\n **Reset** , and then click **Reset** to confirm.\n\nClean up\n--------\n\n\nTo avoid incurring charges to your Google Cloud account for\nthe resources used on this page, follow these steps.\n\nIf you created a new project to learn about\nVertex AI Workbench user-managed notebooks\nand you no longer need the project, then\n[delete the project](https://console.cloud.google.com/cloud-resource-manager).\n\nIf you used an existing Google Cloud project, then delete the resources\nyou created to avoid incurring charges to your account:\n\n1. In the Google Cloud console, go to the **User-managed notebooks** page.\n\n [Go to User-managed notebooks](https://console.cloud.google.com/vertex-ai/workbench/user-managed)\n2. Select the row containing the instance that you want to delete.\n\n3. Click delete **Delete** .\n (Depending on the size of your window,\n the **Delete** button might be in\n the more_vert options menu.)\n\n4. To confirm, click **Delete**.\n\nWhat's next\n-----------\n\n- Try one of the tutorials that is included\n in your new user-managed notebooks instance.\n In the JupyterLab\n folder **File Browser** ,\n open the **tutorials** folder,\n and open one of the notebook files.\n\n- [Read the Introduction to user-managed notebooks](/vertex-ai/docs/workbench/user-managed/introduction).\n\n- [Create a user-managed notebooks instance\n with specific properties](/vertex-ai/docs/workbench/user-managed/create-new#create-with-options)."]]