Auf jeder Seite wird davon ausgegangen, dass Sie die Anleitung auf den vorherigen Seiten des Leitfadens bereits ausgeführt haben.
Im weiteren Verlauf dieses Dokuments wird davon ausgegangen, dass Sie dieselbe Cloud Shell-Umgebung verwenden, die Sie erstellt haben, wenn Sie der ersten Seite dieser Anleitung gefolgt sind. Wenn Ihre ursprüngliche Cloud Shell-Sitzung nicht mehr geöffnet ist, können Sie mit folgenden Schritten zur Umgebung zurückkehren:
In the Google Cloud console, activate Cloud Shell.
Führen Sie in der Cloud Shell-Sitzung den folgenden Befehl aus:
cdhello-custom-sample
Endpunkt erstellen
Erstellen Sie einen Vertex AI-Endpunkt, um Onlinevorhersagen aus dem ML-Modell abzurufen, das Sie zuvor auf der vorherigen Seite dieser Anleitung trainiert haben.
Endpoints stellt Onlinevorhersagen aus einem oder mehreren Modellen bereit.
Rufen Sie in der Google Cloud Console im Bereich „Vertex AI“ die Seite Modelle auf.
Suchen Sie die Zeile des Modells, hello_custom, das Sie im vorherigen Schritt dieser Anleitung trainiert haben, und klicken Sie auf den Namen des Modells, um die Detailseite des Modells zu öffnen.
Klicken Sie auf dem Tab Bereitstellen und testen auf Auf Endpunkt bereitstellen, um den Bereich Auf Endpunkt bereitstellen zu öffnen.
Fügen Sie im Schritt Endpunkt definieren einige grundlegende Informationen für den Endpunkt hinzu:
Wählen Sie Neuen Endpunkt erstellen aus.
Geben Sie im Feld Endpunktnamehello_custom ein.
Prüfen Sie im Abschnitt Modelleinstellungen, ob der Name Ihres Modells mit dem Namen hello_custom angezeigt wird. Geben Sie die folgenden Modelleinstellungen an:
Geben Sie im Feld Trafficaufteilung den Wert 100 ein. Vertex AI unterstützt das Aufteilen des Traffics für einen Endpunkt in mehrere Modelle. In dieser Anleitung wird diese Funktion jedoch nicht verwendet.
Geben Sie im Feld Mindestanzahl von Knoten den Wert 1 ein.
Wählen Sie in der Drop-down-Liste Maschinentyp die Option n1-standard-2 aus dem Abschnitt Standard aus.
Klicken Sie auf Fertig.
Prüfen Sie im Abschnitt Logging, ob beide Arten von Vorhersage-Logging aktiviert sind.
Klicken Sie auf Weiter.
Bestätigen Sie im Schritt Endpunktdetails, dass der Endpunkt in us-central1 (Iowa) bereitgestellt wird.
Klicken Sie nicht das Kästchen Vom Kunden verwalteten Verschlüsselungsschlüssel verwenden an.
In dieser Anleitung wird CMEK nicht verwendet.
Klicken Sie auf Bereitstellen, um den Endpunkt zu erstellen und Ihr Modell auf dem Endpunkt bereitzustellen.
Nach einigen Minuten wird in der Tabelle Endpoints neben dem neuen Endpunkt check_circle angezeigt. Gleichzeitig erhalten Sie eine E-Mail, in der Sie darüber informiert werden, dass Sie den Endpunkt erstellt und Ihr Modell auf dem Endpunkt bereitgestellt haben.
Cloud Run-Funktion bereitstellen
Sie können Vorhersagen aus dem soeben erstellten Vertex AI-Endpunkt abrufen, indem Sie Anfragen an die REST-Schnittstelle der Vertex AI API senden. Allerdings können nur Hauptkonten mit der Berechtigung aiplatform.endpoints.predict Anfragen für Onlinevorhersagen senden. Sie können den Endpunkt nicht für jeden freigeben, der Anfragen senden kann, z. B. über eine Webanwendung.
In diesem Abschnitt stellen Sie Code für Cloud Run Functions bereit, um nicht authentifizierte Anfragen zu verarbeiten. Der Beispielcode, den Sie beim Lesen der ersten Seite dieser Anleitung heruntergeladen haben, enthält Code für diese Cloud Run Functions-Funktion im Verzeichnis function/. Führen Sie optional den folgenden Befehl aus, um sich den Cloud Run Functions-Code anzusehen:
lessfunction/main.py
Die Bereitstellung der Funktion dient folgenden Zwecken:
Sie können eine Cloud Run Functions-Funktion so konfigurieren, dass sie nicht authentifizierte Anfragen empfängt. Außerdem werden Funktionen mit einem Dienstkonto mit der Rolle "Bearbeiter" ausgeführt. Dieses Feature enthält die Berechtigung aiplatform.endpoints.predict, die erforderlich ist, um Vorhersagen von Ihrem Vertex AI-Endpunkt abzurufen.
Diese Funktion führt auch eine sinnvolle Vorverarbeitung von Anfragen durch. Der Vertex AI-Endpunkt erwartet Vorhersageanfragen im Format der ersten Schicht der TensorFlow Keras-Grafik: einen Tensor der normalisierten floats mit festen Abmessungen. Die Funktion nimmt die URL eines Bildes als Eingabe an und verarbeitet das Bild in dieses Format, bevor eine Vorhersage vom Vertex AI-Endpunkt angefordert wird.
So stellen Sie die Cloud Run Functions-Funktion bereit:
Rufen Sie in der Google Cloud Console im Abschnitt „Vertex AI“ die Seite Endpunkte auf.
Suchen Sie die Zeile des Endpunkts, die Sie im vorherigen Abschnitt erstellt haben und den Namen hello_custom erhalten. Klicken Sie in dieser Zeile auf Beispielanfrage, um den Bereich Beispielanfrage zu öffnen.
Suchen Sie im Bereich Beispielanfrage nach der Zeile des Shell-Codes, der dem folgenden Muster entspricht:
ENDPOINT_ID="ENDPOINT_ID"
ENDPOINT_ID ist eine Zahl, die diesen Endpunkt identifiziert.
Kopieren Sie diese Codezeile und führen Sie sie in Ihrer Cloud Shell-Sitzung aus, um die Variable ENDPOINT_ID festzulegen.
Führen Sie in Ihrer Cloud Shell-Sitzung den folgenden Befehl aus, um die Cloud Run Functions-Funktion bereitzustellen:
Eine Webanwendung zum Senden von Vorhersageanfragen bereitstellen
Hosten Sie schließlich eine statische Webanwendung in Cloud Storage, um Vorhersagen aus Ihrem trainierten ML-Modell zu erhalten. Die Webanwendung sendet Anfragen an Ihre Cloud Run Functions-Funktion, die sie vorverarbeitet und Vorhersagen vom Vertex AI-Endpunkt abruft.
Das Verzeichnis webapp des heruntergeladenen Beispielcodes enthält eine Beispiel-Webanwendung. Führen Sie in Ihrer Cloud Shell-Sitzung die folgenden Befehle aus, um die Webanwendung vorzubereiten und bereitzustellen:
Legen Sie einige Shell-Variablen für Befehle in den folgenden Schritten fest:
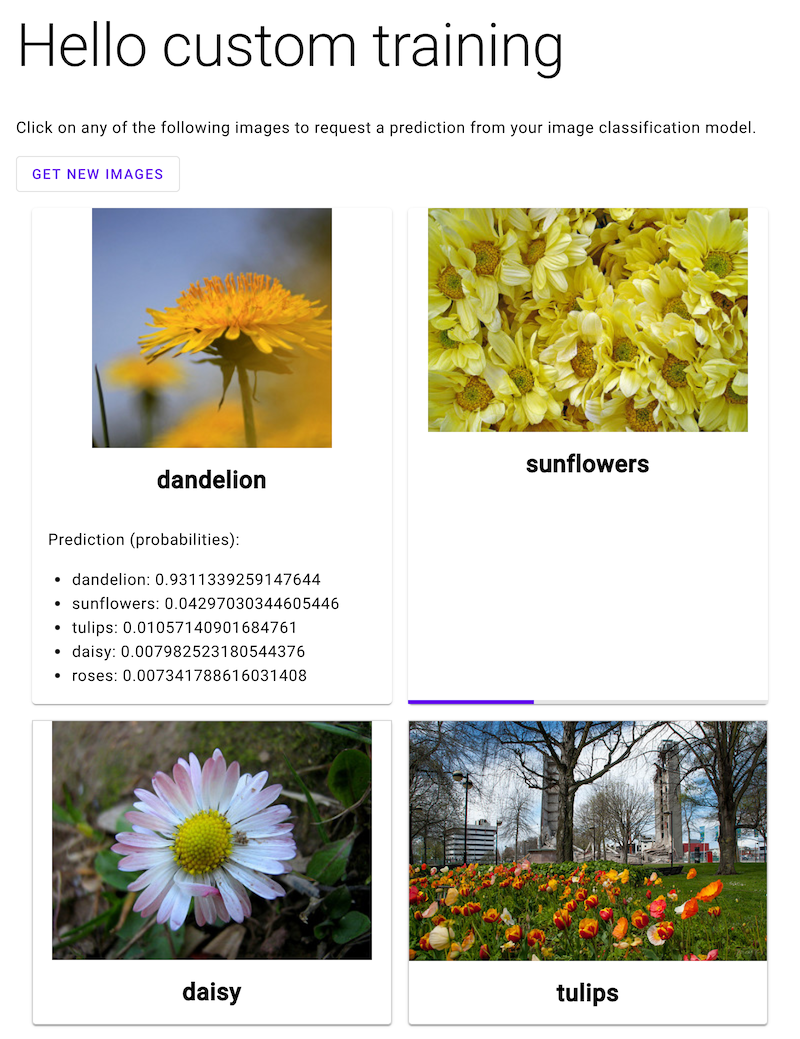
Öffnen Sie die Webanwendung und klicken Sie auf ein Bild einer Blume, um die Klassifizierung des ML-Modells anzusehen. Die Webanwendung stellt die Vorhersage als Liste der Blumentypen und die Wahrscheinlichkeit dar, dass das Bild jede Art von Blumen enthält.
Im folgenden Screenshot hat die Webanwendung bereits eine Vorhersage erhalten und wird eine weitere Vorhersageanfrage senden.
[[["Leicht verständlich","easyToUnderstand","thumb-up"],["Mein Problem wurde gelöst","solvedMyProblem","thumb-up"],["Sonstiges","otherUp","thumb-up"]],[["Schwer verständlich","hardToUnderstand","thumb-down"],["Informationen oder Beispielcode falsch","incorrectInformationOrSampleCode","thumb-down"],["Benötigte Informationen/Beispiele nicht gefunden","missingTheInformationSamplesINeed","thumb-down"],["Problem mit der Übersetzung","translationIssue","thumb-down"],["Sonstiges","otherDown","thumb-down"]],["Zuletzt aktualisiert: 2025-08-19 (UTC)."],[],[],null,["# Hello custom training: Serve predictions from a custom image classification model\n\nThis page walks through serving predictions from your image classification model\nand viewing these predictions in a web app.\nThis tutorial has several pages:\n\n\u003cbr /\u003e\n\n1. [Setting up your project and environment.](/vertex-ai/docs/tutorials/image-classification-custom)\n\n2. [Training a custom image classification\n model.](/vertex-ai/docs/tutorials/image-classification-custom/training)\n\n3. Serving predictions from a custom image\n classification model.\n\n4. [Cleaning up your project.](/vertex-ai/docs/tutorials/image-classification-custom/cleanup)\n\nEach page assumes that you have already performed the instructions from the\nprevious pages of the tutorial.\nThe rest of this document assumes that you are using the same Cloud Shell environment that you created when following the [first page of this\ntutorial](/vertex-ai/docs/tutorials/image-classification-custom). If your original Cloud Shell session is no longer open, you can return to the environment by doing the following:\n\n\u003cbr /\u003e\n\n1. In the Google Cloud console, activate Cloud Shell.\n\n [Activate Cloud Shell](https://console.cloud.google.com/?cloudshell=true)\n2. In the Cloud Shell session, run the following command:\n\n ```bash\n cd hello-custom-sample\n ```\n\nCreate an endpoint\n------------------\n\nTo get online predictions from the ML model that you trained when following\nthe previous page of this tutorial, create a Vertex AI *endpoint*.\nEndpoints serve online predictions from one or more models.\n\n1. In the Google Cloud console, in the Vertex AI section, go to\n the **Models** page.\n\n [Go to Models](https://console.cloud.google.com/vertex-ai/models)\n2. Find the row of the model that you trained in the [previous step of this\n tutorial](/vertex-ai/docs/tutorials/image-classification-custom/training), `hello_custom`, and click the model's\n name to open the model detail page.\n\n3. On the **Deploy \\& test** tab, click **Deploy to endpoint** to open the\n **Deploy to endpoint** pane.\n\n4. On the **Define your endpoint** step, add some basic information for your\n endpoint:\n\n 1. Select **Create new endpoint**.\n\n 2. In the **Endpoint name** field, enter `hello_custom`.\n\n 3. In the **Model settings** section, ensure that you see the name of your\n model, which is also called `hello_custom`. Specify the following model\n settings:\n\n 1. In the **Traffic split** field, enter `100`. Vertex AI\n supports splitting traffic for an endpoint to multiple models, but\n this tutorial doesn't use that feature.\n\n 2. In the **Minimum number of compute nodes** field, enter `1`.\n\n 3. In the **Machine type** drop-down list, select **n1-standard-2** from\n the **Standard** section.\n\n 4. Click **Done**.\n\n 4. In the **Logging** section, ensure that both types of prediction logging\n are enabled.\n\n Click **Continue**.\n5. On the **Endpoint details** step, confirm that your endpoint will be deployed\n to `us-central1 (Iowa)`.\n\n Do not select the **Use a customer-managed encryption key (CMEK)** checkbox.\n This tutorial does not use [CMEK](/vertex-ai/docs/general/cmek).\n6. Click **Deploy** to create the endpoint and deploy your model to the\n endpoint.\n\nAfter a few minutes, check_circle appears next to the new\nendpoint in the **Endpoints** table. At the same time, you also receive an email\nindicating that you have successfully created the endpoint and deployed your\nmodel to the endpoint.\n\nDeploy a Cloud Run function\n---------------------------\n\nYou can get predictions from the Vertex AI endpoint that you just\ncreated by sending requests to the Vertex AI API's REST interface. However, only\nprincipals with the [`aiplatform.endpoints.predict`\npermission](/vertex-ai/docs/general/access-control) can send online prediction requests. You\ncannot make the endpoint public for anybody to send requests to, for example via\na web app.\n\nIn this section, deploy code to [Cloud Run functions](/functions/docs) to handle\nunauthenticated requests. The sample code that you downloaded when you read the\n[first page of this tutorial](/vertex-ai/docs/tutorials/image-classification-custom) contains code for this\nCloud Run function in the `function/` directory. Optionally, run the\nfollowing command to explore the Cloud Run function code: \n\n less function/main.py\n\nDeploying the function serves the following purposes:\n\n- You *can* configure a Cloud Run function to receive unauthenticated\n requests. Additionally, functions run using [a service account with the Editor\n role by default](/functions/docs/securing/function-identity), which includes\n the `aiplatform.endpoints.predict` permission necessary to get predictions\n from your Vertex AI endpoint.\n\n- This function also performs useful preprocessing on requests. The\n Vertex AI endpoint expects prediction requests in the format\n of the trained TensorFlow Keras graph's first layer: a tensor of normalized\n floats with fixed dimensions. The function takes the URL of an image as input\n and preprocesses the image into this format before requesting a prediction\n from the Vertex AI endpoint.\n\nTo deploy the Cloud Run function, do the following:\n\n1. In the Google Cloud console, in the Vertex AI section, go to\n the **Endpoints** page.\n\n [Go to Endpoints](https://console.cloud.google.com/vertex-ai/endpoints)\n2. Find the row of the endpoint that you created in the previous section, named\n `hello_custom`. In this row, click **Sample request** to open the\n **Sample request** pane.\n\n3. In the **Sample request** pane, find the line of shell code that matches the\n following pattern:\n\n ```bash\n ENDPOINT_ID=\"\u003cvar translate=\"no\"\u003eENDPOINT_ID\u003c/var\u003e\"\n ```\n\n \u003cvar translate=\"no\"\u003eENDPOINT_ID\u003c/var\u003e is a number that identifies this particular endpoint.\n\n Copy this line of code, and run it in your Cloud Shell session to\n set the `ENDPOINT_ID` variable.\n4. Run the following command in your Cloud Shell session to deploy the\n Cloud Run function:\n\n gcloud functions deploy classify_flower \\\n --region=us-central1 \\\n --source=function \\\n --runtime=python37 \\\n --memory=2048MB \\\n --trigger-http \\\n --allow-unauthenticated \\\n --set-env-vars=ENDPOINT_ID=${ENDPOINT_ID}\n\nDeploy a web app to send prediction requests\n--------------------------------------------\n\nFinally, host a static web app on Cloud Storage to get predictions\nfrom your trained ML model. The web app sends requests to your\nCloud Run function, which preprocesses them and gets predictions from the\nVertex AI endpoint.\n\nThe `webapp` directory of the sample code that you downloaded contains a sample\nweb app. In your Cloud Shell session, run the following commands\nto prepare and deploy the web app:\n\n1. Set a couple of shell variables for commands in following steps to use:\n\n PROJECT_ID=\u003cvar translate=\"no\"\u003ePROJECT_ID\u003c/var\u003e\n BUCKET_NAME=\u003cvar translate=\"no\"\u003eBUCKET_NAME\u003c/var\u003e\n\n Replace the following:\n - \u003cvar translate=\"no\"\u003ePROJECT_ID\u003c/var\u003e: Your Google Cloud [project\n ID](/resource-manager/docs/creating-managing-projects#identifying_projects).\n - \u003cvar translate=\"no\"\u003eBUCKET_NAME\u003c/var\u003e: The name of the Cloud Storage bucket that you created when following the [first page of this tutorial](/vertex-ai/docs/tutorials/image-classification-custom).\n2. Edit the app to provide it with the trigger URL of your\n Cloud Run function:\n\n echo \"export const CLOUD_FUNCTION_URL = 'https://us-central1-${PROJECT_ID}.cloudfunctions.net/classify_flower';\" \\\n \u003e webapp/function-url.js\n\n3. Upload the `webapp` directory to your Cloud Storage bucket:\n\n gcloud storage cp webapp gs://${BUCKET_NAME}/ --recursive\n\n4. Make the web app files that you just uploaded [publicly\n readable](/storage/docs/access-control/making-data-public):\n\n gcloud storage objects update gs://${BUCKET_NAME}/webapp/** --add-acl-grant=entity=allUsers,role=READER\n\n | **Note:** Shells (like bash, zsh) sometimes attempt to expand wildcards in ways that can be surprising. For more details, see [URI wildcards](/storage/docs/wildcards#surprising-behavior).\n5. You can now navigate to the following URL to open web app and get\n predictions:\n\n ```\n https://storage.googleapis.com/BUCKET_NAME/webapp/index.html\n ```\n\n Open the web app and click an image of a flower to see your ML model's\n classification of the flower type. The web app presents the prediction as a\n list of flower types and the probability that the image contains each type of\n flower.\n | **Note:** This web app gets predictions for images that were also included in the training dataset for the model. Therefore the model might appear more accurate than it actually is due to [overfitting](https://developers.google.com/machine-learning/glossary#overfitting).\n\nIn the following screenshot, the web app has already gotten one\nprediction and is in the process of sending another prediction\nrequest.\n\nWhat's next\n-----------\n\nFollow the [last page of the tutorial](/vertex-ai/docs/tutorials/image-classification-custom/cleanup) to clean up\nresources that you have created."]]