Mit Sammlungen den Überblick behalten
Sie können Inhalte basierend auf Ihren Einstellungen speichern und kategorisieren.
Colab Enterprise-Notebook mit der Google Cloud Console erstellen
Erfahren Sie, wie Sie mithilfe der Google Cloud Console ein Colab Enterprise-Notebook erstellen und seinen Code in einer Standardlaufzeit ausführen.
Auf dieser Seite wird auch beschrieben, wie Sie ein Notebook umbenennen, hochladen und löschen.
Vorbereitung
Sign in to your Google Cloud account. If you're new to
Google Cloud,
create an account to evaluate how our products perform in
real-world scenarios. New customers also get $300 in free credits to
run, test, and deploy workloads.
In the Google Cloud console, on the project selector page,
select or create a Google Cloud project.
Bitten Sie Ihren Administrator, Ihrem Nutzerkonto die IAM-Rolle „Colab Enterprise User“ (roles/aiplatform.colabEnterpriseUser) für das Projekt zuzuweisen, damit Ihr Nutzerkonto die erforderlichen Berechtigungen zum Erstellen eines Colab Enterprise-Notebooks und zum Ausführen des Notebookcodes in einer Laufzeit hat.
Weitere Informationen zum Zuweisen von Rollen finden Sie unter Zugriff auf Projekte, Ordner und Organisationen verwalten.
Wählen Sie im Menü Region die Region aus, in der Sie Ihr Notebook erstellen möchten.
Klicken Sie neben Dateien auf add_boxNotebook erstellen.
Ihr neues Notebook wird auf dem Tab Meine Notebooks angezeigt.
Nach Abschluss der in diesem Dokument beschriebenen Aufgaben können Sie weitere Kosten vermeiden, indem Sie die erstellten Ressourcen löschen. Weitere Informationen finden Sie unter Bereinigen.
Code in einer Standardlaufzeit ausführen
So führen Sie den Code eines Colab Enterprise-Notebooks in der Standardlaufzeit aus:
Rufen Sie in der Google Cloud Console die Colab Enterprise-Seite Notebooks auf.
Wählen Sie im Menü Region die Region aus, in der sich Ihr Notebook befindet.
Klicken Sie auf dem Tab Meine Notebooks auf das Notebook, das Sie öffnen möchten.
Halten Sie den Mauszeiger über die Codezelle, die Sie ausführen möchten, und klicken Sie dann auf die Schaltfläche Zelle ausführen.
Wenn Sie zum ersten Mal eine Verbindung mit einer Laufzeit herstellen, in der Endnutzeranmeldedaten aktiviert sind, wird ein Dialogfeld Anmelden angezeigt.
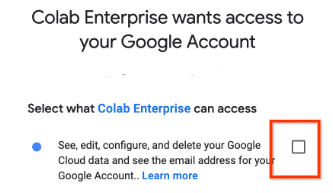
Führen Sie die folgenden Schritte aus, um Colab Enterprise Zugriff auf Ihre Nutzeranmeldedaten zu gewähren:
Klicken Sie im Dialogfeld Anmelden auf Ihr Nutzerkonto.
Wählen Sie Google Cloud Platform-Daten abrufen, bearbeiten, konfigurieren und löschen... aus, um Colab Enterprise Zugriff auf Ihre Nutzeranmeldedaten zu gewähren.
Klicken Sie auf Weiter.
Nachdem Ihre Laufzeit gestartet ist, stellt Colab Enterprise eine Verbindung zur Laufzeit her und führt den Code in der Zelle aus.
Notebook umbenennen
So benennen Sie ein Colab Enterprise-Notebook um:
Rufen Sie in der Google Cloud Console die Colab Enterprise-Seite Notebooks auf.
Wählen Sie im Menü Region die Region aus, in die Sie Ihr Notebook hochladen möchten.
Klicken Sie neben Dateien auf uploadNotebookdatei hochladen.
Klicken Sie im Dialogfeld Notebook hochladen im Feld Notebook auswählen auf Durchsuchen und wählen Sie das Notebook aus, das Sie hochladen möchten.
Optional: Bearbeiten Sie im Feld Notebookname den Namen der Notebookdatei.
Klicken Sie auf Hochladen.
Ihr Notebook wird auf dem Tab Meine Notebooks angezeigt.
Bereinigen
Mit den folgenden Schritten vermeiden Sie, dass Ihrem Google Cloud-Konto die in dieser Anleitung verwendeten Ressourcen in Rechnung gestellt werden:
Damit Ihrem Google Cloud-Konto die in dieser Anleitung verwendeten Ressourcen nicht in Rechnung gestellt werden, löschen Sie entweder das Projekt, das die Ressourcen enthält, oder Sie behalten das Projekt und löschen die einzelnen Ressourcen.
Projekt löschen
In the Google Cloud console, go to the Manage resources page.
[[["Leicht verständlich","easyToUnderstand","thumb-up"],["Mein Problem wurde gelöst","solvedMyProblem","thumb-up"],["Sonstiges","otherUp","thumb-up"]],[["Schwer verständlich","hardToUnderstand","thumb-down"],["Informationen oder Beispielcode falsch","incorrectInformationOrSampleCode","thumb-down"],["Benötigte Informationen/Beispiele nicht gefunden","missingTheInformationSamplesINeed","thumb-down"],["Problem mit der Übersetzung","translationIssue","thumb-down"],["Sonstiges","otherDown","thumb-down"]],["Zuletzt aktualisiert: 2025-09-04 (UTC)."],[],[],null,["# Quickstart: Create a Colab Enterprise notebook by using the Google Cloud console\n\nCreate a Colab Enterprise notebook by using the Google Cloud console\n====================================================================\n\nLearn how to create a Colab Enterprise notebook and run its code\non a default runtime by using the Google Cloud console.\nThis page also describes how to rename, import, and delete a notebook.\n\nBefore you begin\n----------------\n\n- Sign in to your Google Cloud account. If you're new to Google Cloud, [create an account](https://console.cloud.google.com/freetrial) to evaluate how our products perform in real-world scenarios. New customers also get $300 in free credits to run, test, and deploy workloads.\n- In the Google Cloud console, on the project selector page,\n select or create a Google Cloud project.\n\n | **Note**: If you don't plan to keep the resources that you create in this procedure, create a project instead of selecting an existing project. After you finish these steps, you can delete the project, removing all resources associated with the project.\n\n [Go to project selector](https://console.cloud.google.com/projectselector2/home/dashboard)\n-\n [Verify that billing is enabled for your Google Cloud project](/billing/docs/how-to/verify-billing-enabled#confirm_billing_is_enabled_on_a_project).\n\n-\n\n\n Enable the Vertex AI, Dataform, and Compute Engine APIs.\n\n\n [Enable the APIs](https://console.cloud.google.com/flows/enableapi?apiid=aiplatform.googleapis.com, dataform.googleapis.com, compute.googleapis.com&redirect=https://console.cloud.google.com)\n\n- In the Google Cloud console, on the project selector page,\n select or create a Google Cloud project.\n\n | **Note**: If you don't plan to keep the resources that you create in this procedure, create a project instead of selecting an existing project. After you finish these steps, you can delete the project, removing all resources associated with the project.\n\n [Go to project selector](https://console.cloud.google.com/projectselector2/home/dashboard)\n-\n [Verify that billing is enabled for your Google Cloud project](/billing/docs/how-to/verify-billing-enabled#confirm_billing_is_enabled_on_a_project).\n\n-\n\n\n Enable the Vertex AI, Dataform, and Compute Engine APIs.\n\n\n [Enable the APIs](https://console.cloud.google.com/flows/enableapi?apiid=aiplatform.googleapis.com, dataform.googleapis.com, compute.googleapis.com&redirect=https://console.cloud.google.com)\n\n### Required roles\n\n\nTo get the permissions that\nyou need to create a Colab Enterprise notebook and run the notebook's code on a runtime,\n\nask your administrator to grant you the\n\n\nColab Enterprise User ([`roles/aiplatform.colabEnterpriseUser`](/vertex-ai/docs/general/access-control#aiplatform.colabEnterpriseUser))\nIAM role on the project.\n\n\nFor more information about granting roles, see [Manage access to projects, folders, and organizations](/iam/docs/granting-changing-revoking-access).\n\n\nYou might also be able to get\nthe required permissions through [custom\nroles](/iam/docs/creating-custom-roles) or other [predefined\nroles](/iam/docs/roles-overview#predefined).\n| One or more of the required roles includes the `dataform.repositories.list` permission. Users who are granted the `dataform.repositories.list` permission or the [Code Creator\n| (`roles/dataform.codeCreator`)](/iam/docs/understanding-roles#dataform.codeCreator) role in a project can list the names of code assets in that project by using the Dataform API or the Dataform command-line interface (CLI). Non-administrators using BigQuery Studio can only see code assets that they created or that were shared with them.\n\nCreate a notebook\n-----------------\n\nTo create a Colab Enterprise notebook by using the Google Cloud console:\n\n1. In the Google Cloud console, go to\n the Colab Enterprise **My notebooks** page.\n\n [Go to My notebooks](https://console.cloud.google.com/vertex-ai/colab/notebooks)\n2. In the **Region** menu, select the region where you want to\n create your notebook.\n\n3. Click add_box **New\n notebook**.\n\n Vertex AI creates and opens your notebook.\n\nWhen you finish the tasks that are described in this document, you can avoid\ncontinued billing by deleting the resources that you created. For more information, see\n[Clean up](#clean-up).\n\nRun code in a default runtime\n-----------------------------\n\nTo run a Colab Enterprise notebook's code\non the default runtime, do the following:\n\n1. In the Google Cloud console, go to\n the Colab Enterprise **My notebooks** page.\n\n [Go to My notebooks](https://console.cloud.google.com/vertex-ai/colab/notebooks)\n2. In the **Region** menu, select the region that contains your notebook.\n\n3. Click the notebook that you want to open.\n\n4. Hold the pointer over the code cell that you want to run,\n and then click the\n **Run cell** button.\n\n5. If this is your first time connecting to a runtime with\n end-user credentials enabled, a **Sign in** dialog appears.\n\n | The default runtime has end-user credentials enabled to make it easier to [run code that interacts\n | with Google Cloud](/colab/docs/run-code-adc).\n\n To grant Colab Enterprise access to your user credentials,\n complete the following steps:\n 1. In the **Sign in** dialog, click your user account.\n\n 2. Select **See, edit, configure, and delete your\n Google Cloud data...** to grant Colab Enterprise\n access to your user credentials.\n\n 3. Click **Continue**.\n\nAfter your runtime starts, Colab Enterprise connects\nto the runtime and runs the code in the cell.\n\nRename your notebook\n--------------------\n\nTo rename a Colab Enterprise notebook:\n\n1. In the Google Cloud console, go to\n the Colab Enterprise **My notebooks** page.\n\n [Go to My notebooks](https://console.cloud.google.com/vertex-ai/colab/notebooks)\n2. In the **Region** menu, select the region that contains your notebook.\n\n3. Next to the notebook that you want to rename, click the\n more_vert**Actions** menu,\n and then select **Rename**.\n\n4. In the **Rename notebook** dialog,\n change the name of the notebook, and then click **Rename**.\n\nImport a notebook\n-----------------\n\nTo import a notebook into Colab Enterprise:\n\n1. In the Google Cloud console, go to\n the Colab Enterprise **My notebooks** page.\n\n [Go to My notebooks](https://console.cloud.google.com/vertex-ai/colab/notebooks)\n2. In the **Region** menu, select the region where you want to\n import your notebook.\n\n3. Click\n upload **Import**.\n\n4. In the **Import notebooks** dialog, select an\n **Import source**.\n\n5. If you selected:\n\n - **Your computer**, navigate to and select a notebook file to import.\n - **Cloud Storage**, navigate to and select a notebook in Cloud Storage.\n - **URL**, enter the URL of the notebook file to import.\n\n | The notebook must be fewer than 20 MB.\n6. To add another notebook, click\n add_box **Add\n notebook**.\n\n7. After you've added the notebooks that you want to import,\n click **Import**.\n\n Colab Enterprise imports your notebook files.\n\nClean up\n--------\n\n\nTo avoid incurring charges to your Google Cloud account for\nthe resources used on this page, follow these steps.\n\nTo avoid incurring charges to your Google Cloud account for the resources\nused in this tutorial, either delete the project that contains the resources,\nor keep the project and delete the individual resources. \n\n### Delete the project\n\n| **Caution** : Deleting a project has the following effects:\n|\n| - **Everything in the project is deleted.** If you used an existing project for the tasks in this document, when you delete it, you also delete any other work you've done in the project.\n| - **Custom project IDs are lost.** When you created this project, you might have created a custom project ID that you want to use in the future. To preserve the URLs that use the project ID, such as an `appspot.com` URL, delete selected resources inside the project instead of deleting the whole project.\n|\n|\n| If you plan to explore multiple architectures, tutorials, or quickstarts, reusing projects\n| can help you avoid exceeding project quota limits.\n1. In the Google Cloud console, go to the **Manage resources** page.\n\n [Go to Manage resources](https://console.cloud.google.com/iam-admin/projects)\n2. In the project list, select the project that you want to delete, and then click **Delete**.\n3. In the dialog, type the project ID, and then click **Shut down** to delete the project. \n\n### Delete your notebook\n\nTo delete a Colab Enterprise notebook:\n\n1. In the Google Cloud console, go to\n the Colab Enterprise **My notebooks** page.\n\n [Go to My notebooks](https://console.cloud.google.com/vertex-ai/colab/notebooks)\n2. In the **Region** menu, select the region that contains\n the notebook that you want to delete.\n\n3. Next to the notebook that you want to delete, click the\n more_vert**Actions** menu,\n and then select\n delete **Delete\n notebook**.\n\n4. In the **Delete notebook** dialog,\n click **Confirm**.\n\nWhat's next\n-----------\n\n- Read the [Introduction to\n Colab Enterprise](/colab/docs/introduction).\n\n- To find a notebook that can help you get your project started quickly,\n see the [notebook gallery](https://console.cloud.google.com/vertex-ai/colab/notebook-gallery).\n\n- [Connect to a runtime](/colab/docs/connect-to-runtime)."]]