Fügen Sie unter Rechnungskonto das Cloud-Rechnungskonto für das Angebot hinzu.
Wenn das Cloud-Rechnungskonto mit einem Unterkonto eines Kunden übereinstimmt, für den Sie einen Resellerrabatt konfiguriert haben, wird eine Benachrichtigung zu diesem Rabatt angezeigt. Klicken Sie auf Rabatt ansehen, um die Details des Rabatts aufzurufen.
Produkt- und Preisdetails eingeben
Geben Sie die folgenden Details für Ihr Angebot ein:
Wählen Sie unter Produkt, Tarif und Preis das Produkt für das Angebot und den gewünschten Tarif aus.
Wenn Sie Zahlungsdetails für Ihr Angebot eingeben möchten, klicken Sie unter Zahlungsdetails auf Konfigurieren. Geben Sie im angezeigten Bereich die folgenden Zahlungsdetails ein:
Legen Sie unter Annahmefrist für das Angebot eine Frist fest, bis zu der Ihr Kunde das Angebot annehmen kann.
Wenn Sie ein bestehendes Angebot ersetzen, muss das Datum der Frist vor dem Enddatum des aktuellen Angebots liegen. Wenn Sie ein bestehendes Angebot mit Raten ersetzen, muss das Datum der Frist vor dem Startdatum der nächsten Rate des aktuellen Angebots liegen.
Das Angebot läuft am ausgewählten Datum um 23:45 Uhr US and Canadian Pacific Time (UTC-8) ab.
Wählen Sie unter Häufigkeit im Menü Abrechnungshäufigkeit einen Zahlungszeitplan aus. Weitere Informationen zu Abrechnungsintervallen finden Sie unter Abrechnungsintervalle für private Angebote.
Geben Sie für Preismodelle, die eine Aufteilung unterstützen, unter Aufteilung an, ob die Aufteilung aktiviert oder deaktiviert werden soll. Wenn die Aufteilung aktiviert ist, werden die Kosten für die erste Rate automatisch aufgeteilt. Wenn Sie die anteilige Berechnung aktivieren, können Sie auswählen, ob der Cloud Marketplace die anteilige Berechnung basierend auf dem Jubiläumsdatum des Angebots oder dem ersten Tag des Monats vornimmt.
Geben Sie zusätzliche Preisdetails an, die sich auf das ausgewählte Preismodell und die Abrechnungshäufigkeit beziehen.
Wählen Sie unter Angebotsbeginn aus, ob das Angebot an einem bestimmten geplanten Startdatum beginnen soll. Wenn Sie die automatische Angebotsgenehmigung für Ihr Produkt aktiviert haben, können Sie ein geplantes Startdatum für die erste Rate des Angebots auswählen oder festlegen, dass das Startdatum der ersten Rate das Datum ist, an dem der Kunde das Angebot akzeptiert.
Wenn Sie ein geplantes Startdatum eingeben, muss dieses Datum nach dem Datum liegen, das Sie als Annahmefrist für das Angebot eingegeben haben.
Geben Sie unter Angebotsende das Enddatum oder die Dauer des Angebots an.
Klicken Sie unter Automatisch verlängern auf die Ein-/Aus-Schaltfläche, um die automatische Verlängerung für dieses Angebot zu aktivieren, und geben Sie die Anzahl der Verlängerungen an, die Sie zulassen möchten. Weitere Informationen zur automatischen Verlängerung finden Sie unter Automatische Verlängerung für private Angebote.
Sehen Sie sich den Zahlungsplan an, den der Cloud Marketplace anhand Ihrer vorherigen Eingaben generiert. Wenn Sie für die Abrechnungshäufigkeit Ihres Angebots Monatlich, Vierteljährlich oder Jährlich ausgewählt haben, können Sie die Felder des Tilgungsplans nicht bearbeiten. Wenn Sie für die Abrechnungshäufigkeit Ihres Angebots Benutzerdefiniert ausgewählt haben, können Sie die Felder des Ratenzeitplans bearbeiten.
Geben Sie an, ob nicht verwendetes Guthaben für die Zusicherung zwischen den Raten des Vertrags übertragen oder am Ende jeder Rate des Vertrags ablaufen soll.
Wenn Sie das Verhalten von Rate zu Rate variieren möchten, wählen Sie Benutzerdefiniert aus. Wenn Sie Benutzerdefiniert auswählen, können Sie für jede Rate in einem Kästchen auswählen, ob nicht genutzte Zusicherungen am Ende der Rate auf die nächste Rate übertragen oder verfallen sollen. Jedes Mal, wenn eine ungenutzte Zusicherung am Ende einer Rate abläuft oder übertragen wird, laufen alle verbleibenden ungenutzten Zusicherungen ab oder werden übertragen, einschließlich aller ungenutzten Zusicherungen, die bereits aus früheren Raten übertragen wurden.
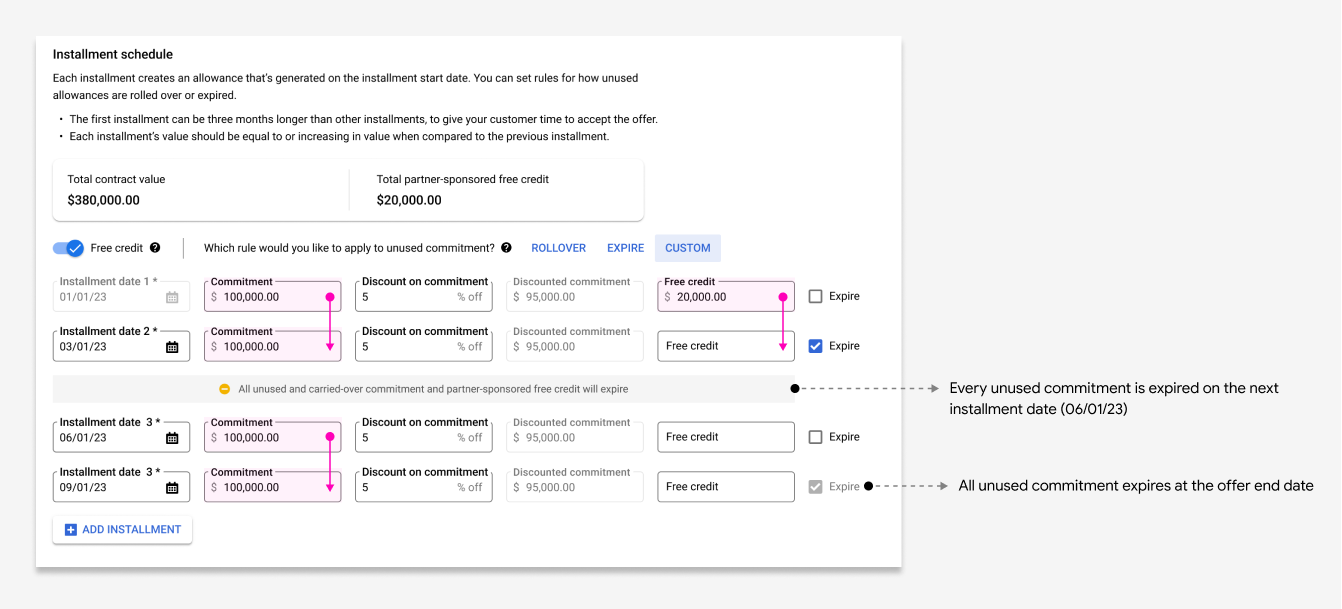
Bei Angeboten mit benutzerdefinierten Abrechnungshäufigkeiten können Sie bestimmten Raten optional von Partnern gesponserte einmalige Gutschriften hinzufügen. Aktivieren Sie dazu die Option Kostenloses Guthaben und fügen Sie dann die Beträge der einmaligen Gutschriften, die Sie sponsern möchten, den Raten hinzu, auf die sie angewendet werden sollen.
Einmalige Gutschriften laufen ab oder werden gemäß den Regeln verlängert, die Sie für die Raten festgelegt haben, auf die sie sich beziehen.
Wenn Sie detailliertere Rabatte auf Nutzungsmesswerte anbieten möchten, klicken Sie unter Messwertrabatte (optional) auf die Ein/Aus-Schaltfläche Rabatte auf einzelne Messwerte anwenden. Maximieren Sie die Messwerte für die Nutzung, für die Sie einen Rabatt gewähren möchten, und geben Sie die Rabattprozentsätze ein.
Klicken Sie auf Speichern.
Nächste Schritte
Nachdem du die Preise für dein Private Offer festgelegt hast, führe die folgenden Schritte im Producer Portal aus:
[[["Leicht verständlich","easyToUnderstand","thumb-up"],["Mein Problem wurde gelöst","solvedMyProblem","thumb-up"],["Sonstiges","otherUp","thumb-up"]],[["Schwer verständlich","hardToUnderstand","thumb-down"],["Informationen oder Beispielcode falsch","incorrectInformationOrSampleCode","thumb-down"],["Benötigte Informationen/Beispiele nicht gefunden","missingTheInformationSamplesINeed","thumb-down"],["Problem mit der Übersetzung","translationIssue","thumb-down"],["Sonstiges","otherDown","thumb-down"]],["Zuletzt aktualisiert: 2025-09-03 (UTC)."],[],[],null,["# Set up your offer's pricing\n\nThis article describes how to set up pricing for a\n[private offer in Producer Portal](/marketplace/docs/partners/offers/create-private-offers).\n\nBefore you begin\n----------------\n\nBefore you set up pricing for your offer, you must complete the following steps\nin Producer Portal:\n\n1. [Create a new offer](/marketplace/docs/partners/offers/create-private-offers).\n\n2. [Add customer and sales contact details](/marketplace/docs/partners/offers/add-offer-details)\n to the offer.\n\nProvide the Cloud Billing account\n---------------------------------\n\nUnder **Billing account**, add the Cloud Billing account for the offer.\n\nIf the Cloud Billing account matches a resold customer subaccount that\nyou've configured a reseller discount for, you see a notice that informs you of\nthe discount. To view the details of the discount, click **View discount**.\n\nEnter product and pricing details\n---------------------------------\n\nEnter the following details for your offer:\n\n1. Under **Product, plan and pricing**, select the product for the offer and\n the plan that you want to use.\n\n2. Under **Pricing model** , select the pricing model for the plan. For more\n details, see\n [Pricing models for private offers](/marketplace/docs/partners/offers/select-pricing-model).\n\n| **Caution:** If you modify the Cloud Billing account, product, or pricing plan later, other information that you already input might be erased. To avoid losing offer data, ensure that you've selected the correct product, pricing plan, and Cloud Billing account for the customer.\n\nEnter payment details\n---------------------\n\nTo enter payment details for your offer, under **Payment details** , click\n**Configure**. In the panel that appears, enter the following payment details:\n\n1. Under **Offer acceptance deadline**, set a deadline for your customer to\n accept the offer.\n\n If you're replacing an existing offer, the deadline must be before the\n current offer's end date. If you're replacing an existing offer that has\n installments, the deadline must also be before the start date of the current\n offer's next installment.\n\n On the date that you select, the offer expires at 11:45 PM US and Canadian\n Pacific Time (UTC-8).\n2. Under **Frequency** , use the **Billing frequency** menu to select a payment\n schedule. For more information about billing frequencies, see\n [Billing frequencies for private offers](/marketplace/docs/partners/offers/select-payment-schedule).\n\n3. For pricing models that support proration, under **Proration**, specify\n whether to turn proration on or off. When proration is turned on,\n Cloud Marketplace automatically prorates the charges for the first\n installment. When you turn on proration, you choose whether\n Cloud Marketplace prorates based on the anniversary date of the offer or\n the first day of the month.\n\n4. Specify additional pricing details based on your selected pricing model and\n billing frequency.\n\n5. Under **Offer start** , select whether the offer should start on a specific\n scheduled start date. If you've\n [turned on automatic offer approval](/marketplace/docs/partners/offers/automatic-approval)\n for your product, you can select a scheduled start date for the offer's first\n installment, or choose to have the first installment's start date be the date\n that the customer accepts the offer.\n\n If you enter a scheduled start date, that date must be later than the date\n that you entered as the offer acceptance deadline.\n6. Under **Offer end**, specify the set end date or duration for the offer.\n\n | **Note:** If your offer has a custom payment frequency, you can choose to specify a set end date or a duration. If your offer's payment frequency is monthly, quarterly, or annually, you must specify a duration.\n7. Under **Auto-renew** , click the toggle to turn on auto-renew for this offer,\n and specify the number of renewals that you want to allow. For details about\n auto-renew, visit\n [Automatic renewal for private offers](/marketplace/docs/partners/offers/auto-renew).\n\n8. Review the **Payment installment schedule** , which Cloud Marketplace\n generates based on your previous inputs. If you chose **Monthly** ,\n **Quarterly** , or **Annually** for your offer's billing frequency, you aren't\n able to edit the fields of the installment schedule. If you chose **Custom**\n for your offer's billing frequency, you can edit the fields of the\n installment schedule.\n\n9. Specify whether you want unused commitment to roll over between installments\n of the contract, or to expire at the end of each installment of the contract.\n\n | **Note:** Your selection here determines how unused commitment is handled between installments of the contract. However, for all choices, all remaining unused commitment expires at the end of the contract term.\n\n If you want to vary the behavior from installment to installment, choose\n **Custom** . When you choose **Custom**, you click a checkbox to choose for\n each installment whether unused commitment remaining at the end of the\n installment rolls over to the next installment or expires. Every time unused\n commitment expires or rolls over at the end of an installment, all remaining\n unused commitment expires or rolls over, including any unused commitment that\n already had rolled over from previous installments.\n\n | **Note:** When you [view reports for your Cloud Marketplace products](/marketplace/docs/partners/offers/reports-resources), you don't see whether commitment expires or rolls over between installments. To see this information for an offer, view the offer in Producer Portal.\n10. Optionally, for offers with custom billing frequencies, if you want to add\n partner-sponsored one-time credits to specific installments, use the\n **Free credit** toggle, and then add the amounts of the one-time credits that\n you want to sponsor to the installments that you want them to apply to.\n One-time credits expire or roll over according to the rules that you\n specified for the installments that they apply to.\n\n11. Optionally, if you want to offer more granular discounts on usage metrics,\n under **Metric discounts (optional)** , click the\n **Apply discounts on individual metrics** toggle. Expand the usage metrics\n that you want to discount, and enter your discount percentages.\n\n | **Note:** For offers with custom billing frequencies, metric discounts override the default discount at the installment level, and must be specified for each installment. For all other new offers, metric discounts override the default discount at the offer level.\n12. Click **Save**.\n\nWhat's next\n-----------\n\nAfter you've set up your private offer's pricing, you complete the following\nsteps in Producer Portal:\n\n1. [Specify the end user license agreement (EULA)](/marketplace/docs/partners/offers/select-eula)\n for your offer.\n\n2. [Review and publish](/marketplace/docs/partners/offers/review-offer) your\n offer."]]