Under Billing account, add the Cloud Billing account for the offer.
If the Cloud Billing account matches a resold customer subaccount that
you've configured a reseller discount for, you see a notice that informs you of
the discount. To view the details of the discount, click View discount.
Enter product and pricing details
Enter the following details for your offer:
Under Product, plan and pricing, select the product for the offer and
the plan that you want to use.
To enter payment details for your offer, under Payment details, click
Configure. In the panel that appears, enter the following payment details:
Under Offer acceptance deadline, set a deadline for your customer to
accept the offer.
If you're replacing an existing offer, the deadline must be before the
current offer's end date. If you're replacing an existing offer that has
installments, the deadline must also be before the start date of the current
offer's next installment.
On the date that you select, the offer expires at 11:45 PM US and Canadian
Pacific Time (UTC-8).
Under Frequency, use the Billing frequency menu to select a payment
schedule. For more information about billing frequencies, see
Billing frequencies for private offers.
For pricing models that support proration, under Proration, specify
whether to turn proration on or off. When proration is turned on,
Cloud Marketplace automatically prorates the charges for the first
installment. When you turn on proration, you choose whether
Cloud Marketplace prorates based on the anniversary date of the offer or
the first day of the month.
Specify additional pricing details based on your selected pricing model and
billing frequency.
Under Offer start, select whether the offer should start on a specific
scheduled start date. If you've
turned on automatic offer approval
for your product, you can select a scheduled start date for the offer's first
installment, or choose to have the first installment's start date be the date
that the customer accepts the offer.
If you enter a scheduled start date, that date must be later than the date
that you entered as the offer acceptance deadline.
Under Offer end, specify the set end date or duration for the offer.
Under Auto-renew, click the toggle to turn on auto-renew for this offer,
and specify the number of renewals that you want to allow. For details about
auto-renew, visit
Automatic renewal for private offers.
Review the Payment installment schedule, which Cloud Marketplace
generates based on your previous inputs. If you chose Monthly,
Quarterly, or Annually for your offer's billing frequency, you aren't
able to edit the fields of the installment schedule. If you chose Custom
for your offer's billing frequency, you can edit the fields of the
installment schedule.
Specify whether you want unused commitment to roll over between installments
of the contract, or to expire at the end of each installment of the contract.
If you want to vary the behavior from installment to installment, choose
Custom. When you choose Custom, you click a checkbox to choose for
each installment whether unused commitment remaining at the end of the
installment rolls over to the next installment or expires. Every time unused
commitment expires or rolls over at the end of an installment, all remaining
unused commitment expires or rolls over, including any unused commitment that
already had rolled over from previous installments.
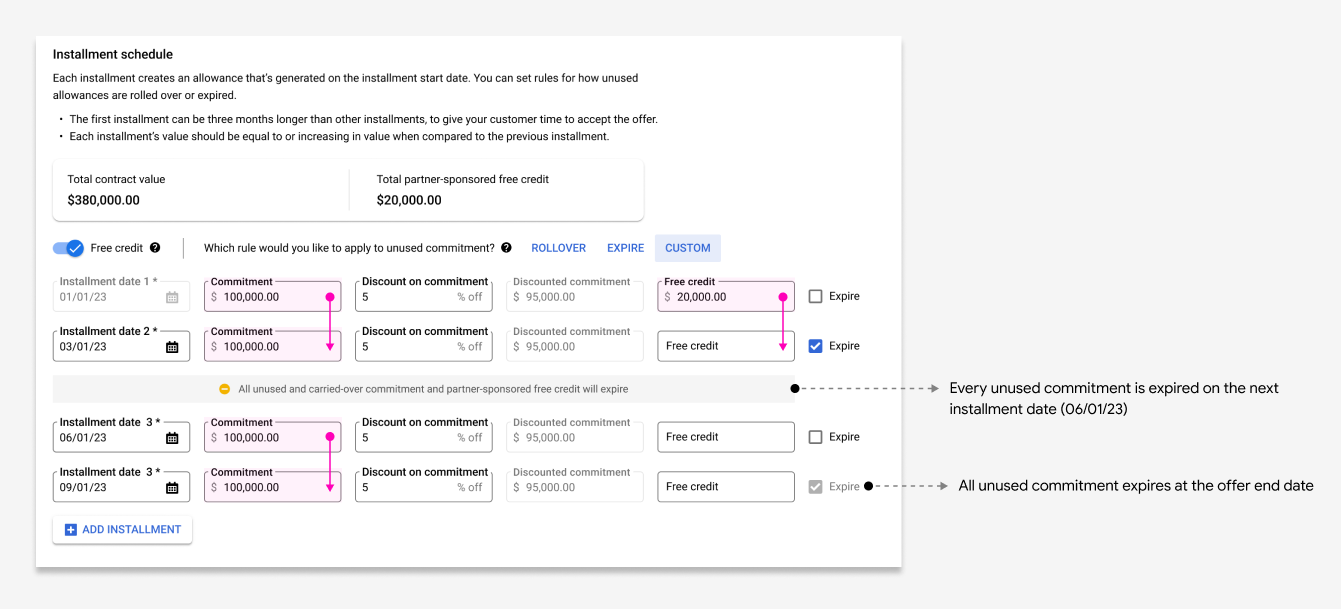
Optionally, for offers with custom billing frequencies, if you want to add
partner-sponsored one-time credits to specific installments, use the
Free credit toggle, and then add the amounts of the one-time credits that
you want to sponsor to the installments that you want them to apply to.
One-time credits expire or roll over according to the rules that you
specified for the installments that they apply to.
Optionally, if you want to offer more granular discounts on usage metrics,
under Metric discounts (optional), click the
Apply discounts on individual metrics toggle. Expand the usage metrics
that you want to discount, and enter your discount percentages.
Click Save.
What's next
After you've set up your private offer's pricing, you complete the following
steps in Producer Portal:
[[["Easy to understand","easyToUnderstand","thumb-up"],["Solved my problem","solvedMyProblem","thumb-up"],["Other","otherUp","thumb-up"]],[["Hard to understand","hardToUnderstand","thumb-down"],["Incorrect information or sample code","incorrectInformationOrSampleCode","thumb-down"],["Missing the information/samples I need","missingTheInformationSamplesINeed","thumb-down"],["Other","otherDown","thumb-down"]],["Last updated 2025-08-28 UTC."],[],[],null,["# Set up your offer's pricing\n\nThis article describes how to set up pricing for a\n[private offer in Producer Portal](/marketplace/docs/partners/offers/create-private-offers).\n\nBefore you begin\n----------------\n\nBefore you set up pricing for your offer, you must complete the following steps\nin Producer Portal:\n\n1. [Create a new offer](/marketplace/docs/partners/offers/create-private-offers).\n\n2. [Add customer and sales contact details](/marketplace/docs/partners/offers/add-offer-details)\n to the offer.\n\nProvide the Cloud Billing account\n---------------------------------\n\nUnder **Billing account**, add the Cloud Billing account for the offer.\n\nIf the Cloud Billing account matches a resold customer subaccount that\nyou've configured a reseller discount for, you see a notice that informs you of\nthe discount. To view the details of the discount, click **View discount**.\n\nEnter product and pricing details\n---------------------------------\n\nEnter the following details for your offer:\n\n1. Under **Product, plan and pricing**, select the product for the offer and\n the plan that you want to use.\n\n2. Under **Pricing model** , select the pricing model for the plan. For more\n details, see\n [Pricing models for private offers](/marketplace/docs/partners/offers/select-pricing-model).\n\n| **Caution:** If you modify the Cloud Billing account, product, or pricing plan later, other information that you already input might be erased. To avoid losing offer data, ensure that you've selected the correct product, pricing plan, and Cloud Billing account for the customer.\n\nEnter payment details\n---------------------\n\nTo enter payment details for your offer, under **Payment details** , click\n**Configure**. In the panel that appears, enter the following payment details:\n\n1. Under **Offer acceptance deadline**, set a deadline for your customer to\n accept the offer.\n\n If you're replacing an existing offer, the deadline must be before the\n current offer's end date. If you're replacing an existing offer that has\n installments, the deadline must also be before the start date of the current\n offer's next installment.\n\n On the date that you select, the offer expires at 11:45 PM US and Canadian\n Pacific Time (UTC-8).\n2. Under **Frequency** , use the **Billing frequency** menu to select a payment\n schedule. For more information about billing frequencies, see\n [Billing frequencies for private offers](/marketplace/docs/partners/offers/select-payment-schedule).\n\n3. For pricing models that support proration, under **Proration**, specify\n whether to turn proration on or off. When proration is turned on,\n Cloud Marketplace automatically prorates the charges for the first\n installment. When you turn on proration, you choose whether\n Cloud Marketplace prorates based on the anniversary date of the offer or\n the first day of the month.\n\n4. Specify additional pricing details based on your selected pricing model and\n billing frequency.\n\n5. Under **Offer start** , select whether the offer should start on a specific\n scheduled start date. If you've\n [turned on automatic offer approval](/marketplace/docs/partners/offers/automatic-approval)\n for your product, you can select a scheduled start date for the offer's first\n installment, or choose to have the first installment's start date be the date\n that the customer accepts the offer.\n\n If you enter a scheduled start date, that date must be later than the date\n that you entered as the offer acceptance deadline.\n6. Under **Offer end**, specify the set end date or duration for the offer.\n\n | **Note:** If your offer has a custom payment frequency, you can choose to specify a set end date or a duration. If your offer's payment frequency is monthly, quarterly, or annually, you must specify a duration.\n7. Under **Auto-renew** , click the toggle to turn on auto-renew for this offer,\n and specify the number of renewals that you want to allow. For details about\n auto-renew, visit\n [Automatic renewal for private offers](/marketplace/docs/partners/offers/auto-renew).\n\n8. Review the **Payment installment schedule** , which Cloud Marketplace\n generates based on your previous inputs. If you chose **Monthly** ,\n **Quarterly** , or **Annually** for your offer's billing frequency, you aren't\n able to edit the fields of the installment schedule. If you chose **Custom**\n for your offer's billing frequency, you can edit the fields of the\n installment schedule.\n\n9. Specify whether you want unused commitment to roll over between installments\n of the contract, or to expire at the end of each installment of the contract.\n\n | **Note:** Your selection here determines how unused commitment is handled between installments of the contract. However, for all choices, all remaining unused commitment expires at the end of the contract term.\n\n If you want to vary the behavior from installment to installment, choose\n **Custom** . When you choose **Custom**, you click a checkbox to choose for\n each installment whether unused commitment remaining at the end of the\n installment rolls over to the next installment or expires. Every time unused\n commitment expires or rolls over at the end of an installment, all remaining\n unused commitment expires or rolls over, including any unused commitment that\n already had rolled over from previous installments.\n\n | **Note:** When you [view reports for your Cloud Marketplace products](/marketplace/docs/partners/offers/reports-resources), you don't see whether commitment expires or rolls over between installments. To see this information for an offer, view the offer in Producer Portal.\n10. Optionally, for offers with custom billing frequencies, if you want to add\n partner-sponsored one-time credits to specific installments, use the\n **Free credit** toggle, and then add the amounts of the one-time credits that\n you want to sponsor to the installments that you want them to apply to.\n One-time credits expire or roll over according to the rules that you\n specified for the installments that they apply to.\n\n11. Optionally, if you want to offer more granular discounts on usage metrics,\n under **Metric discounts (optional)** , click the\n **Apply discounts on individual metrics** toggle. Expand the usage metrics\n that you want to discount, and enter your discount percentages.\n\n | **Note:** For offers with custom billing frequencies, metric discounts override the default discount at the installment level, and must be specified for each installment. For all other new offers, metric discounts override the default discount at the offer level.\n12. Click **Save**.\n\nWhat's next\n-----------\n\nAfter you've set up your private offer's pricing, you complete the following\nsteps in Producer Portal:\n\n1. [Specify the end user license agreement (EULA)](/marketplace/docs/partners/offers/select-eula)\n for your offer.\n\n2. [Review and publish](/marketplace/docs/partners/offers/review-offer) your\n offer."]]