Filtering by email address works by comparing the address of the logged in viewer to a field in your data source that contains valid email addresses. For each row in your data, the filter checks whether the viewer's email address matches the address in that row.
Consider the following data:
| Data | |
|---|---|
| alan@example.com | abc |
| mary@example.com | cde |
| alan@example.com | efg |
| mary@example.com | ghi |
If this data is filtered by email address, and a user alan@example.com views the filtered report, then this user sees only the data
abc and efg. If another user, mary@example.com, views the same report, then this users sees the data cde and ghi.
This approach works if there is a one-to-one relationship between viewers and the data. But what if you also want the user manager@example.com to see the data? That is, you want many people to see the same rows of data (a many-to-many relationship.)
Because filtering by email works on only one address per row, you can't include a list of email addresses in your Email field. For example, including a list of email addresses in the Email field as follows won't work:
| Data | |
|---|---|
| alan@example.com, manager@example.com, vp@example.com, bigwig@customer.com | abc |
Solution: Use data blending
You can create a many-to-many relationship between email addresses and your data by blending a table of addresses with your data, using any common field as a join key.
Fruit stand example
You manage a produce company, and want show your sales representatives how they are performing at the various fruit stands they service. Multiple sales people can service multiple stands. To filter the data so your sales people only see their data, you could do the following:
Step 1: Create an access control list table
In this step, you'll create an access control list (ACL) table that contains the email addresses of the authorized sales people, paired with a data field (a fruit stand name) that can be used as a join key in the blend.
| Sales Rep Email | Join key |
|---|---|
| salesrep1@example.com | Fruit Stand A |
| salesrep2@example.com | Fruit Stand A |
| salesrep1@example.com | Fruit Stand B |
| salesrep2@example.com |
Fruit Stand C |
Access control list (ACL) table
Note that the user salesrep1@example.com can see data for Fruit Stand A and Fruit Stand B, while the user salesrep2@example.com can see data for Fruit Stand A and Fruit Stand C.
Step 2: Create the data table
The data table tracks the sales each representative made to each fruit stand.
| Fruit Stand | Fruit | Sales |
|---|---|---|
| Fruit Stand A | Apple | 50 |
| Fruit Stand A | Banana | 26 |
| Fruit Stand A | Orange | 20 |
| Fruit Stand A | Pear | 93 |
| Fruit Stand B | Apple | 98 |
| Fruit Stand B | Banana | 86 |
| Fruit Stand B | Orange | 7 |
| Fruit Stand B | Pear | 85 |
| Fruit Stand C | Apple | 21 |
| Fruit Stand C | Banana | 61 |
| Fruit Stand C | Orange | 3 |
| Fruit Stand C | Pear | 78 |
Data table
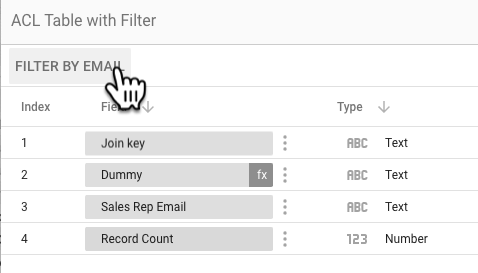
Step 3: Apply the email filter to the ACL table
To apply the email filter to the ACL table, complete these steps:
- Edit the data source for the ACL table.
- Click FILTER BY EMAIL.
- Select the Sales Rep Email field for the filter.
Step 4: Blend the ACL table with the data table
Finally, blend the data table with the ACL table. Since we want to effectively add the sales rep email as a column to the data table, we will start from the data table and then left-join the ACL table.
With no email filter applied, you'll see all the records for both sales representatives. However, with the email filter applied, blending the ACL table with the sales data table filters that data according to which sales person is viewing the report. Here's what each representative would see when they view the report:
Sales Rep 1 sees this:
| Data | Fruit | Sales |
|---|---|---|
| Fruit Stand A | Apple | 50 |
| Fruit Stand A | Banana | 26 |
| Fruit Stand A | Orange | 20 |
| Fruit Stand A | Pear | 93 |
| Fruit Stand B | Apple | 98 |
| Fruit Stand B | Banana | 86 |
| Fruit Stand B | Orange | 7 |
| Fruit Stand B | Pear | 85 |
Sales Rep 2 sees this:
| Data | Fruit | Sales |
|---|---|---|
| Fruit Stand A | Banana | 26 |
| Fruit Stand A | Orange | 20 |
| Fruit Stand A | Apple | 50 |
| Fruit Stand A | Pear | 93 |
| Fruit Stand C | Banana | 61 |
| Fruit Stand C | Orange | 3 |
| Fruit Stand C | Apple | 21 |
| Fruit Stand C | Pear | 78 |