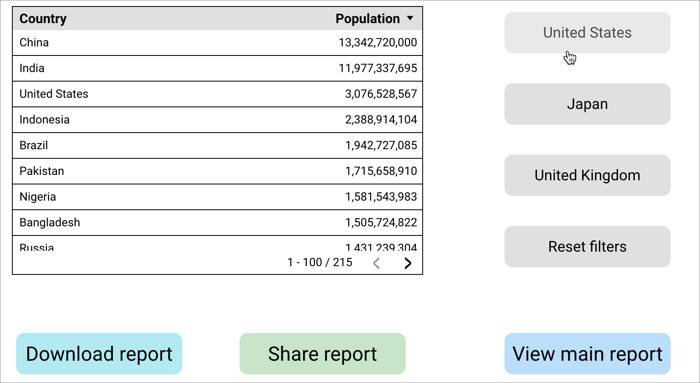
[[["易于理解","easyToUnderstand","thumb-up"],["解决了我的问题","solvedMyProblem","thumb-up"],["其他","otherUp","thumb-up"]],[["很难理解","hardToUnderstand","thumb-down"],["信息或示例代码不正确","incorrectInformationOrSampleCode","thumb-down"],["没有我需要的信息/示例","missingTheInformationSamplesINeed","thumb-down"],["翻译问题","translationIssue","thumb-down"],["其他","otherDown","thumb-down"]],["最后更新时间 (UTC):2025-08-25。"],[],[],null,["# Add buttons\n\nYou can add buttons to your Looker Studio reports to let users filter data, access report actions, and navigate to linked content in a streamlined and convenient way. For example, you can let users filter a table with **Country** and **Population** by preset country values or navigate to a related page, and you can also provide them with quick ways to download or share a report.\n| **Important:** When users click an external link, Looker Studio displays a redirect notice.\n\nAdd buttons to a report\n-----------------------\n\n1. [Edit your report](/looker/docs/studio/edit-a-report).\n2. Select the **Button** option from the **Add a control** drop-down menu.\n3. Label your button by typing in the button field.\n4. Rearrange your button to position it in the desired location on your report.\n\nNext, customize the button using the **Setup** and **Style** options in the **Properties** menu.\n\nButton setup options\n--------------------\n\nThe options in a button's **Setup** panel determine how a button is configured.\n\n### Data source\n\nA data source provides the connection between the component and the underlying dataset.\n\n- To change the button's data source, select the current data source name.\n- To view or edit the data source, select the **Edit data source** pencil icon . You must have at least view permissions to see this icon.\n\nThis option applies to the **Filter** action type.\n\n### Button action type\n\nThese options control the ways a dashboard user can interact with a report using buttons. Each option has additional configuration options.\n\nThere are several types of button actions:\n\n- [Navigation](#navigation_button)\n- [Report actions](#report_action_button)\n- [Filter](#filter_button)\n\n#### Navigation\n\nThe **Navigation** option lets dashboard editors create a button for users to quickly navigate to [internal or external linked content](/looker/docs/studio/link-to-a-page).\n| **Important:** When users click an external link, Looker Studio displays a redirect notice.\n| **Note:** This feature is being released gradually. You might not see it right away.\n\nThere are two types of navigation you can choose from:\n\n- [Static link](#static-link) --- A preset link that users can select to navigate to a specific page.\n- [Dynamic link](#dynamic-link) --- A link that users can select that changes based on the dimension value that they select when [cross-filtering is enabled](/looker/docs/studio/chart-cross-filtering) on a chart.\n\n| **Warning:** [Cross-filtering](/looker/docs/studio/chart-cross-filtering) must be enabled for a chart for **Dynamic** navigation buttons to function as expected. If cross-filtering is not enabled, dynamic link navigation uses the value of the first row of the dataset by default.\n\nTo add a **Static** link navigation button to your report, follow these steps:\n\n1. Select the **Navigation** option.\n2. Select the **Static link** option from the **Button link URL** drop-down menu.\n3. Select the **Insert link** button in the **Button link URL** section to open the **Insert link** menu.\n4. Input the URL.\n5. Select or deselect the **Open link in new tab** option, as desired.\n6. Select **Apply** to save the navigation options or **Cancel** to close the pop-up menu without saving.\n\nTo add a **Dynamic** link navigation button to your report, follow these steps:\n\n1. Select the **Navigation** option.\n\n2. Select the **Dynamic link (from dimension)** option from the **Button link URL** drop-down menu.\n\n3. Select **Add a new dimension** in the **Button Link URL** section to choose a dimension that includes URL values.\n\n - Alternatively, select **ADD FIELD** to open the calculated field menu and [create an expression](/looker/docs/studio/add-edit-and-troubleshoot-calculated-fields) that concatenates dimension values to a URL.\\\\\n\n For example, to create a dynamic link that performs a Google Search for a value from a dimension called **Country**, you can use the following expression:\n\n `concat(\"http://www.google.com/search?q=\",Country)`\n\n When a user selects a **Country** value in a chart, the button link will change to include that value.\n4. If you select **ADD FIELD** to create a dynamic URL, select the **URL** option from the **Data** **Type** drop-down menu, and then click **Apply** in the calculated field menu.\n\n5. Select or deselect the **Open link in new tab** option, as desired.\n\n#### Report actions\n\nThe **Report actions** option lets dashboard editors create a button for users to quickly access report actions such as sharing and downloading.\n\nTo add a **Report action** button to a report, follow these steps:\n\n1. Select the **Report actions** option.\n2. Choose one of the following options from the **Choose a report action for the button** drop-down menu:\n 1. **Invite people** --- Lets users quickly [invite other users](/looker/docs/studio/invite-others-to-your-reports) to view or collaborate on a report.\n 2. **Get report link** --- Lets users quickly [access a URL](/looker/docs/studio/get-a-link-to-your-report) for sharing a report with others or for using a report in web pages.\n 3. **Download report** --- Lets users quickly [download a report as a PDF](/looker/docs/studio/download-a-looker-studio-report-as-pdf).\n 4. **Reset filters** --- Lets users quickly reset [filters](/looker/docs/studio/about-filter-properties) on a report.\n\n#### Filter\n\nThe **Filter** option lets dashboard editors create preset filters for dashboard viewers to quickly and conveniently apply complex filter logic to charts and reports.\n\nSee the [Preset filter control page](/looker/docs/studio/preset-filter-control) to learn more about configuring preset filter controls.\n\nButton style options\n--------------------\n\nA button's **Style** properties control its overall presentation and appearance.\n\n### Button font options\n\nThese options control the appearance of button font styling.\n\n- **Font color:** Specifies the color of button text from a color palette pop-up.\n- **Font size:**Specifies the size of button text in pixels from a series of drop-down menu options.\n- **Font family:** Specifies the font family of button text from a series of drop-down menu options.\n\n### Background and border options\n\nThese options control the appearance of the button background container.\n\n- **Background:** Sets the button background color.\n- **Border radius:**Adds rounded borders to the chart background. When the radius is 0, the background shape has 90° corners. Border radius of 100° produces a circular shape.\n- **Opacity:** Sets the button's opacity. 100% opacity completely hides objects behind the button. 60% is the lowest opacity setting.\n- **Border color:** Sets the button border color.\n- **Border weight:** Sets the button border line thickness.\n- **Border style:** Sets the button border line style.\n- **Add border shadow:** Adds a shadow to the button's lower and right borders.\n\nRelated resources\n-----------------\n\n- Use [report theme](/looker/docs/studio/themes) and [layout](/looker/docs/studio/report-and-page-layout) settings to adjust the appearance of the page navigation.\n- [Preset filter control](/looker/docs/studio/preset-filter-control)\n- [Download a Looker Studio report as PDF](/looker/docs/studio/download-a-looker-studio-report-as-pdf)\n- [Invite others to your reports](/looker/docs/studio/invite-others-to-your-reports)\n- [Get a link to your report](/looker/docs/studio/get-a-link-to-your-report)"]]