Mantenha tudo organizado com as coleções
Salve e categorize o conteúdo com base nas suas preferências.
Instalar dependências
Depois de criar uma instância de notebooks gerenciados pelo usuário, talvez seja necessário instalar o software exigido por ele. É possível instalar dependências adicionando comandos de instalação a um arquivo no notebook ou usando uma janela de terminal.
Ao adicionar comandos de instalação a um arquivo,
os comandos para instalar as dependências são salvos com o
notebook e ficam disponíveis para os usuários com quem você compartilha o notebook.
Instalar dependências de uma instância de notebooks gerenciado pelo usuário
Para instalar pacotes Python a partir de uma instância de notebooks gerenciados pelo usuário:
No Google Cloud console, acesse a página Notebooks gerenciados pelo usuário.
Selecione a instância em que você quer instalar as dependências.
Clique em Open JupyterLab.
Para adicionar um arquivo do notebook, use o menu ou o acesso rápido.
Menu
Para adicionar um novo arquivo de notebook no menu, selecione
Arquivo > Novo > Notebook.
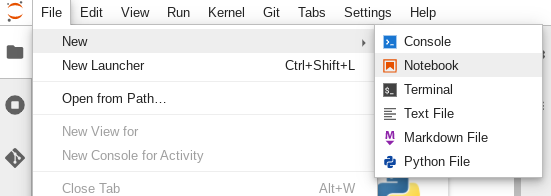
Na caixa de diálogo Selecionar kernel, selecione o kernel do novo
notebook, como o Python 3, e clique em Selecionar.
O novo arquivo do notebook será aberto.
Launcher
Para adicionar um novo arquivo de notebook do Python 3 no acesso rápido, selecione
File > New > Launcher.
Clique no bloco Python 3.
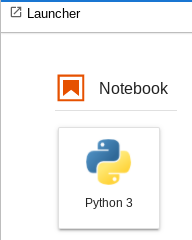
O novo arquivo do notebook será aberto.
Renomeie o novo arquivo do notebook.
Menu
Selecione Arquivo > Renomear notebook. A
caixa de diálogo Rename file é aberta.
No campo Novo nome, altere Untitled.ipynb para algo
significativo, como install.ipynb.
Clique em Renomear.
Launcher
Clique com o botão direito do mouse na guia Untitled.ipynb e clique em Renomear notebook. A caixa de diálogo Rename file é aberta.
No campo Novo nome, altere Untitled.ipynb para algo
significativo, como install.ipynb.
Clique em Renomear.
Instale as dependências da seguinte maneira.
Ao abrir o novo notebook, você verá uma célula de código padrão em que é possível inserir o código (neste caso, Python 3).
Para instalar a biblioteca de aprendizado profundo do mxnet (em inglês) em um notebook Python 3, digite o seguinte comando na célula de código:
%pip install mxnet
Selecione o botão de execução para iniciar o comando de instalação.
Quando a instalação estiver concluída, selecione Kernel -> Reiniciar kernel
para reiniciar o kernel e garantir que a biblioteca esteja disponível para importação.
Para salvar, selecione Arquivo -> Salvar notebook para salvar o notebook.
Instalar dependências usando um terminal
Para se conectar a um terminal, é possível usar seu notebook JupyterLab ou SSH. Para instalar pacotes do Python a partir de um terminal:
No Google Cloud console, acesse a página Notebooks gerenciados pelo usuário.
Selecione a instância em que você quer instalar as dependências.
Clique em Open JupyterLab.
Para abrir uma janela de terminal, você pode usar o menu ou o acesso rápido.
Menu
Para abrir uma janela de terminal no menu, selecione
Arquivo > Novo > Terminal.
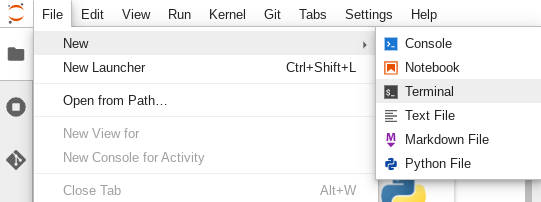
A janela do terminal é aberta.
Launcher
Para abrir uma janela de terminal na tela de início, selecione
File > New > Launcher.
Em Other, clique no bloco Terminal.
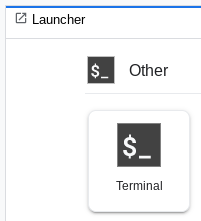
A janela do terminal é aberta.
Na janela de terminal, insira o comando para instalar a dependência de software na instância de notebooks gerenciados pelo usuário.
Para instalar a biblioteca de aprendizado profundo do mxnet (em inglês) para notebooks Python 3, digite o seguinte comando:
pip3 install mxnet
Quando a instalação for concluída, reinicie o kernel para garantir que a
biblioteca esteja disponível para importação. Em todos os arquivos de notebook abertos na
mesma instância de notebooks gerenciados pelo usuário, selecione
Kernel > Reiniciar kernel.
Para salvar, selecione Arquivo -> Salvar notebook para salvar o notebook.
[[["Fácil de entender","easyToUnderstand","thumb-up"],["Meu problema foi resolvido","solvedMyProblem","thumb-up"],["Outro","otherUp","thumb-up"]],[["Difícil de entender","hardToUnderstand","thumb-down"],["Informações incorretas ou exemplo de código","incorrectInformationOrSampleCode","thumb-down"],["Não contém as informações/amostras de que eu preciso","missingTheInformationSamplesINeed","thumb-down"],["Problema na tradução","translationIssue","thumb-down"],["Outro","otherDown","thumb-down"]],["Última atualização 2025-08-19 UTC."],[],[],null,["# Install dependencies on a Vertex AI Workbench user-managed notebooks instance\n\nInstall dependencies\n====================\n\n\n| Vertex AI Workbench user-managed notebooks is\n| [deprecated](/vertex-ai/docs/deprecations). On\n| April 14, 2025, support for\n| user-managed notebooks will end and the ability to create user-managed notebooks instances\n| will be removed. Existing instances will continue to function\n| but patches, updates, and upgrades won't be available. To continue using\n| Vertex AI Workbench, we recommend that you\n| [migrate\n| your user-managed notebooks instances to Vertex AI Workbench instances](/vertex-ai/docs/workbench/user-managed/migrate-to-instances).\n\n\u003cbr /\u003e\n\nAfter you create a user-managed notebooks instance, you might need to\ninstall software that\nyour notebook depends on. You can install dependencies by adding install\ncommands to a file in your notebook or by using a terminal\nwindow.\n\nAn advantage of adding install commands to a file is that, when you share\na notebook, the commands to install the dependencies are saved with the\nnotebook and are available to users that you share the notebook with.\n\nInstall dependencies from a user-managed notebooks instance\n-----------------------------------------------------------\n\nTo install Python packages from a user-managed notebooks\ninstance:\n\n1. In the Google Cloud console, go to the **User-managed notebooks** page.\n\n [Go to User-managed notebooks](https://console.cloud.google.com/vertex-ai/workbench/user-managed)\n2. Select the instance where you want to install dependencies.\n\n3. Click **Open JupyterLab**.\n\n4. To add a notebook file, you can use the menu or the Launcher.\n\n ### Menu\n\n 1. To add a new notebook file from the menu, select\n **File \\\u003e New \\\u003e Notebook**.\n\n 2. In the **Select kernel** dialog, select the kernel for your new\n notebook, for example, **Python 3** , and then click **Select**.\n\n Your new notebook file opens.\n\n ### Launcher\n\n 1. To add a new Python 3 notebook file from the Launcher, select\n **File \\\u003e New \\\u003e Launcher**.\n\n 2. Click the **Python 3** tile.\n\n Your new notebook file opens.\n5. Rename your new notebook file.\n\n ### Menu\n\n 1. Select **File \\\u003e Rename notebook** . The\n **Rename file** dialog opens.\n\n 2. In the **New name** field, change `Untitled.ipynb` to something\n meaningful, such as `install.ipynb`.\n\n 3. Click **Rename**.\n\n ### Launcher\n\n 1. Right-click the `Untitled.ipynb` tab and then click\n **Rename notebook** . The **Rename file** dialog opens.\n\n 2. In the **New name** field, change `Untitled.ipynb` to something\n meaningful, such as `install.ipynb`.\n\n 3. Click **Rename**.\n\n6. Install dependencies as follows.\n\n When you open your new notebook, there is a default code cell where you\n can enter code, in this case Python 3.\n\n To install the [mxnet](https://mxnet.apache.org/)\n deep learning library in a Python 3 notebook, enter the following\n command in the code cell:\n\n `%pip install mxnet`\n\n7. Click the run button to run the install command.\n\n8. When installation is complete, select\n **Kernel \\\u003e Restart kernel**\n to restart the kernel and ensure the library is available for import.\n\n9. Select **File \\\u003e Save notebook** to save the notebook.\n\nInstall dependencies from a terminal\n------------------------------------\n\nTo connect to a terminal, you can use your JupyterLab notebook or\n[SSH](/vertex-ai/docs/workbench/user-managed/ssh-access). To install Python\npackages from a terminal:\n\n1. In the Google Cloud console, go to the **User-managed notebooks** page.\n\n [Go to User-managed notebooks](https://console.cloud.google.com/vertex-ai/workbench/user-managed)\n2. Select the instance where you want to install dependencies.\n\n3. Click **Open JupyterLab**.\n\n4. To open a terminal window, you can use the menu or the Launcher.\n\n ### Menu\n\n To open a terminal window from the menu, select\n **File \\\u003e New \\\u003e Terminal**.\n\n The terminal window opens.\n\n ### Launcher\n\n 1. To open a terminal window from the Launcher, select\n **File \\\u003e New \\\u003e Launcher**.\n\n 2. In **Other** , click the **Terminal** tile.\n\n The terminal window opens.\n5. In the terminal window, enter the command to install the software\n dependency for your user-managed notebooks instance.\n\n To install the [mxnet](https://mxnet.apache.org/)\n deep learning library for Python 3 notebooks, enter the following\n command:\n\n `pip3 install mxnet`\n\n6. When installation is complete, restart the kernel to make sure the\n library is available for import. In every open notebook file in the\n same user-managed notebooks instance, select\n **Kernel \\\u003e Restart kernel**.\n\n7. Select **File \\\u003e Save notebook** to save the notebook."]]