Sign in to your Google Cloud account. If you're new to
Google Cloud,
create an account to evaluate how our products perform in
real-world scenarios. New customers also get $300 in free credits to
run, test, and deploy workloads.
In the Google Cloud console, on the project selector page,
select or create a Google Cloud project.
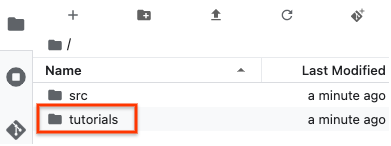
[[["易于理解","easyToUnderstand","thumb-up"],["解决了我的问题","solvedMyProblem","thumb-up"],["其他","otherUp","thumb-up"]],[["很难理解","hardToUnderstand","thumb-down"],["信息或示例代码不正确","incorrectInformationOrSampleCode","thumb-down"],["没有我需要的信息/示例","missingTheInformationSamplesINeed","thumb-down"],["翻译问题","translationIssue","thumb-down"],["其他","otherDown","thumb-down"]],["最后更新时间 (UTC):2025-08-18。"],[],[],null,["# Quickstart: Create a user-managed notebooks instance by using the Google Cloud console\n\nCreate a user-managed notebooks instance\nby using the Google Cloud console\n==========================================================================\n\n\n| Vertex AI Workbench user-managed notebooks is\n| [deprecated](/vertex-ai/docs/deprecations). On\n| April 14, 2025, support for\n| user-managed notebooks will end and the ability to create user-managed notebooks instances\n| will be removed. Existing instances will continue to function\n| but patches, updates, and upgrades won't be available. To continue using\n| Vertex AI Workbench, we recommend that you\n| [migrate\n| your user-managed notebooks instances to Vertex AI Workbench instances](/vertex-ai/docs/workbench/user-managed/migrate-to-instances).\n\n\u003cbr /\u003e\n\nLearn how to create\na Vertex AI Workbench user-managed notebooks instance\nand open JupyterLab by using the Google Cloud console.\nThis page also describes how to stop, start, reset, or delete\na user-managed notebooks instance.\n\n*** ** * ** ***\n\nTo follow step-by-step guidance for this task directly in the\nGoogle Cloud console, click **Guide me**:\n\n[Guide me](https://console.cloud.google.com/freetrial?redirectPath=/?walkthrough_id=vertex-ai--workbench--user-managed--create-user-managed-notebooks-instance-console-quickstart)\n\n*** ** * ** ***\n\n\u003cbr /\u003e\n\nBefore you begin\n----------------\n\n- Sign in to your Google Cloud account. If you're new to Google Cloud, [create an account](https://console.cloud.google.com/freetrial) to evaluate how our products perform in real-world scenarios. New customers also get $300 in free credits to run, test, and deploy workloads.\n- In the Google Cloud console, on the project selector page,\n select or create a Google Cloud project.\n\n | **Note**: If you don't plan to keep the resources that you create in this procedure, create a project instead of selecting an existing project. After you finish these steps, you can delete the project, removing all resources associated with the project.\n\n [Go to project selector](https://console.cloud.google.com/projectselector2/home/dashboard)\n-\n [Verify that billing is enabled for your Google Cloud project](/billing/docs/how-to/verify-billing-enabled#confirm_billing_is_enabled_on_a_project).\n\n-\n\n\n Enable the Notebooks API.\n\n\n [Enable the API](https://console.cloud.google.com/flows/enableapi?apiid=notebooks.googleapis.com&redirect=https://console.cloud.google.com)\n\n- In the Google Cloud console, on the project selector page,\n select or create a Google Cloud project.\n\n | **Note**: If you don't plan to keep the resources that you create in this procedure, create a project instead of selecting an existing project. After you finish these steps, you can delete the project, removing all resources associated with the project.\n\n [Go to project selector](https://console.cloud.google.com/projectselector2/home/dashboard)\n-\n [Verify that billing is enabled for your Google Cloud project](/billing/docs/how-to/verify-billing-enabled#confirm_billing_is_enabled_on_a_project).\n\n-\n\n\n Enable the Notebooks API.\n\n\n [Enable the API](https://console.cloud.google.com/flows/enableapi?apiid=notebooks.googleapis.com&redirect=https://console.cloud.google.com)\n\n\u003cbr /\u003e\n\nCreate an instance\n------------------\n\n1. In the Google Cloud console, go to the **User-managed notebooks** page.\n\n [Go to User-managed notebooks](https://console.cloud.google.com/vertex-ai/workbench/user-managed)\n2. Click add_box **Create new**.\n\n3. For **Name** , enter `my-instance`.\n\n4. Click **Create**.\n\nWhen you finish the tasks that are described in this document, you can avoid\ncontinued billing by deleting the resources that you created. For more information, see\n[Clean up](#clean-up).\n\nOpen JupyterLab\n---------------\n\nAfter you create your instance, Vertex AI Workbench automatically starts\nthe instance. When the instance is ready to use, Vertex AI Workbench\nactivates an **Open JupyterLab** link.\n\n1. Next to your user-managed notebooks instance's name,\n click **Open JupyterLab**.\n\n Your user-managed notebooks instance opens JupyterLab.\n\nOpen a new notebook file\n------------------------\n\n1. Select **File \\\u003e New \\\u003e Notebook**.\n\n2. In the **Select Kernel** dialog, select **Python 3** ,\n and then click **Select**.\n\n3. Your new notebook file opens.\n\nChange the kernel\n-----------------\n\nYou can change the kernel of your JupyterLab notebook file from the menu\nor in the file. \n\n### Menu\n\n1. In JupyterLab, on the **Kernel** menu, click **Change kernel**.\n\n2. In the **Select Kernel** dialog, select another kernel to use\n and then click **Select**.\n\n### In the file\n\n1. In your JupyterLab notebook file, click the kernel name.\n\n2. In the **Select Kernel** dialog, select another kernel to use\n and then click **Select**.\n\nStop your instance\n------------------\n\n1. In the Google Cloud console, go to the **User-managed notebooks** page.\n\n [Go to User-managed notebooks](https://console.cloud.google.com/vertex-ai/workbench/user-managed)\n2. Select the instance that you want to stop.\n\n3. Click stop **Stop**.\n\nStart your instance\n-------------------\n\n1. In the Google Cloud console, go to the **User-managed notebooks** page.\n\n [Go to User-managed notebooks](https://console.cloud.google.com/vertex-ai/workbench/user-managed)\n2. Select the instance that you want to start.\n\n3. Click play_arrow **Start**.\n\nReset your instance\n-------------------\n\nResetting a compute instance forcibly wipes the memory contents of your instance\nand resets the instance to its initial state. To learn more about how resetting\nan instance works, see\n[Resetting an instance](/compute/docs/instances/suspend-stop-reset-instances-overview#resetting-instance).\n\n1. In the Google Cloud console, go to the **User-managed notebooks** page.\n\n [Go to User-managed notebooks](https://console.cloud.google.com/vertex-ai/workbench/user-managed)\n2. Select the instance that you want to reset.\n\n3. Click\n\n **Reset** , and then click **Reset** to confirm.\n\nClean up\n--------\n\n\nTo avoid incurring charges to your Google Cloud account for\nthe resources used on this page, follow these steps.\n\nIf you created a new project to learn about\nVertex AI Workbench user-managed notebooks\nand you no longer need the project, then\n[delete the project](https://console.cloud.google.com/cloud-resource-manager).\n\nIf you used an existing Google Cloud project, then delete the resources\nyou created to avoid incurring charges to your account:\n\n1. In the Google Cloud console, go to the **User-managed notebooks** page.\n\n [Go to User-managed notebooks](https://console.cloud.google.com/vertex-ai/workbench/user-managed)\n2. Select the row containing the instance that you want to delete.\n\n3. Click delete **Delete** .\n (Depending on the size of your window,\n the **Delete** button might be in\n the more_vert options menu.)\n\n4. To confirm, click **Delete**.\n\nWhat's next\n-----------\n\n- Try one of the tutorials that is included\n in your new user-managed notebooks instance.\n In the JupyterLab\n folder **File Browser** ,\n open the **tutorials** folder,\n and open one of the notebook files.\n\n- [Read the Introduction to user-managed notebooks](/vertex-ai/docs/workbench/user-managed/introduction).\n\n- [Create a user-managed notebooks instance\n with specific properties](/vertex-ai/docs/workbench/user-managed/create-new#create-with-options)."]]

 重置,然后点击重置进行确认。