Create a managed notebooks instance by using the Google Cloud console
Learn how to create a Vertex AI Workbench managed notebooks instance and open JupyterLab by using the Google Cloud console. This page also describes how to stop, start, reset, or delete a managed notebooks instance.
Before you begin
- Sign in to your Google Cloud account. If you're new to Google Cloud, create an account to evaluate how our products perform in real-world scenarios. New customers also get $300 in free credits to run, test, and deploy workloads.
-
In the Google Cloud console, on the project selector page, select or create a Google Cloud project.
Roles required to select or create a project
- Select a project: Selecting a project doesn't require a specific IAM role—you can select any project that you've been granted a role on.
-
Create a project: To create a project, you need the Project Creator
(
roles/resourcemanager.projectCreator), which contains theresourcemanager.projects.createpermission. Learn how to grant roles.
-
Verify that billing is enabled for your Google Cloud project.
-
Enable the Notebooks API.
Roles required to enable APIs
To enable APIs, you need the Service Usage Admin IAM role (
roles/serviceusage.serviceUsageAdmin), which contains theserviceusage.services.enablepermission. Learn how to grant roles. -
In the Google Cloud console, on the project selector page, select or create a Google Cloud project.
Roles required to select or create a project
- Select a project: Selecting a project doesn't require a specific IAM role—you can select any project that you've been granted a role on.
-
Create a project: To create a project, you need the Project Creator
(
roles/resourcemanager.projectCreator), which contains theresourcemanager.projects.createpermission. Learn how to grant roles.
-
Verify that billing is enabled for your Google Cloud project.
-
Enable the Notebooks API.
Roles required to enable APIs
To enable APIs, you need the Service Usage Admin IAM role (
roles/serviceusage.serviceUsageAdmin), which contains theserviceusage.services.enablepermission. Learn how to grant roles.
Create an instance
In the Google Cloud console, go to the Managed notebooks page.
Click Create new.
In the Create instance window, in the Name field, enter
my-instance.Click Create.
When you finish the tasks that are described in this document, you can avoid continued billing by deleting the resources that you created. For more information, see Clean up.
Open JupyterLab
After you create your instance, Vertex AI Workbench automatically starts the instance. When the instance is ready to use, Vertex AI Workbench activates an Open JupyterLab link.
Next to your managed notebooks instance's name, click Open JupyterLab.
In the Authenticate your managed notebook dialog, click the button to get an authentication code.
Choose an account and click Allow. Copy the authentication code.
In the Authenticate your managed notebook dialog, paste the authentication code, and then click Authenticate.
Your managed notebooks instance opens JupyterLab.
Open a new notebook file
Select File > New > Notebook.
In the Select kernel dialog, select Python, and then click Select.
Your new notebook file opens.
Change the kernel
You can change the kernel of your JupyterLab notebook file from the menu or in the file.
Menu
In JupyterLab, on the Kernel menu, click Change kernel.
In the Select kernel dialog, select another kernel to use.
Click Select.
In the file
In your JupyterLab notebook file, click the kernel name.

In the Select kernel dialog, select another kernel to use.
Click Select.
Stop your instance
In the Google Cloud console, go to the Managed notebooks page.
Select the instance that you want to stop.
Click Stop.
Start your instance
In the Google Cloud console, go to the Managed notebooks page.
Select the instance that you want to start.
Click Start.
Reset your instance
Resetting an instance forcibly wipes the memory contents of your instance and resets the instance to its initial state. To learn more about how resetting an instance works, see Resetting an instance.
In the Google Cloud console, go to the Managed notebooks page.
Select the instance that you want to reset.
Click Reset, and then click Reset to confirm.
Clean up
To avoid incurring charges to your Google Cloud account for the resources used on this page, follow these steps.
If you created a new project to learn about Vertex AI Workbench managed notebooks and you no longer need the project, then delete the project.
If you used an existing Google Cloud project, then delete the resources you created to avoid incurring charges to your account:
In the Google Cloud console, go to the Managed notebooks page.
Select the row containing the instance that you want to delete.
Click Delete. (Depending on the size of your window, the Delete button might be in the options menu.)
To confirm, click Delete.
What's next
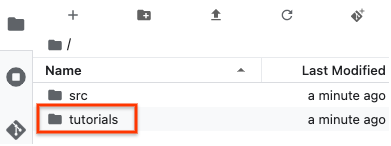
Try one of the tutorials that is included in your new managed notebooks instance. In the JupyterLab File Browser, open the tutorials folder, and open one of the notebook files.

Read the Introduction to managed notebooks.

 Reset, and then click Reset to confirm.