Dados da imagem Hello: implantar um modelo em um endpoint e enviar uma predição
Mantenha tudo organizado com as coleções
Salve e categorize o conteúdo com base nas suas preferências.
Depois que o treinamento do modelo de classificação de imagens do AutoML for concluído, use o
consoleGoogle Cloud para criar um endpoint e implantar seu modelo no
endpoint. Depois que o modelo for implantado nesse novo endpoint, envie uma imagem para o modelo para previsão de rótulos.
Selecione o modelo treinado do AutoML. Isso leva você à guia Avaliar,
onde é possível conferir as métricas de performance do modelo.
Escolha a guia tabImplantar e testar.
Clique em Implantar no endpoint.
Escolha radio_button_checkedCriar novo
endpoint, defina o nome do endpoint como hello_automl_image e clique em
Continuar.
Em Configurações de modelo, aceite a Divisão de tráfego de
100% e insira 1 em Número de nós da computação e clique em Concluído.
Clique em Implantar para implantar o modelo no novo endpoint.
Leva alguns minutos para criar o endpoint e implantar o modelo do AutoML no novo endpoint.
Enviar uma previsão para seu modelo
Depois que o processo de criação do endpoint terminar, envie uma única solicitação de anotação de imagem (previsão) no console Google Cloud .
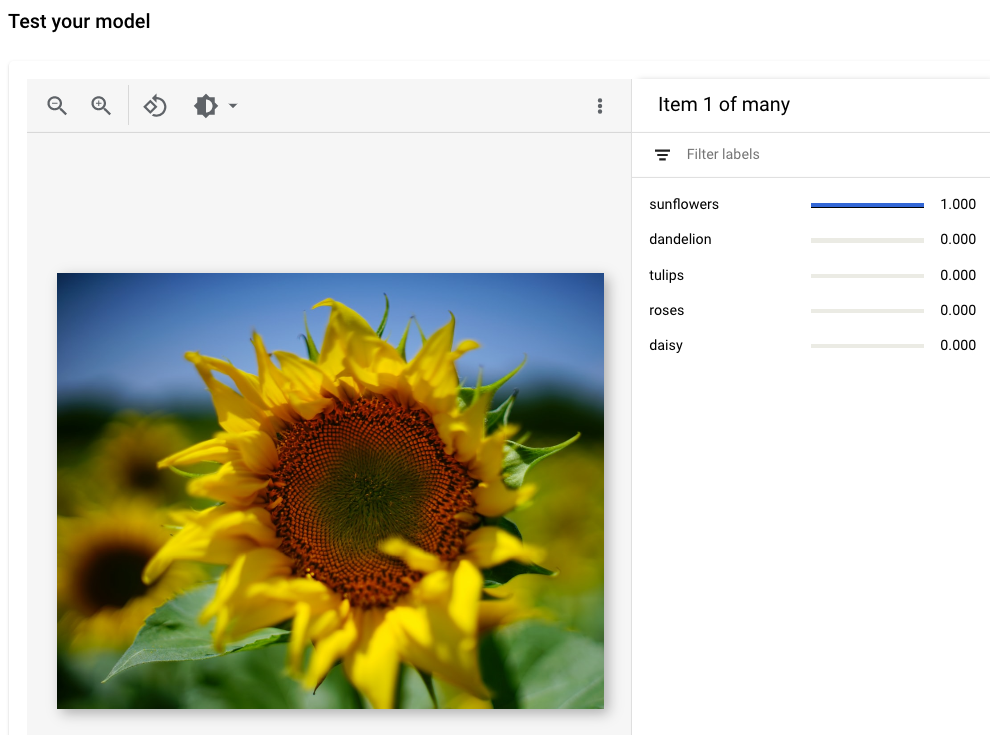
Navegue até a seção "Testar o modelo" da mesma guia Implantar e testar usada para criar um endpoint na etapa anterior (Modelos > your_model > tab Implantar e testar.
Clique em Fazer upload de imagem, escolha uma imagem salva localmente para previsão e veja o rótulo previsto nela.
[[["Fácil de entender","easyToUnderstand","thumb-up"],["Meu problema foi resolvido","solvedMyProblem","thumb-up"],["Outro","otherUp","thumb-up"]],[["Difícil de entender","hardToUnderstand","thumb-down"],["Informações incorretas ou exemplo de código","incorrectInformationOrSampleCode","thumb-down"],["Não contém as informações/amostras de que eu preciso","missingTheInformationSamplesINeed","thumb-down"],["Problema na tradução","translationIssue","thumb-down"],["Outro","otherDown","thumb-down"]],["Última atualização 2025-08-19 UTC."],[],[],null,["# Hello image data: Deploy a model to an endpoint and send a prediction\n\nAfter your AutoML image classification model is done training, use the\nGoogle Cloud console to create an endpoint and deploy your model to\nthe endpoint. After your model is deployed to this new endpoint, send an image\nto the model for label prediction.\n\nThis tutorial has several pages:\n\n1. [Set up your project and environment.](/vertex-ai/docs/tutorials/image-classification-automl)\n\n2. [Create an image classification dataset, and\n import images.](/vertex-ai/docs/tutorials/image-classification-automl/dataset)\n\n3. [Train an AutoML image classification\n model.](/vertex-ai/docs/tutorials/image-classification-automl/training)\n\n4. [Evaluate and analyze model performance.](/vertex-ai/docs/tutorials/image-classification-automl/error-analysis)\n\n5. Deploy a model to an endpoint, and send a\n prediction.\n\n6. [Clean up your project.](/vertex-ai/docs/tutorials/image-classification-automl/cleanup)\n\nEach page assumes that you have already performed the instructions from the\nprevious pages of the tutorial.\n\nDeploy your model to an endpoint\n--------------------------------\n\nAccess your trained model to deploy it to a new or existing endpoint from\nthe Models page:\n\n1. In the Google Cloud console, in the Vertex AI section, go to\n the **Training** page.\n\n [Go to the Training page](https://console.cloud.google.com/vertex-ai/training)\n2. Select your trained AutoML model. This takes you to the **Evaluate** tab\n where you can view model performance metrics.\n\n3. Choose the tab **Deploy \\& test** tab.\n\n4. Click **Deploy to endpoint**.\n\n5. Choose radio_button_checked**Create new\n endpoint** , set the endpoint name to `hello_automl_image`, then click\n **Continue**.\n\n6. In **Model settings** , accept the **Traffic split** of\n **100%** , enter **1** in **Number of compute nodes** , then click **Done**.\n\n7. Click **Deploy** to deploy your model to your new endpoint.\n\nIt takes several minutes to create the endpoint and deploy the AutoML model\nto the new endpoint.\n\nSend a prediction to your model\n-------------------------------\n\nAfter the endpoint creation process finishes you can send a single image\nannotation (prediction) request in the Google Cloud console.\n\n1. Navigate to the \"Test your model\" section of the same **Deploy \\& test** tab\n you used to create an endpoint in the previous step\n (**Models \\\u003e \u003cvar translate=\"no\"\u003eyour_model\u003c/var\u003e \\\u003e tab Deploy \\& test**).\n\n2. Click **Upload image** and choose a locally saved image for prediction, and\n view its predicted label.\n\n *Image credit* : [Siming Ye, Unsplash](https://unsplash.com/photos/qE-_sYxOMa8) (*shown in UI view*).\n\nWhat's next\n-----------\n\nFollow the [last page of the tutorial](/vertex-ai/docs/tutorials/image-classification-automl/cleanup) to clean up\nresources that you have created."]]