本文將逐步說明如何建構管道,以便在排定的時間間隔或資料集插入新資料時,使用 Vertex AI Pipelines 和 Cloud Run 函式自動訓練自訂模型。
目標
以下步驟說明這個程序:
在 BigQuery 中取得及準備資料集。
建立並上傳自訂訓練套件。執行時,這項作業會從資料集讀取資料,並訓練模型。
建立 Vertex AI Pipeline。這個管道會執行自訂訓練套件、將模型上傳至 Vertex AI Model Registry、執行評估作業,並傳送電子郵件通知。
手動執行管道。
建立 Cloud Function,並使用 Eventarc 觸發程序,在有新資料插入 BigQuery 資料集時執行管道。
事前準備
設定專案和筆記本。
專案設定
-
In the Google Cloud console, go to the project selector page.
-
Select or create a Google Cloud project.
Roles required to select or create a project
- Select a project: Selecting a project doesn't require a specific IAM role—you can select any project that you've been granted a role on.
-
Create a project: To create a project, you need the Project Creator
(
roles/resourcemanager.projectCreator), which contains theresourcemanager.projects.createpermission. Learn how to grant roles.
-
Verify that billing is enabled for your Google Cloud project.
建立筆記本
我們會使用 Colab Enterprise 筆記本執行本教學課程中的部分程式碼。
如果您不是專案擁有者,請要求專案擁有者授予您
roles/resourcemanager.projectIamAdmin和roles/aiplatform.colabEnterpriseUserIAM 角色。您必須具備這些角色,才能使用 Colab Enterprise,並將 IAM 角色和權限授予自己和服務帳戶。
前往 Google Cloud 控制台的 Colab Enterprise 筆記本頁面。
如果尚未啟用下列必要 API,Colab Enterprise 會要求您啟用。
- Vertex AI API
- Dataform API
- Compute Engine API
在「Region」(區域) 選單中,選取要建立筆記本的區域。如果不確定,請使用 us-central1 做為區域。
本教學課程中的所有資源都使用相同區域。
按一下「建立新筆記本」。
新的筆記本就會出現在「My notebooks」(我的筆記本) 分頁中。如要在筆記本中執行程式碼,請新增程式碼儲存格,然後按一下 「Run cell」(執行儲存格) 按鈕。
設定開發環境
在筆記本中安裝下列 Python3 套件。
! pip3 install  google-cloud-aiplatform==1.34.0 \
                google-cloud-pipeline-components==2.6.0 \
                kfp==2.4.0 \
                scikit-learn==1.0.2 \
                mlflow==2.10.0
執行下列指令,設定 Google Cloud CLI 專案:
PROJECT_ID = "PROJECT_ID"

# Set the project id
! gcloud config set project {PROJECT_ID}
將 PROJECT_ID 替換為專案 ID。如有需要,您可以在 Google Cloud 控制台中找到專案 ID。
將角色授予 Google 帳戶:
! gcloud projects add-iam-policy-binding PROJECT_ID --member="user:"EMAIL_ADDRESS"" --role=roles/bigquery.admin
! gcloud projects add-iam-policy-binding PROJECT_ID --member="user:"EMAIL_ADDRESS"" --role=roles/aiplatform.user
! gcloud projects add-iam-policy-binding PROJECT_ID --member="user:"EMAIL_ADDRESS"" --role=roles/storage.admin
! gcloud projects add-iam-policy-binding PROJECT_ID --member="user:"EMAIL_ADDRESS"" --role=roles/pubsub.editor
! gcloud projects add-iam-policy-binding PROJECT_ID --member="user:"EMAIL_ADDRESS"" --role=roles/cloudfunctions.admin
! gcloud projects add-iam-policy-binding PROJECT_ID --member="user:"EMAIL_ADDRESS"" --role=roles/logging.viewer
! gcloud projects add-iam-policy-binding PROJECT_ID --member="user:"EMAIL_ADDRESS"" --role=roles/logging.configWriter
! gcloud projects add-iam-policy-binding PROJECT_ID --member="user:"EMAIL_ADDRESS"" --role=roles/iam.serviceAccountUser
! gcloud projects add-iam-policy-binding PROJECT_ID --member="user:"EMAIL_ADDRESS"" --role=roles/eventarc.admin
! gcloud projects add-iam-policy-binding PROJECT_ID --member="user:"EMAIL_ADDRESS"" --role=roles/aiplatform.colabEnterpriseUser
! gcloud projects add-iam-policy-binding PROJECT_ID --member="user:"EMAIL_ADDRESS"" --role=roles/artifactregistry.admin
! gcloud projects add-iam-policy-binding PROJECT_ID --member="user:"EMAIL_ADDRESS"" --role=roles/serviceusage.serviceUsageAdmin
啟用下列 API
- Artifact Registry API
- BigQuery API
- Cloud Build API
- Cloud Functions API
- Cloud Logging API
- Pub/Sub API
- Cloud Run Admin API
- Cloud Storage API
- Eventarc API
- Service Usage API
- Vertex AI API
! gcloud services enable artifactregistry.googleapis.com bigquery.googleapis.com cloudbuild.googleapis.com cloudfunctions.googleapis.com logging.googleapis.com pubsub.googleapis.com run.googleapis.com storage-component.googleapis.com eventarc.googleapis.com serviceusage.googleapis.com aiplatform.googleapis.com將角色授予專案的服務帳戶:
查看服務帳戶名稱
! gcloud iam service-accounts list記下 Compute 服務代理人的名稱。格式應為
xxxxxxxx-compute@developer.gserviceaccount.com。將必要角色授予服務代理。
! gcloud projects add-iam-policy-binding PROJECT_ID --member="serviceAccount:"SA_ID-compute@developer.gserviceaccount.com"" --role=roles/aiplatform.serviceAgent
! gcloud projects add-iam-policy-binding PROJECT_ID --member="serviceAccount:"SA_ID-compute@developer.gserviceaccount.com"" --role=roles/eventarc.eventReceiver
取得及準備資料集
在本教學課程中,您將建構一個模型,根據乘車時間、地點和距離等特徵預估計程車資。我們將使用公開的「芝加哥計程車車程」資料集。這個資料集包含 2013 年至今的計程車行程,由芝加哥市以監管機構的身分回報。為同時保護計程車司機和使用者的隱私權,並允許匯總工具分析資料,特定計程車牌照號碼的計程車 ID 會保持一致,但不會顯示該號碼;在某些情況下,普查區會遭到隱藏,時間則會四捨五入至最接近的 15 分鐘。
詳情請參閱 Marketplace 上的芝加哥計程車行程。
建立 BigQuery 資料集
前往 Google Cloud 控制台的「BigQuery Studio」。
在「Explorer」面板中找到專案,依序點選「動作」 和「建立資料集」。
在「Create dataset」(建立資料集) 頁面:
在「Dataset ID」(資料集 ID) 中輸入
mlops。詳情請參閱資料集命名。「位置類型」請選擇多區域。舉例來說,如果您使用
us-central1,請選擇「美國 (多個美國地區)」。資料集建立後即無法變更位置。點選「建立資料集」。
詳情請參閱如何建立資料集。
建立及填入 BigQuery 資料表
在本節中,您將建立資料表,並從公開資料集匯入一年的資料到專案的資料集中。
前往 BigQuery Studio
按一下「建立 SQL 查詢」,然後點選 「執行」,執行下列 SQL 查詢。
CREATE OR REPLACE TABLE `PROJECT_ID.mlops.chicago`
AS (
    WITH
      taxitrips AS (
      SELECT
        trip_start_timestamp,
        trip_end_timestamp,
        trip_seconds,
        trip_miles,
        payment_type,
        pickup_longitude,
        pickup_latitude,
        dropoff_longitude,
        dropoff_latitude,
        tips,
        tolls,
        fare,
        pickup_community_area,
        dropoff_community_area,
        company,
        unique_key
      FROM
        `bigquery-public-data.chicago_taxi_trips.taxi_trips`
      WHERE pickup_longitude IS NOT NULL
      AND pickup_latitude IS NOT NULL
      AND dropoff_longitude IS NOT NULL
      AND dropoff_latitude IS NOT NULL
      AND trip_miles > 0
      AND trip_seconds > 0
      AND fare > 0
      AND EXTRACT(YEAR FROM trip_start_timestamp) = 2019
    )

    SELECT
      trip_start_timestamp,
      EXTRACT(MONTH from trip_start_timestamp) as trip_month,
      EXTRACT(DAY from trip_start_timestamp) as trip_day,
      EXTRACT(DAYOFWEEK from trip_start_timestamp) as trip_day_of_week,
      EXTRACT(HOUR from trip_start_timestamp) as trip_hour,
      trip_seconds,
      trip_miles,
      payment_type,
      ST_AsText(
          ST_SnapToGrid(ST_GeogPoint(pickup_longitude, pickup_latitude), 0.1)
      ) AS pickup_grid,
      ST_AsText(
          ST_SnapToGrid(ST_GeogPoint(dropoff_longitude, dropoff_latitude), 0.1)
      ) AS dropoff_grid,
      ST_Distance(
          ST_GeogPoint(pickup_longitude, pickup_latitude),
          ST_GeogPoint(dropoff_longitude, dropoff_latitude)
      ) AS euclidean,
      CONCAT(
          ST_AsText(ST_SnapToGrid(ST_GeogPoint(pickup_longitude,
              pickup_latitude), 0.1)),
          ST_AsText(ST_SnapToGrid(ST_GeogPoint(dropoff_longitude,
              dropoff_latitude), 0.1))
      ) AS loc_cross,
      IF((tips/fare >= 0.2), 1, 0) AS tip_bin,
      tips,
      tolls,
      fare,
      pickup_longitude,
      pickup_latitude,
      dropoff_longitude,
      dropoff_latitude,
      pickup_community_area,
      dropoff_community_area,
      company,
      unique_key,
      trip_end_timestamp
    FROM
      taxitrips
    LIMIT 1000000
)
這項查詢會建立
<PROJECT_ID>.mlops.chicago資料表,並從公開的bigquery-public-data.chicago_taxi_trips.taxi_trips資料表填入資料。如要查看資料表結構定義,請點按「前往資料表」,然後點按「結構定義」分頁標籤。
如要查看資料表內容,請點選「Preview」(預覽) 分頁標籤。
建立及上傳自訂訓練套件
在本節中,您將建立 Python 套件,其中包含讀取資料集、將資料分割為訓練集和測試集,以及訓練自訂模型的程式碼。套件會以管道中的其中一項工作執行。詳情請參閱為預先建構的容器建構 Python 訓練應用程式。
建立自訂訓練套件
在 Colab 筆記本中,為訓練應用程式建立上層資料夾:
!mkdir -p training_package/trainer在每個資料夾中建立
__init__.py檔案,使用下列指令將資料夾設為套件:! touch training_package/__init__.py ! touch training_package/trainer/__init__.py您可以在「檔案」資料夾面板中查看新檔案和資料夾。
在「Files」面板中,於 training_package/trainer 資料夾中建立名為
task.py的檔案,並加入下列內容。# Import the libraries from sklearn.model_selection import train_test_split, cross_val_score from sklearn.preprocessing import OneHotEncoder, StandardScaler from google.cloud import bigquery, bigquery_storage from sklearn.ensemble import RandomForestRegressor from sklearn.compose import ColumnTransformer from sklearn.pipeline import Pipeline from google import auth from scipy import stats import numpy as np import argparse import joblib import pickle import csv import os # add parser arguments parser = argparse.ArgumentParser() parser.add_argument('--project-id', dest='project_id', type=str, help='Project ID.') parser.add_argument('--training-dir', dest='training_dir', default=os.getenv("AIP_MODEL_DIR"), type=str, help='Dir to save the data and the trained model.') parser.add_argument('--bq-source', dest='bq_source', type=str, help='BigQuery data source for training data.') args = parser.parse_args() # data preparation code BQ_QUERY = """ with tmp_table as ( SELECT trip_seconds, trip_miles, fare, tolls, company, pickup_latitude, pickup_longitude, dropoff_latitude, dropoff_longitude, DATETIME(trip_start_timestamp, 'America/Chicago') trip_start_timestamp, DATETIME(trip_end_timestamp, 'America/Chicago') trip_end_timestamp, CASE WHEN (pickup_community_area IN (56, 64, 76)) OR (dropoff_community_area IN (56, 64, 76)) THEN 1 else 0 END is_airport, FROM `{}` WHERE dropoff_latitude IS NOT NULL and dropoff_longitude IS NOT NULL and pickup_latitude IS NOT NULL and pickup_longitude IS NOT NULL and fare > 0 and trip_miles > 0 and MOD(ABS(FARM_FINGERPRINT(unique_key)), 100) between 0 and 99 ORDER BY RAND() LIMIT 10000) SELECT *, EXTRACT(YEAR FROM trip_start_timestamp) trip_start_year, EXTRACT(MONTH FROM trip_start_timestamp) trip_start_month, EXTRACT(DAY FROM trip_start_timestamp) trip_start_day, EXTRACT(HOUR FROM trip_start_timestamp) trip_start_hour, FORMAT_DATE('%a', DATE(trip_start_timestamp)) trip_start_day_of_week FROM tmp_table """.format(args.bq_source) # Get default credentials credentials, project = auth.default() bqclient = bigquery.Client(credentials=credentials, project=args.project_id) bqstorageclient = bigquery_storage.BigQueryReadClient(credentials=credentials) df = ( bqclient.query(BQ_QUERY) .result() .to_dataframe(bqstorage_client=bqstorageclient) ) # Add 'N/A' for missing 'Company' df.fillna(value={'company':'N/A','tolls':0}, inplace=True) # Drop rows containing null data. df.dropna(how='any', axis='rows', inplace=True) # Pickup and dropoff locations distance df['abs_distance'] = (np.hypot(df['dropoff_latitude']-df['pickup_latitude'], df['dropoff_longitude']-df['pickup_longitude']))*100 # Remove extremes, outliers possible_outliers_cols = ['trip_seconds', 'trip_miles', 'fare', 'abs_distance'] df=df[(np.abs(stats.zscore(df[possible_outliers_cols].astype(float))) < 3).all(axis=1)].copy() # Reduce location accuracy df=df.round({'pickup_latitude': 3, 'pickup_longitude': 3, 'dropoff_latitude':3, 'dropoff_longitude':3}) # Drop the timestamp col X=df.drop(['trip_start_timestamp', 'trip_end_timestamp'],axis=1) # Split the data into train and test X_train, X_test = train_test_split(X, test_size=0.10, random_state=123) ## Format the data for batch predictions # select string cols string_cols = X_test.select_dtypes(include='object').columns # Add quotes around string fields X_test[string_cols] = X_test[string_cols].apply(lambda x: '\"' + x + '\"') # Add quotes around column names X_test.columns = ['\"' + col + '\"' for col in X_test.columns] # Save DataFrame to csv X_test.to_csv(os.path.join(args.training_dir,"test.csv"),index=False,quoting=csv.QUOTE_NONE, escapechar=' ') # Save test data without the target for batch predictions X_test.drop('\"fare\"',axis=1,inplace=True) X_test.to_csv(os.path.join(args.training_dir,"test_no_target.csv"),index=False,quoting=csv.QUOTE_NONE, escapechar=' ') # Separate the target column y_train=X_train.pop('fare') # Get the column indexes col_index_dict = {col: idx for idx, col in enumerate(X_train.columns)} # Create a column transformer pipeline ct_pipe = ColumnTransformer(transformers=[ ('hourly_cat', OneHotEncoder(categories=[range(0,24)], sparse = False), [col_index_dict['trip_start_hour']]), ('dow', OneHotEncoder(categories=[['Mon', 'Tue', 'Sun', 'Wed', 'Sat', 'Fri', 'Thu']], sparse = False), [col_index_dict['trip_start_day_of_week']]), ('std_scaler', StandardScaler(), [ col_index_dict['trip_start_year'], col_index_dict['abs_distance'], col_index_dict['pickup_longitude'], col_index_dict['pickup_latitude'], col_index_dict['dropoff_longitude'], col_index_dict['dropoff_latitude'], col_index_dict['trip_miles'], col_index_dict['trip_seconds']]) ]) # Add the random-forest estimator to the pipeline rfr_pipe = Pipeline([ ('ct', ct_pipe), ('forest_reg', RandomForestRegressor( n_estimators = 20, max_features = 1.0, n_jobs = -1, random_state = 3, max_depth=None, max_leaf_nodes=None, )) ]) # train the model rfr_score = cross_val_score(rfr_pipe, X_train, y_train, scoring = 'neg_mean_squared_error', cv = 5) rfr_rmse = np.sqrt(-rfr_score) print ("Crossvalidation RMSE:",rfr_rmse.mean()) final_model=rfr_pipe.fit(X_train, y_train) # Save the model pipeline with open(os.path.join(args.training_dir,"model.joblib"), 'wb') as model_file: pickle.dump(final_model, model_file)這段程式碼會完成下列工作:
- 選取特徵。
- 將上車和下車資料的時間從世界標準時間轉換為芝加哥當地時間。
- 從取貨日期時間擷取日期、小時、星期幾、月份和年份。
- 使用開始和結束時間計算行程時間。
- 根據社區區域,找出並標記在機場開始或結束的行程。
- 系統會使用 scikit-learn 架構訓練隨機森林迴歸模型,預測計程車行程的車資。
訓練好的模型會儲存到 Pickle 檔案
model.joblib中。所選方法和特徵工程是以「預測芝加哥計程車車資」的資料探索和分析為依據。
在「Files」(檔案) 面板中,於 training_package 資料夾中建立名為
setup.py的檔案,並加入下列內容。from setuptools import find_packages from setuptools import setup REQUIRED_PACKAGES=["google-cloud-bigquery[pandas]","google-cloud-bigquery-storage"] setup( name='trainer', version='0.1', install_requires=REQUIRED_PACKAGES, packages=find_packages(), include_package_data=True, description='Training application package for chicago taxi trip fare prediction.' )在筆記本中執行
setup.py,為訓練應用程式建立來源發行版本:! cd training_package && python setup.py sdist --formats=gztar && cd ..
本節結束時,「檔案」面板應包含 training-package 下列檔案和資料夾。
dist
  trainer-0.1.tar.gz
trainer
  __init__.py
  task.py
trainer.egg-info
__init__.py
setup.py
將自訂訓練套件上傳至 Cloud Storage
建立 Cloud Storage bucket。
REGION="REGION"
BUCKET_NAME = "BUCKET_NAME"
BUCKET_URI = f"gs://{BUCKET_NAME}"

! gcloud storage buckets create gs://$BUCKET_URI --location=$REGION --project=$PROJECT_ID
替換下列參數值:
REGION:選擇與建立 Colab 筆記本時相同的區域。BUCKET_NAME:bucket 名稱。
將訓練套件上傳至 Cloud Storage bucket。
# Copy the training package to the bucket
! gcloud storage cp training_package/dist/trainer-0.1.tar.gz $BUCKET_URI/
建立管道
管道是以步驟圖表的形式,說明 MLOps 工作流程,這些步驟稱為「管道工作」。
在本節中,您將定義管道工作、將其編譯為 YAML,並在 Artifact Registry 中註冊管道,以便進行版本控管,以及由單一或多位使用者多次執行。
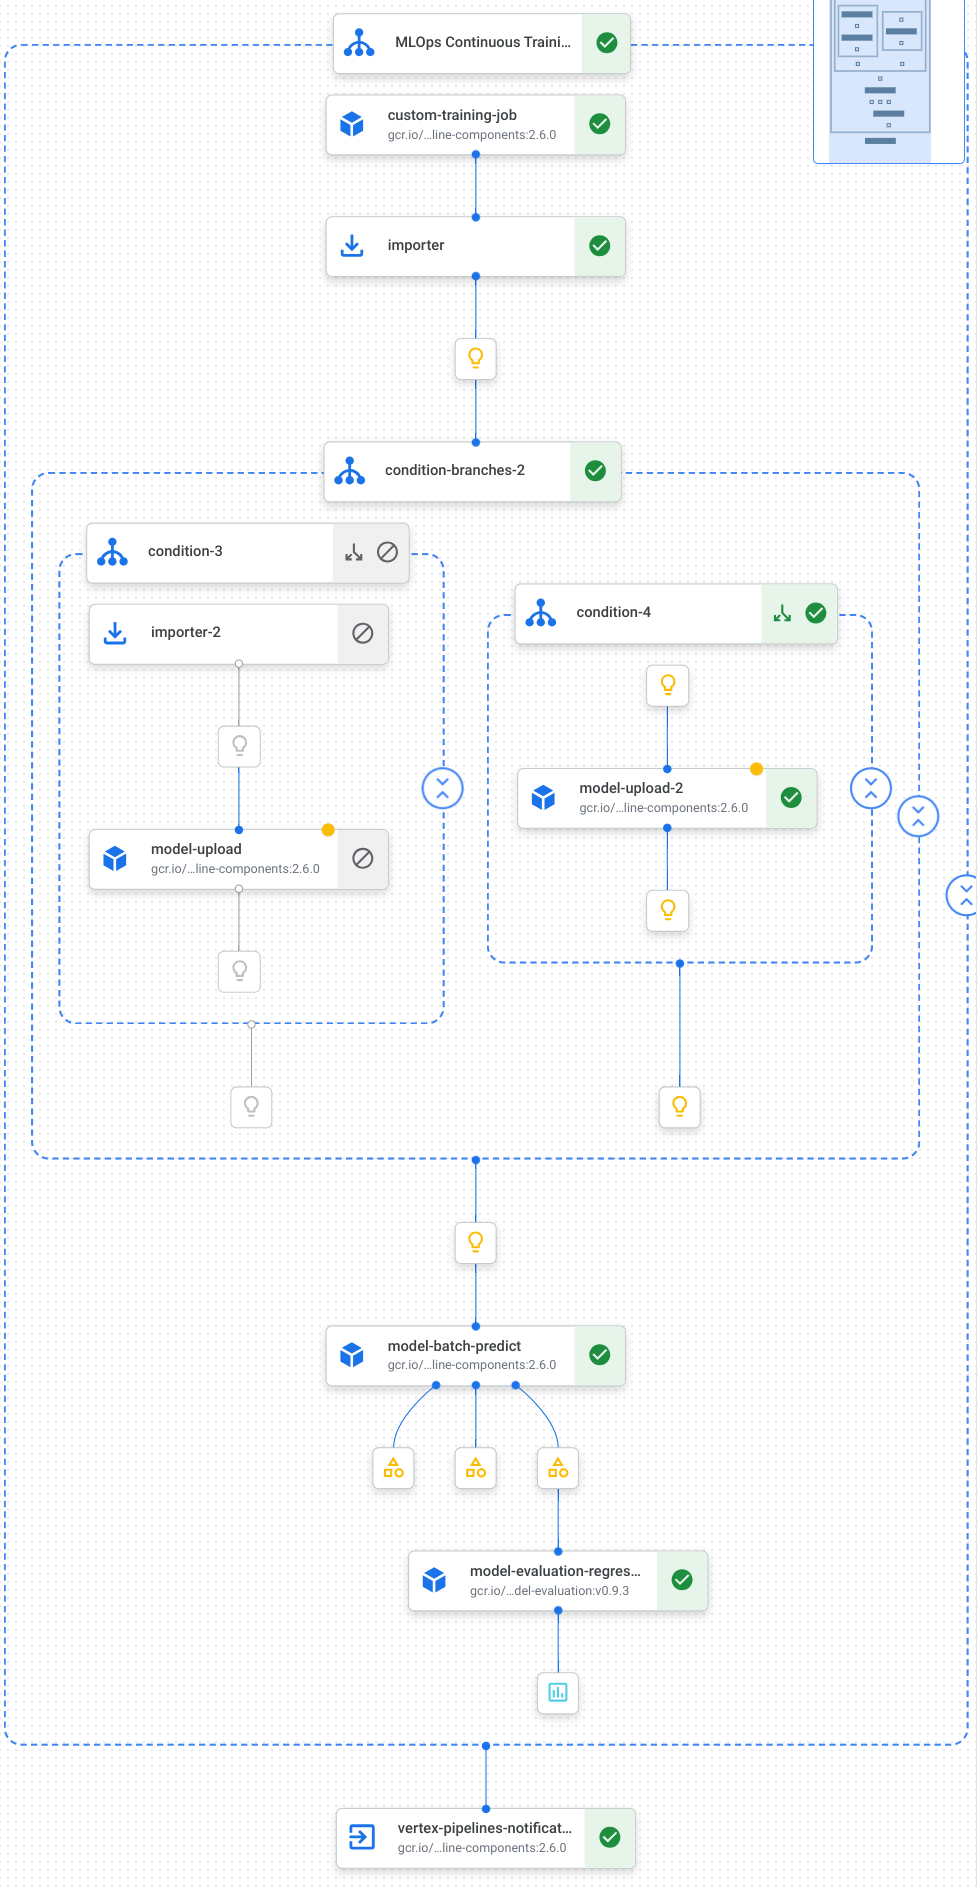
以下是管道中的工作視覺化圖表,包括模型訓練、模型上傳、模型評估和電子郵件通知:
詳情請參閱建立管道範本。
定義常數並初始化用戶端
在筆記本中,定義後續步驟中會用到的常數:
import os

EMAIL_RECIPIENTS = [ "NOTIFY_EMAIL" ]
PIPELINE_ROOT = "{}/pipeline_root/chicago-taxi-pipe".format(BUCKET_URI)
PIPELINE_NAME = "vertex-pipeline-datatrigger-tutorial"
WORKING_DIR = f"{PIPELINE_ROOT}/mlops-datatrigger-tutorial"
os.environ['AIP_MODEL_DIR'] = WORKING_DIR
EXPERIMENT_NAME = PIPELINE_NAME + "-experiment"
PIPELINE_FILE = PIPELINE_NAME + ".yaml"
將
NOTIFY_EMAIL替換為電子郵件地址。管道工作完成後 (無論成功與否),系統都會傳送電子郵件至該電子郵件地址。使用專案、暫存 bucket、位置和實驗初始化 Vertex AI SDK。
from google.cloud import aiplatform

aiplatform.init(
    project=PROJECT_ID,
    staging_bucket=BUCKET_URI,
    location=REGION,
    experiment=EXPERIMENT_NAME)

aiplatform.autolog()
定義管道工作
在筆記本中定義管道 custom_model_training_evaluation_pipeline:
from kfp import dsl
from kfp.dsl import importer
from kfp.dsl import OneOf
from google_cloud_pipeline_components.v1.custom_job import CustomTrainingJobOp
from google_cloud_pipeline_components.types import artifact_types
from google_cloud_pipeline_components.v1.model import ModelUploadOp
from google_cloud_pipeline_components.v1.batch_predict_job import ModelBatchPredictOp
from google_cloud_pipeline_components.v1.model_evaluation import ModelEvaluationRegressionOp
from google_cloud_pipeline_components.v1.vertex_notification_email import VertexNotificationEmailOp
from google_cloud_pipeline_components.v1.endpoint import ModelDeployOp
from google_cloud_pipeline_components.v1.endpoint import EndpointCreateOp
from google.cloud import aiplatform

# define the train-deploy pipeline
@dsl.pipeline(name="custom-model-training-evaluation-pipeline")
def custom_model_training_evaluation_pipeline(
    project: str,
    location: str,
    training_job_display_name: str,
    worker_pool_specs: list,
    base_output_dir: str,
    prediction_container_uri: str,
    model_display_name: str,
    batch_prediction_job_display_name: str,
    target_field_name: str,
    test_data_gcs_uri: list,
    ground_truth_gcs_source: list,
    batch_predictions_gcs_prefix: str,
    batch_predictions_input_format: str="csv",
    batch_predictions_output_format: str="jsonl",
    ground_truth_format: str="csv",
    parent_model_resource_name: str=None,
    parent_model_artifact_uri: str=None,
    existing_model: bool=False

):
    # Notification task
    notify_task = VertexNotificationEmailOp(
                    recipients= EMAIL_RECIPIENTS
                    )
    with dsl.ExitHandler(notify_task, name='MLOps Continuous Training Pipeline'):
        # Train the model
        custom_job_task = CustomTrainingJobOp(
                                    project=project,
                                    display_name=training_job_display_name,
                                    worker_pool_specs=worker_pool_specs,
                                    base_output_directory=base_output_dir,
                                    location=location
                            )

        # Import the unmanaged model
        import_unmanaged_model_task = importer(
                                        artifact_uri=base_output_dir,
                                        artifact_class=artifact_types.UnmanagedContainerModel,
                                        metadata={
                                            "containerSpec": {
                                                "imageUri": prediction_container_uri,
                                            },
                                        },
                                    ).after(custom_job_task)

        with dsl.If(existing_model == True):
            # Import the parent model to upload as a version
            import_registry_model_task = importer(
                                        artifact_uri=parent_model_artifact_uri,
                                        artifact_class=artifact_types.VertexModel,
                                        metadata={
                                            "resourceName": parent_model_resource_name
                                        },
                                    ).after(import_unmanaged_model_task)
            # Upload the model as a version
            model_version_upload_op = ModelUploadOp(
                                    project=project,
                                    location=location,
                                    display_name=model_display_name,
                                    parent_model=import_registry_model_task.outputs["artifact"],
                                    unmanaged_container_model=import_unmanaged_model_task.outputs["artifact"],
                                )

        with dsl.Else():
            # Upload the model
            model_upload_op = ModelUploadOp(
                                    project=project,
                                    location=location,
                                    display_name=model_display_name,
                                    unmanaged_container_model=import_unmanaged_model_task.outputs["artifact"],
                                )
        # Get the model (or model version)
        model_resource = OneOf(model_version_upload_op.outputs["model"], model_upload_op.outputs["model"])

        # Batch prediction
        batch_predict_task = ModelBatchPredictOp(
                            project= project,
                            job_display_name= batch_prediction_job_display_name,
                            model= model_resource,
                            location= location,
                            instances_format= batch_predictions_input_format,
                            predictions_format= batch_predictions_output_format,
                            gcs_source_uris= test_data_gcs_uri,
                            gcs_destination_output_uri_prefix= batch_predictions_gcs_prefix,
                            machine_type= 'n1-standard-2'
                            )
        # Evaluation task
        evaluation_task = ModelEvaluationRegressionOp(
                            project= project,
                            target_field_name= target_field_name,
                            location= location,
                            # model= model_resource,
                            predictions_format= batch_predictions_output_format,
                            predictions_gcs_source= batch_predict_task.outputs["gcs_output_directory"],
                            ground_truth_format= ground_truth_format,
                            ground_truth_gcs_source= ground_truth_gcs_source
                            )
    return
您的管道包含工作圖,會使用下列Google Cloud 管道元件:
CustomTrainingJobOp: 在 Vertex AI 中執行自訂訓練工作。ModelUploadOp:將訓練好的機器學習模型上傳至模型登錄。ModelBatchPredictOp: 建立批次預測工作。ModelEvaluationRegressionOp: 評估迴歸批次作業。VertexNotificationEmailOp: 傳送電子郵件通知。
編譯管道
使用 Kubeflow Pipelines (KFP) 編譯器將管道編譯為 YAML 檔案,其中包含管道的密封表示法。
from kfp import dsl
from kfp import compiler

compiler.Compiler().compile(
    pipeline_func=custom_model_training_evaluation_pipeline,
    package_path="{}.yaml".format(PIPELINE_NAME),
)
工作目錄中應該會顯示名為 vertex-pipeline-datatrigger-tutorial.yaml 的 YAML 檔案。
將管道上傳為範本
在 Artifact Registry 中建立
KFP類型的存放區。REPO_NAME = "mlops" # Create a repo in the artifact registry ! gcloud artifacts repositories create $REPO_NAME --location=$REGION --repository-format=KFP將已編譯的管道上傳至存放區。
from kfp.registry import RegistryClient

host = f"https://{REGION}-kfp.pkg.dev/{PROJECT_ID}/{REPO_NAME}"
client = RegistryClient(host=host)
TEMPLATE_NAME, VERSION_NAME = client.upload_pipeline(
file_name=PIPELINE_FILE,
tags=["v1", "latest"],
extra_headers={"description":"This is an example pipeline template."})
TEMPLATE_URI = f"https://{REGION}-kfp.pkg.dev/{PROJECT_ID}/{REPO_NAME}/{TEMPLATE_NAME}/latest"
在 Google Cloud 控制台中,確認範本是否顯示在「Pipeline Templates」(Pipeline 範本) 中。
手動執行管道
如要確保管道正常運作,請手動執行管道。
在筆記本中,指定以工作形式執行管道所需的參數。
DATASET_NAME = "mlops" TABLE_NAME = "chicago" worker_pool_specs = [{ "machine_spec": {"machine_type": "e2-highmem-2"}, "replica_count": 1, "python_package_spec":{ "executor_image_uri": "us-docker.pkg.dev/vertex-ai/training/sklearn-cpu.1-0:latest", "package_uris": [f"{BUCKET_URI}/trainer-0.1.tar.gz"], "python_module": "trainer.task", "args":["--project-id",PROJECT_ID, "--training-dir",f"/gcs/{BUCKET_NAME}","--bq-source",f"{PROJECT_ID}.{DATASET_NAME}.{TABLE_NAME}"] }, }] parameters = { "project": PROJECT_ID, "location": REGION, "training_job_display_name": "taxifare-prediction-training-job", "worker_pool_specs": worker_pool_specs, "base_output_dir": BUCKET_URI, "prediction_container_uri": "us-docker.pkg.dev/vertex-ai/prediction/sklearn-cpu.1-0:latest", "model_display_name": "taxifare-prediction-model", "batch_prediction_job_display_name": "taxifare-prediction-batch-job", "target_field_name": "fare", "test_data_gcs_uri": [f"{BUCKET_URI}/test_no_target.csv"], "ground_truth_gcs_source": [f"{BUCKET_URI}/test.csv"], "batch_predictions_gcs_prefix": f"{BUCKET_URI}/batch_predict_output", "existing_model": False }建立及執行管道工作。
# Create a pipeline job
job = aiplatform.PipelineJob(
    display_name="triggered_custom_regression_evaluation",
    template_path=TEMPLATE_URI ,
    parameter_values=parameters,
    pipeline_root=BUCKET_URI,
    enable_caching=False
)
# Run the pipeline job
job.run()
這項工作大約需要 30 分鐘才能完成。
在控制台中,「Pipelines」頁面應該會顯示新的 pipeline 執行作業:
管道執行完成後,您應該會在 Vertex AI Model Registry 中看到名為「
taxifare-prediction-model」的新模型或新模型版本:您也應該會看到新的批次預測工作:
自動執行管道
自動執行管道的方式有兩種:排定時間或在資料集插入新資料時執行。
依排程執行管道
在筆記本中呼叫
PipelineJob.create_schedule。job_schedule = job.create_schedule( display_name="mlops tutorial schedule", cron="0 0 1 * *", # max_concurrent_run_count=1, max_run_count=12, )cron運算式會排定作業,在每個月的 1 號凌晨 12 點 (世界標準時間) 執行。在本教學課程中,我們不希望多個工作同時執行,因此將
max_concurrent_run_count設為 1。在 Google Cloud 控制台中,確認「Pipelines schedules」顯示
schedule。
有新資料時執行管道
建立具有 Eventarc 觸發條件的函式
建立 Cloud Function (第 2 代),每當有新資料插入 BigQuery 資料表時,就會執行管道。
具體來說,每當發生 google.cloud.bigquery.v2.JobService.InsertJob 事件時,我們就會使用 Eventarc 觸發函式。這個函式接著會執行管道範本。
詳情請參閱「Eventarc 觸發條件」和「支援的事件類型」。
前往 Google Cloud 控制台的 Cloud Run 函式。
按一下「建立函式」按鈕。在「設定」頁面中:
選取「第 2 代」做為環境。
在「Function name」(函式名稱) 部分輸入 mlops。
在「Region」(地區) 中,選取與 Cloud Storage 值區和 Artifact Registry 存放區相同的地區。
在「觸發條件」中選取「其他觸發條件」。「Eventarc Trigger」(Eventarc 觸發條件) 窗格隨即開啟。
在「觸發條件類型」中,選擇「Google 來源」。
針對「Event Provider」(事件供應商),選擇「BigQuery」。
針對「Event type」(事件類型),請選擇
google.cloud.bigquery.v2.JobService.InsertJob。在「資源」部分,選擇「特定資源」,並指定 BigQuery 資料表
projects/PROJECT_ID/datasets/mlops/tables/chicago在「Region」(地區) 欄位中,選取 Eventarc 觸發條件的位置 (如適用)。詳情請參閱「觸發位置」。
按一下「儲存觸發條件」。
如果系統要求您授予服務帳戶角色,請按一下「全部授予」。
點選「下一步」前往「程式碼」頁面。在「程式碼」頁面中:
將「執行階段」設為 Python 3.12。
將「Entry point」(進入點) 設為
mlops_entrypoint。使用內嵌編輯器開啟
main.py檔案,並將內容替換為下列內容:將
PROJECT_ID、REGION、BUCKET_NAME替換為您先前使用的值。import json import functions_framework import requests import google.auth import google.auth.transport.requests # CloudEvent function to be triggered by an Eventarc Cloud Audit Logging trigger # Note: this is NOT designed for second-party (Cloud Audit Logs -> Pub/Sub) triggers! @functions_framework.cloud_event def mlops_entrypoint(cloudevent): # Print out the CloudEvent's (required) `type` property # See https://github.com/cloudevents/spec/blob/v1.0.1/spec.md#type print(f"Event type: {cloudevent['type']}") # Print out the CloudEvent's (optional) `subject` property # See https://github.com/cloudevents/spec/blob/v1.0.1/spec.md#subject if 'subject' in cloudevent: # CloudEvent objects don't support `get` operations. # Use the `in` operator to verify `subject` is present. print(f"Subject: {cloudevent['subject']}") # Print out details from the `protoPayload` # This field encapsulates a Cloud Audit Logging entry # See https://cloud.google.com/logging/docs/audit#audit_log_entry_structure payload = cloudevent.data.get("protoPayload") if payload: print(f"API method: {payload.get('methodName')}") print(f"Resource name: {payload.get('resourceName')}") print(f"Principal: {payload.get('authenticationInfo', dict()).get('principalEmail')}") row_count = payload.get('metadata', dict()).get('tableDataChange',dict()).get('insertedRowsCount') print(f"No. of rows: {row_count} !!") if row_count: if int(row_count) > 0: print ("Pipeline trigger Condition met !!") submit_pipeline_job() else: print ("No pipeline triggered !!!") def submit_pipeline_job(): PROJECT_ID = 'PROJECT_ID' REGION = 'REGION' BUCKET_NAME = "BUCKET_NAME" DATASET_NAME = "mlops" TABLE_NAME = "chicago" base_output_dir = BUCKET_NAME BUCKET_URI = "gs://{}".format(BUCKET_NAME) PIPELINE_ROOT = "{}/pipeline_root/chicago-taxi-pipe".format(BUCKET_URI) PIPELINE_NAME = "vertex-mlops-pipeline-tutorial" EXPERIMENT_NAME = PIPELINE_NAME + "-experiment" REPO_NAME ="mlops" TEMPLATE_NAME="custom-model-training-evaluation-pipeline" TRAINING_JOB_DISPLAY_NAME="taxifare-prediction-training-job" worker_pool_specs = [{ "machine_spec": {"machine_type": "e2-highmem-2"}, "replica_count": 1, "python_package_spec":{ "executor_image_uri": "us-docker.pkg.dev/vertex-ai/training/sklearn-cpu.1-0:latest", "package_uris": [f"{BUCKET_URI}/trainer-0.1.tar.gz"], "python_module": "trainer.task", "args":["--project-id",PROJECT_ID,"--training-dir",f"/gcs/{BUCKET_NAME}","--bq-source",f"{PROJECT_ID}.{DATASET_NAME}.{TABLE_NAME}"] }, }] parameters = { "project": PROJECT_ID, "location": REGION, "training_job_display_name": "taxifare-prediction-training-job", "worker_pool_specs": worker_pool_specs, "base_output_dir": BUCKET_URI, "prediction_container_uri": "us-docker.pkg.dev/vertex-ai/prediction/sklearn-cpu.1-0:latest", "model_display_name": "taxifare-prediction-model", "batch_prediction_job_display_name": "taxifare-prediction-batch-job", "target_field_name": "fare", "test_data_gcs_uri": [f"{BUCKET_URI}/test_no_target.csv"], "ground_truth_gcs_source": [f"{BUCKET_URI}/test.csv"], "batch_predictions_gcs_prefix": f"{BUCKET_URI}/batch_predict_output", "existing_model": False } TEMPLATE_URI = f"https://{REGION}-kfp.pkg.dev/{PROJECT_ID}/{REPO_NAME}/{TEMPLATE_NAME}/latest" print("TEMPLATE URI: ", TEMPLATE_URI) request_body = { "name": PIPELINE_NAME, "displayName": PIPELINE_NAME, "runtimeConfig":{ "gcsOutputDirectory": PIPELINE_ROOT, "parameterValues": parameters, }, "templateUri": TEMPLATE_URI } pipeline_url = "https://us-central1-aiplatform.googleapis.com/v1/projects/{}/locations/{}/pipelineJobs".format(PROJECT_ID, REGION) creds, project = google.auth.default() auth_req = google.auth.transport.requests.Request() creds.refresh(auth_req) headers = { 'Authorization': 'Bearer {}'.format(creds.token), 'Content-Type': 'application/json; charset=utf-8' } response = requests.request("POST", pipeline_url, headers=headers, data=json.dumps(request_body)) print(response.text)開啟
requirements.txt檔案,並將內容替換為下列程式碼:requests==2.31.0 google-auth==2.25.1
按一下「Deploy」(部署) 即可部署函式。
插入資料以觸發管道
前往 Google Cloud 控制台的「BigQuery Studio」。
按一下「建立 SQL 查詢」,然後點選 「執行」,執行下列 SQL 查詢。
INSERT INTO `PROJECT_ID.mlops.chicago`
(
    WITH
      taxitrips AS (
      SELECT
        trip_start_timestamp,
        trip_end_timestamp,
        trip_seconds,
        trip_miles,
        payment_type,
        pickup_longitude,
        pickup_latitude,
        dropoff_longitude,
        dropoff_latitude,
        tips,
        tolls,
        fare,
        pickup_community_area,
        dropoff_community_area,
        company,
        unique_key
      FROM
        `bigquery-public-data.chicago_taxi_trips.taxi_trips`
      WHERE pickup_longitude IS NOT NULL
      AND pickup_latitude IS NOT NULL
      AND dropoff_longitude IS NOT NULL
      AND dropoff_latitude IS NOT NULL
      AND trip_miles > 0
      AND trip_seconds > 0
      AND fare > 0
      AND EXTRACT(YEAR FROM trip_start_timestamp) = 2022
    )

    SELECT
      trip_start_timestamp,
      EXTRACT(MONTH from trip_start_timestamp) as trip_month,
      EXTRACT(DAY from trip_start_timestamp) as trip_day,
      EXTRACT(DAYOFWEEK from trip_start_timestamp) as trip_day_of_week,
      EXTRACT(HOUR from trip_start_timestamp) as trip_hour,
      trip_seconds,
      trip_miles,
      payment_type,
      ST_AsText(
          ST_SnapToGrid(ST_GeogPoint(pickup_longitude, pickup_latitude), 0.1)
      ) AS pickup_grid,
      ST_AsText(
          ST_SnapToGrid(ST_GeogPoint(dropoff_longitude, dropoff_latitude), 0.1)
      ) AS dropoff_grid,
      ST_Distance(
          ST_GeogPoint(pickup_longitude, pickup_latitude),
          ST_GeogPoint(dropoff_longitude, dropoff_latitude)
      ) AS euclidean,
      CONCAT(
          ST_AsText(ST_SnapToGrid(ST_GeogPoint(pickup_longitude,
              pickup_latitude), 0.1)),
          ST_AsText(ST_SnapToGrid(ST_GeogPoint(dropoff_longitude,
              dropoff_latitude), 0.1))
      ) AS loc_cross,
      IF((tips/fare >= 0.2), 1, 0) AS tip_bin,
      tips,
      tolls,
      fare,
      pickup_longitude,
      pickup_latitude,
      dropoff_longitude,
      dropoff_latitude,
      pickup_community_area,
      dropoff_community_area,
      company,
      unique_key,
      trip_end_timestamp
    FROM
      taxitrips
    LIMIT 1000000
)
這項 SQL 查詢會在資料表中插入新資料列。
如要確認事件是否已觸發,請在函式的記錄中搜尋
pipeline trigger condition met。如果函式觸發成功,您應該會在 Vertex AI Pipelines 中看到新的管道執行作業。管道作業大約需要 30 分鐘才能完成。
清除所用資源
如要清除此專案中使用的所有 Google Cloud 資源,您可以刪除用於本教學課程的 Google Cloud 專案。
或者,您也可以刪除為本教學課程建立的個別資源。
按照下列步驟刪除模型:
在 Vertex AI 專區中,前往「Model Registry」頁面。
在模型名稱旁邊,按一下 「Actions」(動作) 選單,然後選擇「Delete model」(刪除模型)。
刪除管線執行作業:
前往「Pipeline runs」(管道執行) 頁面。
在每個管道執行作業的名稱旁邊,按一下「Actions」(動作) 選單,然後選擇「Delete pipeline run」(刪除管道執行作業)。
刪除自訂訓練工作:
在每個自訂訓練工作名稱旁邊,按一下「動作」選單,然後選擇「刪除自訂訓練工作」。
按照下列步驟刪除批次預測工作:
在每個批次預測工作名稱旁邊,按一下「動作」選單,然後選擇「刪除批次預測工作」。