This page describes how to connect SharePoint Online to Agentspace Enterprise. The connector supports both data ingestion and federated search. See the section for the approach you plan to use:
Connect SharePoint Online (data ingestion)
Use the following procedure to sync data from SharePoint Online.
After you set up your data source and import data the first time, the data store syncs data from that source at a frequency that you select during setup.
Before you begin
Before setting up your connection:
Set up access control for your data source. For information about setting up access control, see Use data source access control.
Grant administrator consent. For information about how to grant consent, see [Grant tenant-wide administrator consent to an application][microsoft-admin-consent] in the Microsoft Entra documentation.
Prepare the following Sharepoint Online authentication information to use during setup:
Instance URL. In the form
http://DOMAIN_OR_SERVER/[sites/]WEBSITE
—for example,mydomain.sharepoint.com/sites/sample-site
.Federated authentication requires the tenant ID and client ID, while OAuth requires the tenant ID, client ID, and client secret. To register the application, select Accounts in this organizational directory only for the sign-in audience, and then locate this authentication information. For more information, see [Quickstart: Register an application with the Microsoft identity platform][microsoft-register] in the Microsoft Entra documentation.
When registering the application, use
https://vertexaisearch.cloud.google.com/console/oauth/sharepoint_oauth.html
as the web callback URL.
The following table describes the roles that are recommended for configuration and their limitations.
Use this method for granular control over SharePoint REST API permissions, allowing you to restrict resource access on the user account. Make sure to create a new SharePoint user, which might add licensing costs. Use the OAuth 2.0 refresh token method to set up an Entra application registration and enable secure access to SharePoint.
Configure Entra application registration
Set up an Entra application registration to enable secure access to SharePoint. Choose one of the following methods:
Federated credentials for token-based access: Set up federated credentials to securely allow Google to access SharePoint using cryptographically signed tokens, avoiding the need for a real user principal. Google recommends that you use this method.
OAuth 2.0 refresh token for granular control: Configure OAuth 2.0 authentication using a client secret and a refresh token from the SharePoint user to enable granular control over SharePoint API access.
Set up federated credentials
Use the following steps to configure the app registration, grant permissions, and establish authentication. Google recommends that you use the federated credentials method.
Obtain service account client ID:
- In the Google Cloud console, go to the Agentspace Enterprise page.
- In the navigation menu, click Data stores.
- Click Create data store.
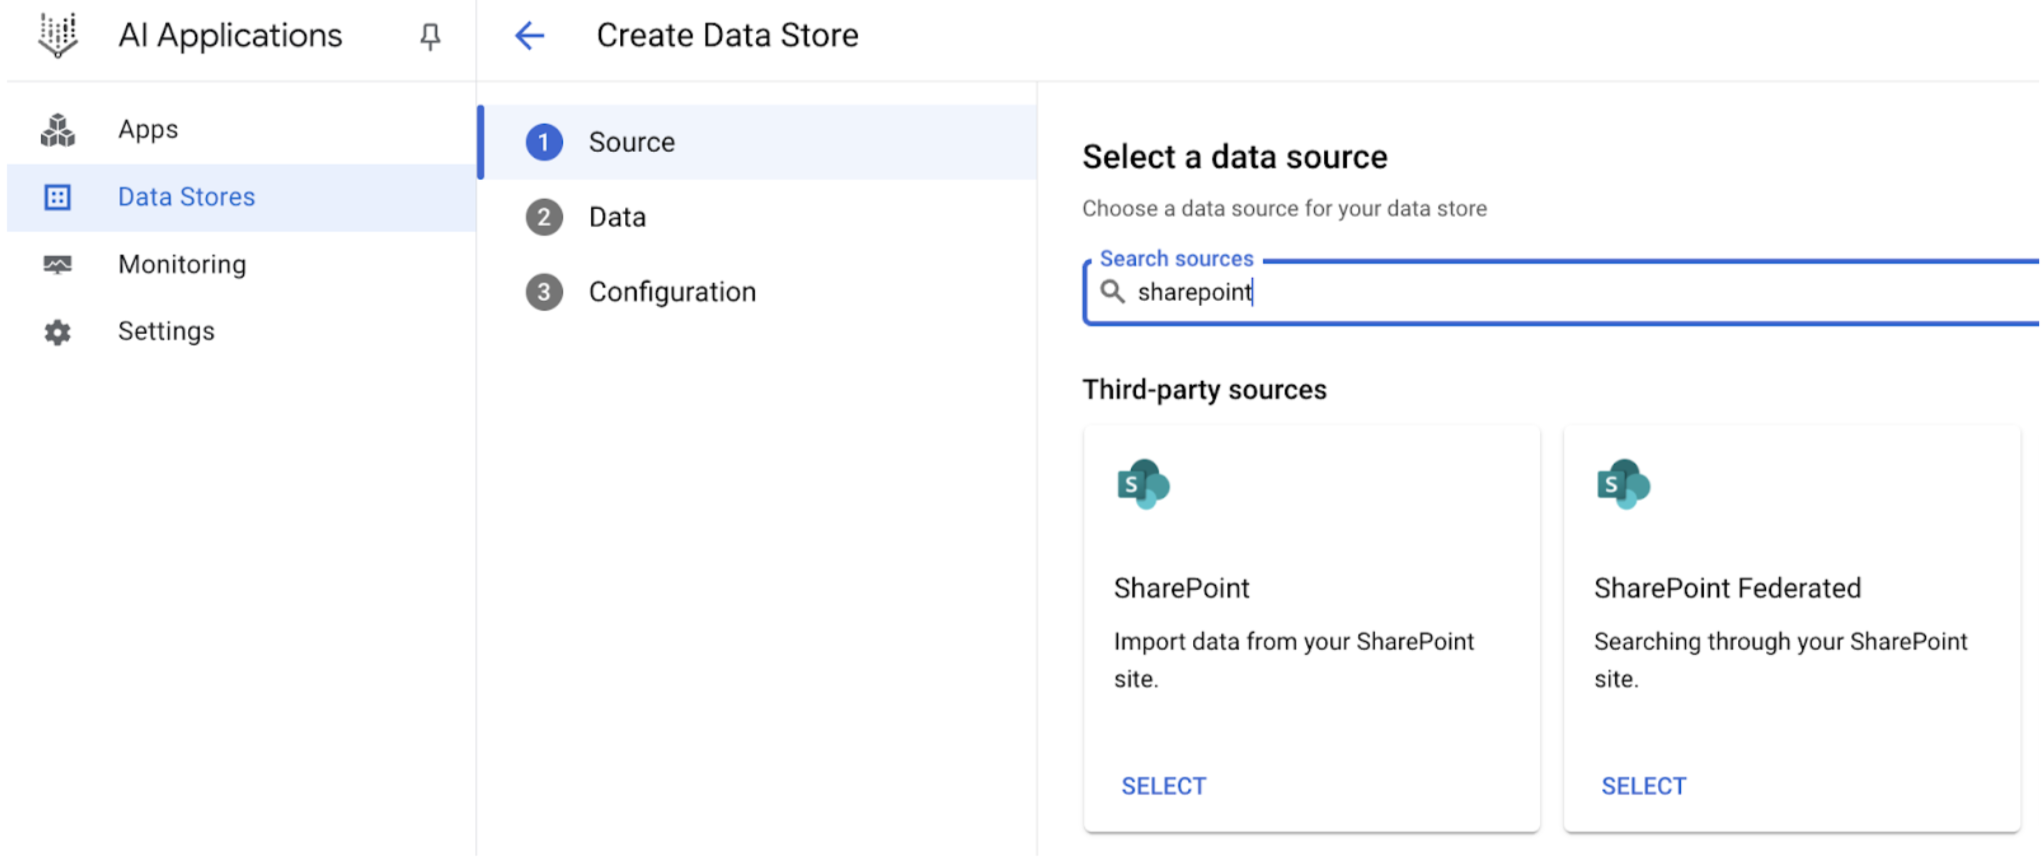
- On the Select a data source page, scroll or search for SharePoint Online to connect your third-party source.
- Note the Subject identifier. Don't click Continue yet.
Perform the next steps in this task and then complete the steps in
the Google Cloud console by following the instructions in
Create a SharePoint Online connector.
Note the subject ID but don't click Continue yet
Register app in Microsoft Entra:
- Navigate to Microsoft Entra admin center.
- In the menu, expand the Applications section and select App registrations.
- On the App registrations page, select New registration.
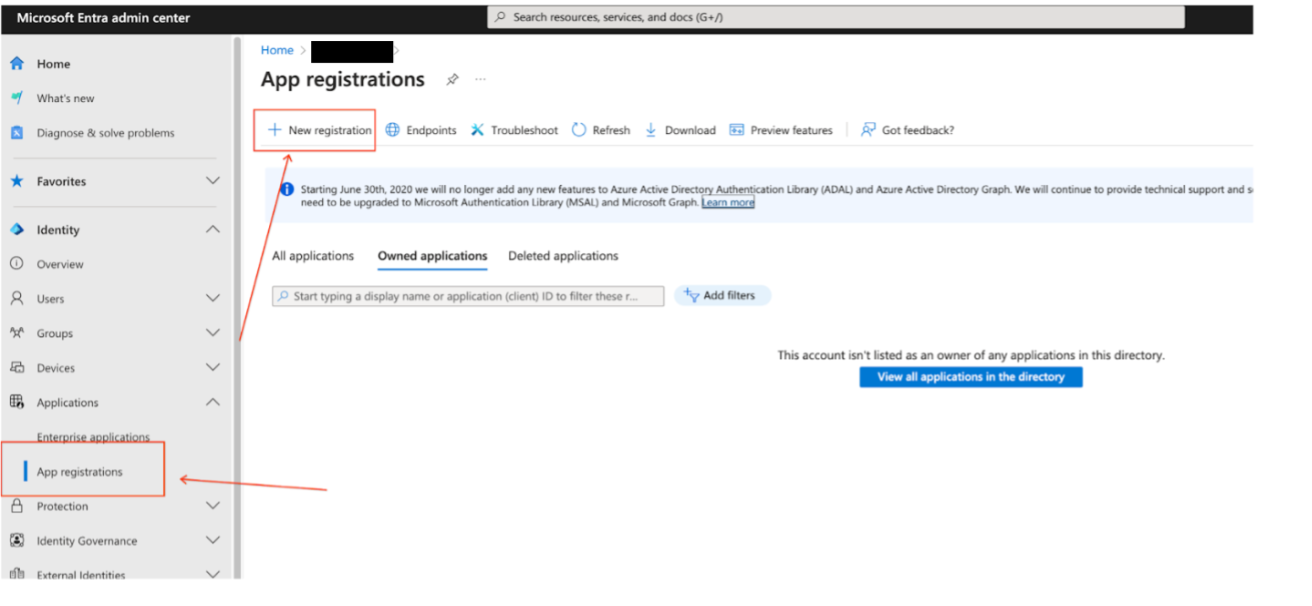
Register a new app in Microsoft Entra admin center Create an app registration on the Register an application page:
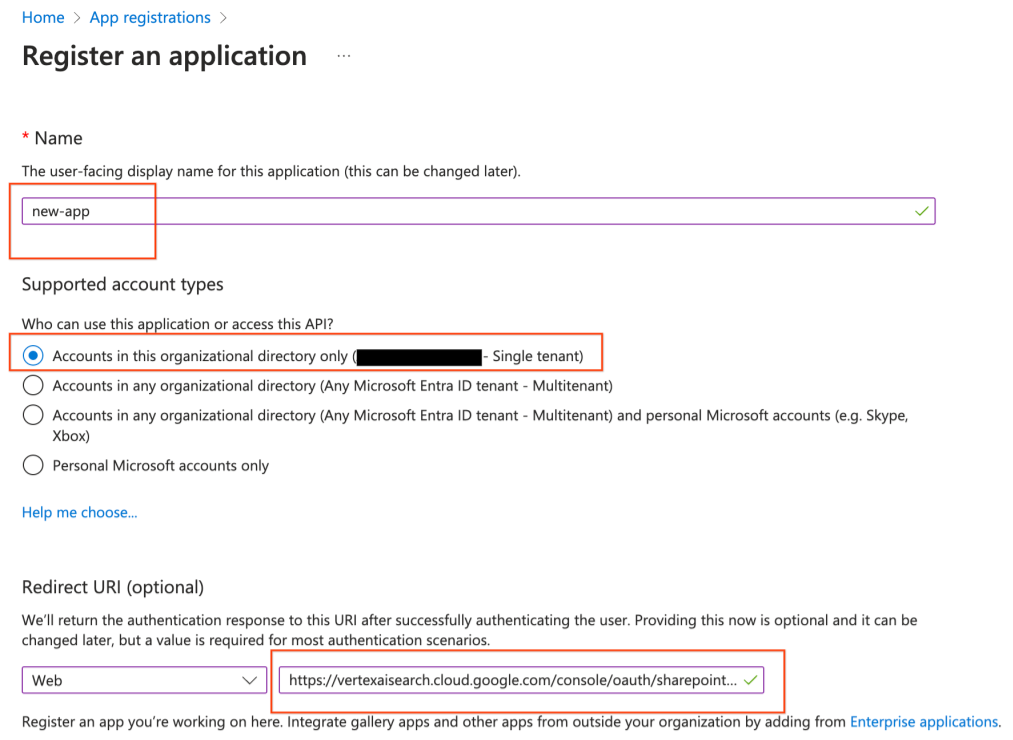
- In the Supported account types section, select Accounts in the organizational directory only.
- In the Redirect URI section, select Web and enter the redirect
URI as
https://vertexaisearch.cloud.google.com/console/oauth/sharepoint_oauth.html
- Keep other settings default and click Register.
Select the account type and enter the redirect URI
Note the Client ID and Tenant ID.
App details page
Add federated credentials:
Go to Certificates & secrets > Federated credentials > Add credential.
Add federated credentials in Microsoft Entra Use the following settings:
- Federated credential scenario: Other issuer
- Issuer:
https://accounts.google.com
- Subject identifier: Use the value of Subject identifier that you noted in Google Cloud console in Step 1.a.v.
- Name: Provide a unique name.
Click Add to grant access.
Connect your Google Account to Microsoft Entra ID
Set API permissions:
Select the app to set API permissions Add and grant admin consent for the following Microsoft Graph permissions with the type set to Application:
GroupMember.Read.All
: Read all group memberships.Sites.FullControl.All
: Full control over all sites.Sites.Read.All
: Read all sites. UseSites.Selected
to assign specific site permissions instead ofSites.FullControl.All
.Sites.Selected
can't be directly configured through the UI. After selectingSites.Selected
, you must call the Microsoft Graph API to explicitly grant the fullcontrol role to the application for the sites you want to crawl.User.Read.All
: Read all users' full profiles.Request the API permissions (Application) for Microsoft Graph
Add and grant admin consent for the following SharePoint permissions with the type set to Delegated:
AllSites.FullControl
: Have full control of all site collectionsAllSites.Read
: Read items in all site collectionsSelect the API permissions
Configure OAuth 2.0 authentication
Use the following steps to configure the app registration, grant permissions, and establish authentication. Google recommends that you set up federated credentials instead of configuring OAuth 2.0 authentication.
Create app registration:
Navigate to Entra administrator center.
Create an app registration:
- Supported account types: Accounts in the organizational directory only.
- Redirect URI:
https://vertexaisearch.cloud.google.com/console/oauth/sharepoint_oauth.html
.
Note the Client ID and Tenant ID.
Add client secret:
- Go to Certificates & secrets > New client secret.
- Note the secret string.
Set API permissions:
Add and grant administrator consent for the following permissions:
GroupMember.Read.All
: Read all group memberships.Sites.FullControl.All
: Full control of all site collections.User.Read.All
: Read all users' full profiles.AllSites.FullControl
: Full control over all sites.
Use a dedicated user account with limited access to specific sites.
Make sure the account has Owner access to the selected sites.
Create a SharePoint Online connector
Console
To use the Google Cloud console to sync data from Slack to Agentspace Enterprise , follow these steps:
In the Google Cloud console, go to the Agentspace Enterprise page.
In the navigation menu, click Data stores.
Click
Create data store.On the Select a data source page, scroll or search for SharePoint Online to connect your third-party source.
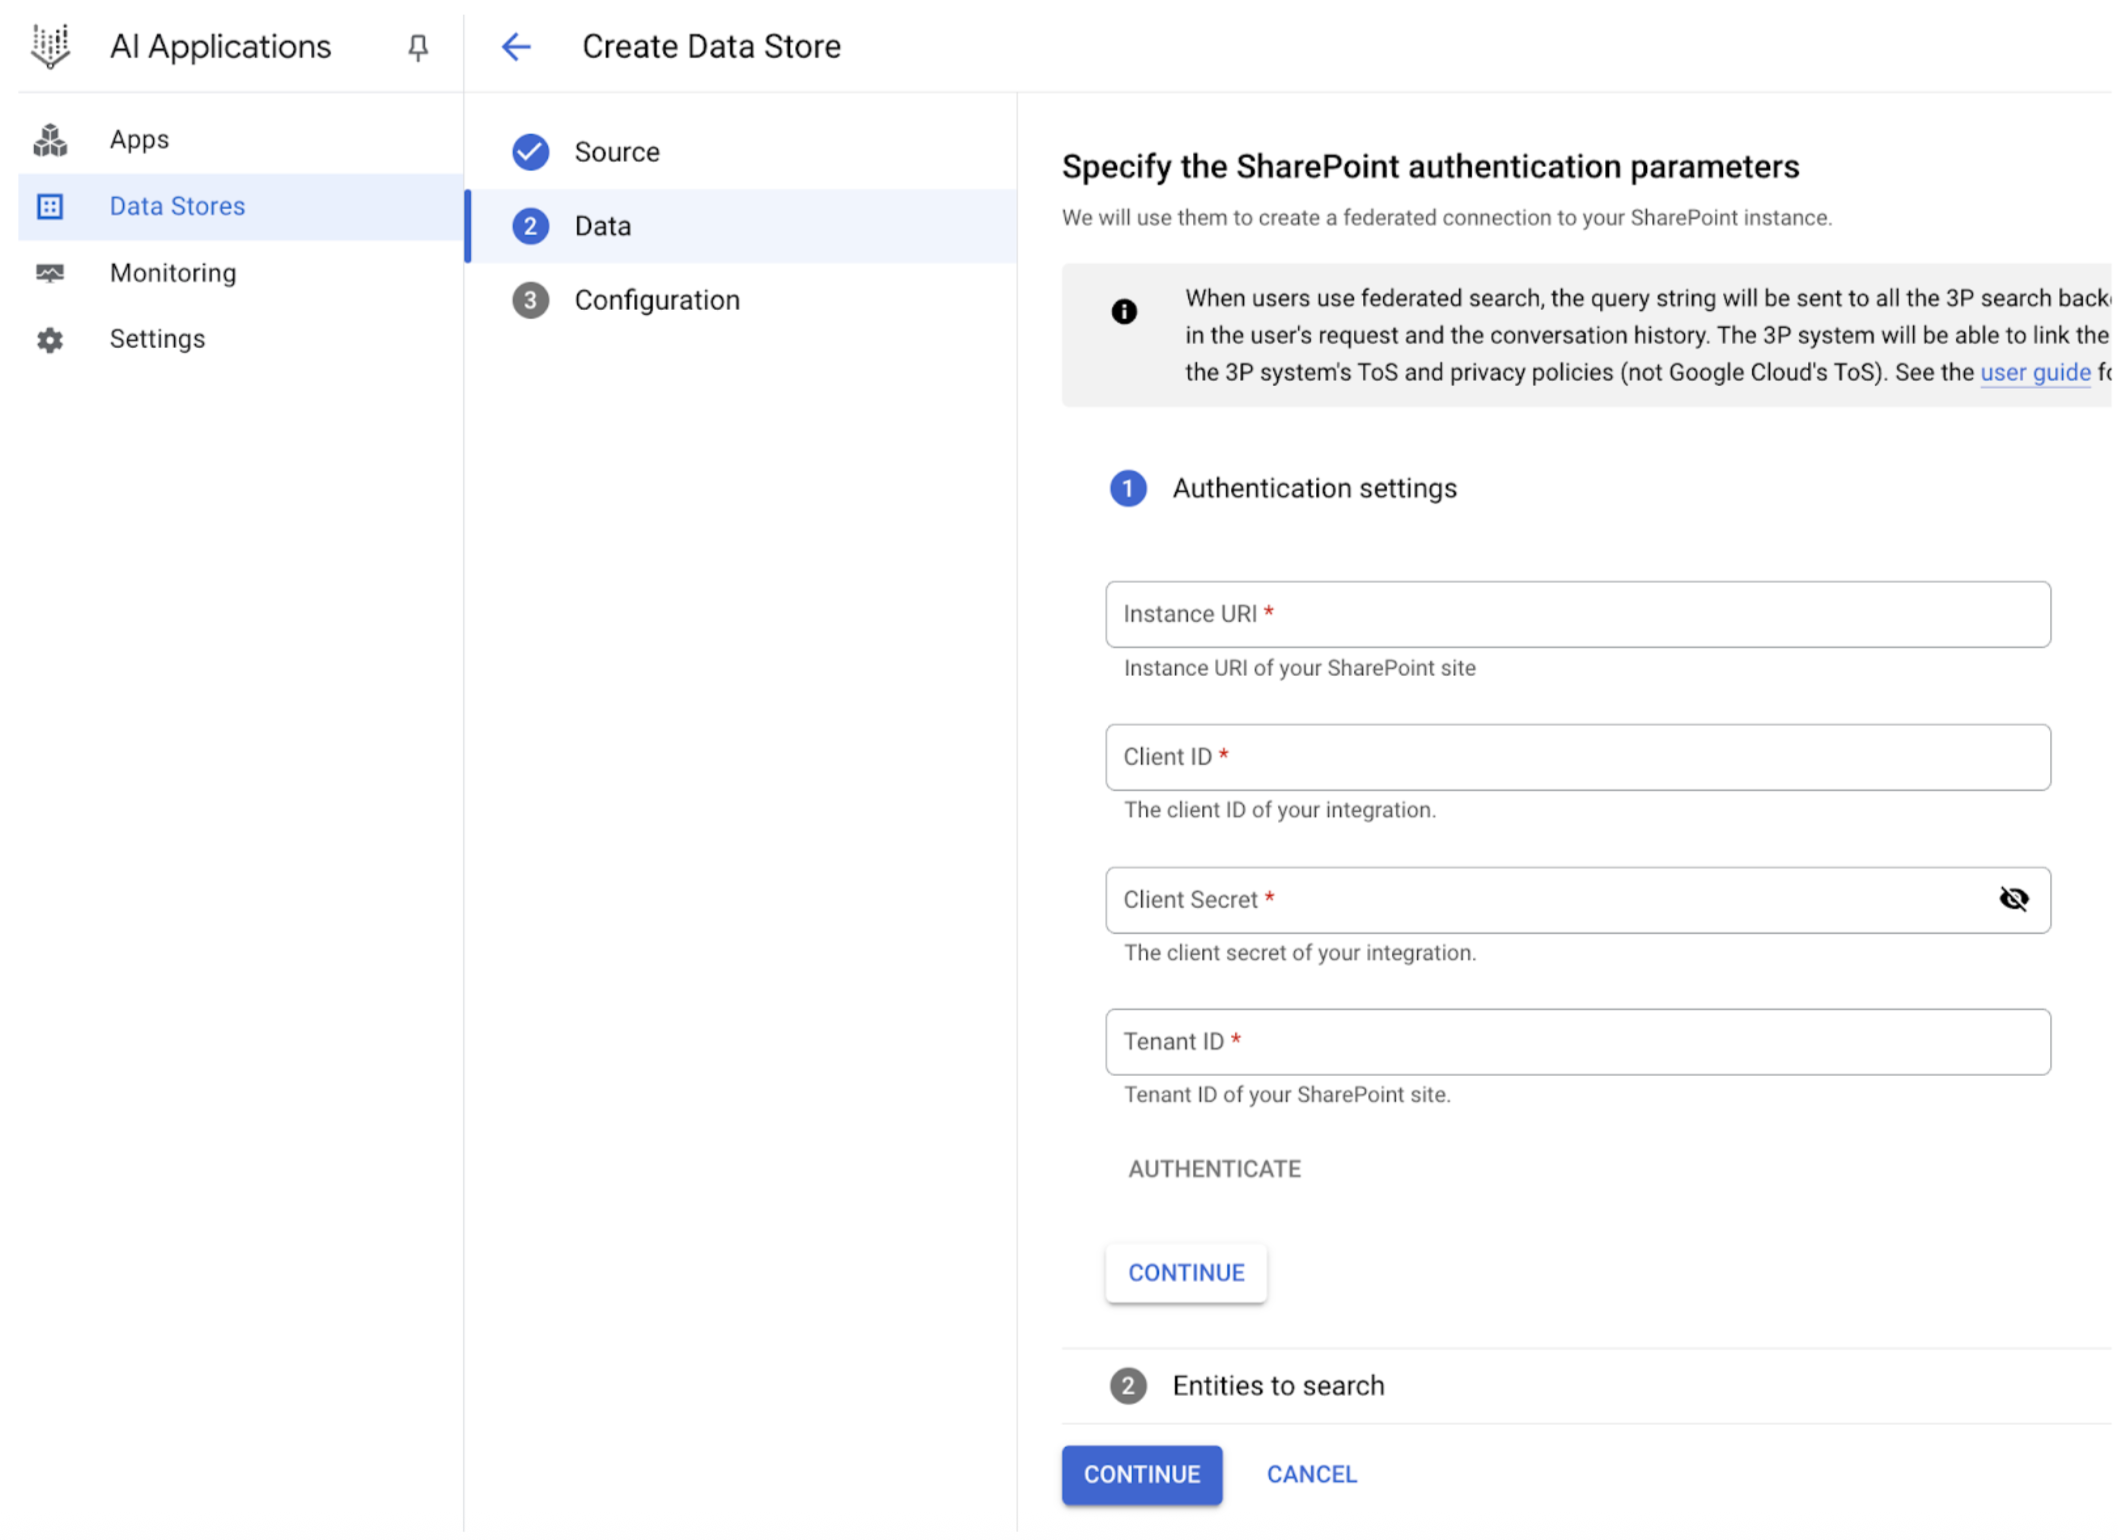
Search for and select Sharepoint as the data source Enter your Sharepoint Online authentication information and click Continue.
Add the authentication information Enter the SharePoint site URL:
- For a single site:
https://domain_name.sharepoint.com/sites/<site_name>
. - For all first-level sites:
https://domain_name.sharepoint.com
.
- For a single site:
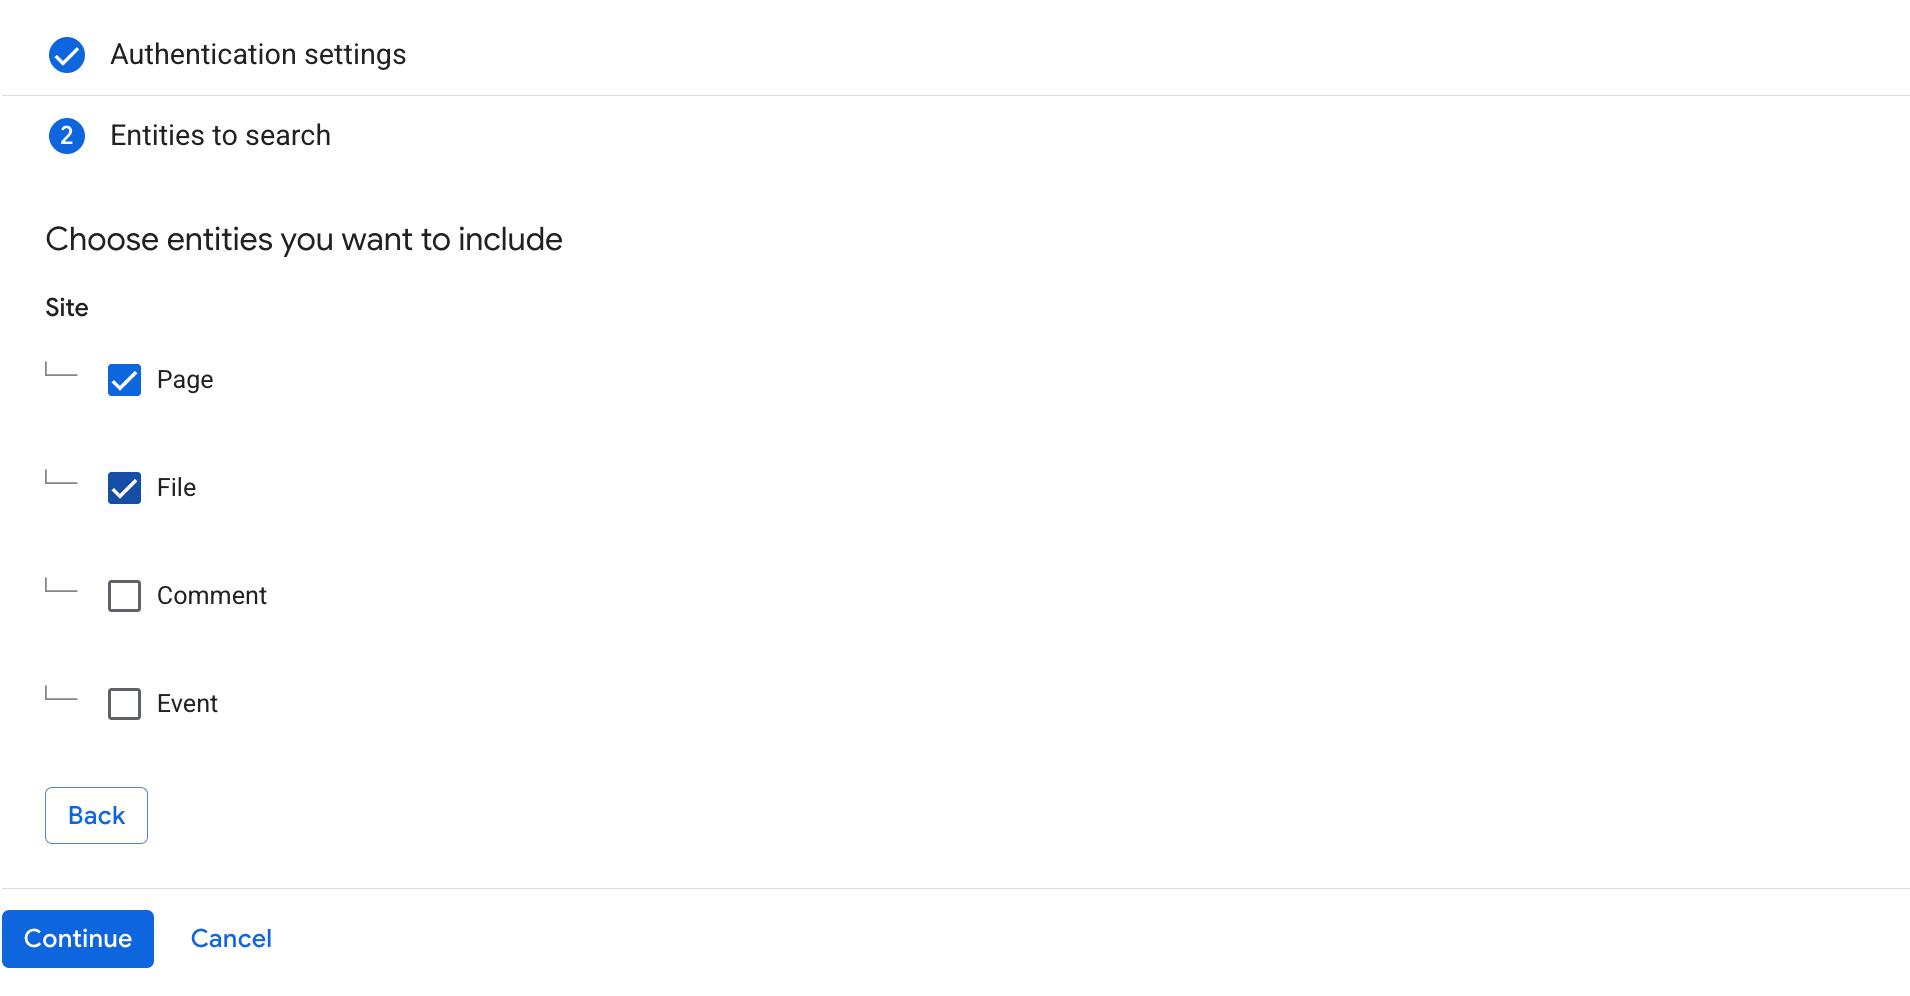
Select the entities to sync and click Continue.
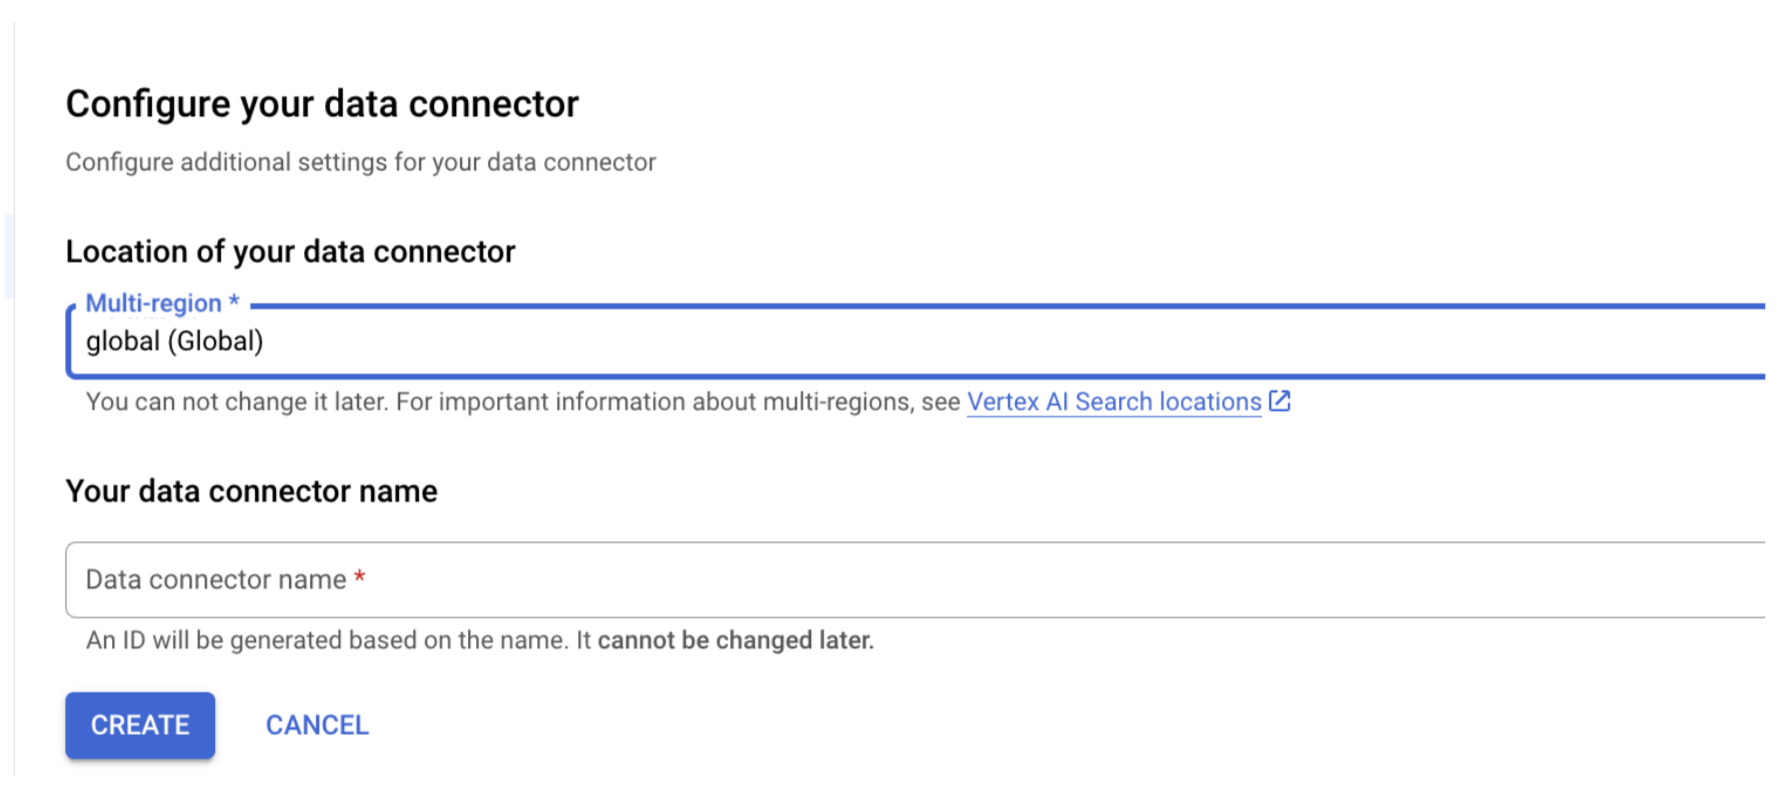
Select the entities to sync and the sync frequency Select a region for your data store.
Enter a name for your data store.
Select a synchronization frequency for your data store.
- Data synchronization frequencies range from three hours to seven days
- Identity synchronization frequencies range from 30 minutes to seven days
Click Create. Agentspace Enterprise creates your data store and displays your data stores on the Data stores page.
To check the status of your ingestion, go to the Data stores page and click your data store name to see details about it on its Data page. The Connector state changes from Creating to Running when it starts synchronizing data. When ingestion is complete, the state changes to Active to indicate that the connection to your data source is set up and awaiting the next scheduled synchronization.
Connector status on the data store details page Depending on the size of your data, ingestion can take minutes or hours.
Test the search engine
After configuring your search engine, test its capabilities. This ensures it returns accurate results based on user access.
Enable web app:
- Go to the app integration configurations and toggle to Enable the web app.
Test web app:
Click Open next to the web app link and sign in with a user in your workforce pool.
Verify that search results are restricted to items accessible by the logged-in user.
Configure the workforce pool
The workforce pool lets you to manage and authenticate users from external identity providers, such as Azure or Okta, within Google Cloud console. To configure your workforce pool and enable the web app for seamless user access, do the following:
Create workforce pool at the organization level in Google Cloud by following the appropriate setup manual:
Configure the workforce pool in Agentspace Enterprise > Settings for the region where you create your app.
Next steps
To attach your data store to an app, create an app and select your data store following the steps in Create an app.
To preview how your search results appear after your app and data store are set up, see Preview search results. If you used third-party access control, see [Preview results for apps with third-party access control][access-control-preview].
Connect Federated Search with SharePoint
Use the following procedure to search through your SharePoint account using federated search.
About federated search
You can use federated search connectors to send your queries to third-party search APIs instead of ingesting and indexing all data into Agentspace Enterprise. Using this approach, you can access external data sources immediately, without waiting for ingestion.
However, this approach might not be suitable in all scenarios. While federated search is quick to set up, it has the following limitations:
- Compared to indexed data, federated search may deliver lower-quality results.
- Federated search may introduce higher latency, because it depends on the third-party search API.
- Not all connectors support federated search.
Before you begin
Register Agentspace Enterprise as an OAuth 2.0 application in SharePoint. Make sure you have the following credentials:
- Client ID
- Client secret
- Instance URL
- Tenant ID
Create a federated search connector with SharePoint
User authorization
After creating a federated search data store, you can see it listed as one of the data sources in your source management panel. If you haven't previously authorized Agentspace Enterprise, then you can't select the data source. Instead, an Authorize button appears next to it.
To initiate the authorization flow:
Click Authorize. You are redirected to the SharePoint authorization server.
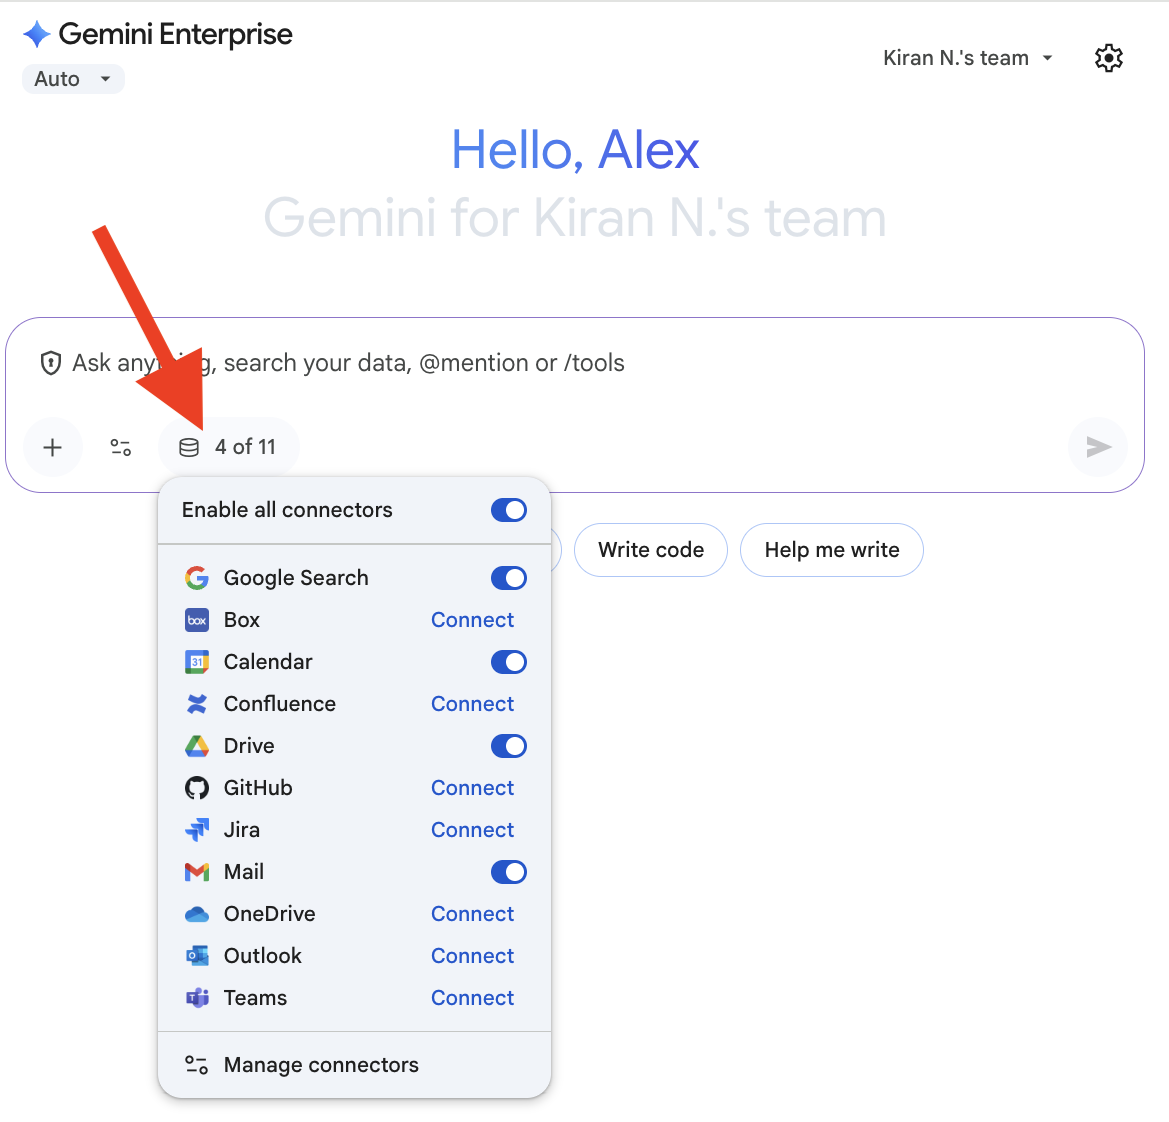
Click Authorize Sign in to your account.
Click Grant access. After granting access, you are redirected back to Agentspace Enterprise to complete the authorization flow. Agentspace Enterprise obtains the
access_token
, and uses it to access the 3P search.
Query execution
When you enter a search query:
- If SharePoint is authorized, Agentspace Enterprise sends the query to the SharePoint API.
- Agentspace Enterprise blends the results with those from other sources and displays them.
Data handling
When using third-party federated search, your query string is sent to the third-party search backend. These third parties may associate queries with your identity. If multiple federated search data sources are enabled, the query may be sent to all of them.
Once the data reaches the third-party system, it is governed by that system's Terms of Service and privacy policies (not by Google Cloud's terms).