This page describes how to connect Box to Agentspace. The connector supports both data ingestion and federated search. See the section for the approach you plan to use:
Connect Box (data ingestion)
Use the following procedure to sync data from Box to Agentspace.
After you set up your data source and import data the first time, the data store syncs data from that source at a frequency that you select during setup.
Before you begin
Before setting up your connection:
You must have administrator access to the Box instance with 2FA enabled. All the set up instructions can only be performed from the administrator account.
Set up access control for your data source. For information about setting up access control, see Use data source access control.
Read Setup with JWT in the Box documentation for an overview of the setup with screenshots.
Create a Box app
- Sign in to the Box Developer Console with your administrator account.
- Click Create platform app.
- Select App type as Custom app.
- Enter the App name.
- Set the following properties:
- Purpose: Integration
- Categories: AI
- External system: Google Cloud Agentspace
- Select Authentication method as Server authentication (with JWT).
- Click Create app.
Configure the Box app
- In the Box Developer Console, choose the Platform app and then go to the Configuration tab.
- In the App access level section, select App + Enterprise access.
In the Application scopes section, select the following scopes:
- Read all files and folders stored in Box
- Write all files and folders stored in Box
- Manage users
- Manage groups
- Manage enterprise properties
In the Advanced features section, select Make API calls using the as-user header.
In the Add and manage public keys section, click Generate a public/private keypair.
- The public key is automatically uploaded to the console with an ID. This ID is used when creating a connection.
- You can download a configuration file with the private key and passphrase. Make sure to keep this file for later use.
- Optionally, to generate your own key, see the Box keypair setup guide.
Click Save changes.
Authorize the Box app
- In the Box Developer Console, choose the Platform app and then go to the Authorization tab.
- Click Review and submit.
- In the Review app authorization submission dialog, click Submit.
- Sign in to the Box admin platform apps manager with your administrator account.
- Choose the Platform app that you have configured.
- Click the three dots (...) in the corresponding row.
- Select Authorize app from the drop-down list.
- In the Authorize app dialog, click Authorize to complete the authorization process.
Have the following Box authentication information ready:
- Enterprise ID: Obtain it from the General settings tab.
- Client ID and Client secret: Obtain it from the Configuration tab under OAuth 2.0 credentials.
- Private key, Key ID, and Passphrase: These parameters were already generated and downloaded to a local file from the Configuration tab under Add and manage public keys while configuring the app.
Create a Box connector
Console
To use the Google Cloud console to sync data from Box to Agentspace, follow these steps:
In the Google Cloud console, go to the Agentspace page.
In the navigation menu, click Data stores.
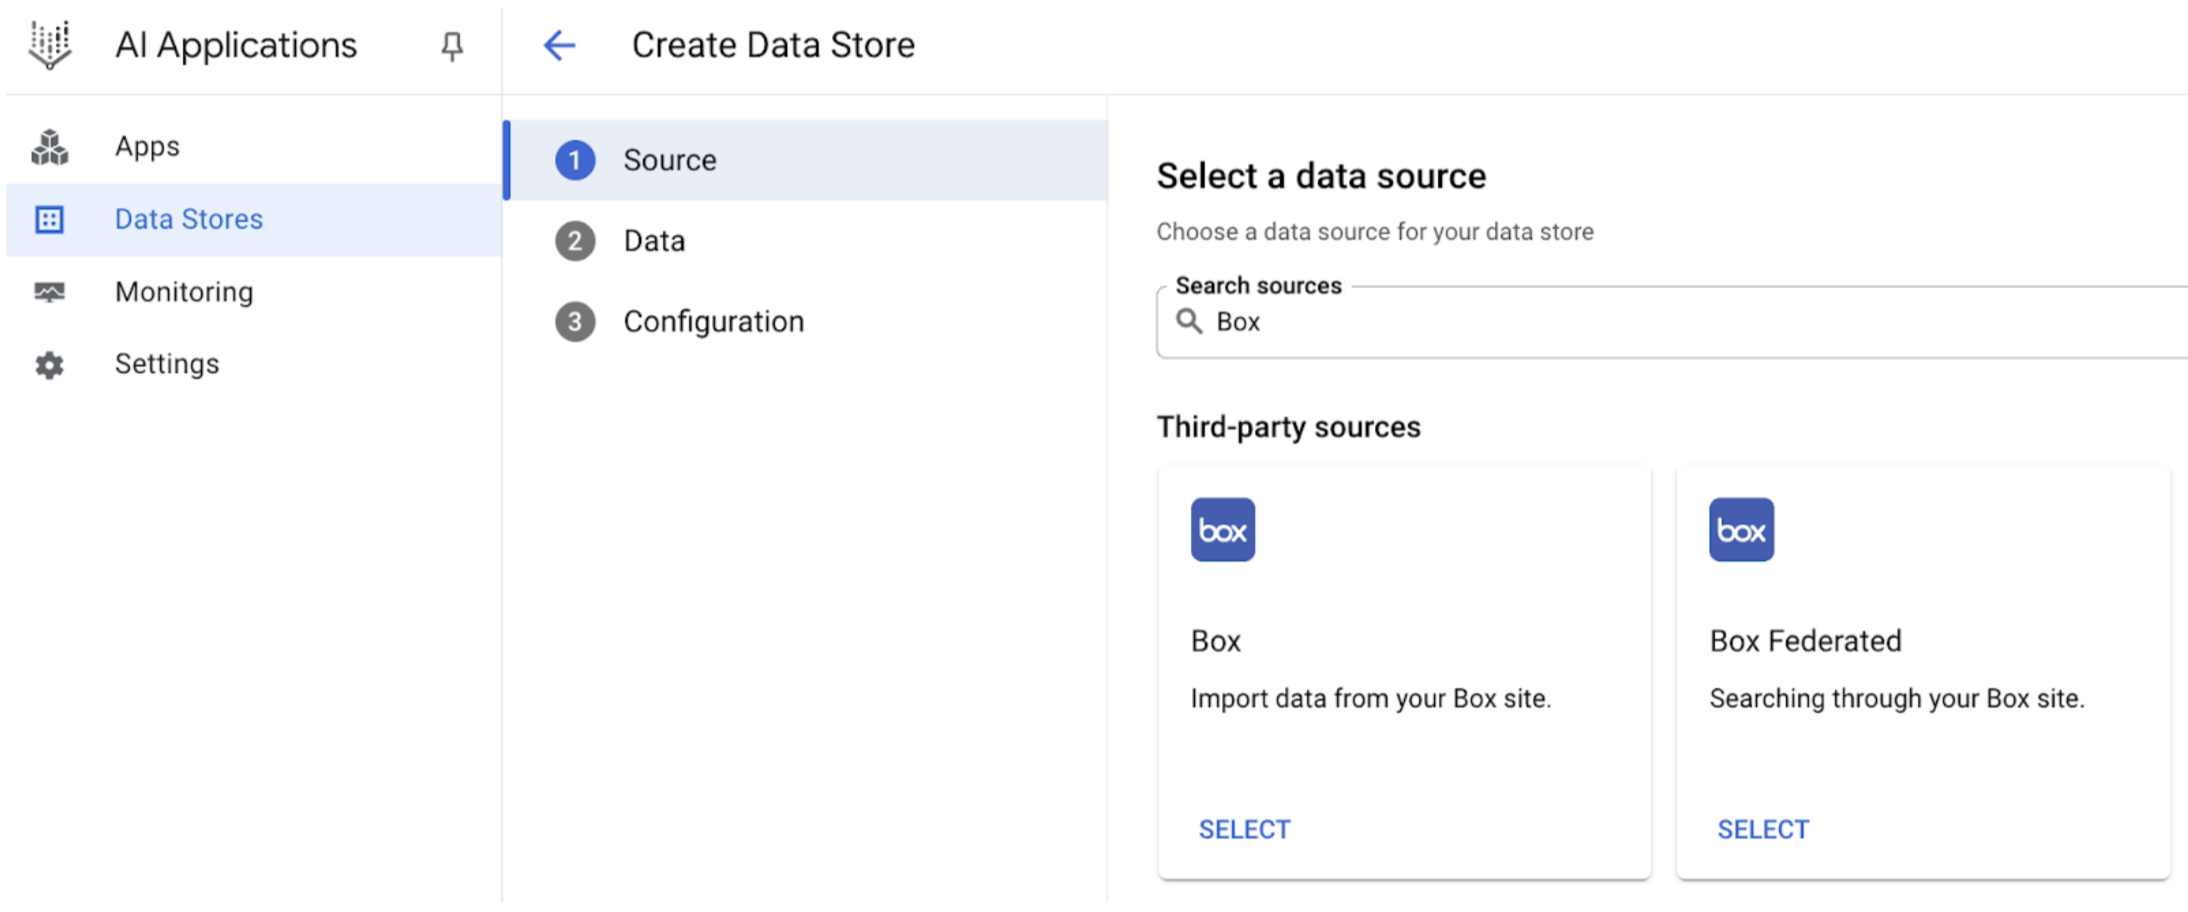
Click Create data store.
On the Select a data source page, scroll or search for Box to connect your third-party source.
Enter your authentication information in the Authentication settings. In the Private key field, copy and paste the following private key value.
-----BEGIN ENCRYPTED PRIVATE KEY-----\nMIIFLTBXBgkqhkiG9w0BBQ0wSjApBgkqhkiGK7wbIkVf2jW\n-----END ENCRYPTED PRIVATE KEY-----\nSelect which entities to sync and click Continue.
Select the Sync frequency for Full sync and the Incremental sync frequency for Incremental data sync. For more information, see Sync frequency.
If you want to schedule separate full syncs of entity and identity data, expand the menu under Full sync and then select Custom options.
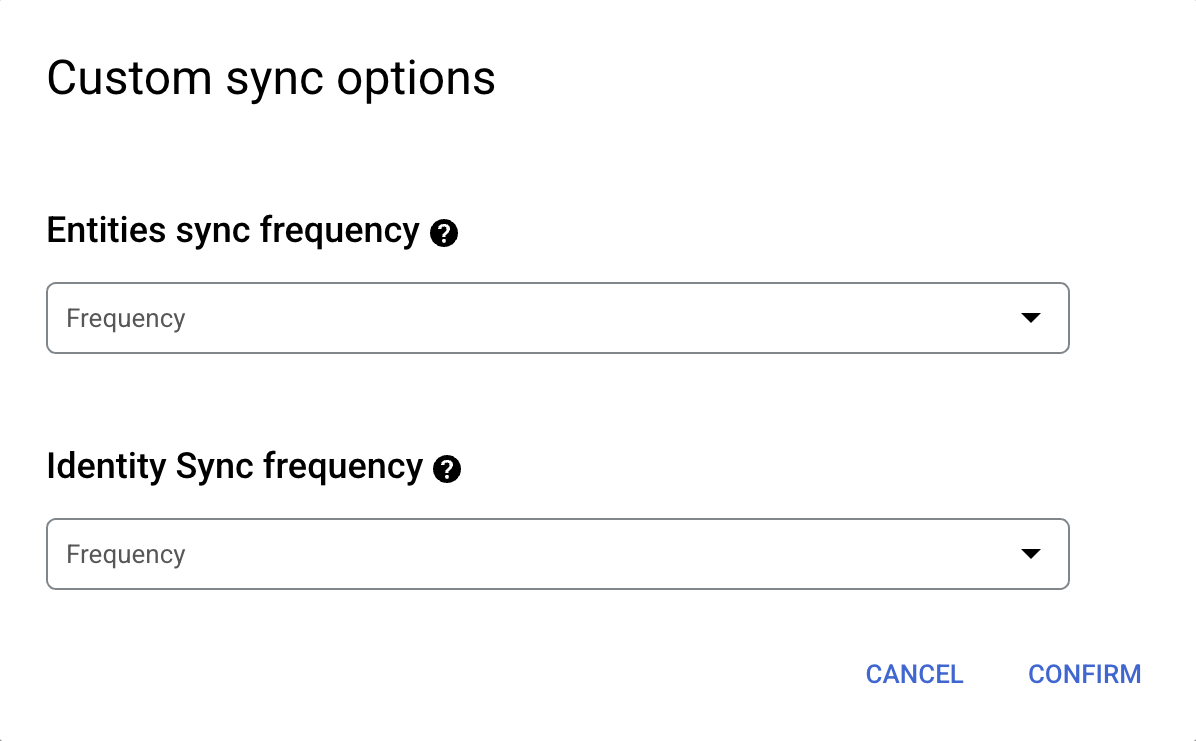
Setting separate schedules for full entity sync and full identity sync. Select a region for your data store.
Enter a name for your data store.
Click Create. Agentspace creates your data store and displays your data stores on the Data stores page.
To check the status of your ingestion, go to the Data stores page and click your data store name to see details about it on its Data page. The Connector state changes from Creating to Running when it starts synchronizing data. When ingestion is complete, the state changes to Active to indicate that the connection to your data source is set up and awaiting the next scheduled synchronization.
Depending on the size of your data, ingestion can take minutes or hours.
Next steps
To attach your data store to an app, create an app and select your data store following the steps in Create a search app.
To preview how your search results appear after your app and data store are set up, see Get search results. If you used third-party access control, see Preview results for apps with third-party access control.
To enable alerts for the data store, see Configure alerts for third-party data stores.
Connect Federated Search with Box
Use the following procedure to search through your Box account using federated search.
About federated search
You can use federated search connectors to send your queries to third-party search APIs instead of ingesting and indexing all data into Agentspace. Using this approach, you can access external data sources immediately, without waiting for ingestion.
However, this approach might not be suitable in all scenarios. While federated search is quick to set up, it has the following limitations:
- Compared to indexed data, federated search may deliver lower-quality results.
- Federated search may introduce higher latency, because it depends on the third-party search API.
- Not all connectors support federated search.
Before you begin
Register Agentspace as an OAuth 2.0 application in Box. Make sure you have the following credentials:
- Client ID
- Client secret
Create a federated search connector with Box
Console
Use the following steps for Google Cloud console to perform federated search through Box from Agentspace.
In the Google Cloud console, go to the Agentspace page.
In the navigation menu, click Data stores.
Click Create data store.
On the Select a data source page, scroll or search for Box Federated to connect your third-party source.
Search for Box Federated Under Authentication settings:
- Enter the Client ID and Client secret.
- Click Authenticate.
Click Continue.

Enter the authentication information
Select a region for your data source.
Enter a name for your data source.

Configure your data connector Click Create. Agentspace creates your data store and displays your data stores on the Data stores page.
Once the data store is created, go to the Data stores page and click your data store name to see the status. If the Connector state changes from Creating to Active, the federated search connector is ready to be used.
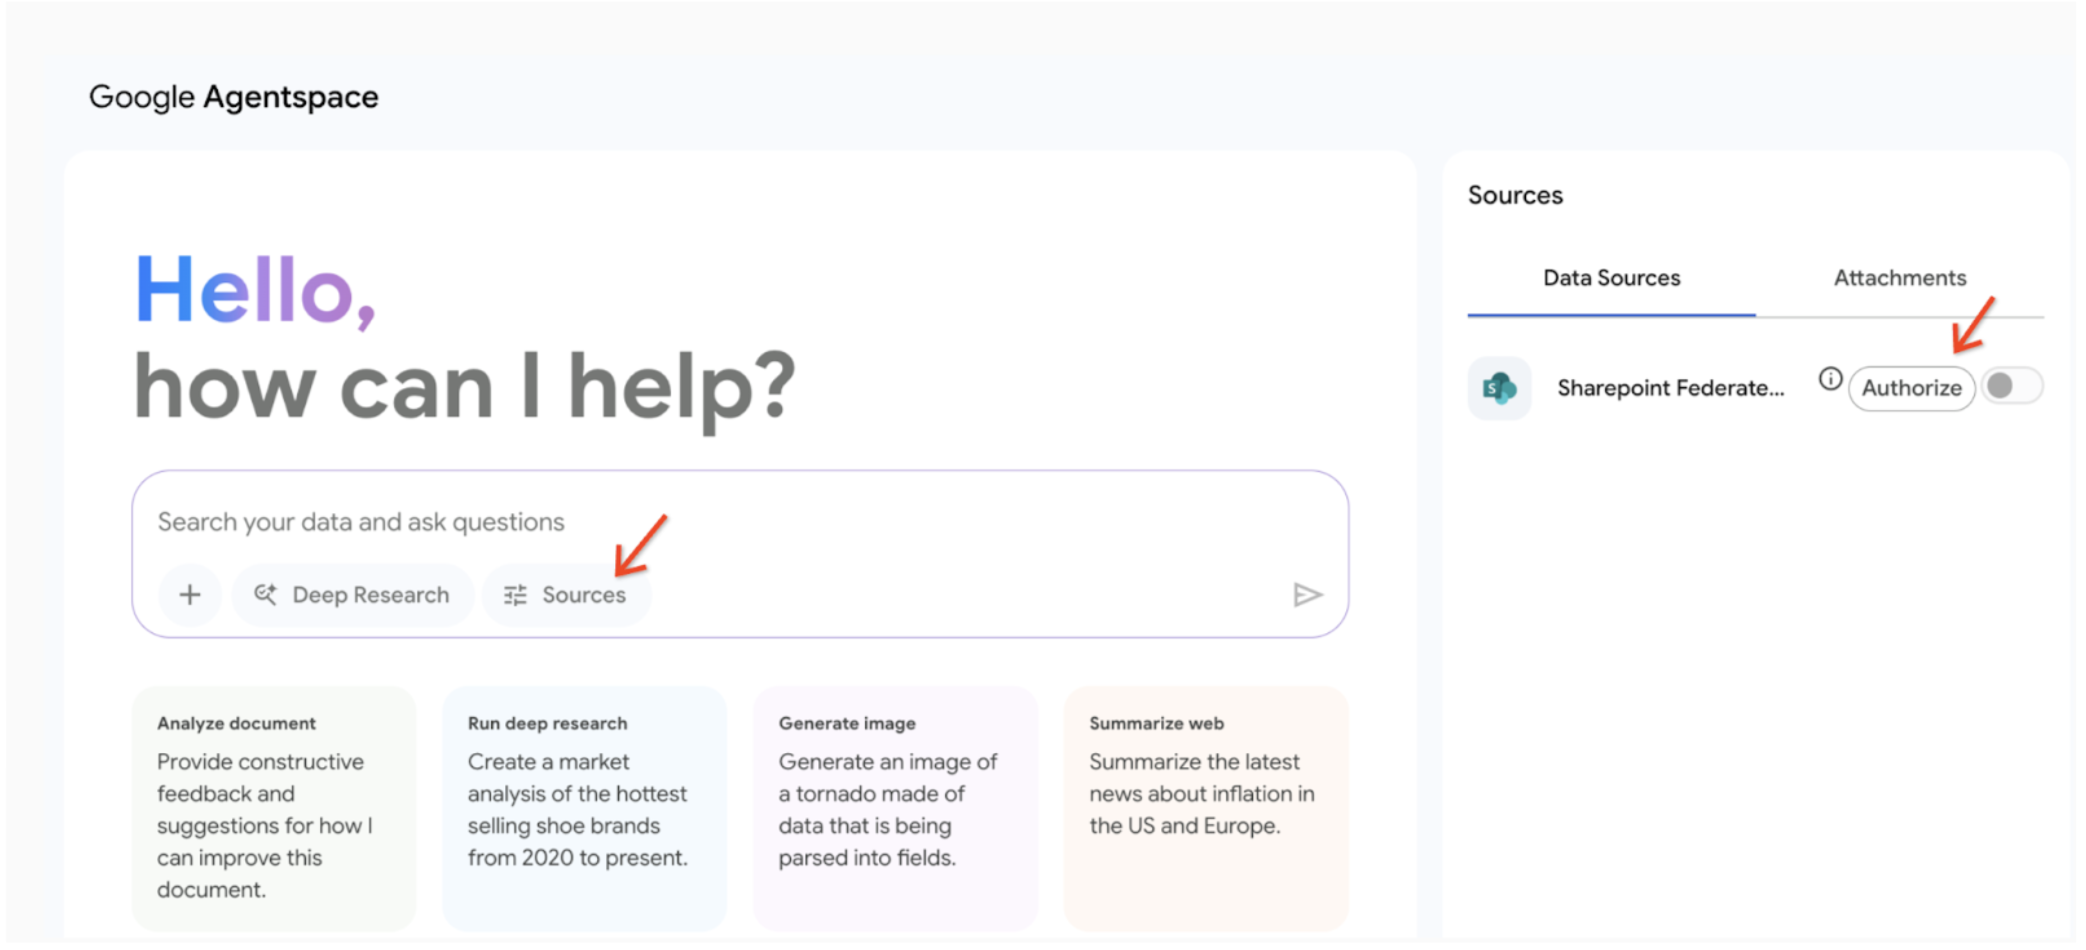
User authorization
After creating a federated search data store, you can see it listed as one of the data sources in your source management panel. If you haven't previously authorized Agentspace, then you can't select the data source. Instead, an Authorize button appears next to it.
To initiate the authorization flow:
Click Authorize. You are redirected to the Box authorization server.
Click Authorize Sign in to your Box account.
Click Grant access. After granting access, you are redirected back to Agentspace to complete the authorization flow.
Agentspace obtains the
access_token, and uses it to access the 3P search.
Query execution
When you enter a search query:
- If Box federated search is authorized, Agentspace sends the query to the Box API.
- Agentspace blends the results with those from other sources and displays them.
Data handling
When using third-party federated search, your query string is sent to the third-party search backend. These third parties may associate queries with your identity. If multiple federated search data sources are enabled, the query may be sent to all of them.
Once the data reaches the third-party system, it is governed by that system's Terms of Service and privacy policies (not by Google Cloud's terms).